DIY Jeep WJ Cargo/Trunk Platform

  • HTML tutorial

adventure_is_necessary

Rocky Mountain Region Local Expert Kansas
Member

Traveler III

4,007
Bonner Springs, Kansas, United States
First Name
Lucas
Last Name
Antes
Member #

7082

Ham/GMRS Callsign
KE0ZXA
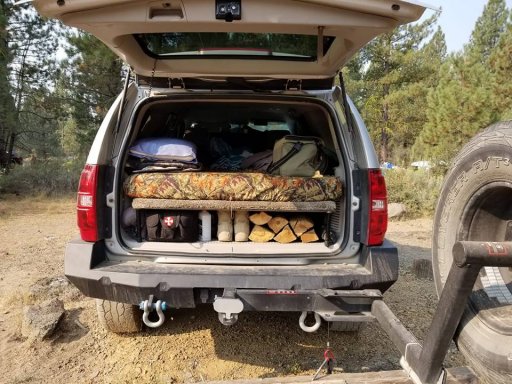
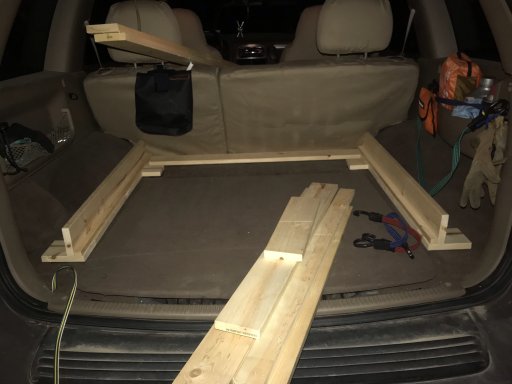
So as the title states, I am looking at building a platform for the cargo/trunk space in my WJ. I need the rear seats for kiddos and dogs, and I'll also need access to the spare wheel bay as I am keeping my spare in there (for now).
cargo_area_dimen.jpg

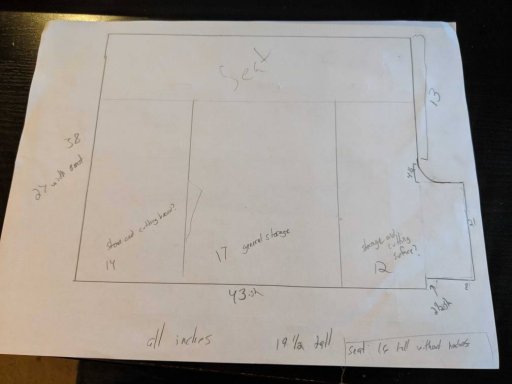
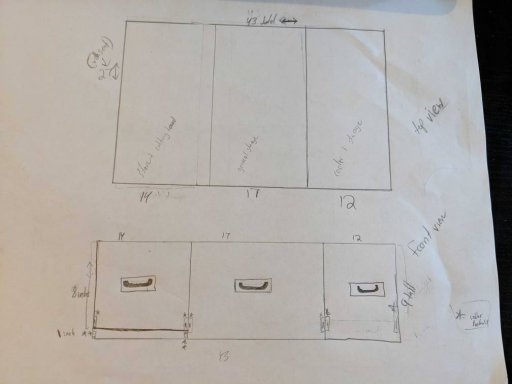
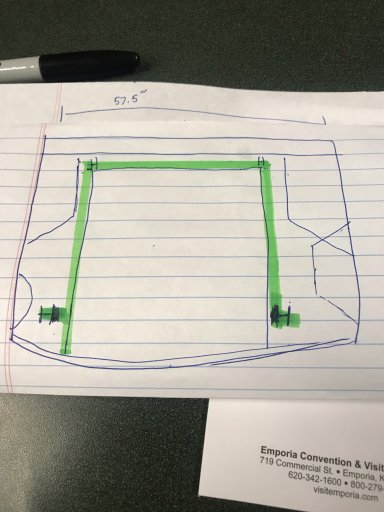
I borrowed this picture from wjjeeps.com, so who knows how accurate the dimensions are, but this give you an idea of the space and layout I'm working with. I want to make it to where the dogs can stay on the platform if needed, or store gear on top, as well as under it. I think some 1/2'-3/4' plywood for the top and 1x (however wide needed) for the upright supports etc. I am thinking of having a one piece top from wall to wall, with a hinged door to access the spare wheel if needed. I am considering tying in the platform to the factory floor tie downs (however that will work, I'm unsure just yet) so it won't budge on the trail, but still be able to remove it if needed. This will maybe sit 12" off of the floor to accommodate getting gear and the spare in and out. I have also thrown around the idea of having hinged "wings" to be able to easily access the smaller spaces on either side of the spare wheel bay.

Now that you can see what I'm working with and have a brief idea of what I'm wanting to do, has anyone done something similar? If so, would you be willing to assist me with my design? Does anyone have any input on creating this? No CAD or anything to design on. Maybe MS Paint :sweatsmile::tearsofjoy: or just hand drawn and then cardboard cutouts. Thanks in advance!
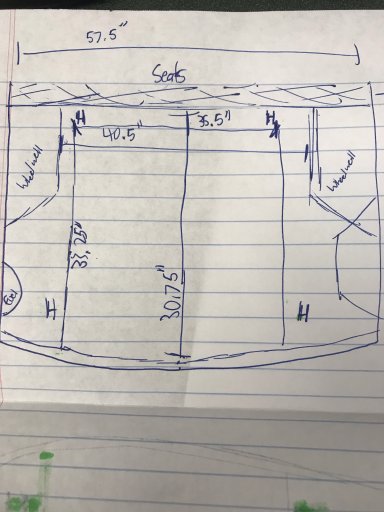
 
  • Like
Reactions: Gabriel Bozeman

adventure_is_necessary

Rocky Mountain Region Local Expert Kansas
Member

Traveler III

4,007
Bonner Springs, Kansas, United States
First Name
Lucas
Last Name
Antes
Member #

7082

Ham/GMRS Callsign
KE0ZXA
So I haven't done a whole lot yet with this project, however I did take a little time to sketch out the overhead layout of the trunk/cargo space, then traced it over to get an idea of what I will do for a base for the platform.

***Disclaimer, I am no artist and this was all virtually freehand. Your children might draw better than I do :tearsofjoy::tearsofjoy::tearsofjoy:***IMG_6785.jpg
Here is the overhead view with measurements. The tricky part (once I decide what to do with the sides/wings) is how to clear these obstructions. Not a big deal if it's one piece, but could be a little tricky if I decide to hinge the wings.
IMG_6786.jpg
Here is the basic sketch of the overhead view without all the measurements. In green is the perimeter of the spare wheel well where I plan on making the vertical base for the platform. The "H" on each corner are factory tiedowns that literally look like an H but recessed below for hooks, etc to go through. I am still contemplating how to tie the platform into these mounts as they appear to be riveted into the body. Maybe a hook bolt with a washer and lock nut going through the wood? This would probably be easy and secure. Might also be easier to remove should that need arise. Any thoughts? I am hoping to get started on the base this weekend and maybe lock down the attachment points as well. Thanks in advance!
 
  • Like
Reactions: Gabriel Bozeman

adventure_is_necessary

Rocky Mountain Region Local Expert Kansas
Member

Traveler III

4,007
Bonner Springs, Kansas, United States
First Name
Lucas
Last Name
Antes
Member #

7082

Ham/GMRS Callsign
KE0ZXA
I began work on the platform build! Just got the base built for it as time was limited yesterday and I didn't want to get in over my head just yet. Should sit up about 9"-10" off the floor so I can still store gear under it. Will have a door in the center the same width and length as the one for the spare wheel bay so I can have easy access if it is needed, but also access to all my gear (as discussed initially). I still IMG_6789.jpgIMG_6788.jpgIMG_6787.jpghaven't decided whether the top will be one solid piece, minus the center door, or is there will be wings on the sides for easier access to that relatively odd sized and somewhat unusable usable space. Once it's all together how I want it, I think I'm going to shoot in in a matte black and maybe hit the top with bed liner for added grip for gear and for the dogs.
 
  • Like
Reactions: Gabriel Bozeman

Charles M

Rank V
Launch Member

Member III

2,771
Wickenburg, AZ, USA
First Name
Charles
Last Name
M
Member #

17640

Ham/GMRS Callsign
K1CJM
I have a Tahoe so it is not the same but, I thought I would show you what I did maybe you can use some of the ideas on yours too.
I used steel shelving and cut the legs to the height I wanted then hinged two shelves together. In the first photo one shelf is folded over on top of the other one to give easy access to storage if needed. In the second photo the shelf is in normal position with a full size bed on top. I have carpet on the shelves to give me a solid platform to put things on and it also covers up anything I want to hide underneath. The platform is about 11 inches tall and mates up with the height of my seats when folded down so the bed lays flat on top.

20170917_170726[1].jpg

Not pictured here but, I use short bungee cords on each side to hold it down and in place. The complete unit can lift out in about a minute after removing the bungee cords.

Tahoe.jpg
 

adventure_is_necessary

Rocky Mountain Region Local Expert Kansas
Member

Traveler III

4,007
Bonner Springs, Kansas, United States
First Name
Lucas
Last Name
Antes
Member #

7082

Ham/GMRS Callsign
KE0ZXA
Made a little progress last night on the platform. Time is limited, the shop is 5min away, and the table saw is on its last leg. Not a good trio of issues. I have the hook bolts waiting and will hopefully be installed tonight once I mark and drill the holes to line up with the factory tie downs.

On the porch. Will be adding some more support to hold the weight of gear and dogs before I add the plywood and hinges. Hoping to have more progress on this project by Sunday evening.
IMG-6817.JPG

Inside the Jeep. The angles fit nicely with the seat backs. Everything sits nice and tight. There will be plenty of room between the gear under the platform and the top. Should be able to hold a good bit of gear under there. Might even look at adding to it once it's done and tested.
IMG-6819.JPGIMG-6818.JPG
 

Gabriel Bozeman

Rank V
Launch Member

Traveler II

2,902
Oak Harbor, WA, USA
First Name
Gabriel
Last Name
Bozeman
Member #

16950

So I haven't done a whole lot yet with this project, however I did take a little time to sketch out the overhead layout of the trunk/cargo space, then traced it over to get an idea of what I will do for a base for the platform.

***Disclaimer, I am no artist and this was all virtually freehand. Your children might draw better than I do :tearsofjoy::tearsofjoy::tearsofjoy:***View attachment 92086
Here is the overhead view with measurements. The tricky part (once I decide what to do with the sides/wings) is how to clear these obstructions. Not a big deal if it's one piece, but could be a little tricky if I decide to hinge the wings.
View attachment 92085
Here is the basic sketch of the overhead view without all the measurements. In green is the perimeter of the spare wheel well where I plan on making the vertical base for the platform. The "H" on each corner are factory tiedowns that literally look like an H but recessed below for hooks, etc to go through. I am still contemplating how to tie the platform into these mounts as they appear to be riveted into the body. Maybe a hook bolt with a washer and lock nut going through the wood? This would probably be easy and secure. Might also be easier to remove should that need arise. Any thoughts? I am hoping to get started on the base this weekend and maybe lock down the attachment points as well. Thanks in advance!
Love this idea! I'm looking at doing the same thing with my P38 Range Rover. I am going to have a jump seat installed (that folds) so that will take up some room, but I should be able to get a good 27 inches the seat folded up. I have a rough drawing of what I would like it to look like.

Thanks for the inspiration and ideas! I've seen so many storage systems for Wranglers, 4Runners, Tacomas, and other popular rigs, but haven't seen much for other rigs (like mine and yours).

Thanks,
Gabe1556034887623.jpeg1556034872620.jpeg
 

adventure_is_necessary

Rocky Mountain Region Local Expert Kansas
Member

Traveler III

4,007
Bonner Springs, Kansas, United States
First Name
Lucas
Last Name
Antes
Member #

7082

Ham/GMRS Callsign
KE0ZXA
Love this idea! I'm looking at doing the same thing with my P38 Range Rover. I am going to have a jump seat installed (that folds) so that will take up some room, but I should be able to get a good 27 inches the seat folded up. I have a rough drawing of what I would like it to look like.

Thanks for the inspiration and ideas! I've seen so many storage systems for Wranglers, 4Runners, Tacomas, and other popular rigs, but haven't seen much for other rigs (like mine and yours).

Thanks,
GabeView attachment 94863View attachment 94864
Thank you! I've seen a few ideas for a WJ, but I had to go a different route obviously. Looks like you have a similar issue with utilizing the space to its full potential as well with the jump seat. If I end up keeping the rig after a few years, I will probably have a different rear bumper with a dual swing out on it, so the spare bay will then be used for non-essential gear. I might go this route with a drawer system, piggybacking off of my current design. We shall see!
 
  • Like
Reactions: Gabriel Bozeman

Gabriel Bozeman

Rank V
Launch Member

Traveler II

2,902
Oak Harbor, WA, USA
First Name
Gabriel
Last Name
Bozeman
Member #

16950

Thank you! I've seen a few ideas for a WJ, but I had to go a different route obviously. Looks like you have a similar issue with utilizing the space to its full potential as well with the jump seat. If I end up keeping the rig after a few years, I will probably have a different rear bumper with a dual swing out on it, so the spare bay will then be used for non-essential gear. I might go this route with a drawer system, piggybacking off of my current design. We shall see!
Keep us updated.
 

Gabriel Bozeman

Rank V
Launch Member

Traveler II

2,902
Oak Harbor, WA, USA
First Name
Gabriel
Last Name
Bozeman
Member #

16950

Thank you! I've seen a few ideas for a WJ, but I had to go a different route obviously. Looks like you have a similar issue with utilizing the space to its full potential as well with the jump seat. If I end up keeping the rig after a few years, I will probably have a different rear bumper with a dual swing out on it, so the spare bay will then be used for non-essential gear. I might go this route with a drawer system, piggybacking off of my current design. We shall see!
My spare is also in the rear. I would love to get the spare out and on a swing-away, but there is only like one option, and it's like $1500. Too much for me right now. So I will have to make one that is light enough to be pulled out and thrown on the rack if need be.
 

adventure_is_necessary

Rocky Mountain Region Local Expert Kansas
Member

Traveler III

4,007
Bonner Springs, Kansas, United States
First Name
Lucas
Last Name
Antes
Member #

7082

Ham/GMRS Callsign
KE0ZXA
My spare is also in the rear. I would love to get the spare out and on a swing-away, but there is only like one option, and it's like $1500. Too much for me right now. So I will have to make one that is light enough to be pulled out and thrown on the rack if need be.
I am currently looking at this option for a solution and an alternative to a swingout bumper
 
  • Like
Reactions: Gabriel Bozeman

adventure_is_necessary

Rocky Mountain Region Local Expert Kansas
Member

Traveler III

4,007
Bonner Springs, Kansas, United States
First Name
Lucas
Last Name
Antes
Member #

7082

Ham/GMRS Callsign
KE0ZXA
Aside from a little bit of sanding and paint, I'd say it's done! I was originally planning on adding wings on either side, but the better half made a good point about being able to fill that space in better with small/soft gear. So, sanding, a few coats of paint, and bed liner on the lid, and it's done!
IMG-6852.JPG
 

Gabriel Bozeman

Rank V
Launch Member

Traveler II

2,902
Oak Harbor, WA, USA
First Name
Gabriel
Last Name
Bozeman
Member #

16950

Aside from a little bit of sanding and paint, I'd say it's done! I was originally planning on adding wings on either side, but the better half made a good point about being able to fill that space in better with small/soft gear. So, sanding, a few coats of paint, and bed liner on the lid, and it's done!
View attachment 95823
Love it! Great work!
 

Gabriel Bozeman

Rank V
Launch Member

Traveler II

2,902
Oak Harbor, WA, USA
First Name
Gabriel
Last Name
Bozeman
Member #

16950

Thanks! It's simple yet sturdy. Serves its purpose and more. It'll make a good trail side table too!
Do you plan on putting in drawers? I was contemplating building mine without securing it to the bottom of the vehicle. Do you think it would be heavy enough (with drawers and filled with stuff)?