
Steward II
- 4,122
- First Name
- Lizabeth
- Last Name
- Deliriumskid
- Member #
30725
- Ham/GMRS Callsign
- KN6STB
This update comes from trying to sleep in my 4Runner.
One of the things I noticed was when you put the back sets down there is a 2 ½ inch lip between the rear seats and the cargo area.
This lip perfectly aligns with my ribs when I sleep in the back of the 4Runner.
So I search online looking for a solution that would not add a ton of extra weight to the rig, cost a fortune or be so complicated I would end up with a something I didn't like.
I landed on a middle ground of building my own rear cargo hatch platform.
A few things I considered :
So I went an purchased a 4x8 sheet of ¾ baltic birch plywood ( I think it is 13 layers ) from our hardwood store (Aura in Santa Cruz) and a 1 inch by 2 foot oak plank for runners.
I mentioned this to my husband the I wanted to build and platform and since he is a wood working shop kinda guy he was willing to do the fiddly bits.
The length we cut everything to is 42 long and 43 wide.
Step 1
We started with the runners first
Measure and cut

Step 2
Cut the plyboard

Step 3
Dry fit everything

Step 4
Chamfer the edge that fits against the back seat rest
He used an electric hand held planer for the plyboard and the electric saw for the runners

Step 5
Glued the runners to the plyboard and then pre-drilled all the screw holes and then screwed the top to the runners.

Step 5
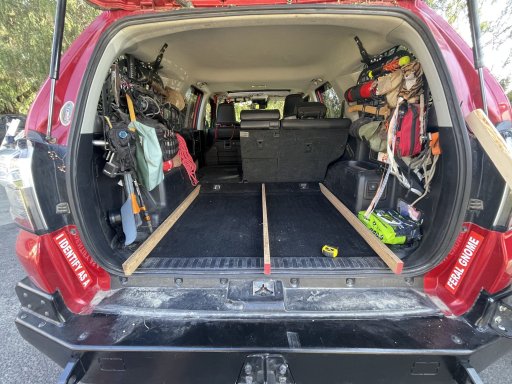
Installed!
I think it looks great and now I can start to use it and figure out what more I want to do with it. ( eg pull out table, a way to secure it to the rear cargo area... )

See ya down the trail!
One of the things I noticed was when you put the back sets down there is a 2 ½ inch lip between the rear seats and the cargo area.
This lip perfectly aligns with my ribs when I sleep in the back of the 4Runner.
So I search online looking for a solution that would not add a ton of extra weight to the rig, cost a fortune or be so complicated I would end up with a something I didn't like.
I landed on a middle ground of building my own rear cargo hatch platform.
A few things I considered :
- I wanted to keep it low so when I did not lose cargo space ( I use the front runner boxes for most of my gear )
- I wanted head room when I do sleep in the back to get dressed and do whatever else suits my fancy.
- I did not want to add drawers under the platform.
- I did want space to add a pull out table
So I went an purchased a 4x8 sheet of ¾ baltic birch plywood ( I think it is 13 layers ) from our hardwood store (Aura in Santa Cruz) and a 1 inch by 2 foot oak plank for runners.
I mentioned this to my husband the I wanted to build and platform and since he is a wood working shop kinda guy he was willing to do the fiddly bits.
The length we cut everything to is 42 long and 43 wide.
Step 1
We started with the runners first
Measure and cut
Step 2
Cut the plyboard
Step 3
Dry fit everything
Step 4
Chamfer the edge that fits against the back seat rest
He used an electric hand held planer for the plyboard and the electric saw for the runners
Step 5
Glued the runners to the plyboard and then pre-drilled all the screw holes and then screwed the top to the runners.
Step 5
Installed!
I think it looks great and now I can start to use it and figure out what more I want to do with it. ( eg pull out table, a way to secure it to the rear cargo area... )
See ya down the trail!
Attachments
Last edited:


