

Last month I took a 9-day trip into southern Utah (Cedar Mesa, Comb Ridge) to explore a few of the many ancient cliff dwellings and petroglyph/pictograph sites in the area. We split the time between two base camp sites. Given the distances and time required to resupply food, water, fuel and ice, the plan was to go completely self sufficient for the entire time. All were easy to do except for the ice and keeping the food and beverages chilled. Without getting into the cooler vs frig debate, here is what worked for me.
I started with a 75 quart Canyon Cooler. I've used this cooler a lot and it works great. But a week has been my limit so far.
Three days prior to departure I began to precool the cooler. All items going in the cooler were in the fridge or freezer at this point.
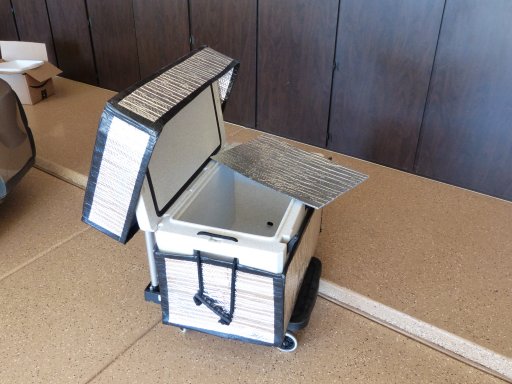
I built a "cooler condom" of reflectix material and duct tape. The bottom half came up to the bottom of the handles, had a double walled floor, and a flap for the drain plug. The upper half came down low enough to overlap the bottom portion by 2 inches to avoid heat loss (or is it cool loss) at the seam. It was also easily removable for when I accessed the cooler. The double walled bottom of the condom served to minimize heat transference from the only solid material touching the cooler. Solids generally transfer heat more than air.
I made ice blocks using tupperware containers in the freezer , rectangles about 3 inches thick that would fit the bottom of the cooler in two rows of 4 blocks. The blocks had two advantages over bag ice from a convenience store. The are solid, so no wasted space, and they are colder (I had cranked the freezer down).
Meat (steaks, pork chops, chicken) was frozen and vacuum sealed in foodsaver bags. I also precooked some meals (Chili, spaghetti, pot roast with veggies) and vacuum sealed and froze those as well.
The day of departure I loaded the ice blocks and 20 pounds of bag ice (gotta have some for cocktails) and then placed the frozen meat and meals atop the ice with the meals placed in order of use, top meal is first to be used, bottom is the last night's meal . I placed a layer of reflectix material on top of this. This insulation kept the upper levels of the ice chest from freezing (think freezer on the bottom, refrigerator on top). the frozen meals are heated in a large stock pot of hot water, the bags snipped open, food plated and served. Really easy for those busy days when time and energy are at a premium. Minimum clean up too.
On top of the reflectix went veggies, beer, soda, cream cheese, butter, steak sauce, etc, etc., all pre cooled of course. The Canyon Cooler has two baskets to help with organization. Organizing was key. No holding the cooler open for 5 minutes searching for some item.
The cooler went in the truck (4Runner) and never left. Every effort was made to keep the cooler on the shady side of the interior.
Temperatures over the 9 days ranged from a high of 84 to one morning's low of 29. Average highs were mid 70s. Average lows were 40.
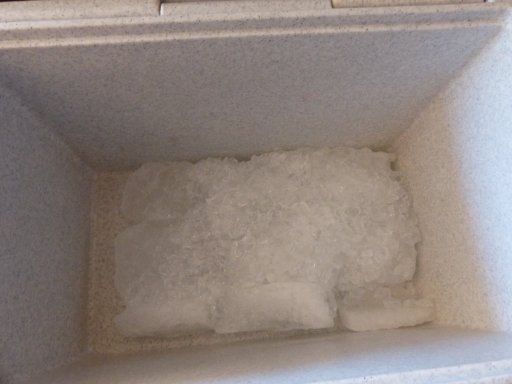
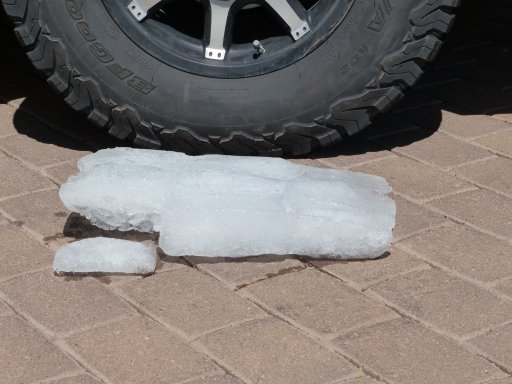
All the food stayed cool for the entire trip. There was plenty of ice for evening drinks. There as considerable ice at the end of the 9 days.
So I am pretty sold on this system.
- Precooling the cooler
- Cooler condom
- Block ice
- Frozen meals
- Organization.
Ice Remaining After 9 Days
Cooler Condom
Ice Dump For Scale
I started with a 75 quart Canyon Cooler. I've used this cooler a lot and it works great. But a week has been my limit so far.
Three days prior to departure I began to precool the cooler. All items going in the cooler were in the fridge or freezer at this point.
I built a "cooler condom" of reflectix material and duct tape. The bottom half came up to the bottom of the handles, had a double walled floor, and a flap for the drain plug. The upper half came down low enough to overlap the bottom portion by 2 inches to avoid heat loss (or is it cool loss) at the seam. It was also easily removable for when I accessed the cooler. The double walled bottom of the condom served to minimize heat transference from the only solid material touching the cooler. Solids generally transfer heat more than air.
I made ice blocks using tupperware containers in the freezer , rectangles about 3 inches thick that would fit the bottom of the cooler in two rows of 4 blocks. The blocks had two advantages over bag ice from a convenience store. The are solid, so no wasted space, and they are colder (I had cranked the freezer down).
Meat (steaks, pork chops, chicken) was frozen and vacuum sealed in foodsaver bags. I also precooked some meals (Chili, spaghetti, pot roast with veggies) and vacuum sealed and froze those as well.
The day of departure I loaded the ice blocks and 20 pounds of bag ice (gotta have some for cocktails) and then placed the frozen meat and meals atop the ice with the meals placed in order of use, top meal is first to be used, bottom is the last night's meal . I placed a layer of reflectix material on top of this. This insulation kept the upper levels of the ice chest from freezing (think freezer on the bottom, refrigerator on top). the frozen meals are heated in a large stock pot of hot water, the bags snipped open, food plated and served. Really easy for those busy days when time and energy are at a premium. Minimum clean up too.
On top of the reflectix went veggies, beer, soda, cream cheese, butter, steak sauce, etc, etc., all pre cooled of course. The Canyon Cooler has two baskets to help with organization. Organizing was key. No holding the cooler open for 5 minutes searching for some item.
The cooler went in the truck (4Runner) and never left. Every effort was made to keep the cooler on the shady side of the interior.
Temperatures over the 9 days ranged from a high of 84 to one morning's low of 29. Average highs were mid 70s. Average lows were 40.
All the food stayed cool for the entire trip. There was plenty of ice for evening drinks. There as considerable ice at the end of the 9 days.
So I am pretty sold on this system.
- Precooling the cooler
- Cooler condom
- Block ice
- Frozen meals
- Organization.
Ice Remaining After 9 Days
Cooler Condom
Ice Dump For Scale


