2020 Wrangler Rubicon Unlimited Build

  • HTML tutorial

deFine_overland

Rank III
Launch Member

Enthusiast III

740
Pemberwick Park Lane, Houston, Texas 77070, United States
First Name
Dominic
Last Name
DeFino
Member #

23824

I wish I would have documented more of my build through the process, but I will try to catch up. Nothing extraordinary, but I did make some changes that were not bolt on parts that may help others. I will try to add on items as I can.
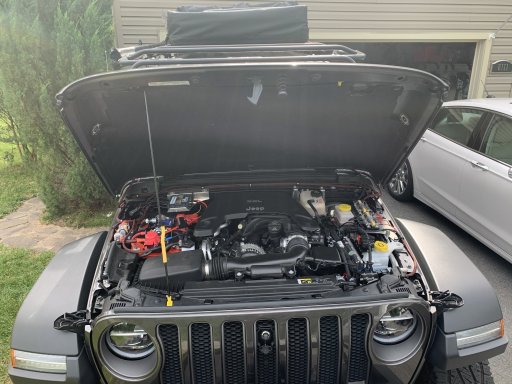
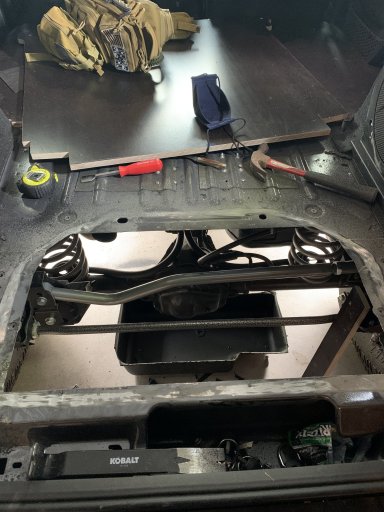
Here are a few photos of its current status. (Amazingly, I do not have any pictures prior to playing with it)
Current upgrades are:
  • Exterior
    • RC Stubby front bumper
    • DV8 Rear bumper with Tire Carrier (LOD Destroyer Bumper/Tire Carrier on order)
    • LOD roof rack
    • OVS 6.5' Nomadic Awning
    • OVS Nomadic 2 RTT
    • RC 12,000 pound winch
  • Suspension
    • RC 3.5" lifted Springs
    • Rubicon Express Front and Rear Control Arms
    • Rubicon Express Front and Rear Adjustable Panhard Bars
    • Rubicon Express Quick Disconnect Sway Bar End Links
    • Vertex Adjustable Remote Reservoir Shocks
    • ACOS rear adjustable spring perch
    • Hellwig Heavy Duty rear sway bar
  • Driveline
    • RC front drive shaft
    • ProComp AT 37 x 12.50 x 17 on stock Rubicon wheels
    • 1.5" Quadratec Wheel Spacers w/ gorilla acorn lug nuts
  • Electrical
    • Genesis Dual Battery Setup w/ 2 Odyssey Group 25 batteries
    • Trigger six shooter with overhead switch mount
    • Way too many lights
    • Under hood blue sea bus bar mount
    • Under body lights (to see for night time repair or rock lights) 4- KC cyclones
    • Under hood lights 2- KC cyclones
    • 20' bumper mount light bar
    • 30" hood mount light bar
    • 4- Cube lights on cowl
    • Cube fog lights
    • Homemade power control box
      • 2 more odyssey group 25 batteries
      • Renogy 1000 watt inverter charger
      • 6 circuit blue sea fuse block for rear power
      • Renogy charge controller for future mounted 100 watt panels (3)
    • Water pump for wash water
  • Misc. Overland Gear
    • Dometic 95 quart dual zone cooler
    • Camp Chef Mountaineer Stove
    • Outback Adventure Products Tailgater
    • 11 pound propane tank in cabinet
    • Homemade flat rear floor rear seat delete (Epoxy Coated Birch Plywood)
    • Homemade 20 gallon aluminum water tank under floor
    • ARB dual compressor with 3gal air tank (Front and Rear air hose quick connect)
I doubt that is all and Ill add individual items and more detailed pictures in the future.


61239736096__C6F84C8C-6ED0-4236-BC4F-4CEEC68C9828.JPG
00D264EF-7285-451D-A046-F0C5A22518D2.JPG
BA4FBCE0-4064-40DA-B26F-B50AD13AAB36.JPG
IMG_0452.jpg
 

deFine_overland

Rank III
Launch Member

Enthusiast III

740
Pemberwick Park Lane, Houston, Texas 77070, United States
First Name
Dominic
Last Name
DeFino
Member #

23824

Here are some photos of my rear build out. Hard to see what all is going on here but i have two separate cabinets. From the rear, the one on the left houses my fridge and gas grill. The fridge is mounted to a drawer on 32" locking drawer slides. Then the grill is mounted to that drawer with 2 additional 32" locking drawer slides. I ended up mounting the fridge from underneath using the threaded holes that came manufactured in the fridge.
The cabinet on the right houses 2 of my batteries and are connected to the two under the hood. Also in the box is the inverter charger, and the wiring for the rear system. Nothing runs off the primary battery while at camp. the circuit breakers are for the inverter and the rear 12 volt system.

The two cables coming out from under the carpet on the passenger wheel well are the cables that tie the front and rear batteries together. It is protected on both ends with fuses.

The switches control left to right (water pump for under floor water tank, left camp lights, right camp lights, cargo and rear lights (to be added in the future), and the last is for future add on)

I did drill a hole in the roof to get 12 volt power to the roof, some said it was crazy, but it was the easiest way to get there, is water tight, has a weatherpac connector inside in case i want to remove the roof and to me was the cleanest way. After all it is only fiberglass. I drilled a second hole that i will get pictures of behind the passenger rear window for my shore power hookup to charge batteries.

Let me know if you are doing something similar and have any questions. I have learned alot doing this and have put eyes on every inch of my rig while working on it.

-DOM
IMG_0471.jpgIMG_0472.jpgIMG_0473.jpgIMG_0474.jpgIMG_0475.jpgIMG_0476.jpgIMG_0477.jpgIMG_0478.jpgIMG_0478.jpgIMG_0479.jpgIMG_0480.jpg
 

deFine_overland

Rank III
Launch Member

Enthusiast III

740
Pemberwick Park Lane, Houston, Texas 77070, United States
First Name
Dominic
Last Name
DeFino
Member #

23824

  • Like
Reactions: F8OO

deFine_overland

Rank III
Launch Member

Enthusiast III

740
Pemberwick Park Lane, Houston, Texas 77070, United States
First Name
Dominic
Last Name
DeFino
Member #

23824

any issues running that size tire on stock rubi rims?
No problem with the rim size. I did have to space them out. I preferred them under the fenders but had inner fender rub when i was in rough terrain and lower control arm rub at full lock. I will probably end up with different wheels in the future so i can kick the wheel spacers.
The biggest issue is that I now that i have added all the weight and additional tire size, I may need to re-gear. It isn't bad, but i never hit 7th or 8th gear on the highway now. I would rather use them since i have them.
 

RoarinRow

Rank V
Launch Member

Member III

2,771
Elk Grove, CA, USA
First Name
Rolando
Last Name
Nispiros
Member #

17011

Ham/GMRS Callsign
KN6JJS
That's it? Come on man get to work! Just kidding! Freaking awesome build!
 

deFine_overland

Rank III
Launch Member

Enthusiast III

740
Pemberwick Park Lane, Houston, Texas 77070, United States
First Name
Dominic
Last Name
DeFino
Member #

23824

That's it? Come on man get to work! Just kidding! Freaking awesome build!
HAHA. Its been a ton of fun stripping it apart and looking for ways to get more in it than there is room for. My friends look at me kind of funny when they find out I'm taking the back seats out, drilling holes in the roof and taking the floor out. Especially considering that as it sits right now, it hasn't seen its first oil change yet.:tonguewink:
 
  • Haha
Reactions: k9sar and RoarinRow

RoarinRow

Rank V
Launch Member

Member III

2,771
Elk Grove, CA, USA
First Name
Rolando
Last Name
Nispiros
Member #

17011

Ham/GMRS Callsign
KN6JJS
HAHA. Its been a ton of fun stripping it apart and looking for ways to get more in it than there is room for. My friends look at me kind of funny when they find out I'm taking the back seats out, drilling holes in the roof and taking the floor out. Especially considering that as it sits right now, it hasn't seen its first oil change yet.:tonguewink:
What?! All that before your first oil change? lol That's amazing! and great work by the way!
 
  • Like
Reactions: deFine_overland

F8OO

Rank IV
Launch Member

Enthusiast III

1,116
Toronto, ON, Canada
First Name
James
Last Name
F
Member #

27559

Thank you. Its a blast. It has been especially fun to figure out some of the missing pieces since there are not a ton of parts available yet for the JLs. Im trying to work through some rear suspension problems right now.
Nice man. I have a 2020 Sport S unlimited - slowly but surely working at it. Trying to plan out a few freelance gigs to fund an Ursa Minor - we'll see :)

I'm obsessed with it though, drive it every chance I get and head out exploring every chance I get.

Ill keep an eye on this post, update as you go!
 

BillB

Rank III
Launch Member

Enthusiast III

646
Chesapeake, Virginia
Member #

3681

Wow ! That rear build out with fridge, stove, and electrical! Awesome. (If you are looking for a way to track your build, try the automodlist app - available for Apple or Android)
 

deFine_overland

Rank III
Launch Member

Enthusiast III

740
Pemberwick Park Lane, Houston, Texas 77070, United States
First Name
Dominic
Last Name
DeFino
Member #

23824

Nice man. I have a 2020 Sport S unlimited - slowly but surely working at it. Trying to plan out a few freelance gigs to fund an Ursa Minor - we'll see :)

I'm obsessed with it though, drive it every chance I get and head out exploring every chance I get.

Ill keep an eye on this post, update as you go!
I have rubicon suspension parts with less than 1000 miles.
 

deFine_overland

Rank III
Launch Member

Enthusiast III

740
Pemberwick Park Lane, Houston, Texas 77070, United States
First Name
Dominic
Last Name
DeFino
Member #

23824

Sooooo, here is a peak at some of the work that I have done under the hood. Very little has been touched here, except the electrical system.
3F234A88-2DD1-4BCC-B686-E5B12A3E9F5D.jpeg
I wanted to make sure that the Jeep electrical system could be independent of the all of the auxiliary equipment from the build out. I wanted the peace of mind knowing that if I ran something too long or had a problem, it wasn’t going to impact my ability to get home. Therefore, I went with the genesis dual battery setup. It allowed that, but also the ability to charge the entire system while driving. (However, I believe that isn’t entirely true. More on that in a later post as I try to tackle that problem). The kit is pretty nice and the install was really straight forward, especially with the line of videos that were produced. I’m a visual learner and they helped out a ton.
4C52D170-69E8-4951-B46F-F485C6F40610.jpeg
I added a trigger six shooter so I didn’t have to run a bunch of wiring into the cab for switches. I could have used the auxiliary switches that Jeep offers, but that was not an option in my Jeep, and like I said earlier, I wanted to keep the electrical systems separated. The only thing I can operate from the driver seat are the front pointing lights and my air compressor. Everything else is operated and switched in the rear in my “power box”, more on that in a later post. This setup is decent. The one thing I do not like about it is that out of the 6 circuits 2 are 30 amp, 2 are 10 amp, and 2 are 5 amp.This left me limited to what could be added and what couldn’t. I also do not like the weatherpac connectors pre installed. I would have preferred ring terminals. I think in the future, an Spod will replace this.
39AE6A04-2333-4BA4-A930-36EDF89D98F1.jpeg
There are a set of under hood lights for night time viewing (KC Cyclones). I can’t say how much I love these lights, compact, low amperage draw, and so easy to mount. Most times I just drop in an M6 nutsert, bolt and washer and good to go.
9ED5931B-0357-46ED-A0B1-384D662E390C.jpeg
The blue sea fuse holder is the feed to the rear batteries to protect the 1 AWG cable running to the back
3C7631D0-0588-4F6F-9643-18F6918B1904.jpeg
I have a number of lights wired together on the same switched circuit, and have found that there is no real good way to splice them together, and that meets my expectations in longevity and reliability. I have found that bus bars do that for me. Not having a ton of real estate under the hood, finding a safe, practical and protected space to put them was tough. But I was able to build a bracket to use some wasted space next to the master cylinder. I was able to get 2 blue sea bus bars there. One currently controls my under body lights and the other is just waiting until I decide what it’s current drawing value in life will be.
63DD3CC5-5D0B-4FC2-8FBC-4CF4A53D5370.jpeg
And of course, everything is wrapped in that fancy red and black loom, because it adds a layer of protection, and it makes the rig look just a little more professional.

Hope someone finds some value in this, let me know if you have any questions.
Will post more installments in the future, in the meantime I’m gonna get back to figuring out how to get 300 watts of solar panel on the roof.

-DOM
 

Attachments

  • Love
Reactions: k9sar

deFine_overland

Rank III
Launch Member

Enthusiast III

740
Pemberwick Park Lane, Houston, Texas 77070, United States
First Name
Dominic
Last Name
DeFino
Member #

23824

I got confirmation that my LOD rear bumper will be here today. So excited. I already have their roof rack installed and was super impressed with the workmanship and quality of finish. Will post pictures of the install. Some are excited about mods that enhance off-road ability, some with HP, some with lightening their rigs, I think when you own a jeep you get that giddy feeling when you can add more storage. I have the jerry can mounts, hi lift mount and cargo rack coming with it. I think I am most excited about adding the cargo rack and am already planning what gear I can get out there and out of the jeep.
 

deFine_overland

Rank III
Launch Member

Enthusiast III

740
Pemberwick Park Lane, Houston, Texas 77070, United States
First Name
Dominic
Last Name
DeFino
Member #

23824

Ok, wanted to share this as I think it is a modification that could appear pretty daunting for some, but brought me great return and was pretty straightforward once I figured out some of the challenges. I also want to share because there is no aftermarket solution to this. It’s no secret that the biggest thing keeps lack, is storage. Just plain and simple, room to cram stuff. The Jeep Jl comes with a rear cubby hole under the rear carpet in the cargo area. The biggest down side to this is, my cargo area is built out and therefore this area is unusable. Goose gear has a hatch built into their base floor to access this, but if you add their cabinets, it is again is useless. One of the things I really struggled with mounting was my ARB dual compressor, as there really is no good location. I did not want it inside the cabin because I didn’t want the noise. I also was concerned with it bing under the hood or under the Jeep due to water and heat exposure. All the aftermarket exterior locations mounted it pretty low. So, I thought had that cubby hole not been there and the rear floor was flat, that would be a perfect location.
So, I did what any normal person would do and I cut the cubby hole liner out.
This all began with removing the muffler. The sound isn’t horrible and I could live with it while I search for a solution to go between the resonator and the rear axle to quiet it down some.
next I worked to remove the plastic storage pan, this was the hardest part. It is some kind of fiberglass plastic, and it is tough.The best way I found was a cutoffwheel in the grinder. Cut it all the way around just below the floor. The next step is the most time consuming. You have to separate the lip of the pan from the floor if is held in by only a couple bolts, but also a nice thick bead of sealant. I found it easiest to use a knife and run between the lip of the bin and the floor. Then some time with a scraper and alcohol gets all the residue off. Next, I laid a piece of 1/8” aluminum plate about an 1” bigger on all sides than the hole over the hole. Marked out where I wanted to drill holes to secure it and drilled them through the plate and the floor. I used M6 nutserts in the Jeep floor. Laid down a nice bead of silicon and then countersunk Allen head bolts in the aluminum plate to mount it.
I ended up mounting my ARB compressor to the underside of this plate which made some value out of dome otherwise useless space.
Hopefully this helps some other Jeep JL owners. If you have questions about any details I may not have been clear on, let me know.

-DOM
 

Attachments

  • Like
Reactions: k9sar