2017 F250 Build

  • HTML tutorial

Krazyjohnny

Rank II

Enthusiast III

473
Northwest Arkansas
First Name
John
Last Name
Ruff
Suffered an epic fail on the project when building the kitchen drawer. I had to fire the engineer from the job. That knucklehead has no idea how to use a tape measure. Thought all was going really well.
IMG_5761.jpg

Then this happened.....

IMG_5763.jpg

Yeah. That is the sink not able to slide out from the side. I think the tailgate only needs one support cable anyway. A small notch in the tailgate won't be that noticeable. Will it?

IMG_5764.jpg
 

Krazyjohnny

Rank II

Enthusiast III

473
Northwest Arkansas
First Name
John
Last Name
Ruff
So we fired the last guy and started over from scratch. So there hasn't been a whole lot different going on except making expensive firewood. This new guy may be a keeper though. He has talked us into just using a slide out from under the stove drawer for the sink and to alternatively have as a work surface when needed. He also has figured out a way that we can use the stove curbside or from the middle of the tailgate. Gonna apply poly to everything and assemble this part so we can move on to getting all of the electrical stuff and plumbing in place. The holes allow the stove feet to rest in them and keep it from sliding around.

IMG_5793.jpg
IMG_5796.jpg
 

Krazyjohnny

Rank II

Enthusiast III

473
Northwest Arkansas
First Name
John
Last Name
Ruff
Well Gang,

Sorry this has been moving slower than I had wished. Work and life have gotten in the way a bit as well as Chinese made slides. I had to spend lots of time working on the slides to get them to work correctly. The catches and locks were basically too wide once bolted up to the drawers and would not allow the slides to glide in and out.

IMG_5798.jpg

IMG_5800.jpg

I even got most of the plumbing laid out with the pump, surge tank and filter in place.

IMG_5799.jpg

Here is the kitchen drawer fully extended with the work surface slid out too.

IMG_5801.jpg
 

Krazyjohnny

Rank II

Enthusiast III

473
Northwest Arkansas
First Name
John
Last Name
Ruff
Sorry it has been a bit since I have updated things here. I have been plagued by multiple weeks of Amazon deliveries not showing up. So I have been busy getting the electrical put together. Still waiting on relays to wire in the accessories. Big shout out to the guys at Overland Power Solutions (Tom and Dave) and Ryan from Redarc for all of their guidance on this. I have a video but since I am not savvy enough to transfer it from my phone I am going to power point you to death here.

IMG_5829.JPG

Picked up a Redarc BCDC1240D to provide proper charging by the truck while it is running. The circuit breakers are Blue Sea 60 amp circuit breakers. one between the Truck and the Redarc BCDC1240D and the other between the BCDC and the battery.

IMG_5828.JPG

Tom and Dave from Overland Power Solutions talked me into a Victron Smart Monitor that ties into the provided shunt seen above with all of the negative cables tied into. I am using an AGM battery from VMAX Tanks with 125 AH. I opted for 4 gauge wire to connect the battery to the shunt and the circuit breakers. Used the same wire to connect the battery to the fuse block (seen below).

IMG_5827.JPG

I am using a Blue Sea 12 circuit fuse block with both the positive and negative busses built in to simplify things.
Now back to waiting on parts so I can complete the wiring that I have ordered thrice now. I guess I can make up some nice drawer fronts and maybe the brackets for this to bolt into the tie down points in the corners of the bed.
 

Krazyjohnny

Rank II

Enthusiast III

473
Northwest Arkansas
First Name
John
Last Name
Ruff
Hope you are all doing well. Had to work out of town last week. Got the wiring done for the drawer system and will now have to figure out how to get it the unit fitted into the truck and get the deck aligned with the vertical supports. Once I get this figured out I will get some more picture uploaded. I am home this week and will be working to get it all pulled together before next business trip. I am at the point where I am just winging-it to get it all together. There are no plans for this and when incorporating electrical and plumbing systems into one unit this compact has been fun and more complicated than originally expected.
 

Krazyjohnny

Rank II

Enthusiast III

473
Northwest Arkansas
First Name
John
Last Name
Ruff
Thank you all for your input and encouragement on this. I am to the point I just want to get it complete. I have been plagued with quality issues with the plywood I bought from Home Depot. I knew it would not be as well put together as what I was used to but, I had no idea how inconsistent the cores really were. Here is what I am talking about. The voids in the ply cores.

IMG_5853.JPG

This is not so bad if you are working on the flat but, if you are trying to work with the edge it can present a problem. All that being said I figured out a work around and went back and re-glued and nailed all of the drawer bottoms. Now on to some progress. I mentioned I have all of the wiring done throughout the "box" so to speak. Just will need to wire it all into the truck once it is in. So I set off on making the tie in plates to connect the box into the tie down points in the corners of the bed. My plan is to bolt these into place and then using threaded inserts bolt the box to them. The deck will then also fasten down using the same inserts using 1/4" x 20 thread machine screws and lock it all together in shear. The panel on the drivers side will have all of the power outlets controlled by a switch, a switch for the the overhead LEDs that will be on the lift gate and will house the Victron power monitor. The black circles are the bolt hole locations where this will be bolted to the truck corner. I am going to use this as a template and practice piece and eventually cut the final piece from Oak or some other hardwood.

IMG_5848.JPG

Got the lay out done and just dove in.

IMG_5852.JPG

I got a pretty good chuckle when I read the label on the hole saw. I have had this one laying around from a previous custom dash project for our old rock crawler. The good ole "hole dozer". Imagine if that was your prison nickname.....

IMG_5851.JPG

I have been traveling for work a bit lately so I also had to get caught up on some honey-dos along the way. Finally made it over to the sawmill to pick this load up to keep my promise to "Special K".

IMG_5846.JPG

I had promised her cedar raised garden boxes. Lucky for me I worked at a sawmill while going to college and was able to source this pretty reasonably from my Uncle to make these for the wife. As you can see she is a very satisfied customer.

IMG_5847.JPG

I just have to keep the keys to the truck from her so a trailer load of dirt doesn't show up that I have to scoop into these things.

Stay tuned I am getting close. Hopefully after next work trip things will get back in line quickly.
 

Krazyjohnny

Rank II

Enthusiast III

473
Northwest Arkansas
First Name
John
Last Name
Ruff
Getting on the home stretch here. Made some pretty big progress today with getting the deck cut to fit. I made a little duplicator out of a pencil and some scraps to get the contour around the edge of the bed close. IMG_5888.JPG

Took the piece out and then smoothed out the lines to get it to fit pretty close.

IMG_5889.JPG

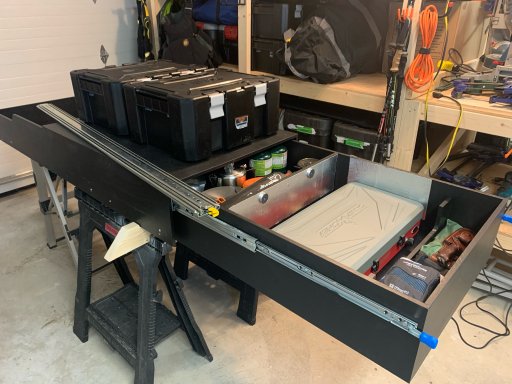
Left side is for the electrical stuff. Victron battery monitor, USB and 12 volt outlets, one switch for the outlets and another for some overhead lights. Right side will have the quick connect for water and the switch for the water pump.

IMG_5852.JPG

Here is a preview of what it will look like once deployed from the truck.

IMG_5884.JPG

I will tell you that all of the builds I looked at made this seem like it took those folks a weekend to build out their setup. Maybe they are a bit more handy than me. I know they probably have better computer skills and probably prepped up and modeled their setup in Sketchup or Revit or something like that. I made up some drawings but, they did not account for all of the inconsistencies in material I have experienced. I had thought about making this out of metal but, my break was not wide enough. At least it would have been more consistent.

What I have left to do...

Install threaded inserts into the wing pieces to tie the drawer box into the bed.
Layout and router the deck for the airline track that will flush mount and hold down the deck to the drawer box.
Layout and install all of the threaded inserts for the airline track and deck to mount to the drawer box.
Layout and router the deck for access panels (6 total).
Cutout access doors with latches.
Cut and make drawer fronts.
Stain and finish wings and drawer fronts.
Assemble the complete system.
Carpet deck and access doors.
Make all water line connections.
Make final electrical connections to truck charging system.
Make electrical leads for solar panel connections.
Fill up the water tank and sanitize the system.
Go camping.
 

Krazyjohnny

Rank II

Enthusiast III

473
Northwest Arkansas
First Name
John
Last Name
Ruff
A few more things ticked off the list. Got the wing pieces in and they performed exactly as I had hoped. Now to do the layout and install on the inserts that will hold down the track in the deck.

I am using EZ lock inserts and adding a little CA glue to them for some added locking potential of the insert.

IMG_5894.JPG

So the wing panels mount into the truck bed structure using the factory tie down locations. The EZ lock inserts in the endgrain of the panel provide a bolt location for the 1.5" long 1/4 x20 thread machine screws to lock the drawer box to the truck bed.

IMG_5892.JPG

Here is the drawer box bolted to the wing panel. Next to get the deck aligned so I can add inserts to the drawer box verticals.

IMG_5893.JPG

Here is the airline track loosely laid on top of the deck in its respective locations. Each one will have (10) 1/4 x 20 bolts through them into the the drawer box verticals to hold down the deck. I plan to router out the deck so these sit flush to the top.

IMG_5895.JPG

Stay tuned I am getting close.
 

Jerome1500

Rank II

Contributor III

442
Burnaby, Metro Vancouver, British Columbia, Canada
First Name
Jerome
Last Name
Weisenfelder
Member #

42223

I am down to the things where measure thrice cut once really counts. I got the track routered into the deck.

View attachment 229952

Here they all are in place. Next will be to install the deck in the truck and start drilling holes for the EZ lok inserts for the rails to bolt down to.

View attachment 229954
Like others have said I’m really impressed with your craftsmanship as well as your shop have to admit I’m a little jealous as well. I really appreciate you taking the time to share what you are doing. I have been slowly working on a drawer for my ram 1500 truck bed as well but I am only using one side for the drawer as I use the other side to keep an inflatable kayak when I go camping. I also have a Retrax bed cover and Yakima rack on top. I’m very much looking forward to seeing the final pictures of your project. I am still in the middle of mine but here are a few pictures . I was able to get the 60 inch slide through Amazon and I’m using a combination of A 32 inch slide in the 60 inch slide.
 

Attachments

Krazyjohnny

Rank II

Enthusiast III

473
Northwest Arkansas
First Name
John
Last Name
Ruff
I had to order slides multiple times before I got some that would work. looks like you had better luck.
Your project is looking good.

My goal is to finish this up in the next week or so before I have to travel for work again.
 

Krazyjohnny

Rank II

Enthusiast III

473
Northwest Arkansas
First Name
John
Last Name
Ruff
Thank you all for your encouragement. It has been a slow go due to work travel. I am really close to the end here now. I got the main box in the truck with the drawer fronts and electrical and plumbing all functioning. Just working on the carpeting on the decking and all of the access panels. Here is how I got to here.

IMG_5951.JPG

Got the access panel openings cut using a template and a trim bit on the router.

IMG_5905.JPG

All of the access holes are cut and ready to go.

IMG_5981.JPG
IMG_5982.JPG

Got everything stained and finished with the switches, power outlets and the Victron battery monitor all connected. The wife did the test of the water system and we used it today coming off of the bike trail . It was awesome to get a nice rinse before heading home.

View attachment IMG_5980.MOV


Now I am working on carpeting the deck and access doors for the final install.

IMG_5985.JPG

So I have connected the drawer box to the existing tie down points in the truck using some longer bolts and some tie plates on the front of the bed. I used 4 ga power and ground cables to tie into the trucks electrical and the blue wire is the ignition on/ run trigger to allow the Redarc BCDC 1240 to charge the "house battery" while we run down the road.

IMG_5966.JPG

The shunt for the Victron battery monitor is the thingy with the large brass bolts and the ground cables going to it.

I am using a VMAX Tanks 125 ah AGM battery. I just could not part with the LiFePo money for something I am not living in. I am using Blue Sea breakers coming from the truck to the BCDC 1240 and then another one running between the BCDC 1240 and the battery and loads.

IMG_5968.JPG

All of the power distribution runs through the Blue Sea fuse block that has both a power and ground bus.

I bet you noticed the broken screws in the power outlets. Yep I have fallen victim to terrible hardware. Yes, I pre-drilled the holes and twisted the heads off with a manual screwdriver.

Getting close now.
 

Attachments

Krazyjohnny

Rank II

Enthusiast III

473
Northwest Arkansas
First Name
John
Last Name
Ruff
Everything is all bolted down now. Gravity water fill port is in place and the airline tracks are all bolted down. Only thing left to do is get the sink mount completed.

IMG_5990.JPG

Oh yeah, I got the wiring done for the overhead lights that are mounted on the lift gate and those purple and black wires were all tucked away in the wiring track of the topper. Used a delphi connector to allow the top to be removed if needed and not have to cut the wires.

IMG_5991.JPG

IMG_5992.JPG


I'll get a nightime pic this weekend and maybe even have the sink mount done.
 

Krazyjohnny

Rank II

Enthusiast III

473
Northwest Arkansas
First Name
John
Last Name
Ruff
Well I have made it to the end now it is 100 plus degrees outside. I am hopeful this has helped someone out there with their build. I should receive the Exped mondomat 10 or something like that this week as our sleeping mattress. Then it will be time to seize the moment when the temps become more reasonable. IMG_6010.jpg

IMG_6011.jpg

Here is a night time pic with the LEDs that I mounted to the lift gate to illuminate the work area.

IMG_5997.jpg

Hope you all enjoyed this build.