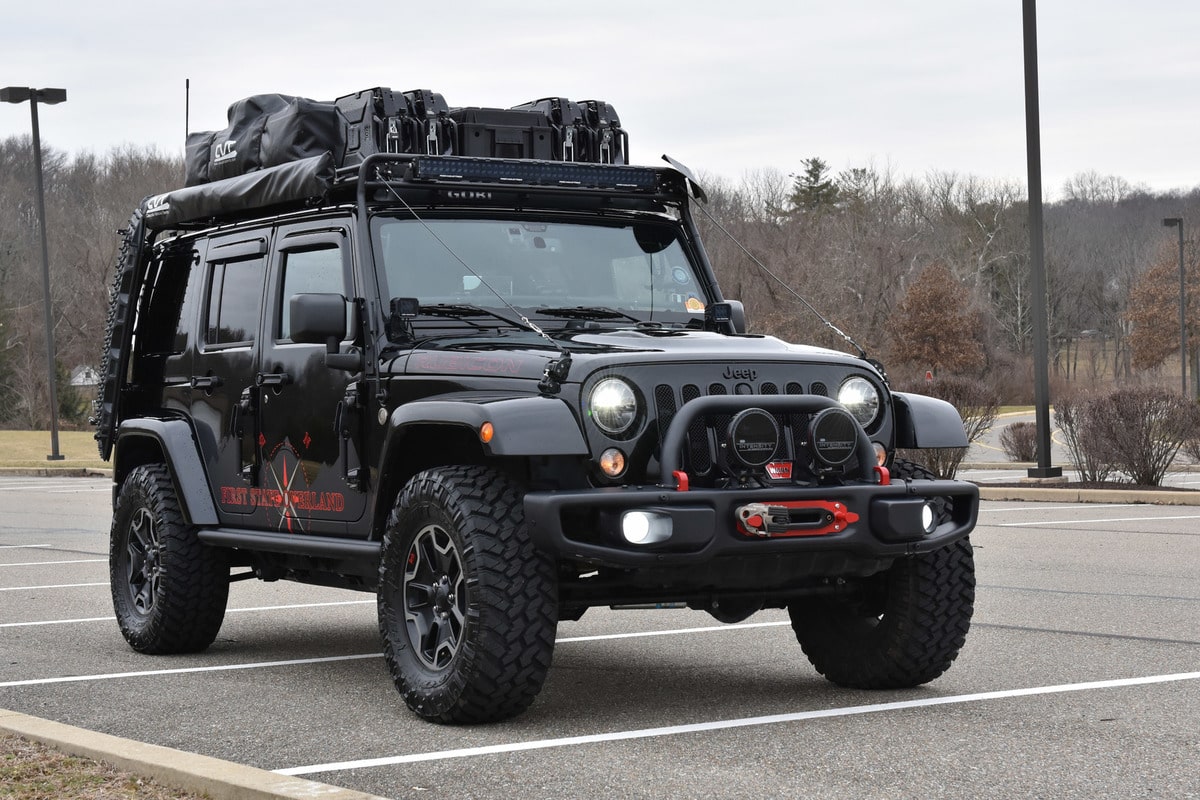
2015 JKURHR Build

  • HTML tutorial

First State Overland

Rank V
Launch Member

Influencer II

2,592
Delaware
Member #

504

Another update. I wasn't happy with my power supply even though I'm running dual batteries upfront, topped off by solar. I wanted to beef up the system to support the charging of filming and photography equipment, and running power to a future trailer climate system, fridge, hot water heater, etc. Each of my two Odyssey Extreme's are great, but only rated at ~65ah each. They currently run the Jeep's accessories, winch, lighting, communications, and tent power. Bottom line, I needed more.

Enter the 125ah VMAX Solar Tank. Then I needed somewhere to hold this 100lb behemoth, so I picked up the driver's side rack from Springtail Solutions. (This is the absolute largest (physically) batter that will fit in this rack. The top opening fits with about a few millimeters on each side). I also wanted something that wasn't going to take up valuable cargo room and utilized the "odd space" that I didn't really use for anything else. It also had to work with my sliding fridge/stove combo. It allows you to keep using your rear seats too.


A very easy install and once in, it's solid and can easily handle this battery weight. Here it is installed. The wires you see are from the VMAX solar tank charger that I've tucked down under the battery on the inside of the rack below it. While this system will be charged by solar, and the Jeep's alternator when running, I wanted the option of direct shore power again when available.


Then I needed to install a beefy inverter to handle the kind of power output I'm expecting. I chose the Xantrex PRO 2000 pure sine wave inverter. 3,000 watts peak, 1800w continuous, if you can get power to it, it will power a small house. So I ended up running 1/0 awg wire, fused at 250 amps directly to it from the VMAX. Again, not having a lot of room, I chose to mount the inverter on the opposite side in the unused space. The inverter has a large footprint, so there wasn't a lot of options.


Here's a shot of the cargo area, with both installed showing that I still have decent storage space. (Obviously the fridge is taken out to work.)


So then I needed to add the rest of the distribution system and build a cover for the VMAX tank so it wasn't exposed. I took some measurements and build a plywood housing with terminal posts. I had to cut out for the rear rollbar and cut out a window on the side for access and maintenance.


Then I carpeted it to blend in and secured it to the rack. You can see how the rear cutout slides under the rollbar. I mounted the distribution block and solar controller on top.
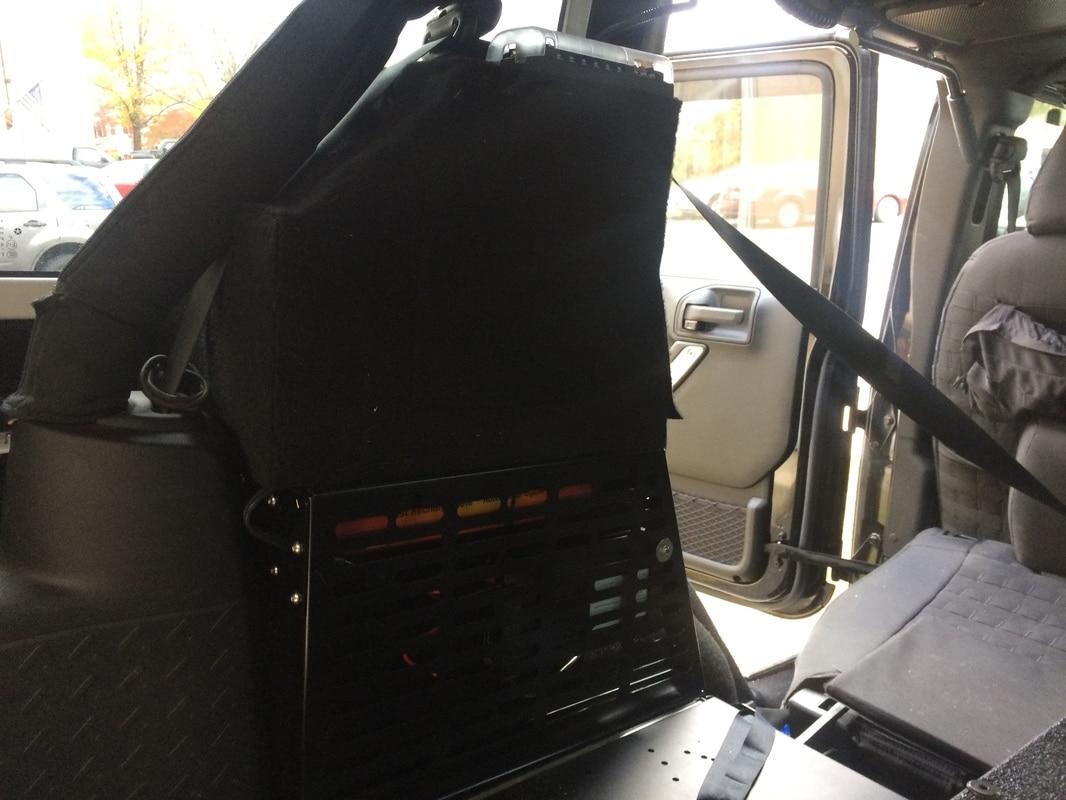


Here's a shot of the back with the fridge back in, and the rear seats up. I've mounted a heavy duty power strip to the rollbar. Still need to do some wire hiding and cleanup.
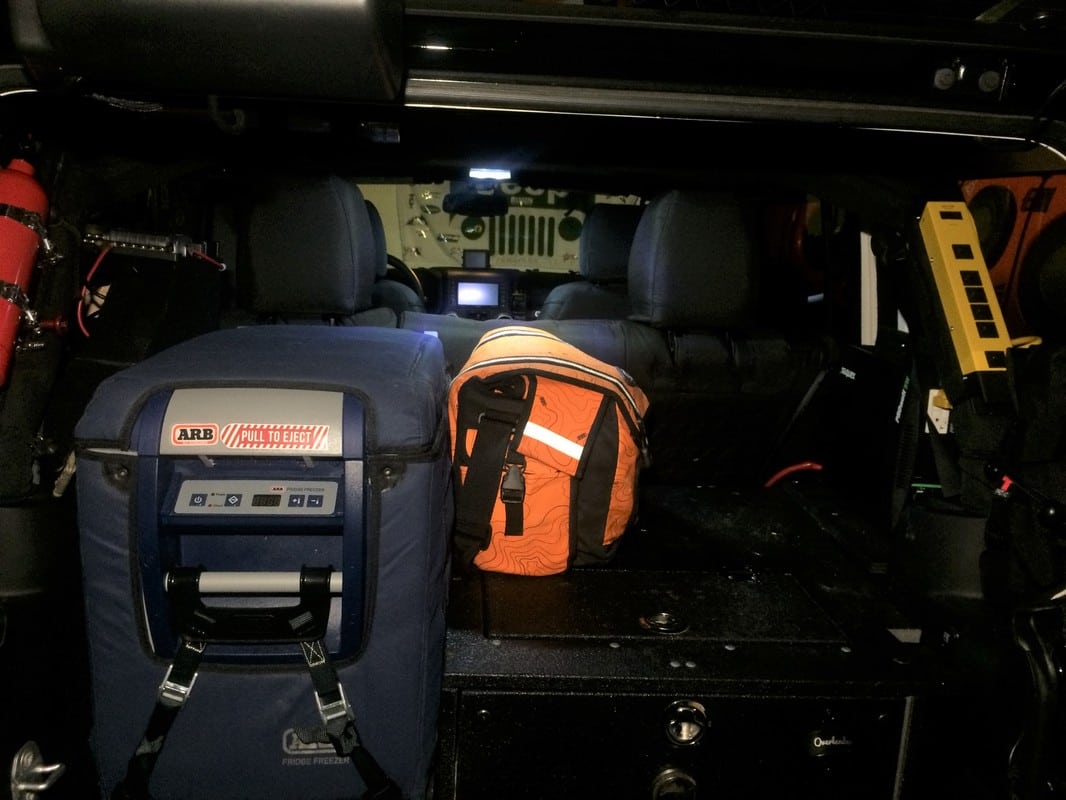


An Anderson plug runs into the solar controller from the front. I covered the lower front with carpet but left if loose just to allow for the 1/0 awg wire to travel out of the bottom to the inverter.


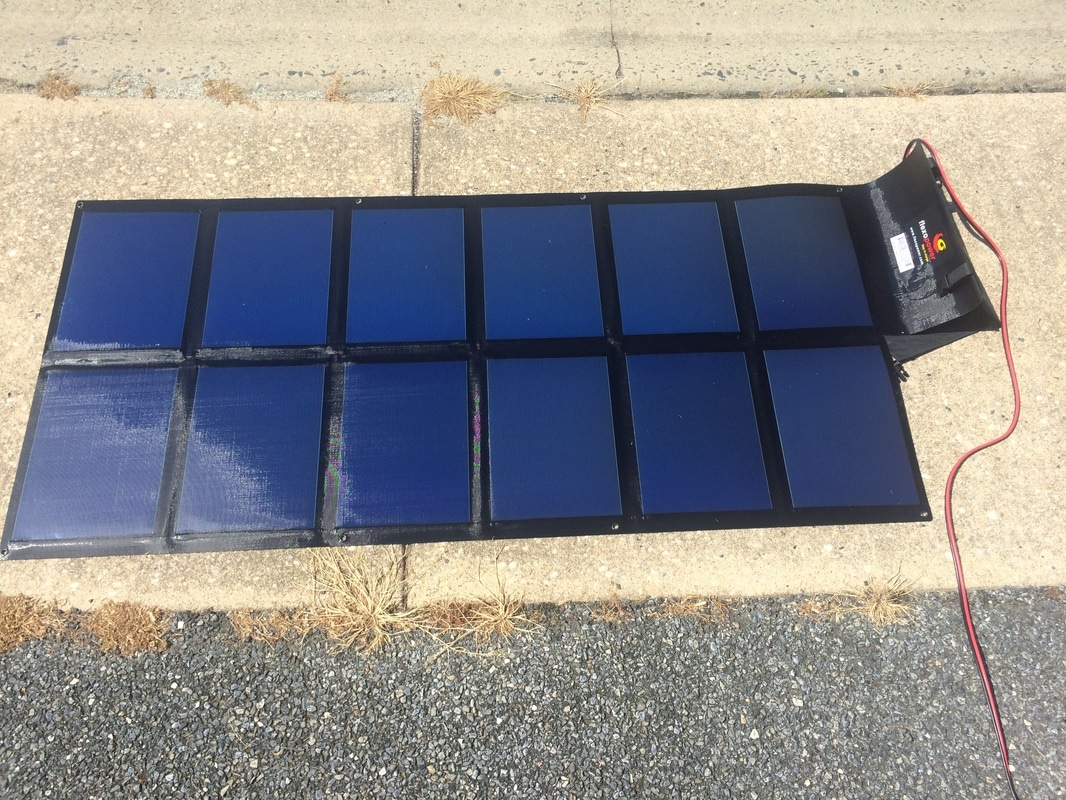
The whole system will be charged with two 79w Flexopower panels for a total of 158W when parked.


Next up, connecting the National Luna isolator from the Genesis Dual Battery kit up front to the VMAX tank in the rear for a tri-battery system. When linked, it will produce 255 amp hours of power, each battery sequentially charged/topped off before connecting the next. (Cranking --> Aux front --> Vmax tank) Then once all three are topped off, they will run connected. More updates on the way. I've done lots of projects just haven't had time to post.
 

Glenn

Rank VI
Launch Member

Advocate I

3,384
New Tazewell, Tennessee, USA
First Name
Glenn
Last Name
Cote
Member #

3112

Incredible build ! I am impressed with your use of space and attention to detail. Have you ever weighed out the rig empty vs loaded? Looking at your power system, it is one of the best ive seen so far in a JK and my biggest concern to go off the grid "efficiently". Im still in the planning process for my '13 Rubicon and love what you have done.
 

First State Overland

Rank V
Launch Member

Influencer II

2,592
Delaware
Member #

504

Incredible build ! I am impressed with your use of space and attention to detail. Have you ever weighed out the rig empty vs loaded? Looking at your power system, it is one of the best ive seen so far in a JK and my biggest concern to go off the grid "efficiently". Im still in the planning process for my '13 Rubicon and love what you have done.
Thanks! Unfortunately, no I haven't weighed it and I'm probably a little afraid to. I do know that my 2.5" lift probably sits 1/2" lower all around just from mods. It's one of the main reasons we're having a trailer built to handle some of the direct weight. You aren't the first person to ask about how much it weighed. Maybe I'll look for a local scale and see where she sits. Cheers!
 

brien

Sonoran Space Program
Staff member
Moderator
Member

Off-Road Ranger I

3,402
Tucson, AZ
First Name
Brien
Last Name
Wankel
Member #

3553

Ham/GMRS Callsign
K7XPO
Your build is incredibly inspiring. I'm just starting the planning phase of my 2016 JKUR HR and I've seen some awesome ideas here, thanks for sharing your build!
 

First State Overland

Rank V
Launch Member

Influencer II

2,592
Delaware
Member #

504

Your build is incredibly inspiring. I'm just starting the planning phase of my 2016 JKUR HR and I've seen some awesome ideas here, thanks for sharing your build!
Thank you! And you never stop building. Even with all that's on there, there are boxes of parts waiting to be put on yet.
 
  • Like
Reactions: brien

LittleRed94

Rank I
Launch Member

Contributor I

233
Poulsbo, WA, USA
First Name
Josh
Last Name
Davis
Member #

3273

Really love your rig! It's very inspirational. I really want a Jk rubicon to build around the weekend warrior driving style.
What's the Most difficult obstacle that you have driven on with your stock tires/suspension?
 

brien

Sonoran Space Program
Staff member
Moderator
Member

Off-Road Ranger I

3,402
Tucson, AZ
First Name
Brien
Last Name
Wankel
Member #

3553

Ham/GMRS Callsign
K7XPO
Not OP, but I also have a JKURHR, still bone stock. I was able to take it down the Three Feathers, one of the more challenging obstacles around Tucson, AZ, where I live. These things are incredibly capable out-of-the-box, especially when a half way decent driver is behind the wheel. The route I took down this obstacle starts off with about a 2.5ft rock step onto a very steep downward rock face with a few more big steps all the way down. Here's video that unfortunately starts just after dropping down the first step, but it may give you a good idea of the capability anyway. If I recall, I think I tapped a skid plate momentarily on the first step but just barely.


First State Overland

Rank V
Launch Member

Influencer II

2,592
Delaware
Member #

504

Really love your rig! It's very inspirational. I really want a Jk rubicon to build around the weekend warrior driving style.
What's the Most difficult obstacle that you have driven on with your stock tires/suspension?
Thanks. I think Brien (above) probably answered this better than I could mainly because I didn't wheel this JK until after the lift was put on. Even with the 2.5" lift now, all of the weight I've added still causes the rear to sag just slightly. So I have 1 inch spacers waiting to go in to help offset it and the weight of a trailer now.
 

LittleRed94

Rank I
Launch Member

Contributor I

233
Poulsbo, WA, USA
First Name
Josh
Last Name
Davis
Member #

3273

Not OP, but I also have a JKURHR, still bone stock. I was able to take it down the Three Feathers, one of the more challenging obstacles around Tucson, AZ, where I live. These things are incredibly capable out-of-the-box, especially when a half way decent driver is behind the wheel. The route I took down this obstacle starts off with about a 2.5ft rock step onto a very steep downward rock face with a few more big steps all the way down. Here's video that unfortunately starts just after dropping down the first step, but it may give you a good idea of the capability anyway. If I recall, I think I tapped a skid plate momentarily on the first step but just barely.

Pretty cool, it's impressive what a stock JK can do. I was just at the dealer again today looking at JKU Rubicon's and its looking like with my trade in the payments on the remaining amount are still higher that what I want to do, 12k down with trade in and I'm still at 400-450 a month. I need to be at 200 a month so its looking like I need to wait until I can double my down payment, or start looking at 2012+ used JKU Rubicon's. Hey How do you like your side mount for the Hi-Lift? It seems like a really good use of empty space?
 
  • Like
Reactions: brien

LittleRed94

Rank I
Launch Member

Contributor I

233
Poulsbo, WA, USA
First Name
Josh
Last Name
Davis
Member #

3273

Thanks. I think Brien (above) probably answered this better than I could mainly because I didn't wheel this JK until after the lift was put on. Even with the 2.5" lift now, all of the weight I've added still causes the rear to sag just slightly. So I have 1 inch spacers waiting to go in to help offset it and the weight of a trailer now.
Dose the 2.5 lift that you have use the original front and rear coil springs? of are you on the Stock coils. I imagine the stock coil rats are way to low for a loaded overland rig haha
 

brien

Sonoran Space Program
Staff member
Moderator
Member

Off-Road Ranger I

3,402
Tucson, AZ
First Name
Brien
Last Name
Wankel
Member #

3553

Ham/GMRS Callsign
K7XPO
Hey How do you like your side mount for the Hi-Lift? It seems like a really good use of empty space?
It's been great. I went with this j-mount because it was the best place to mount it, imo. Tire carrier mount would make it a slight pain to take the top off (by hand). Hood mounts require raising/rerouting wiper sprayers, and getting the jack on and off is awkward. I didn't trust myself to not drop the jack on my hood. With the Bolt J-mount the jack is easy to get to and out of the way. From inside you can't even see it since it hides behind the a-pillar, there is no obstruction of view. The lock is keyed to the jeep key too when you first install it, so you don't have to worry about more keys

One downside is that it will collect mud, not a big issue most of the year here in Southern Arizona, but during our two rainy seasons I've noticed buildup. This can be easily solved by putting one of those hi-lift neoprene jack covers on. I've been meaning to pick one up.


Sent from my iPhone using OB Talk
 
Last edited:
  • Like
Reactions: LittleRed94

csilv

Rank IV
Launch Member

Advocate III

952
Santa Ana, CA, USA
First Name
Chris
Last Name
Silverberg
Member #

5328

Ham/GMRS Callsign
K6IOS
Just wanted to mention how much I admire this build. I'm far away... planning to get a Jeep Wrangler in around 2020.. either a new JL or maybe a used JK/JL... and just starting to do the research (which includes scouring all the JK build threads here). Anyway, this is my favorite build I've seen. Hope it is treating you well.
 

John_Heibel

Rank III
Launch Member

Influencer II

770
Montrose, CO, USA
First Name
John
Last Name
Heibel
Member #

2647

After a bath today, I added some door mounted side steps on all four doors. This makes it SO much easier to get at the roof gear now. Some updated photos.


Couple of months ago added those side door steps as well. They make getting up on top real easy. Awesome additions. My next additions will be the Bushwhacker flat style fender flares and the dual battery kit.
 

First State Overland

Rank V
Launch Member

Influencer II

2,592
Delaware
Member #

504

Just wanted to mention how much I admire this build. I'm far away... planning to get a Jeep Wrangler in around 2020.. either a new JL or maybe a used JK/JL... and just starting to do the research (which includes scouring all the JK build threads here). Anyway, this is my favorite build I've seen. Hope it is treating you well.
Thanks! Much appreciated. Of course they are never done!
 

First State Overland

Rank V
Launch Member

Influencer II

2,592
Delaware
Member #

504

Couple of months ago added those side door steps as well. They make getting up on top real easy. Awesome additions. My next additions will be the Bushwhacker flat style fender flares and the dual battery kit.
Once my OEM flares get torn up to the point where I can't stand them, I think I'll be putting the Metalcloak fenders on. I like that you can step on them.
 

brien

Sonoran Space Program
Staff member
Moderator
Member

Off-Road Ranger I

3,402
Tucson, AZ
First Name
Brien
Last Name
Wankel
Member #

3553

Ham/GMRS Callsign
K7XPO
Where might I find these door mount side steps? I'd love to have better access to my rack.
 

First State Overland

Rank V
Launch Member

Influencer II

2,592
Delaware
Member #

504

Where might I find these door mount side steps? I'd love to have better access to my rack.
They are Kargomaster steps. https://www.quadratec.com/products/12138_1035_14.htm or I think you can get them direct from Kargomaster. A word of caution - you will need to break the paint seal on your door hinges to mount these and no matter what you do it's going to slightly change the alignment of your door despite your best attempts at keeping it closed and properly aligned. All that said, they are still worth it.
 

brien

Sonoran Space Program
Staff member
Moderator
Member

Off-Road Ranger I

3,402
Tucson, AZ
First Name
Brien
Last Name
Wankel
Member #

3553

Ham/GMRS Callsign
K7XPO
Thanks for the info and the word of warning! did you take the doors off to install them or leave the doors on and just closed?
 

First State Overland

Rank V
Launch Member

Influencer II

2,592
Delaware
Member #

504

Thanks for the info and the word of warning! did you take the doors off to install them or leave the doors on and just closed?
Definitely leave them on as per instructions. Taking them off will only make things worse. I was meticulous about even putting spacers in the door gap to help and I was still slightly off.
 
  • Like
Reactions: brien