1971 FJ40 Landcruiser converted to Toyota 1HDT diesel engine

  • HTML tutorial

Ob1

Rank VI
Launch Member

Influencer I

3,057
Palo Alto, CA, USA
First Name
Ofer
Last Name
Bruhis
Member #

17919

Ham/GMRS Callsign
KD6UKE
It all started 15 years ago, when my daughter got her license. We figured she need to build her car, that is, if she want to drive one...

We purchased a 1971 Toyota Landcruiser with engine issues ($2500). The car has been neglected and was not drivable. But it did not need smog in CA, so could be modified easily. We ended up towing it home.
P1010019.JPG
P1010021.JPG

We figured we will build it again (from scratch), starting with a bare frame. A friend owns a paint shop and helped out with all the finish work.
DSCN0186.JPG

DSCN0661.JPG

The tub had rust damage, and needed some part to be grafted. The quarter panels came from a shop in Texas that stamps all the 40 series parts. This is where she learned how to weld.
DSCN1492.JPGDSCN1499.JPG
We ended up taking the tub to the paint shop on the roof of the 60 series.
DSCN2245.JPG

Meanwhile, the engine (2F) was rebuilt and the rolling frame put together.
DSCN1029.JPG
DSCN1055.JPG
The parts came back from the paint shop after a few weeks, and at that point the rig got it's name - Kermit.
DSCN2347.JPG
DSCN2345.JPG
It was time to start putting the 'kit' together.
DSCN2374.JPG
DSCN2378.JPGDSCN2383.JPG
DSCN2377.JPG
And.. this is how the rig looked for 15 years.
71 inside.jpg
image1.jpg
image2.jpg
And now...
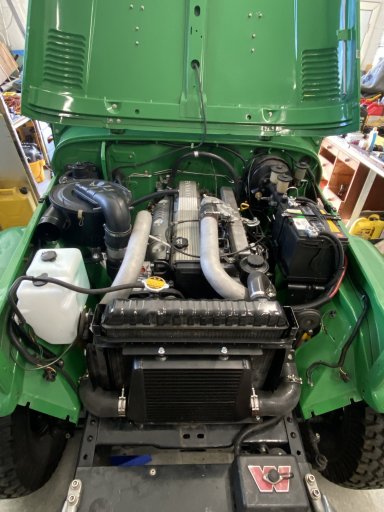
We have come across a Toyota 1HDT 4.2L Turbo diesel, and figured that needed a new project. The engine has good compression and came off a running 'buggy'. At this point, we will replace all the seals, and send the injectors and pump for rebuild. We still need to find a H55 5 speed transmission and a TC.
IMG_2301.JPGIMG_2302.JPG
Injector Pump and injectors were sent out to Portland to a shop. They were in bad shape.IMG_2315.JPG

Stay tuned. I'll keep you posted on the progress... :)
 

Ob1

Rank VI
Launch Member

Influencer I

3,057
Palo Alto, CA, USA
First Name
Ofer
Last Name
Bruhis
Member #

17919

Ham/GMRS Callsign
KD6UKE
Just got the injectors back. This weekend will be an install and also Con Rods bearings and oil pan. The diesel shop is located in Portland, and Mark Singleton, the owner is a great guy. 503.235.1947. ACSD (Automatic Cold Start Device) was removed and replaced with a plate.after.jpg
 

Ob1

Rank VI
Launch Member

Influencer I

3,057
Palo Alto, CA, USA
First Name
Ofer
Last Name
Bruhis
Member #

17919

Ham/GMRS Callsign
KD6UKE
This weekend, installed the rebuilt pump, and con-rod bearings. The bearings were in great shape, but figured, since I don't know the total history of this engine, might as well while it is upside-down... Sooo much easier. I replaced the main oil seals and harmonic balancer. Also, used the CT26 turbo, from the 24 valve engine. Managed to damage one of the seal, so the oil pan will need to wait until I get a replacement.IMG_2813 2.JPGIMG_2814.JPG
 

Ob1

Rank VI
Launch Member

Influencer I

3,057
Palo Alto, CA, USA
First Name
Ofer
Last Name
Bruhis
Member #

17919

Ham/GMRS Callsign
KD6UKE
Main seals and oil pan is on. Today, I welded a small frame so the engine can sit on it and I have access to mount the flywheel, clutch, bellhousing and starter. Intake manifold needs the gasket (on order), and once this is done, I hope I can start it on the bench. I always remember the first time I start and engine after major work.
IMG_2835.JPGIMG_2836.JPG
 
  • Like
Reactions: suzuguru and k9sar

Ob1

Rank VI
Launch Member

Influencer I

3,057
Palo Alto, CA, USA
First Name
Ofer
Last Name
Bruhis
Member #

17919

Ham/GMRS Callsign
KD6UKE
I've been helping my daughter installing the drivetrain in the car. Radiator relocated, engine mounts, fuel system, electrical, etc. Fuel system is hooked up and we almost finished the electrical. Still need to install the rear driveshaft, and the heater core. Can wait to drive this thing...

64028850213__37F4409F-9DB3-4FCC-B817-CC3E400C4D5C.JPGIMG_4905.jpgIMG_5403.JPGIMG_5130.JPGIMG_5235.jpg
 

Ob1

Rank VI
Launch Member

Influencer I

3,057
Palo Alto, CA, USA
First Name
Ofer
Last Name
Bruhis
Member #

17919

Ham/GMRS Callsign
KD6UKE
I shot a photo of the drive train before installing. Almost like a statue to put in your living room. I think my wife will not object. mmm... maybe not.

And a photo of the 2F compared to the 1HDT.

IMG_4538.JPGIMG_4555.JPG
 

Ob1

Rank VI
Launch Member

Influencer I

3,057
Palo Alto, CA, USA
First Name
Ofer
Last Name
Bruhis
Member #

17919

Ham/GMRS Callsign
KD6UKE
Been busy with other projects, but this is moving on. We installed the engine and managed to connect fuel, electrical and vacuum. Driveshafts length was modified because the transfer case sits a few inches back. We had to modify the hump in order to accommodate the 5 speed gear box. Also had to relocate the radiator, otherwise the fan would hit the bottom outlet. All connections of the 3" exhaust were 'V' Bands.

IMG_4912.JPGIMG_4892.JPG64028850213__37F4409F-9DB3-4FCC-B817-CC3E400C4D5C.JPGIMG_4931.jpgIMG_5078.jpg
 
  • Like
Reactions: GLOCKer

Ob1

Rank VI
Launch Member

Influencer I

3,057
Palo Alto, CA, USA
First Name
Ofer
Last Name
Bruhis
Member #

17919

Ham/GMRS Callsign
KD6UKE
At this time we decided to add an intercooler. The exhaust manifold was cracked because this engine has no electronic protection. It will burn as much fuel as you dump in. The intercooler lowered exhaust temperature by a bit over 200F. That makes a huge difference on the climb. We had a PDI adopter, so ended up buying a set of 2.5" pipes on Amazon, and an intercooler and silicone hoses from JEGS. Total cost was less then $400. Considering that the PDI 80 intercooler is over $1000, it was a no brainier.

We had to modify the front bib, because the metal screen in front of the radiator did not leave the 3" for the intercooler.

IMG_5774.JPGIMG_5740.JPGIMG_5783.JPG

IMG_6375.JPG
 

Attachments

suzuguru

Rank 0

Contributor II

38
Nashville, TN
First Name
Eric
Last Name
Crosslin
Your project makes me wish I lived in Palo Alto so I could badger you into helping me with mine. I've just bought a 1HDT, and hope to put it in my '72 FJ40 in the near future. Looks like you and your daughter do excellent work. It turned out fantastic. I must say... I'm jealous! Where did you source your rear transmission crossmember?
 

Ob1

Rank VI
Launch Member

Influencer I

3,057
Palo Alto, CA, USA
First Name
Ofer
Last Name
Bruhis
Member #

17919

Ham/GMRS Callsign
KD6UKE
Your project makes me wish I lived in Palo Alto so I could badger you into helping me with mine. I've just bought a 1HDT, and hope to put it in my '72 FJ40 in the near future. Looks like you and your daughter do excellent work. It turned out fantastic. I must say... I'm jealous! Where did you source your rear transmission crossmember?
Hey Eric,

Thanks for the kind words.

Move west. Much better weather. . I made the cross member myself. It’s simple. You plan to use an H55? Also we had the diffs changed to 3.73 and geared the TC otherwise the 1HDT will be revving. Other option is bigger tires.

Also she just got married and rode to the altar with Kermit. Husband on a motorcycle. They both came out of an aspen forest near Flagstaff.

Where did you find the 1HDT?

A6708182-4F3E-44DC-850B-81993EEA834E.jpeg
 

Ob1

Rank VI
Launch Member

Influencer I

3,057
Palo Alto, CA, USA
First Name
Ofer
Last Name
Bruhis
Member #

17919

Ham/GMRS Callsign
KD6UKE
We Have the same Project what changes do I have to do between 1hdt and h55f transmission to make work
All you need is the right bellhousing and the correct clutch. For the 40 series you need to change the frame motor mounts and cross member and also modify a bit the transmission hump. If you need part numbers, I can dig it out.

The gas pedal is different and also the throttle cable.