Tacoma Overland Drawer 2.0 PullKitchen project

  • HTML tutorial

PapaDave

Local Expert Northern ID and North East WA
Member

Protector II

8,868
Coeur d'Alene, ID, USA
First Name
Dave
Last Name
Addington
Member #

10123

Ham/GMRS Callsign
KN6BKH
PapaDave, I'm on the tnutz site and I found the smooth quarter round t-slotted aluminum but there's a million tap/counterbore/drill thru/etc options. I don't know what it would entail but would you be able to share the options you went with? Did you make any cuts after the fact or did you get it right the first time?
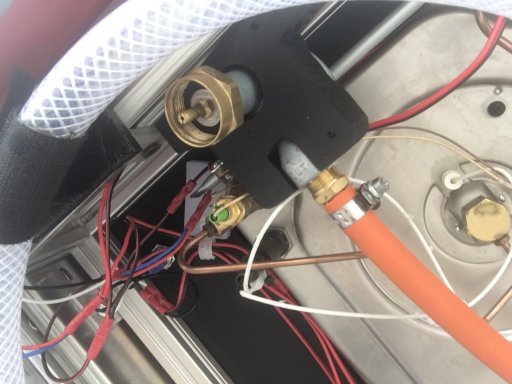
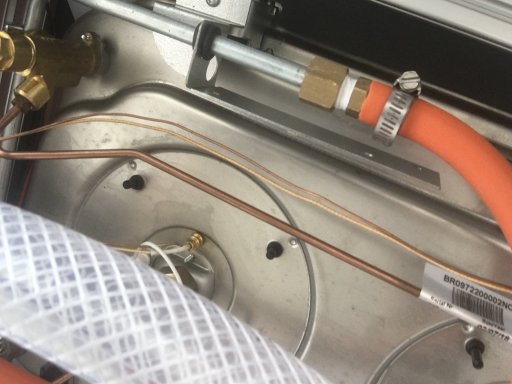
Honestly that’s a pretty big question because there are a lots of aspects to account for. I did have everything cut to measure and I ended up tapping myself. 8020 is easier to tap though than the t-nuts aluminum. So id recommend t-Nutz extrusions to be pre-tapped. You can see the plans and take them from there but I don’t have an exact description of each of the connection points. It’s definitely a DIY project!
 
  • Like
Reactions: Atlost67

GoDevils!

Rank 0

Contributor I

60
AZ - Texas
First Name
James
Last Name
Foster
Became a member here just to learn about this pull-put kitchen. I need it! Great job to the OP! Any idea how much these will cost from Pull Kitchen? Thx
 
  • Like
Reactions: PapaDave

PapaDave

Local Expert Northern ID and North East WA
Member

Protector II

8,868
Coeur d'Alene, ID, USA
First Name
Dave
Last Name
Addington
Member #

10123

Ham/GMRS Callsign
KN6BKH
Became a member here just to learn about this pull-put kitchen. I need it! Great job to the OP! Any idea how much these will cost from Pull Kitchen? Thx
We don’t have a price public yet, but somewhere in the high end roof top tent ballpark, they aren’t cheap to make!
 

PapaDave

Local Expert Northern ID and North East WA
Member

Protector II

8,868
Coeur d'Alene, ID, USA
First Name
Dave
Last Name
Addington
Member #

10123

Ham/GMRS Callsign
KN6BKH
Hi Dave, any chance you can post a picture of the propane regulator attachment under the stove? My 9722 came without the regulator as I figured I wouldn't need it but it seems like something is missing. Thanks
My OG holder was UGLY using plywood and a hose clamp. For our production units we are 3D printing a holder for the regulator, I‘ll post a picture for you in just a bit
 

prescott15

Rank 0

Contributor I

60
Whidbey Island, Washington, USA
First Name
Cory
Last Name
Prescott
My OG holder was UGLY using plywood and a hose clamp. For our production units we are 3D printing a holder for the regulator, I‘ll post a picture for you in just a bit
Thanks Dave, I'm looking specifically how to go from the tube it came with to the regulator. Most grills and other burners have a vent type tube to allow the air mixture. Does this not need that? Looking forward to the pic.
 

PapaDave

Local Expert Northern ID and North East WA
Member

Protector II

8,868
Coeur d'Alene, ID, USA
First Name
Dave
Last Name
Addington
Member #

10123

Ham/GMRS Callsign
KN6BKH
Thanks Dave, I'm looking specifically how to go from the tube it came with to the regulator. Most grills and other burners have a vent type tube to allow the air mixture. Does this not need that? Looking forward to the pic.
I used pipe fitting with barbs to the hose and no special vents.A3A55395-0E6E-4D3E-AE2F-1B59CA0B74BA.jpegBF6BF5A5-8119-475D-856E-9CC22941EEF1.jpeg
 

Leirbag

Rank III
Launch Member

Enthusiast III

646
San Diego, CA
First Name
Gabriel
Last Name
Wilensky
Member #

24890

Hi PapaDave. Awesome work. I was looking at your photos in post #208 above and it looks like you might have a bad electrical connection on the left of the first photo, with the two red wires going into a red crimp sleeve. It appears that some copper is visible, which probably means those wires are not as deep into the sleeve as they should be, or they may be coming off.
 
  • Like
Reactions: PapaDave

PapaDave

Local Expert Northern ID and North East WA
Member

Protector II

8,868
Coeur d'Alene, ID, USA
First Name
Dave
Last Name
Addington
Member #

10123

Ham/GMRS Callsign
KN6BKH
Hi PapaDave. Awesome work. I was looking at your photos in post #208 above and it looks like you might have a bad electrical connection on the left of the first photo, with the two red wires going into a red crimp sleeve. It appears that some copper is visible, which probably means those wires are not as deep into the sleeve as they should be, or they may be coming off.
Good eyes. Yeah the connectors were undersized for 2 wires on the same side. In hindsight a larger connector would have been better but it was 2am and we were trying to finish this pre-production model to take on a trip at 8am a couple months back. The connection is solid, just a little ugly for sure.

I just got back from doing the Mojave road a second time in 3 weeks and so far this test unit has about 8,000 road miles and 500 dirt miles. We are driving it hard to see what breaks or wears out and so far everything from the mount to the electrical has held up better than I had expected. We got airborne yesterday which did scramble my silverware a little :)

This is my fiancée cooking up some fajaitas for us

D754D392-85A0-401A-BC8D-B46F830D1DD4.jpeg
 
Last edited:

A_Patt

Rank I
Launch Member

Member I

233
Texas (DFW)
First Name
Aaron
Last Name
Patterson
Member #

22214

Good eyes. Yeah the connectors were undersized for 2 wires on the same side. In hindsight a larger connector would have been better but it was 2am and we were trying to finish this pre-production model to take on a trip at 8am a couple months back. The connection is solid, just a little ugly for sure.

I just got back from doing the Mojave road a second time in 3 weeks and so far this test unit has about 8,000 road miles and 500 dirt miles. We are driving it hard to see what breaks or wears out and so far everything from the mount to the electrical has held up better than I had expected. We got airborne yesterday which did scramble my silverware a little :)

This is my fiancée cooking up some fajaitas for us

View attachment 147688
Hi Dave,

Love the updates and really looking forward to your end product. My build is slowly coming together and I appreciate your pictures you sent a month back regarding your iKamper and how its mounted to your KB Voodoo Rack. I have another question for you after looking at your above picture (fajitas sound so good right now).

I see that your Dometic is on a slide? I went back through the thread and saw that you posted a different thread for your slide, thanks for that. I have the Diamondback as well and with the rods to lock it, I can only clear 19" which cuts it close to a Dometic as they are around 18.5 inches tall. I'm afraid the slide won't allow me to use either (Fridge & DB) at the same time. Are you still using your locking rods? Stay safe!
Aaron
 
Last edited:
  • Like
Reactions: PapaDave

PapaDave

Local Expert Northern ID and North East WA
Member

Protector II

8,868
Coeur d'Alene, ID, USA
First Name
Dave
Last Name
Addington
Member #

10123

Ham/GMRS Callsign
KN6BKH
Hi Dave,

Love the updates and really looking forward to your end product. My build is slowly coming together and I appreciate your pictures you sent a month back regarding your iKamper and how its mounted to your KB Voodoo Rack. I have another question for you after looking at your above picture (fajitas sound so good right now).

I see that your Dometic is on a slide? I went back through the thread and saw that you posted a different thread for your slide, thanks for that. I have the Diamondback as well and with the rods to lock it, I can only clear 19" which cuts it close to a Dometic as they are around 18.5 inches tall. I'm afraid the slide won't allow me to use either (Fridge & DB) at the same time. Are you still using your locking rods? Stay safe!
Aaron
Yeah the clearance is tight, so I made my own. Posted a thread as a number of people have asked about it. Simple but works great for me :)

 
  • Like
Reactions: A_Patt

Contributor I

60
Lancaster, Ontario, Canada
First Name
john
Last Name
geiger
There’s been a pause in my build as I’m waiting on some items being shipped from T Nutz. I originally bit the bullet and purchased round Tri-corners from 80/20 at about $20 per corner. Ouch. Then I recently found the SAME item at half the price from T Nutz. Sooooo I’m swapping them out as my build has like 16 corners. Dang.

Step up my water tank and pump
View attachment 91968View attachment 91970
Standard hose quick release
View attachment 91973

Adding electrical to the drawer with 3 illuminated switches housed in this project box. 1st switch will power the whole drawer including the pump to be actuated by the faucet, 2nd switch for interior drawer LED’s, and the 3rd switch to illuminate the cooking/sink surface at night. Cooking in the dark is so middle-ages
View attachment 91971

As my Dometic 9722 came from England I spent $11 on a new Mr Heater regulator to make sure the propane flows at 11 WC of pressure. I decided to use 1lb propane bottles as I normally cook for 2-3 people and I don’t need a 20lb tank for that, plus with my set up it would be hard to find space. Even with the 5&11lb bottles I can more easily carry two 1 pounders and be good for a lot of cooking. View attachment 91972
i wonder if you could get tri-corners 3d printed for less?
 
  • Like
Reactions: PapaDave