PCO6's Off Road Trailer Build

  • HTML tutorial

PCO6

Rank V
Launch Member

Member III

2,268
Newmarket, Ontario
First Name
Stew
Last Name
Beatty
Member #

12534

This is a cut and paste job of a build thread I posted on a few other forums. It may seem a bit out of context in places timing wise. I had a couple of major diversions (all good) that delayed my build but I have made a lot of progress on the trailer since my last post in that thread. I will update this thread as soon as I can. The trailer is "almost" completed!


A few years ago I started to make some rough sketches of what I wanted to build as an expedition style trailer. I built a utility trailer 3 or 4 years ago. It was a fun project and I wanted to build another one.

I bought some metal for the frame and started to cut it to size. I was literally about to start welding when I found a trailer for sale on a local Jeep forum. It was very close to what I planned to build and the price was more than right. I couldn't have bought the materials for what I paid for the trailer.

It was only a little more than an hour away. I drove down thinking I would have to repack the bearings, reconstruct the coupler, etc. but it was in perfect condition. I drove it away and was fully confident with it within 10 miles or so. Thanks Just-lift; good deal!

The overall specs are;
- length 12'
- width 5' 10";
- height 3' 5" (without lid)
- clearance 19.75" to frame
- clearance 15" to axle
- tongue platform tapering to 32"
- weight not sure yet !!!
- axle 3,500 lb. (brakes to come)
- wheels 16" Jeep Moab
- tires 245 75R 16 Goodyear Duratrac
- box length 5'
- box width 4'
- box height 19.25"
- box cubic ft. 32 ft(3)
- tongue jack 1,500 lbs.

Here's what I started with. This pic from the ad for it was either taken on the day it was painted or it was more likely raining. It looked shinier that it was.


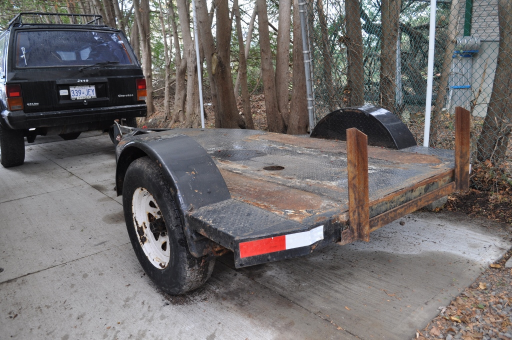
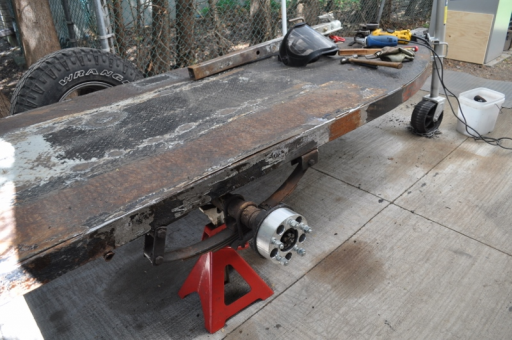
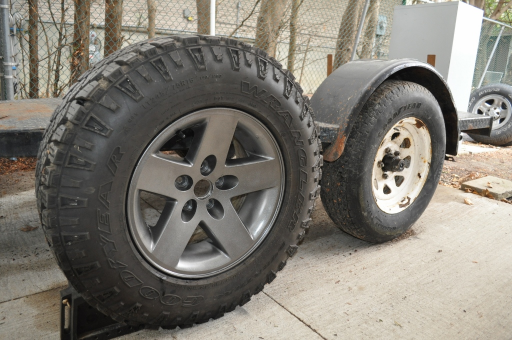
The trailer was well constructed. I understand it was used by a welding company to trailer a mobile welder to job sites. The round fenders were well built and nicely tied to the frame with deck plate running boards. It had 14" wheels and tires that were in pretty good shape. I wanted square fenders though and 16" wheels and tires to match my Jeep TJ & XJ so I decided to tear everything off.


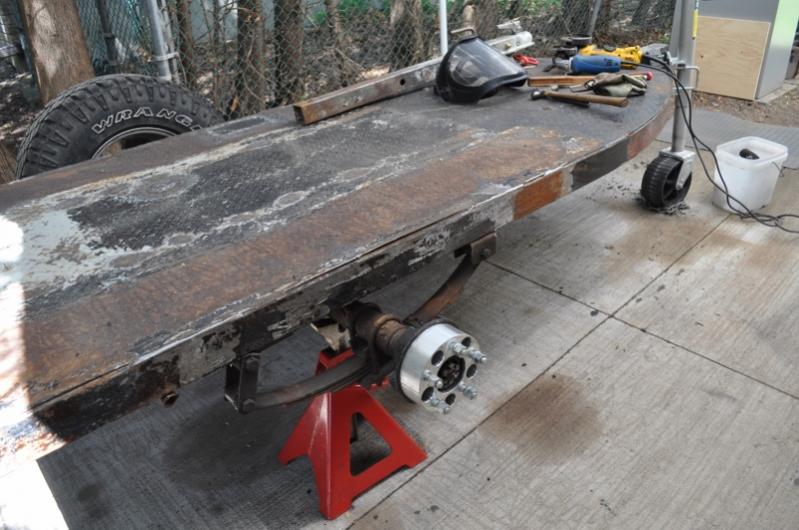
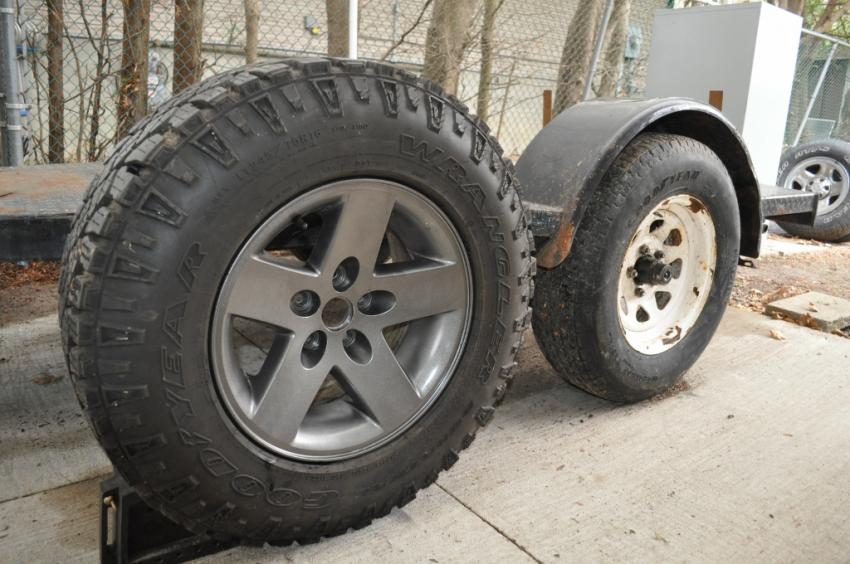
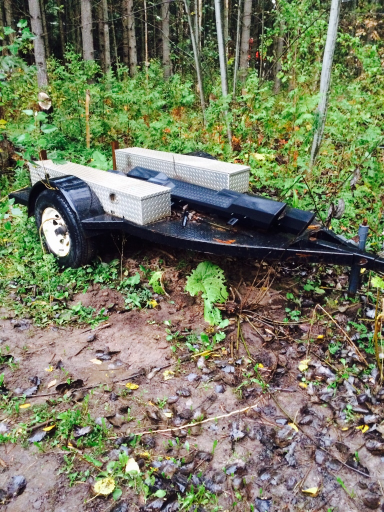
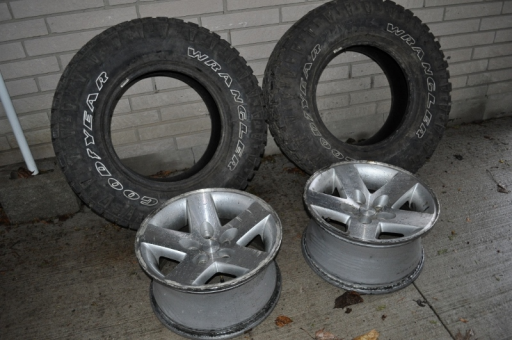
I sanded down a pair of 16" Jeep Moab wheels and painted them with Duplicolor wheel paint. I'll eventually get them powder coated. I went with graphite to distinguish them from the silver wheels on the tow vehicles. I found an almost new set of 245/75R/16 Goodyear Duratracs on Kijiji to match what I have on my TJ. I also needed a set of spacers to mount the wheels to the hubs. I may replace the axle so I can add brakes. Unlike a lot of axles the current one does not have the flanges to bolt the brake backing plates to. If I can fabricate something suitable I'll go that route. If not I'll build a new axle.


I cut off the trailer jack that came with the trailer and welded on brackets to attach a 1,500 lb. marine jack. I like the wheel/tire and hope it handles dirt surfaces better than the more common narrow tires.


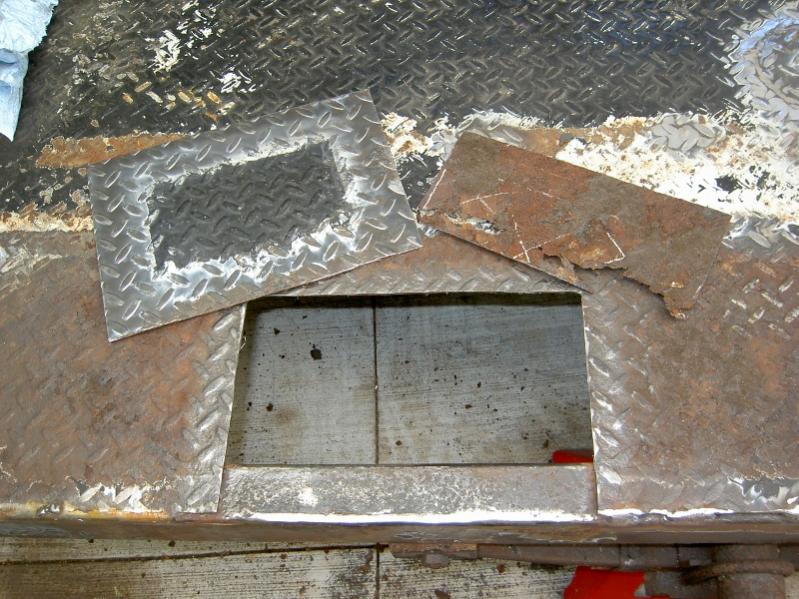
The trailer bed was pretty rusty and had about 30 bolt, rivet and rust holes that needed to be filled.


Scraps from the old running boards came in handy.


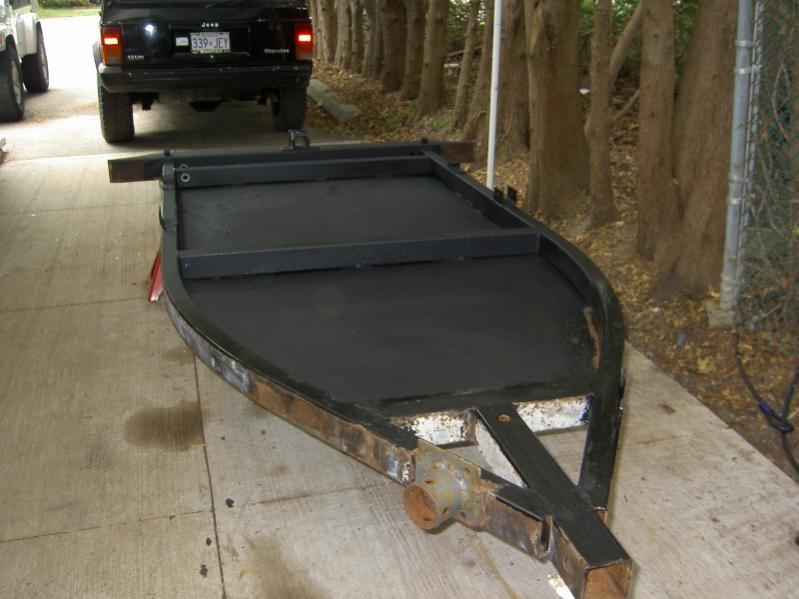
The chassis was built by a company called EZ Tow Trailers. I like the curved side rails which is something I didn't plan for in my original sketches.


I spent a lot of time underneath it getting rid of the rust.


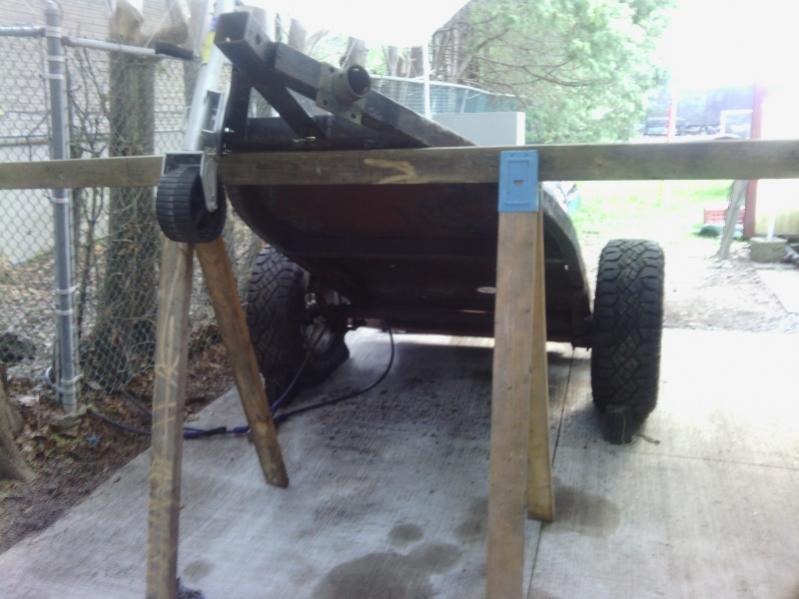
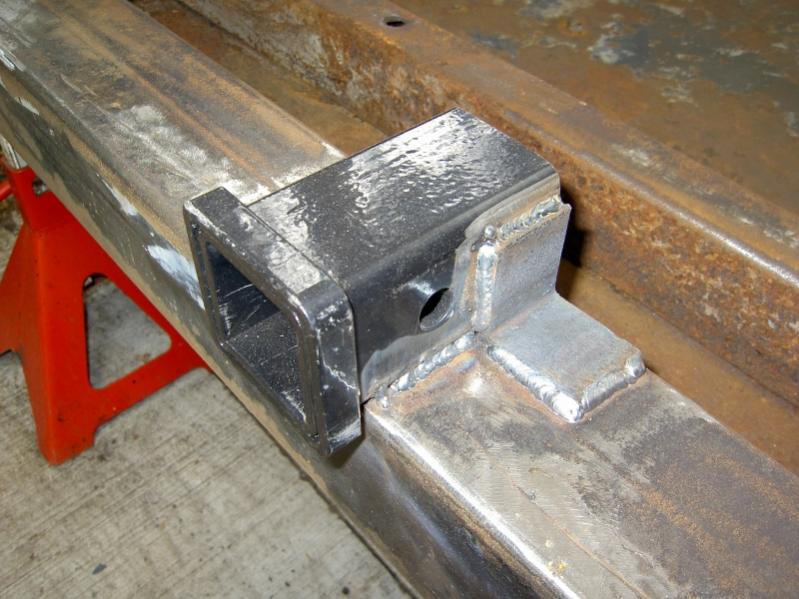
I eventually flipped it over and that seemed like the right time to add a receiver to the rear bumper for a bike rack, etc.


With a lot of the rust gone I painted the frame with POR15 and later with a few different types of cheap aerosol bed liners. I thought I'd try a different ones out and recoat everything with the one I finally like (no decision yet).


Attachments

Last edited:

PCO6

Rank V
Launch Member

Member III

2,268
Newmarket, Ontario
First Name
Stew
Last Name
Beatty
Member #

12534

I finally started to build the box which is 5' long by 4' wide and 19.25" high. In this pic you can see the front gable in place.


Next up was the rear tailgate gable and this where the fun started. I had some 2"x6" tubing left over from when I fabricated new sills for my Jeep XJ. I had planned ahead and figured it would be a nice “visual” tie in to one of my tow vehicles (ha ha). To tie it in to my Jeep TJ I decided to use TJ hinges for the tail gate (thanks to Moose for the donated hinges!). I painted them graphite to match the wheels.

First I had to drill holes for the 4" LED lights. With the tail lights removed I can access most of the interior of the rear posts to get to any fasteners and run wiring.


I then capped the tops. I added an internal tapping plate for some thumb screws that will be added later.


The back end is starting to take shape in this pic. I store a lot of my small camping gear in a couple of 91 litre Action Packers and they kind of dictated the height of the box. In this pic you can see the removable rear cross brace. It will eventually be the surface on which the hinged top will rest. With the cross brace in place the Action Packers can slide out underneath it.


Here are some of the details on the removable cross brace. You can also see in these pics that I decide to use Uni-strut for the side rails. I wasn't sure about their strength at first but it will not be a problem. They are light weight, galvanized and I happened to have them in my metal scrap pile. The rails will allow me to attach various items to the box while camping.


I built a temporary tail gate out of scrap plywood just to get a sense of the size and how I might use it. I initially thought this would be the home for my kitchen but I've abandoned that idea and will use the side of the trailer instead. Alternate ideas are welcome!


I've had a few diversions along the way. I built these bike racks for my TJ out of a pair of roof top carriers. I wanted to be able to open my tail gate with the rack on and bikes off. The bikes come off in less than 10 seconds. I also wanted to be able to do that with the trailer. One rack slides into the other so I can go with one bike only which is what I often do.


Here the box is starting to take shape. You can see that there is a lot of tongue area for a utility box, a cooler, water cans, etc.


Last edited:
  • Like
Reactions: Daryl 32

PCO6

Rank V
Launch Member

Member III

2,268
Newmarket, Ontario
First Name
Stew
Last Name
Beatty
Member #

12534

The box is skinned with 14 gauge aluminum. Here are the front and 2 sides. The 2 small pieces are for the license plate / mud guards. I’ll be skinning the tail gate in the same material.


The box panels are just sitting in place while I construct other parts of the trailer but theses pics give you an idea of how it will look.


The running boards and fenders came next. I decided to make all parts (3 per side) independent of each other so in the future I will be able to modify, replace, repair, paint, etc. any of the pieces without having to take everything off.

The running board frames are 1”x1” thin wall tubing that I salvaged from an old BBQ stand. The round leading edge seemed appropriate.


The rear one was pretty straight forward to build. This pic shows where the propane tank might go (not decided yet).


I didn’t want to get into heavy frames for the fenders so I bought ones from Princess Auto and changed the angle to get the wheel clearance I wanted. I made a couple of slits with a grinder & cut off disc. That made the fenders quite flexible. Welding them to close the slits will be pretty straight forward and will be the final step when everything else is in place.


I fabricated 4 tabs to attach each fender to the running boards. Each one has rubber washers to provide a bit of cushion. The fenders will be tied back into the box eventually. They will also be painted black and will have black hardware.


This pic shows an attachment to the Uni-strut … an aerial / flag pole for when traveling!

 
  • Like
Reactions: Ozzie H and Road

PCO6

Rank V
Launch Member

Member III

2,268
Newmarket, Ontario
First Name
Stew
Last Name
Beatty
Member #

12534

Here I am sizing up part of where the kitchen will be. Another portable counter will be at a right angle along the top of the fender. The kitchen canopy is a Coleman 5'x7' and will be independent of the trailer.


I built the tailgate in situ vs. on my welding table as it was a lot easier to get the correct gaps this way. It's often said that there are 3 things in life that you just can't get enough of and 1 of them is clamps.


The tailgate latch / lock is a simple one that's used for utility boxes. Next up is to make the pin for the latch to lock to and to install the rubber weather sealer When this is complete I will purchase the aluminum sheets to skin both sides of the tailgate.


I'm about to start on the tongue box and racks for water tanks, coolers, etc. and do the electrical connections.

This is a driveway project and I'm just trying to get as much done on this job and others as I can before the snow flies. I won't likely get into building the top until the spring. I guess the good thing is that will give me more time to design it. I don't currently plan to put a roof top tent on it as I prefer a larger tent that I can stand up in. That could change though. I'll more likely use the top for bike and kayak storage.
 

PCO6

Rank V
Launch Member

Member III

2,268
Newmarket, Ontario
First Name
Stew
Last Name
Beatty
Member #

12534

I completed most of the tailgate today. I had to make a catch plate to bolt to the rear post for the latch to grab. I started with a piece of angle iron and basically cut away all but what I needed for the catch. I then bent the catch portion until it caught the latch pin. With the weather strip the tail gate is now water tight, rattle free and I can lock it.


Next up was to mount the licence plate. I started with an old backing plate from an MGB and a piece of 14 gauge sheet metal. Both came from my metal scrap pile. I also used an LED licence plate light from Princess Auto.


I cut the sheet metal to size with my modified metal shear ( http://www.garagejournal.com/forum/showthread.php?t=284652
). This thing is fast and works great for plate up to 3/16".


I plug welded the pieces together and sanded them down for painting.


I then welded a couple of brackets to the tailgate frame so I could attach the licence backing plate.


I attached the aluminum skin to the outside of the tailgate and added a rubber hose to act as a conduit for the licence plate wiring on the back side of the tailgate. The back side will eventually be skinned with aluminum and this hose will be covered.


Here's how it turned out. Like the trailer box, the tailgate is skinned with 14 gauge aluminum. The trailer isn't on the road yet but it's already licensed. The laws for licensing a home made trailer in Ontario are WAY TOO EASY. All you have to do is tell the MTO what you made, or are even thinking of making, what colour it is and give them $25. No questions are asked about the design, the materials, the axle(s), tires, lighting, etc. It makes no sense ... and the licence is good for the life of the trailer.


Next up are the running boards; stay tuned.
 
Last edited:

PCO6

Rank V
Launch Member

Member III

2,268
Newmarket, Ontario
First Name
Stew
Last Name
Beatty
Member #

12534

I finished the left side running boards today, although I'm not sure if that's the right name for them. They are strong enough to stand on. I don't plan to do that but I'm sure someone will!

This is the front one. As mentioned, the square tube is from an old BBQ stand. I like to repurpose things when I can plus it beat having to bend the tube myself. The rest of the fame is angle iron. The covering is 14 gauge sheet metal that I plug welded to the running board frame after spraying both pieces with weld through primer. The boards themselves are bolted to the trailer frame and the fender is then bolted to the boards. All 3 pieces can be removed quite easily.


This pic shows the rear running board which was constructed in the same manner. With the front and rear pieces in place I'll now be able to finish the fender. All that's required here is to weld the slits that allowed me to reshape the fenders closed. The fenders and running boards will be painted black and bolts will be replaced with ones that are also black. Note that I've moved the propane cylinder to the front running board. Now that I've figured out the kitchen layout this is likely where it will stay.

The welding magnet shows where I have to add a small extension to the bumper.


I'll probably tackle the utility box, and other things that will be mounted on the tongue next so more to follow.
 

PCO6

Rank V
Launch Member

Member III

2,268
Newmarket, Ontario
First Name
Stew
Last Name
Beatty
Member #

12534

I’ve made a bit of progress in the last week or so. Picking up where I left off, I added a small extension to the rear bumper for it to line up with the running board.


I then welded the slits I cut into the fenders shut. This really firmed them up.


I installed the fender on the left side and this is where things currently stand.


I made a bracket for the propane tank and installed it on the front left running board. It’s based on a couple of turnbuckles which makes it easy to remove the cylinder when needed. I have yet to make the lock which will secure one turnbuckle to the other so they won’t turn. The rubber pad is to elevate the cylinder above the running board (easier on the paint).


I added spot lights to the rear running boards. These will run off of the trailer battery and will be used to light the camp site when needed. There is a large thumbscrew on the underside of the running board which allows me to rotate the light and retighten it.


Other lights are being installed as I go as is the wiring, switches, fuses, etc. Everything seems to require a bracket of some sort to be fabricated.


This shot shows the start of the tongue box. There is a lot more to come in this area so stay tuned.

 
  • Like
Reactions: phxdsrtrat

PCO6

Rank V
Launch Member

Member III

2,268
Newmarket, Ontario
First Name
Stew
Last Name
Beatty
Member #

12534

After a bit of a break I started to build the lid. Once I figured out how I plan to use it the lid was pretty straight forward to build. I’ll be carrying kayaks and bikes vs. a roof top tent. I prefer a tent that I can stand up in.


I started by cutting and predrilling most of the parts.


I then tacked them together using the trailer box as a jig.


I decided to hinge it from the passenger’s side. I built the tailgate to hinge from the right side to match the tailgates of my TJ & LJ so it made sense to do the lid the same way.


I wasted way too much time trying to find suitable hinges. I finally just grabbed some scraps of metal and played with them until I came up with something that worked. This is what I came up with.


I had to build the sides of the lid before I could weld the hinges on. I built the sides to also be part of the rack. The sides are 1/8” steel and run the length of the box. I started by lightly spraying them black and then taping them to get a general sense of how they would look. I planned to cut out the areas that are black.


I did that by making a plywood buck of sorts. It acted as a bench and drilling surface. I screwed both sides of the rack (2 sheets) to the buck and started drilling with a hole saw. Doing both pieces together ensured both sides would be the same.


I then separated the sides and cut out the rack openings with a grinder with a cutting disc.


Here’s what the buck looked like … before I threw it in my fire pit.


There’s a lot more to do but the hinges are on and the lid is starting to take shape. (Note – the front & rear corners of the rack need to be cut off on an angle yet)


The hinges are welded on and it now lifts from the right side.


I used a pair of 12V actuators to lift the lid. I wasn’t to sure what the best angle would be so I drilled a lot of holes (way more than I’ll need) in the lift brackets before I welded them in. The lid goes up in about 3 or 4 seconds.


That’s about where the lid stands for now. I have some parts to finish welding and then I’ll add the deck (top) before I paint and seal it. I’ll then add the cross members for the kayaks. Lots to do yet!
 

PCO6

Rank V
Launch Member

Member III

2,268
Newmarket, Ontario
First Name
Stew
Last Name
Beatty
Member #

12534


I also took it on its maiden voyage ... all the way from my front yard to my back yard!
 
  • Like
Reactions: TNjohn

PCO6

Rank V
Launch Member

Member III

2,268
Newmarket, Ontario
First Name
Stew
Last Name
Beatty
Member #

12534

I finished off the kitchen table a few days ago. I started with 3 of these common small aluminum camp tables. I cut them up and reassembled them with some aluminum channel underneath as one 23” x 60” table. This thing is ridged and weighs next to nothing. It also stores straight up and down on its side in the trailer box so it takes up very little space. It also matches my Cabella’s sit down “dining” table.


I welded some angle brackets to the box frame to support the table. These brackets will also support the bike racks when I am traveling. The racks will come off to support the table when I’m camping.


Here's the table in place.


… and the removable struts underneath that support it. They’re also adjustable so I can level the table. This table can easily take the weight of anything I’ll be putting on it (stove, BBQ, cooler, etc.).


PCO6

Rank V
Launch Member

Member III

2,268
Newmarket, Ontario
First Name
Stew
Last Name
Beatty
Member #

12534

Thanks Don. Lots to do yet ... but I'm getting there!

Stew
 
Last edited:

PCO6

Rank V
Launch Member

Member III

2,268
Newmarket, Ontario
First Name
Stew
Last Name
Beatty
Member #

12534

I’ve made some progress on the “power box” (for lack of a better term). It actually serves a couple of purposes. I have about 16” of space tongue space in front of it so there’s plenty of room to strap down a cooler or something else on a temporary basis.


I started by attaching a bracket to each side to hold a pair of water tanks. I cut down a rear hitch type carrier to make the brackets. I actually bought the carrier at Princess Auto to use for its intended purpose. It was badly made (twisted) though and I was going to return it. Instead for the price (cheap) I figured I’d cut it up and make something out of it.


I bolted them to the box and the water tanks fit perfectly. This pic also shows the external parts of the water pump. It’s a submersible 12V aquarium pump that provides surprising good pressure and flow. Almost as good as at home! I have both 10 litre and 20 litre tanks so there will be no shortage of water when I need it.


I lined the box itself with ½” plywood. The floor is now lined with rubber sheet (see scrap piece).


It’s not quite done but this shows the basics. In front are a Group 31 Marine/RV deep cycle battery and a 2000W inverter. Across the back wall from left to right are the input line from the 100W solar panel, a 120V battery charge, a 12V ground point for the items in the box itself box, a solar controller, a fuse panel for the box itself (there will be another on the trailer box), a on/off switch for the trailer box electrics and the 12V output line to the trailer box. In the bottom corner is a junction box and switch for the ship to shore power. There’s also an LED light on the underside of the lid.


Here’s a side view of the box. Most of the wiring is now in corrugated plastic loom and attached to the box wall but there are still a few loose ends. It’s only electrical stuff. What could go wrong … eh?


This is the front of the box. On top is a 12V socket and 2 USB ports. The bottom is for the ship to shore electrical line.

 
Last edited:
  • Like
Reactions: David S

PCO6

Rank V
Launch Member

Member III

2,268
Newmarket, Ontario
First Name
Stew
Last Name
Beatty
Member #

12534

I finished the interior side of the tailgate yesterday. I started by lining most of it with 1” of plywood primarily to give it some weight and to provide a solid base for mounting items to it. I used PEX tubing as a conduit for the licence plate light wiring. I ran a few extra wires in it for a 3rd brake light that I plan to install later. I then cut a sheet of aluminum to match the exterior covering.


I used a 4 wire trailer harness for the tailgate wiring. This will make it a lot easier if I ever need to take the tailgate off. The plug is now attached to the underside of the fire extinguisher with Velcro. This keeps it up and out of the way so the harness won’t conflict with opening and closing the tailgate.


Here are the items that I attached to the interior side.


I used a combination of Quick Fists and brackets that I made for the axe and shovel. The brackets are Unistrut ceiling anchors that I added 3/8” galvanized threaded rod with thumb screws to (I still need to shorten the rods). Quick Fists just didn’t fit securely on one end of both items. The flashlight is held in place with Maglite clips. The plate in the middle is removable and allows me to access the wiring harness.

 
Last edited:
  • Like
Reactions: GHQ1

old_man

Rank V
Launch Member

Member III

2,827
Loveland, Colorado
First Name
Tom
Last Name
Houston
Member #

8300

Ham/GMRS Callsign
WØNUT Extra
Nice work. Nice to see another person who fabricates instead of buying everything.