Enthusiast I
Hello everyone! After watching and being inspired by Michael's rear drawer/platform build in his Land Cruiser I decided to give it a go in my GX460. I purchased the aluminum platform lock plates from the OB store. I am bad about just jumping in and working without taking pics but I figured I could explain a bit of how I did what I did.
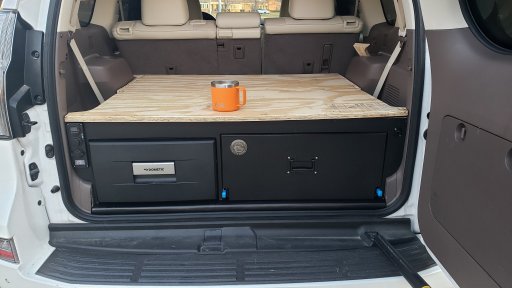
My GX460 needed the third row removed - that was pretty quick work. Next, I made a template of the floor from cardboard and transferred it to 1/2" sanded birch ply. The floor isn't flat so I then used a hole saw to cut out 2" diameter discs of both 1/4" and 1/2" ply that I used to make risers for the floor. I used the existing 4 threaded holes in the rear of my GX and the bolts go right up through the middle of the stacked disc risers I made. tip: once you have the floor template cut out - get 4 bolts that fit the existing threads and cut the tops off of them. Chuck them into a drill and with a grinder wheel make the tops pointy. Then you can hand thread them into the existing GX holes (pointy side up), lay your plywood base on top and press down to perfectly transfer where the holes need drilled. The last step probably wasn't necessary but there are also 2 existing holes (not threaded) that you can use towards the front of your new base. Get on amazon and buy a cheap RivNut setting tool and you can install threaded sleeves into the existing holes. That gave me 6 anchor points for the floor. Not wanting to see the exposed plywood base I then heat wrapped it in 1/8" black PVC sheeting (something I also did to the face of the finished drawer base).
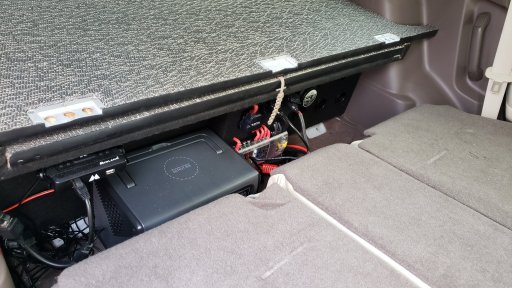
Power was the next big project. I have a Dometic CD30 drawer frig, Midland GMRS radio, dedicated charging port for my Bluetti EB55 + a few other accessory 12v and USB jacks built in to my drawer system. I came off my battery with oxygen free 4 gauge wire (both positive and ground) to a 60AMP circuit breaker under the hood. I then ran the power and ground back under the vehicle and up into the rear. I used two layers of braided cable sleeving to protect the wires. These then run into a Low Voltage Disconnect (set to turn off at 12v) and then into a Blue Sea Systems fuse block and then off to the various items needing power. I am NOT an electrical expert - I basically copied ALL of Michael's steps and recommendations on the OB YouTube videos for running power to the rear (what a great resource!!)
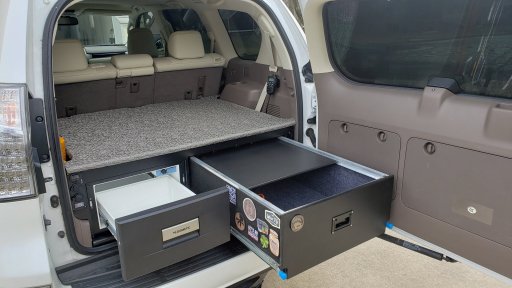
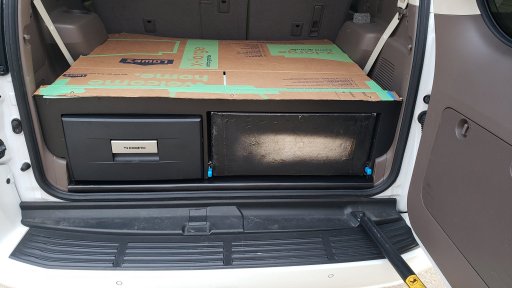
I framed up my drawer/platform with 1/2" birch plywood. All connections are glued and then inside and outside corners are fiberglass reinforced. I basically just built the frame around the Dometic CD30 and then what was left would be the drawer. I framed up the drawer the exact same way except I installed the drawer floor into a 1/2" rabbit cut into the drawer frame. I also installed 2 spans of 1/4" all thread from side to side, under the drawer floor to keep the sides pulled in and keep the drawer floor from sagging at all. Again, all inside/outside corners were fiberglass reinforced. I built the drawer to close flush with the face of the base - but the Dometic sticks out about 1/2" proud of the face of the base. I did this because I wanted to finish the drawer face with a 1/2" sheet of black PVC sheeting. With this affixed to the drawer - the frig and drawer both have a matching black plastic look. I finished building the base by skinning the face with 1/8" black PVC sheeting (easy to just glue it on and then use a trim router to perfectly finish it off). With the design having a nesting extension platform, I had to then add a 1.5" frame to the top left, right and rear (not the front side). This added the 'void' where the platform would stow away. I added 3 2" wide UHMW plastic runners for the extension to slide easily on. The sides of the base, the outside and inside of the drawer were then covered in black automotive carpeting (which by the way lets you stick velcro patches to if you want).
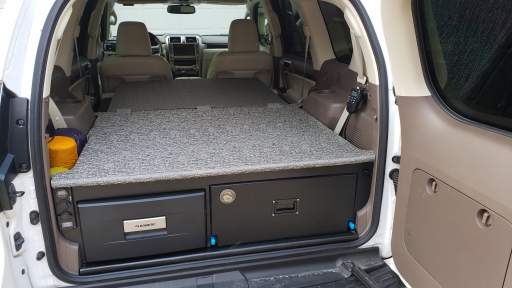
I templated out the top the same way that I did the floor in the first step. Took a sheet of cardboard and traced and cut and then taped in 'filler' pieces until I had a template for the top. Transfer this to 3/4" plywood and you are about done. I could not find a supplier for the awesome bamboo ply that Michael used (I am in Indiana) and had a hard time finding carpeting that matched my Lexus and didn't look cheap (I found out that Lexus doesn't sell OEM carpet like most manufacturers). I ended up using a woven vinyl on felt backing marine carpet from a company called Corinthian Marine. This needs glued down with a special solvent-free glue but once it's on - it is on. I also provides a bit of cushion/sound insulation which is nice. The color that almost perfectly matches the two tone interior in my GX460 is called 'Pampass Smoke' if anyone cares. They will send you free samples so you can get a great match. The platform extension was made from the same 3/4" ply and is basically just cut to fit the area that it 'nests' in - super easy. I installed the awesome aluminum platform brackets that Parnell made and offers on the OB store which gives it a really nice, finished and not DIY look.
That is basically it. My build is removable (it is in three parts - floor/base, cabinet frame, top platform) and I have not had to do a single permanent modification to my vehicle. While I have yet to use everything here is what is built in:
I think that is about it. I am incredibly grateful to the awesome resource that we all have in the OB forum and especially the YouTube channel. I never would have embarked on this project without first seeing how it could be done and how everything would come together. I am mainly use my rig for dispersed camping, fly fishing trips and bird hunting trips. Being able to build out just what I needed is tons of fun!
![20211117_145542[19018].jpg](/forums/data/attachments/220/220940-a2c4d5531764a5fb6fc857740573a951.jpg)
My GX460 needed the third row removed - that was pretty quick work. Next, I made a template of the floor from cardboard and transferred it to 1/2" sanded birch ply. The floor isn't flat so I then used a hole saw to cut out 2" diameter discs of both 1/4" and 1/2" ply that I used to make risers for the floor. I used the existing 4 threaded holes in the rear of my GX and the bolts go right up through the middle of the stacked disc risers I made. tip: once you have the floor template cut out - get 4 bolts that fit the existing threads and cut the tops off of them. Chuck them into a drill and with a grinder wheel make the tops pointy. Then you can hand thread them into the existing GX holes (pointy side up), lay your plywood base on top and press down to perfectly transfer where the holes need drilled. The last step probably wasn't necessary but there are also 2 existing holes (not threaded) that you can use towards the front of your new base. Get on amazon and buy a cheap RivNut setting tool and you can install threaded sleeves into the existing holes. That gave me 6 anchor points for the floor. Not wanting to see the exposed plywood base I then heat wrapped it in 1/8" black PVC sheeting (something I also did to the face of the finished drawer base).
Power was the next big project. I have a Dometic CD30 drawer frig, Midland GMRS radio, dedicated charging port for my Bluetti EB55 + a few other accessory 12v and USB jacks built in to my drawer system. I came off my battery with oxygen free 4 gauge wire (both positive and ground) to a 60AMP circuit breaker under the hood. I then ran the power and ground back under the vehicle and up into the rear. I used two layers of braided cable sleeving to protect the wires. These then run into a Low Voltage Disconnect (set to turn off at 12v) and then into a Blue Sea Systems fuse block and then off to the various items needing power. I am NOT an electrical expert - I basically copied ALL of Michael's steps and recommendations on the OB YouTube videos for running power to the rear (what a great resource!!)
I framed up my drawer/platform with 1/2" birch plywood. All connections are glued and then inside and outside corners are fiberglass reinforced. I basically just built the frame around the Dometic CD30 and then what was left would be the drawer. I framed up the drawer the exact same way except I installed the drawer floor into a 1/2" rabbit cut into the drawer frame. I also installed 2 spans of 1/4" all thread from side to side, under the drawer floor to keep the sides pulled in and keep the drawer floor from sagging at all. Again, all inside/outside corners were fiberglass reinforced. I built the drawer to close flush with the face of the base - but the Dometic sticks out about 1/2" proud of the face of the base. I did this because I wanted to finish the drawer face with a 1/2" sheet of black PVC sheeting. With this affixed to the drawer - the frig and drawer both have a matching black plastic look. I finished building the base by skinning the face with 1/8" black PVC sheeting (easy to just glue it on and then use a trim router to perfectly finish it off). With the design having a nesting extension platform, I had to then add a 1.5" frame to the top left, right and rear (not the front side). This added the 'void' where the platform would stow away. I added 3 2" wide UHMW plastic runners for the extension to slide easily on. The sides of the base, the outside and inside of the drawer were then covered in black automotive carpeting (which by the way lets you stick velcro patches to if you want).
I templated out the top the same way that I did the floor in the first step. Took a sheet of cardboard and traced and cut and then taped in 'filler' pieces until I had a template for the top. Transfer this to 3/4" plywood and you are about done. I could not find a supplier for the awesome bamboo ply that Michael used (I am in Indiana) and had a hard time finding carpeting that matched my Lexus and didn't look cheap (I found out that Lexus doesn't sell OEM carpet like most manufacturers). I ended up using a woven vinyl on felt backing marine carpet from a company called Corinthian Marine. This needs glued down with a special solvent-free glue but once it's on - it is on. I also provides a bit of cushion/sound insulation which is nice. The color that almost perfectly matches the two tone interior in my GX460 is called 'Pampass Smoke' if anyone cares. They will send you free samples so you can get a great match. The platform extension was made from the same 3/4" ply and is basically just cut to fit the area that it 'nests' in - super easy. I installed the awesome aluminum platform brackets that Parnell made and offers on the OB store which gives it a really nice, finished and not DIY look.
That is basically it. My build is removable (it is in three parts - floor/base, cabinet frame, top platform) and I have not had to do a single permanent modification to my vehicle. While I have yet to use everything here is what is built in:
- Dometic CD30 drawer refrigerator
- heavy duty 24"w x 36"d x 11"h drawer on 220lb drawer slides
- Midland GMRS radio (I have split the RJ45 input and have a jack installed in the rear of vehicle + had a jack installed in a black switch plate in my dash. 'SolveFunction' on Etsy actually 3d printed the jack for my dash - I highly recommend him!!
- 12v outlets for the Dometic and to charge the Bluetti when driving - then I can plug the Dometic into the Bluetti while camping. This is all behind the second row seats out of sight
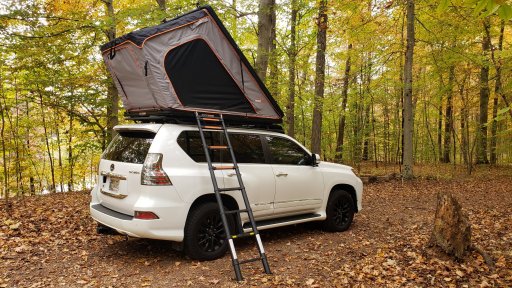
- platform fully extended is 5' 9" long x 48" wide. Not completely long enough to stretch out on but my main reason for this space was to have a flat place for my two dogs to sleep (while I am in the RoofNest above). I have full coverage Cordura interior protector that lays over this space (and even protects the doors)
- Additional 12v jack, USB jacks and voltage meter on rear face of drawer system.
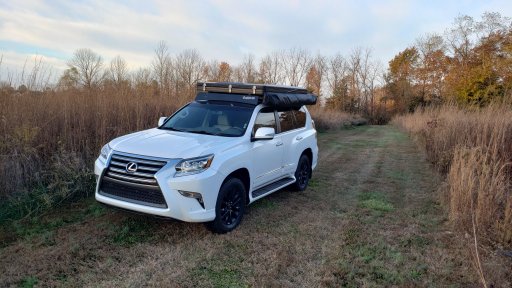
I think that is about it. I am incredibly grateful to the awesome resource that we all have in the OB forum and especially the YouTube channel. I never would have embarked on this project without first seeing how it could be done and how everything would come together. I am mainly use my rig for dispersed camping, fly fishing trips and bird hunting trips. Being able to build out just what I needed is tons of fun!
Attachments
-
 582.5 KB Views: 22
Last edited: