

Contributor I
Intro Comments:
Hello there! Friends call me "six" and this is my build thread for the 5th Xterra I've owned since pre-ordering one of the first 700 SE's to ship in October of 1999. I've had an X (or 2) in the driveway every since. I am an Executive Creative Director, designer and professional photographer currently living in Pittsburgh PA but I split my time between PGH, NYC and SLC for work. I've done almost 900,000 miles in the seat of my Xterras over the past 20 years and finally decided the 15' Pro 4X would be going into the "forever garage" with my other toys. I just started building it out a few months ago once it hit 50k miles and was paid off. I'm not a mechanic, but am very mechanically inclined and use it as a means to get my hands dirty and escape my day to day corporate stress. I have done all the work up to this point myself, making good progress in my free time and weekends to get it to where it sits today. My goal is to have it finished by September 19' in order to make the trek out to Utah for a month of work and play.
Username: six60six
Make: Nissan
Year: 2015
Model: Xterra
Trim: Pro 4X
Color: Super Black
Purchase Date: July 2015
Factory Options:
• Leather Interior
• Rockford Fosgate Audio
• Fog Lights
• Auto-dim/compass mirror
• Reverse Camera
• Tow Package
• Rear cargo privacy cover
• Rear cargo organizer
• Side Molding
• Mud Flaps (Removed)
• Pro 4X Floor Mats
Legend:
Mark | Means
√ | Done!
> | In-progress
$ | Want
X | Removed/Destroyed
MODS
Suspension/Steering:
FRONT:
Lift: 3"
• √ Radflo 2.0 Coilovers with 700# Eibach springs set to 2" lift with Nisstec 1" top hat spacer
• √ Trimmed coil buckets
• √ PRG Upper Control Arms
• √ Moog Lower Control Arms with greaseable ball joints
• √ Moog Inner and Outer Tie Rods
• √ Timbren Bump Stops
• √ Moog Greasable Camber Bolts
• √ Super Pro Sway Bar Bushings
REAR:
Lift: 3"
• √ Radflo Emulsion Extended Shocks
• √ Old Man Emu Dakar Leaf Packs
• √ NissTec Adjustable Shackles Set to Middle
• √ NissTec Shock Skids
• √ NissTec U-bolt Flip Kit
• √ Timbren Active Off-road Bump Stops
• √ Super Pro Full Poly Bushing Kit
• √ Off-Road Gorilla Rear Differential Breather Mod
• √ 3 Degree Steel Shims
Engine/Exhaust/Drivetrain:
• √ m205 3.36 Front Differential
• √ Nissan OEM V8 Pathfinder Front CV Half Shafts
• √ Airflow Snorkel
• $ aFe Mach Force XP Cat Back Exhaust
Brakes:
• √ Raybestos Element 3 Brake Pads
• √ Raybestos Specialty Brake Rotors
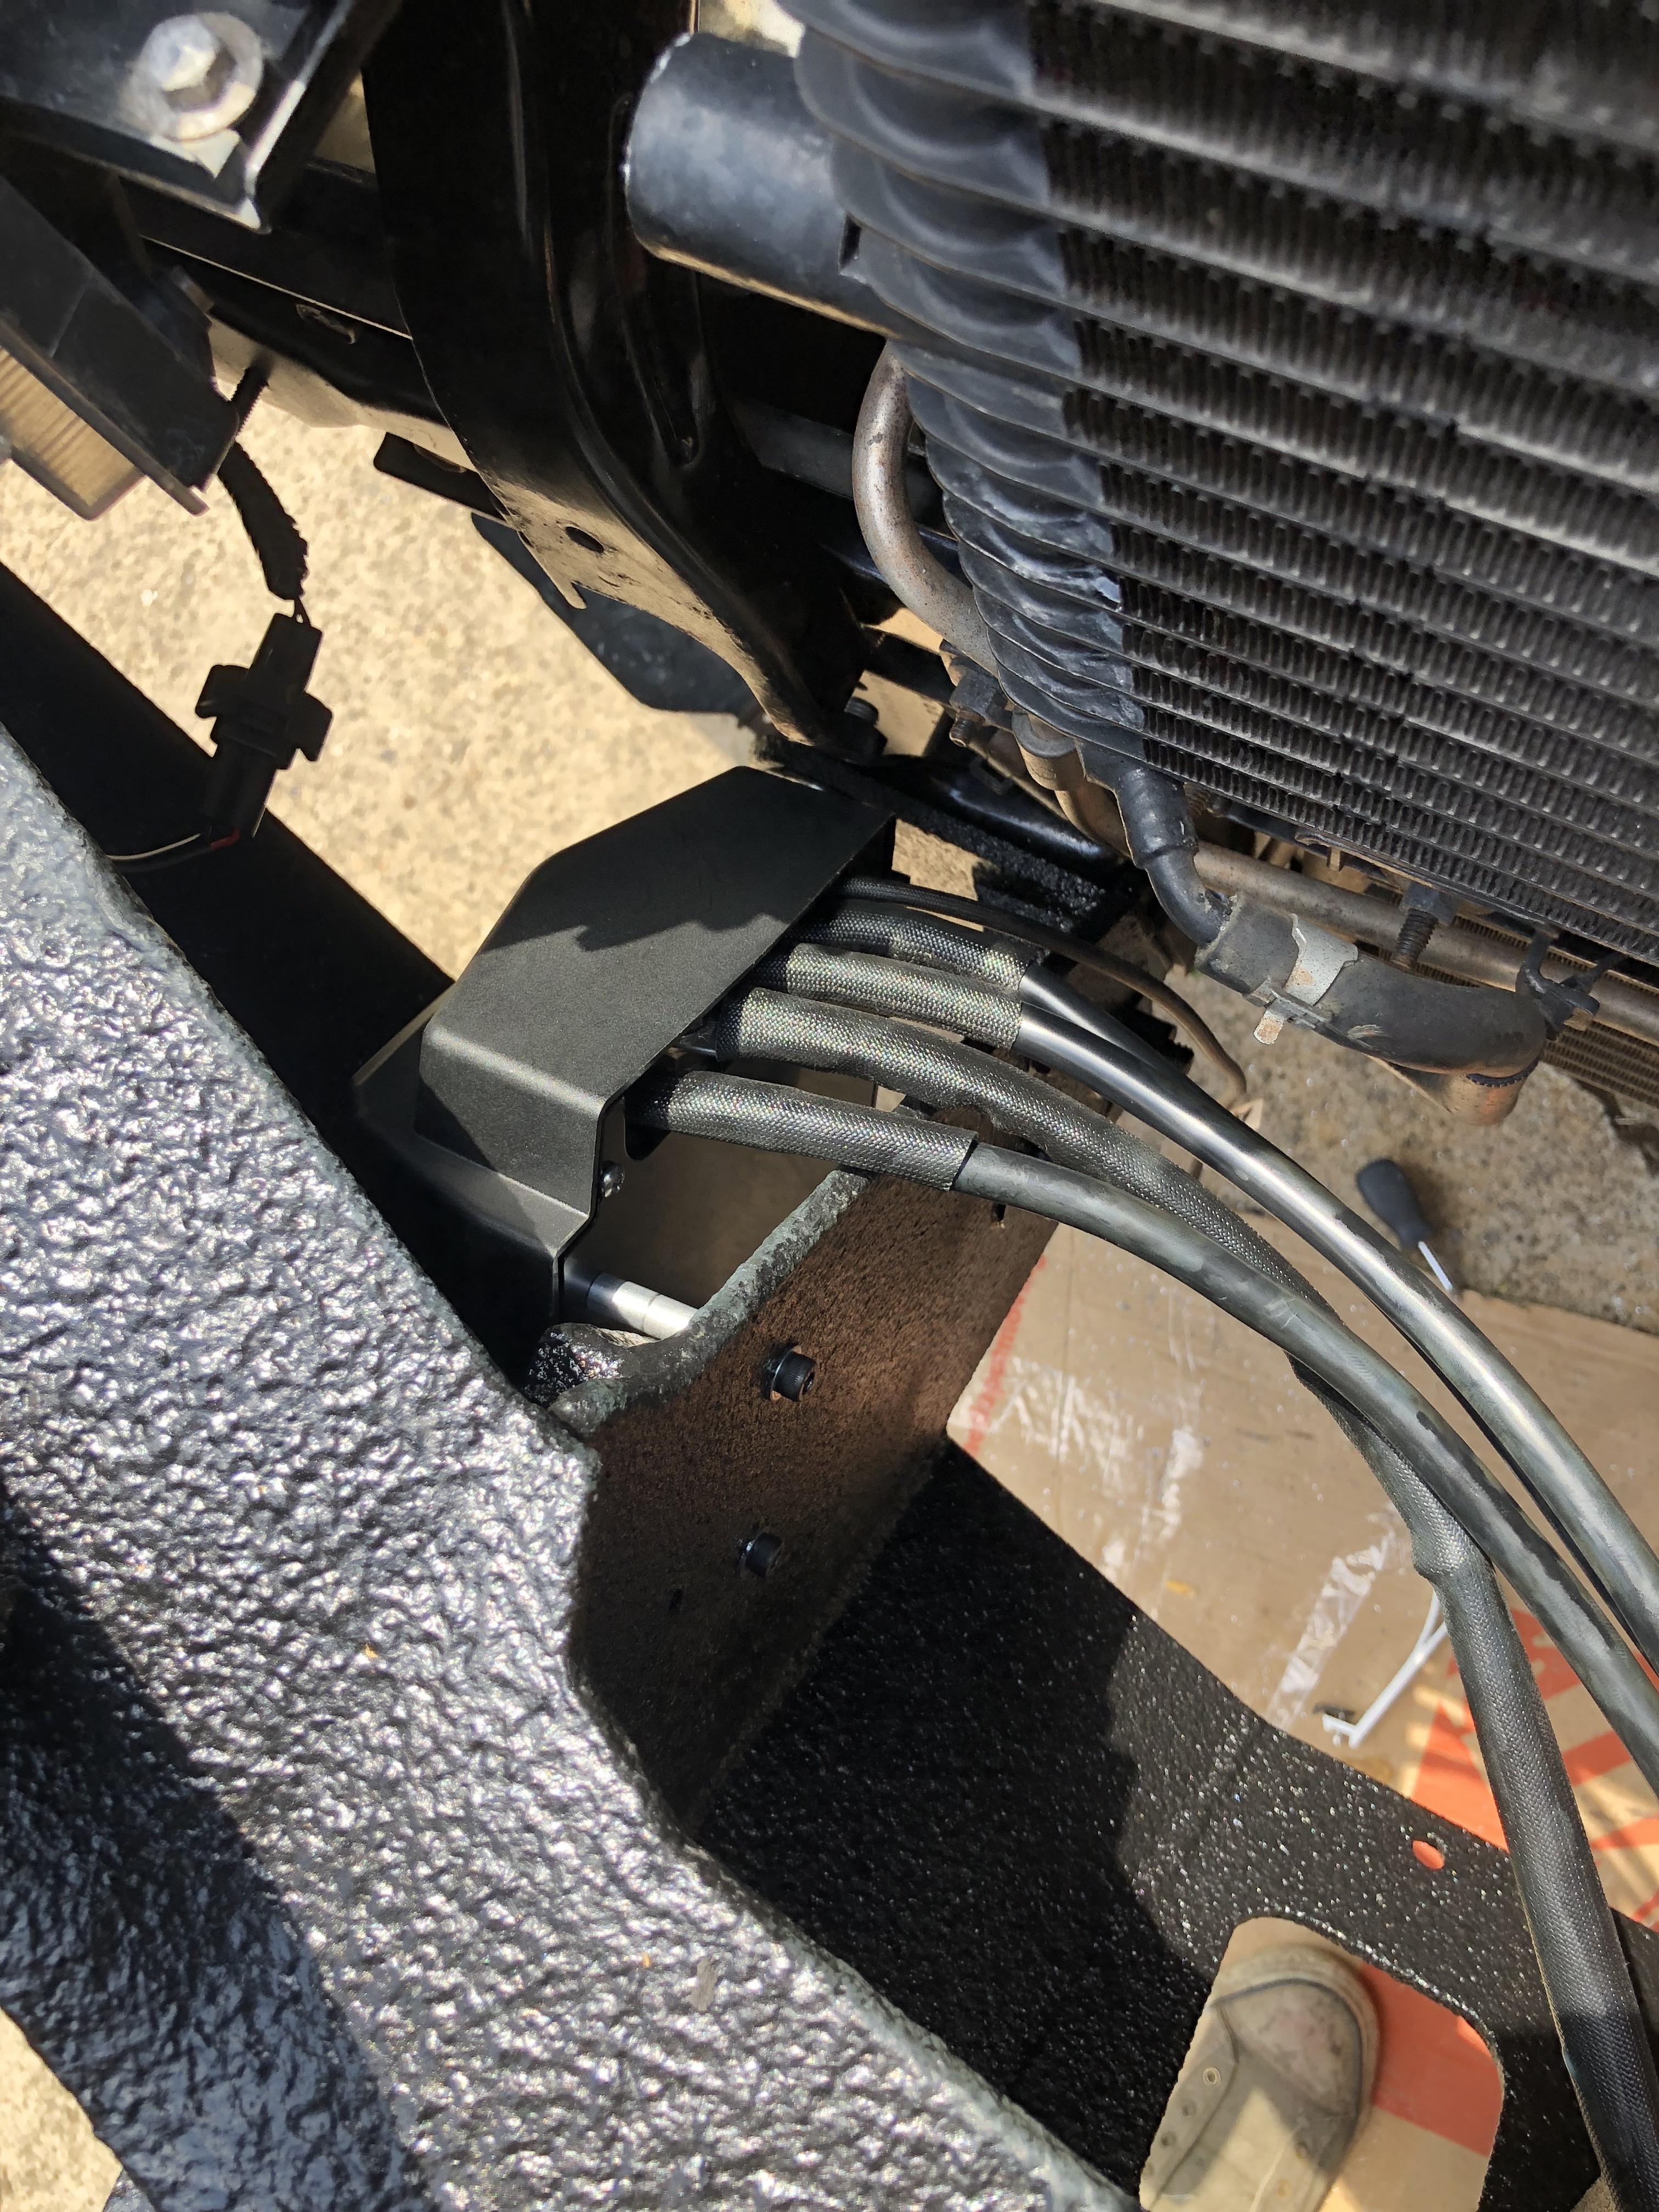
• √ NissTec Stainless Steel Braided Lines - Front & Full Rear
Wheels:
• √ Stock 2015 Pro 4X 2-Tone Charcoal Rims Including Spare
• √ 285/75R-16 BF Goodrich K02
• √ Spidertrax 1.5" Wheel Spacers Front + Rear
Electrical:
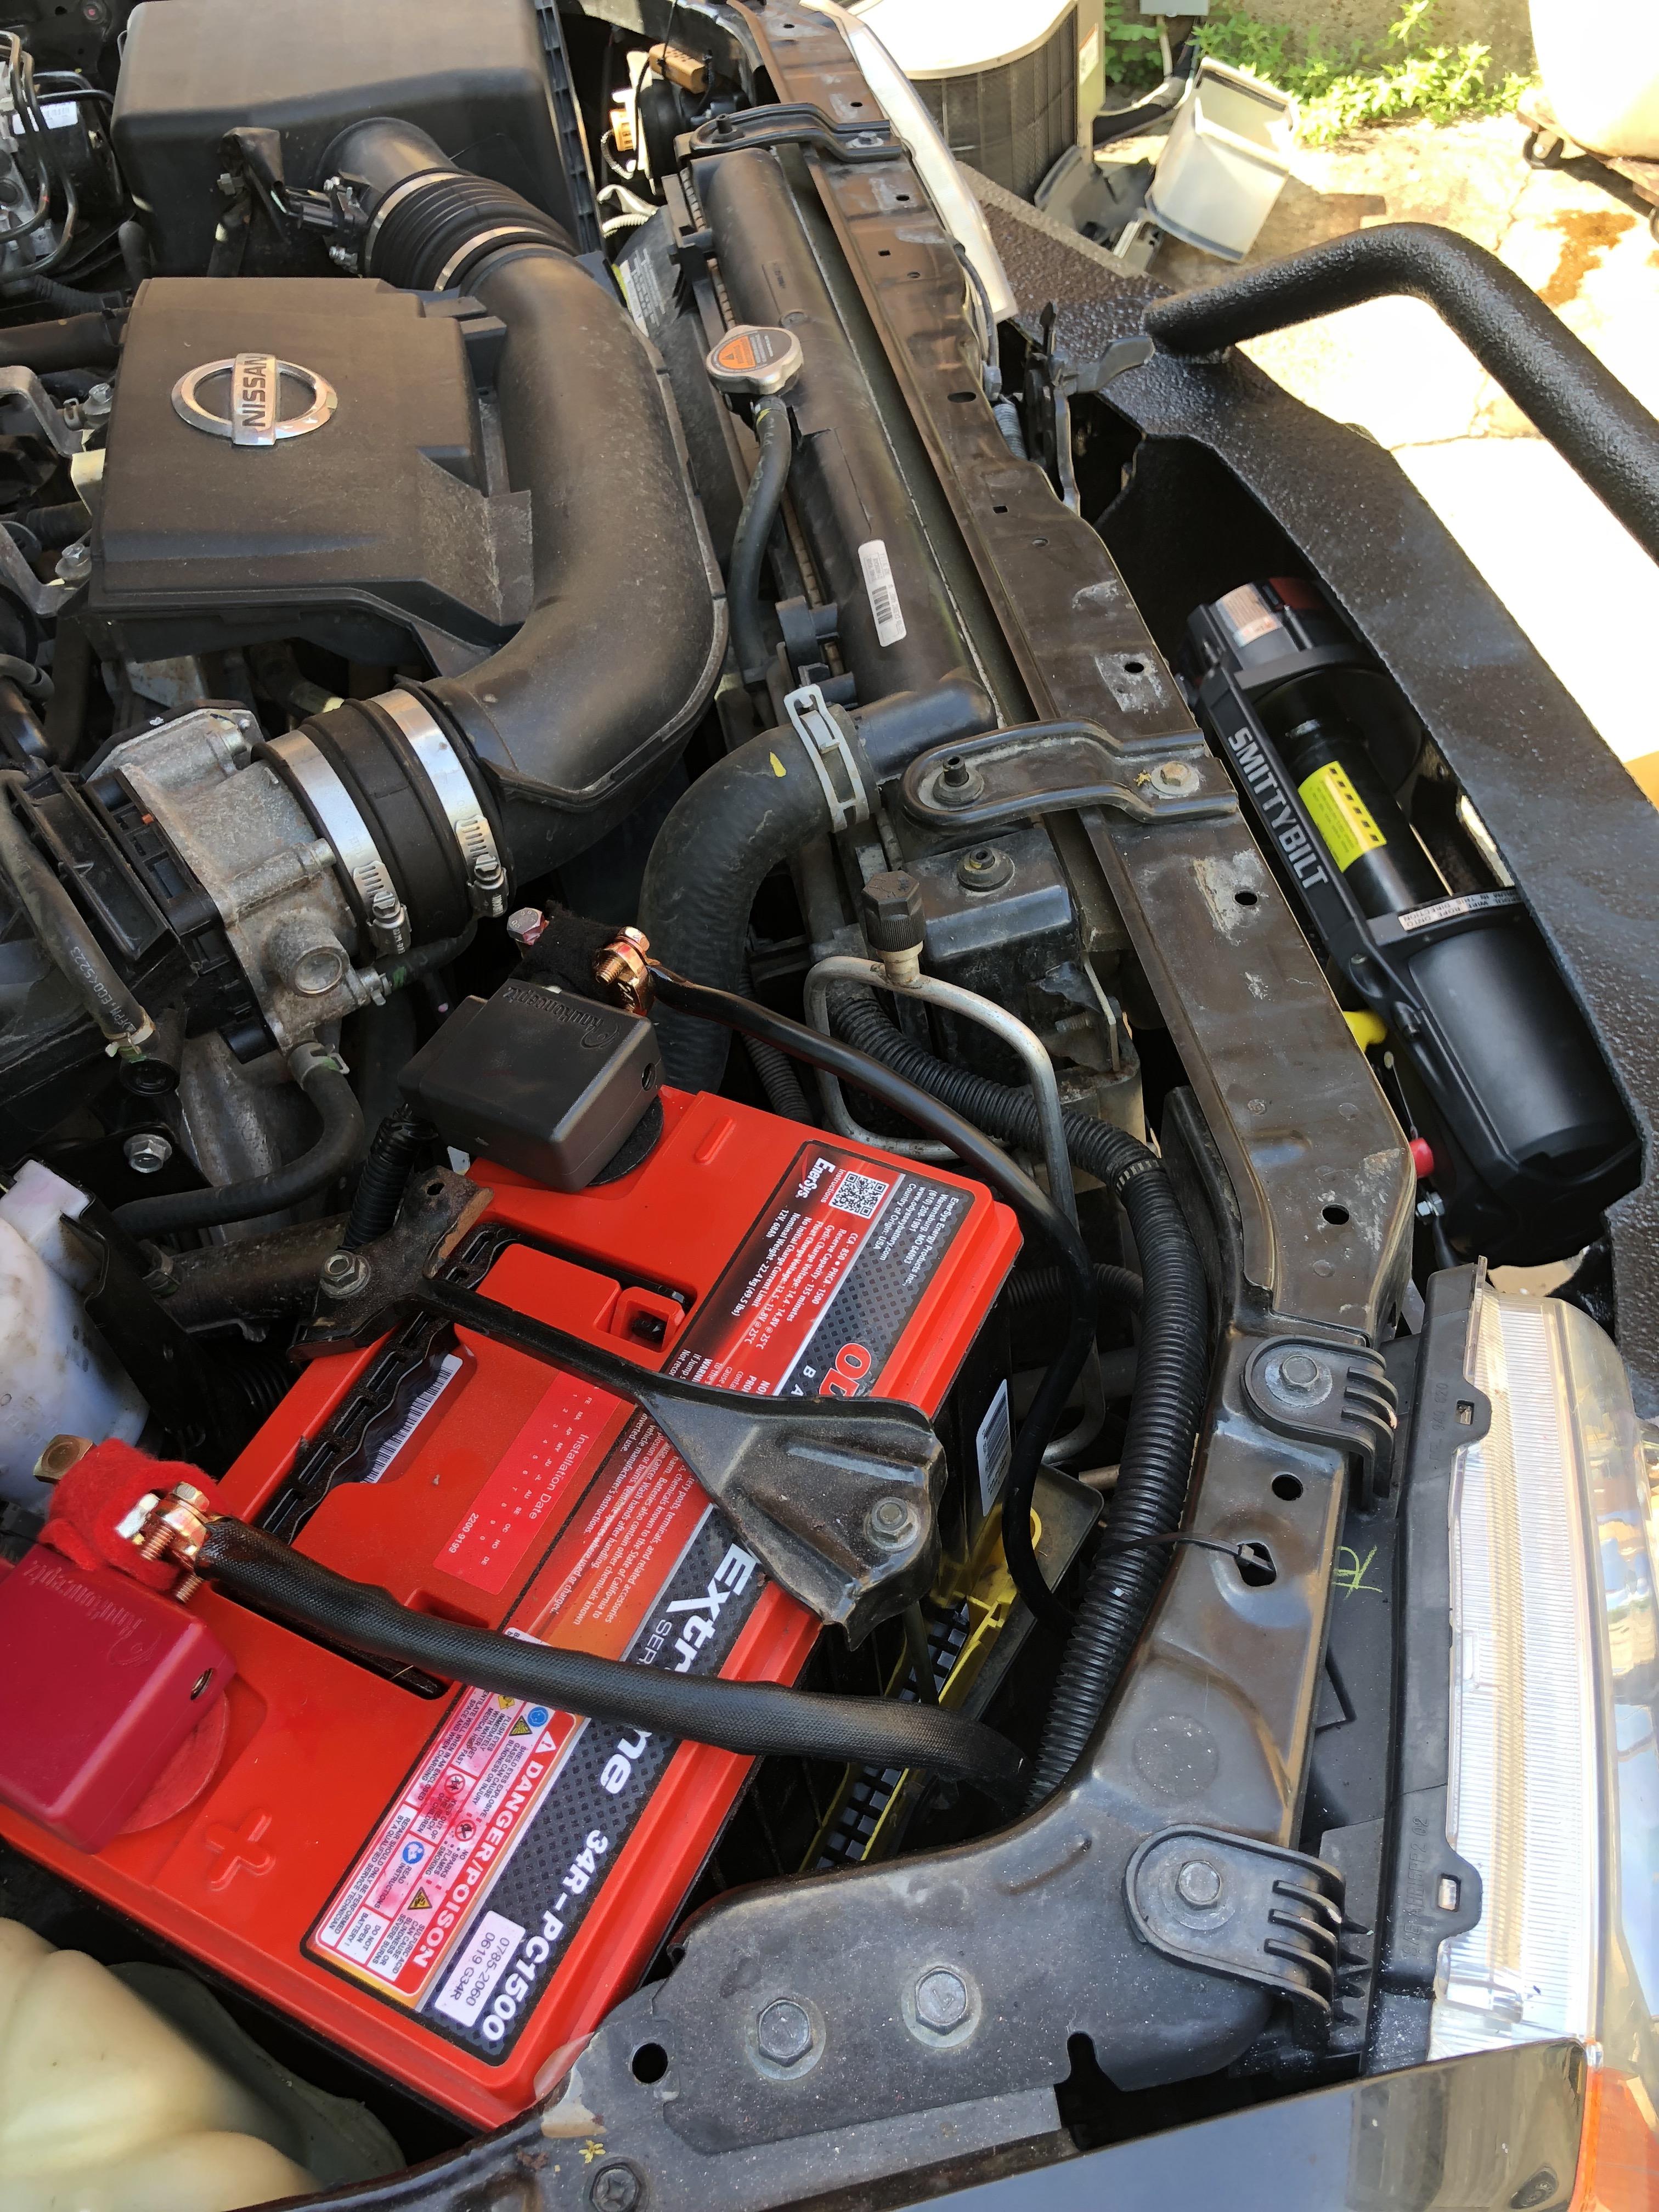
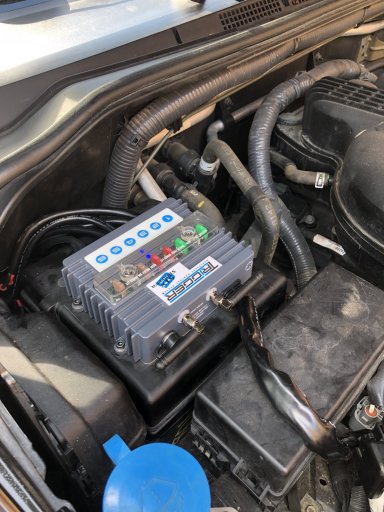
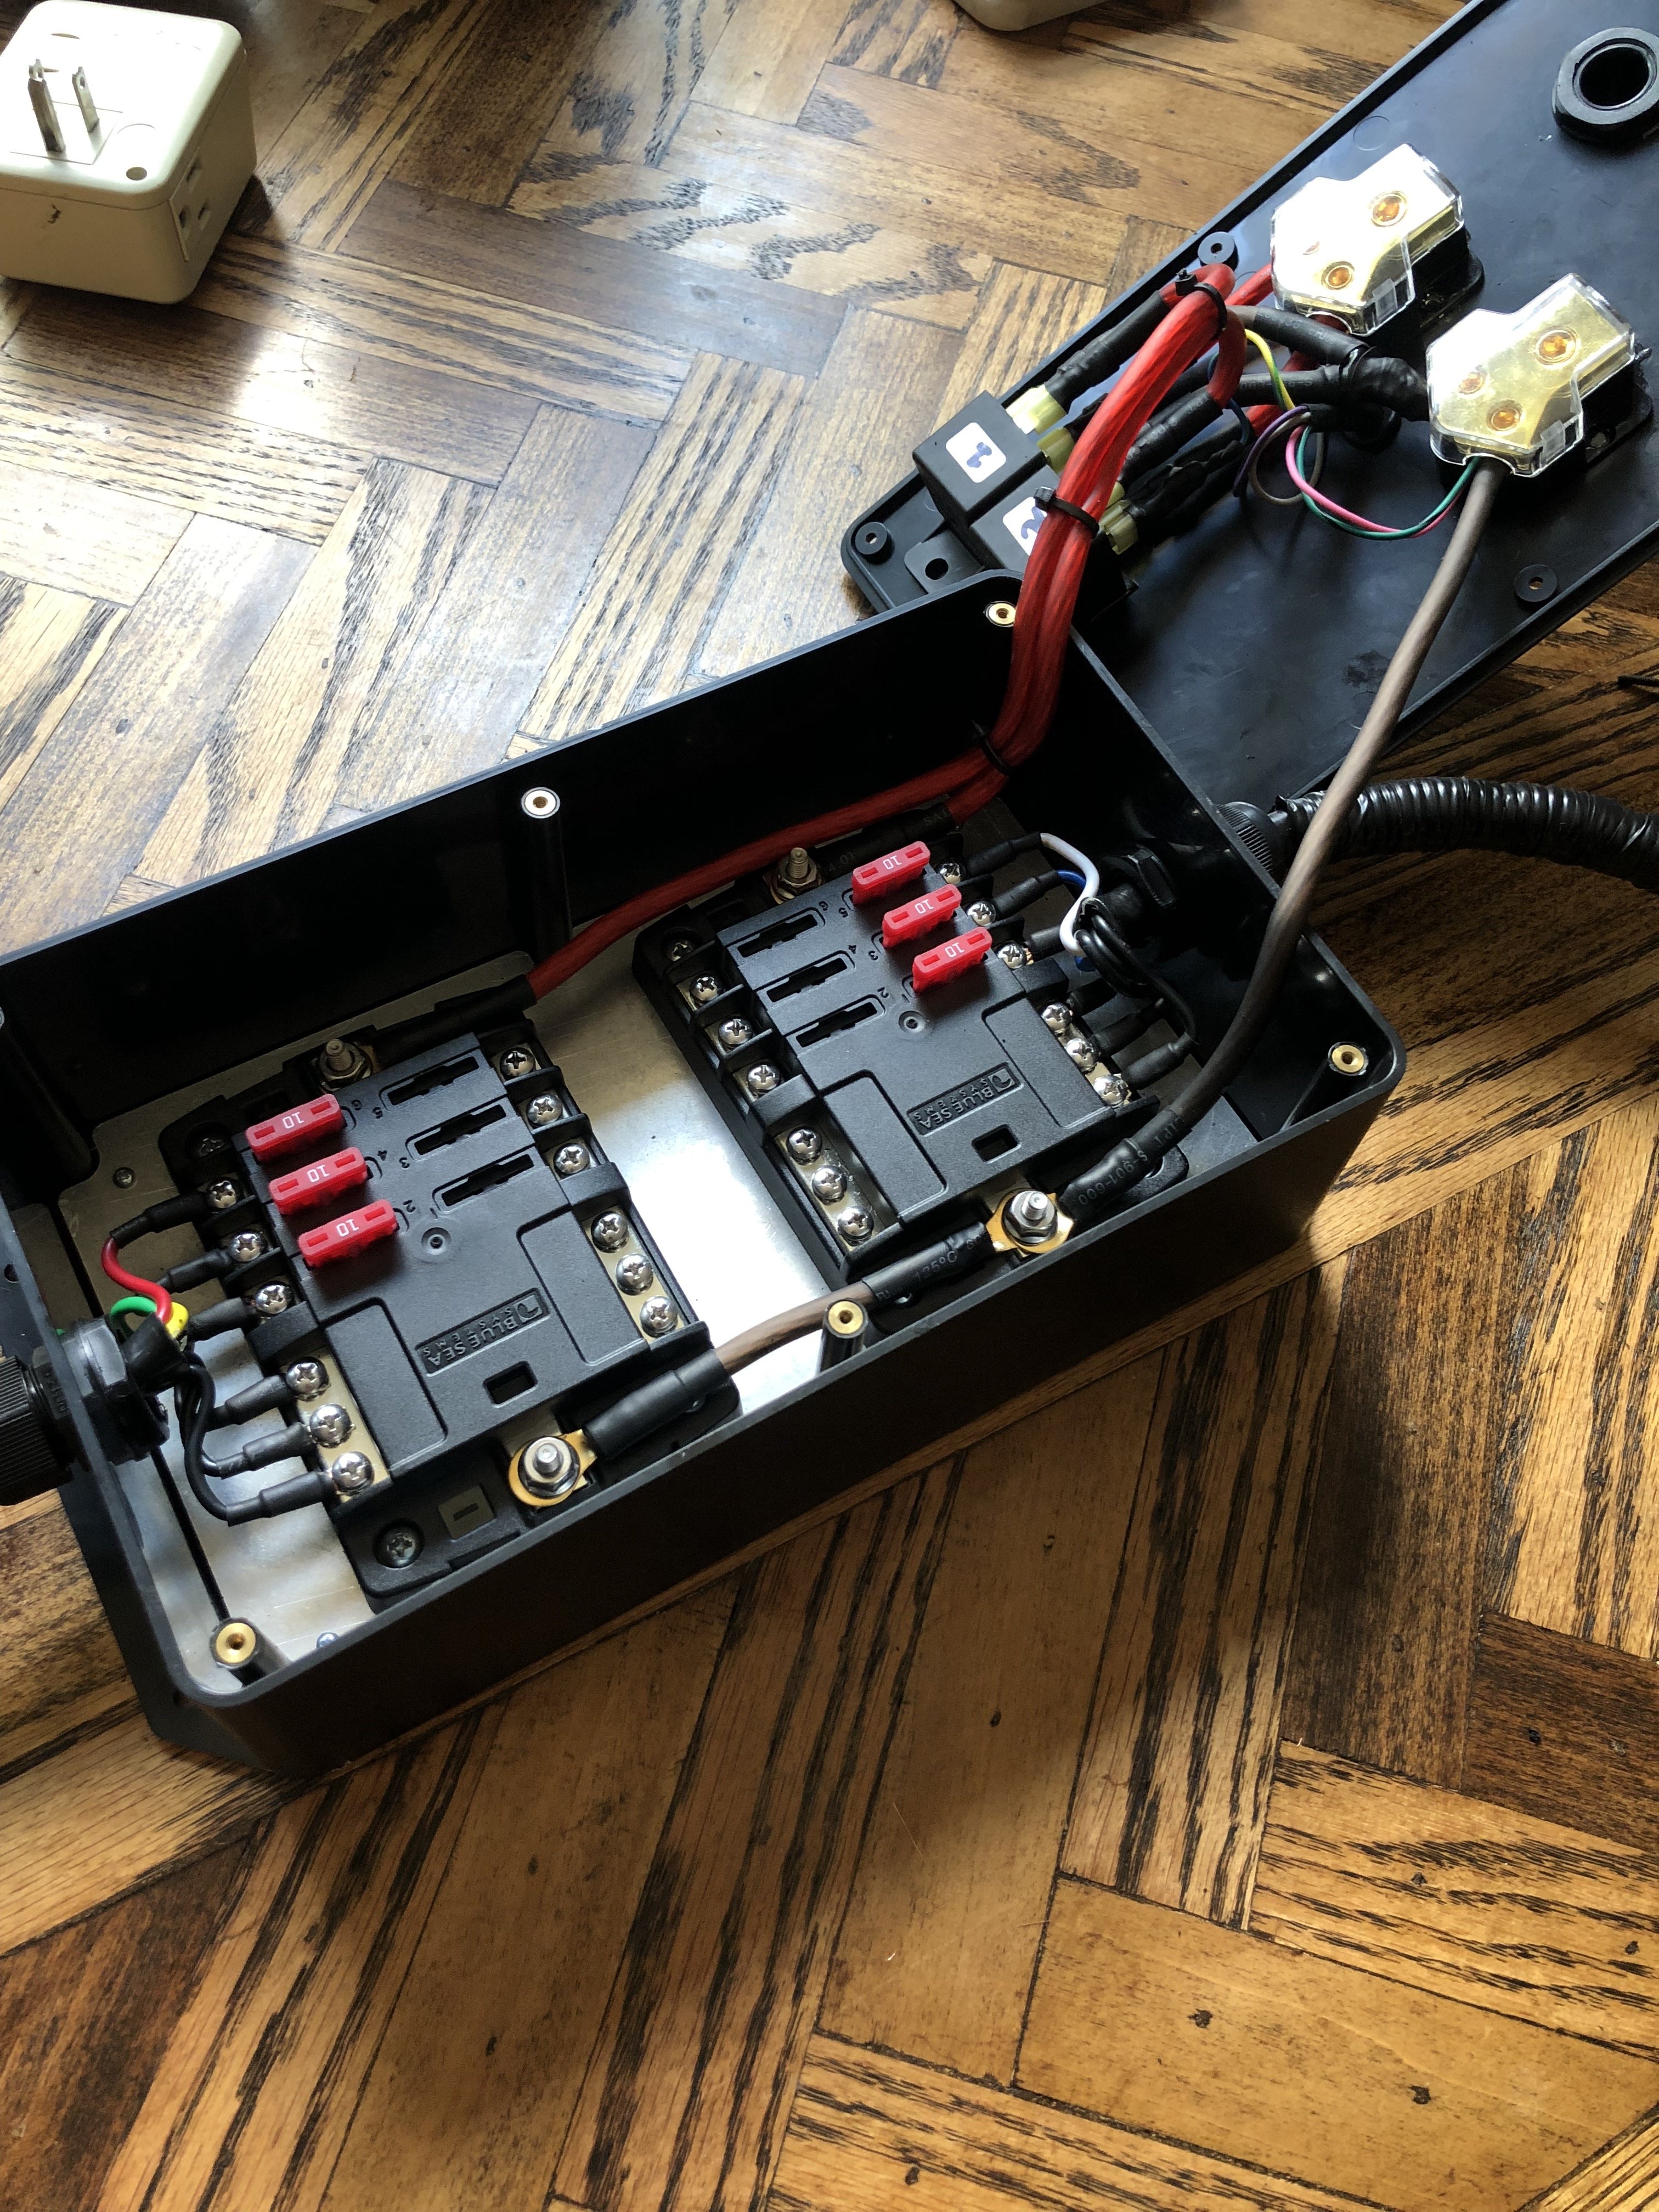
• √ Odyssey 34r-pc1500t Battery
• √ Ultimate Battery Terminals with Top Post Adapters
• √ 10" 0 AWG Extended Battery Lead Wires (Battery to factory harness)
• √ Morimoto 2 Stroke 2.0 LED Headlights
• √ Morimoto XB LED Projector Fog Lights
• √ Morimoto X-VF LED Amber Front Turn Signals
• √ Morimoto XB LED Amber Marker Lights
• √ Morimoto X-VF LED Red Rear Turn Signals
• √ Morimoto X-VF LED Red Brake Lights
• √ Morimoto XB LED Red Third Brake Lights
• √ Morimoto Festoon XB LED Interior Lights
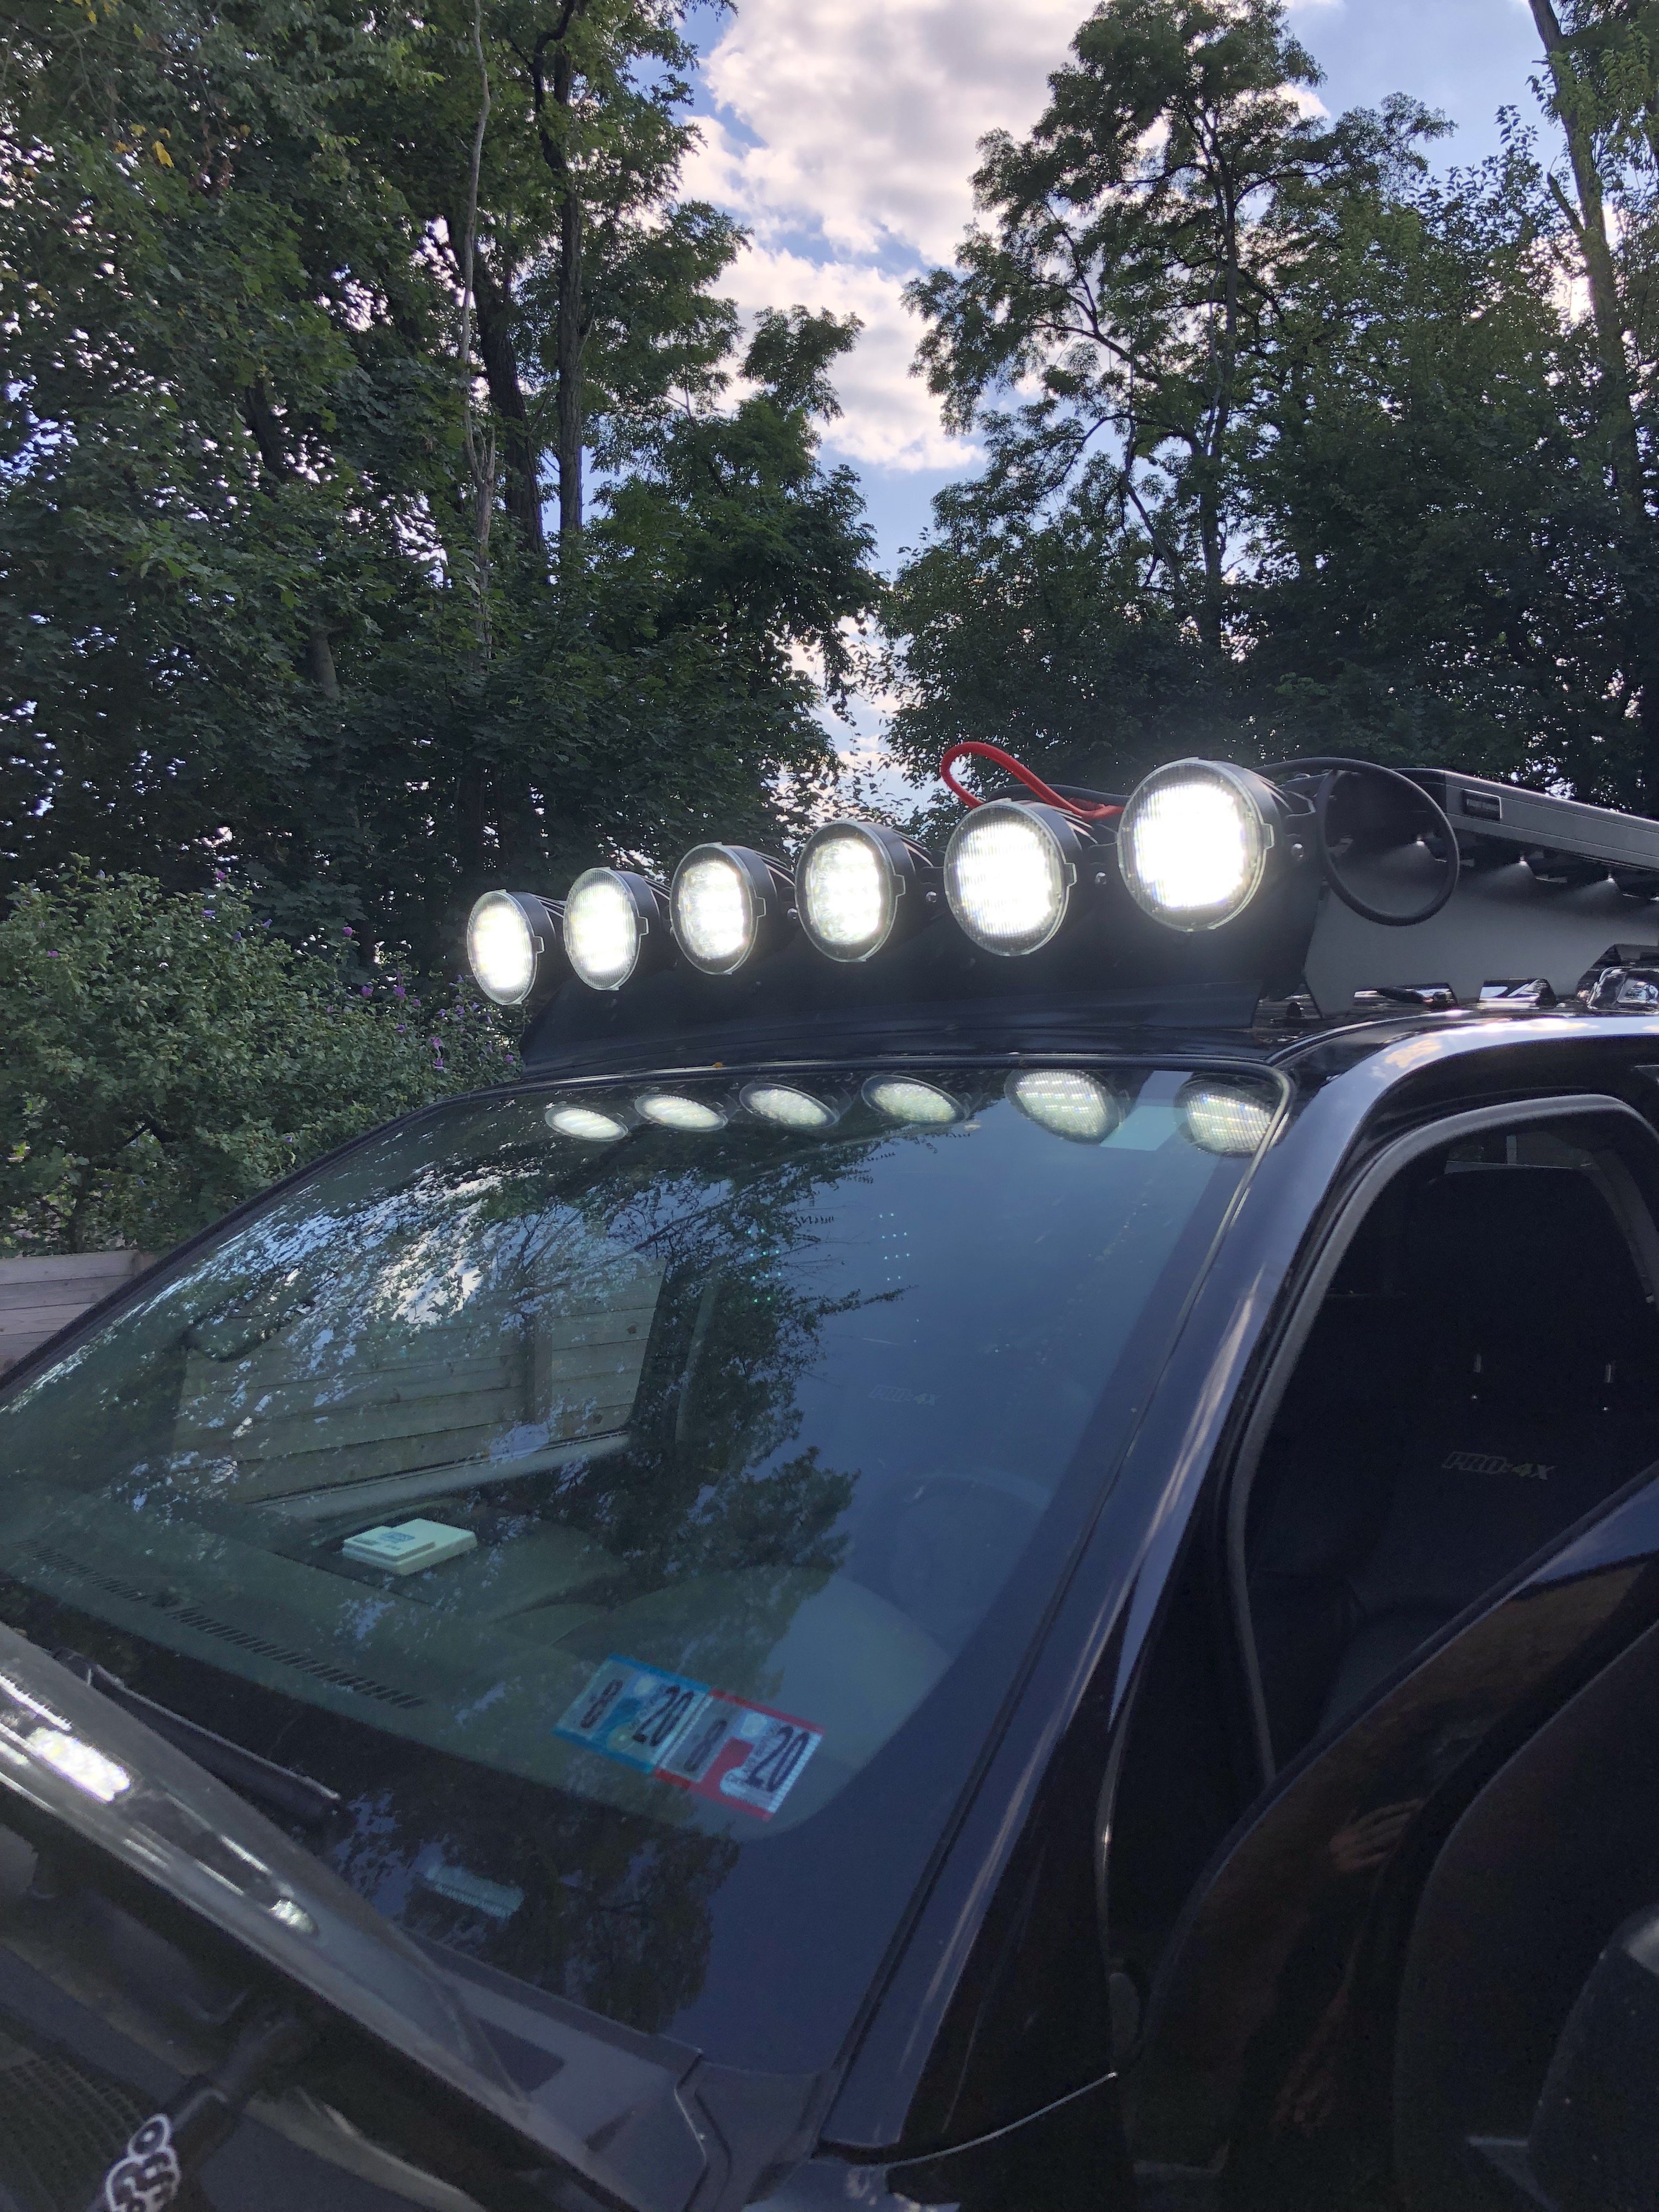
• √ Diode Dynamics XP80 LED Off-Road Roof Lights
• > Trigger 6 Shooter Bluetooth Wireless 6 Channel Relay
• √ Morimoto XBT Bluetooth RGB Controller
• √ Morimoto Profile Pixel RGB Rock Lights
• √ Goal Zero 400 Lithium Power Pack
• √ Goal Zero Boulder 100 Solar Panel
Fluids:
• √ Mobil 1 Synthetic Every 5000 Miles
• √ Nissan Genuine Matic-S (Transmission)
• √ Amsoil ATF (Transfer Case)
• √ Amsoil Severe Gear (Differentials)
• √ Motul RBF 660 Synthetic DOT 4 Brake Fluid
Interior:
• √ 2lb DOT Fire Extinguisher under passenger seat with modded Bracketeer mount
• √ WeatherTech Floor Liners - Front & Rear
Exterior:
• X Rear Passenger Door
• √ WeatherTech Front Window Visors
• > Painted Rear Bumper Corner Plastics - SEM Black Bumper Paint
• > Painted Side Moldings - SEM Black Bumper Paint
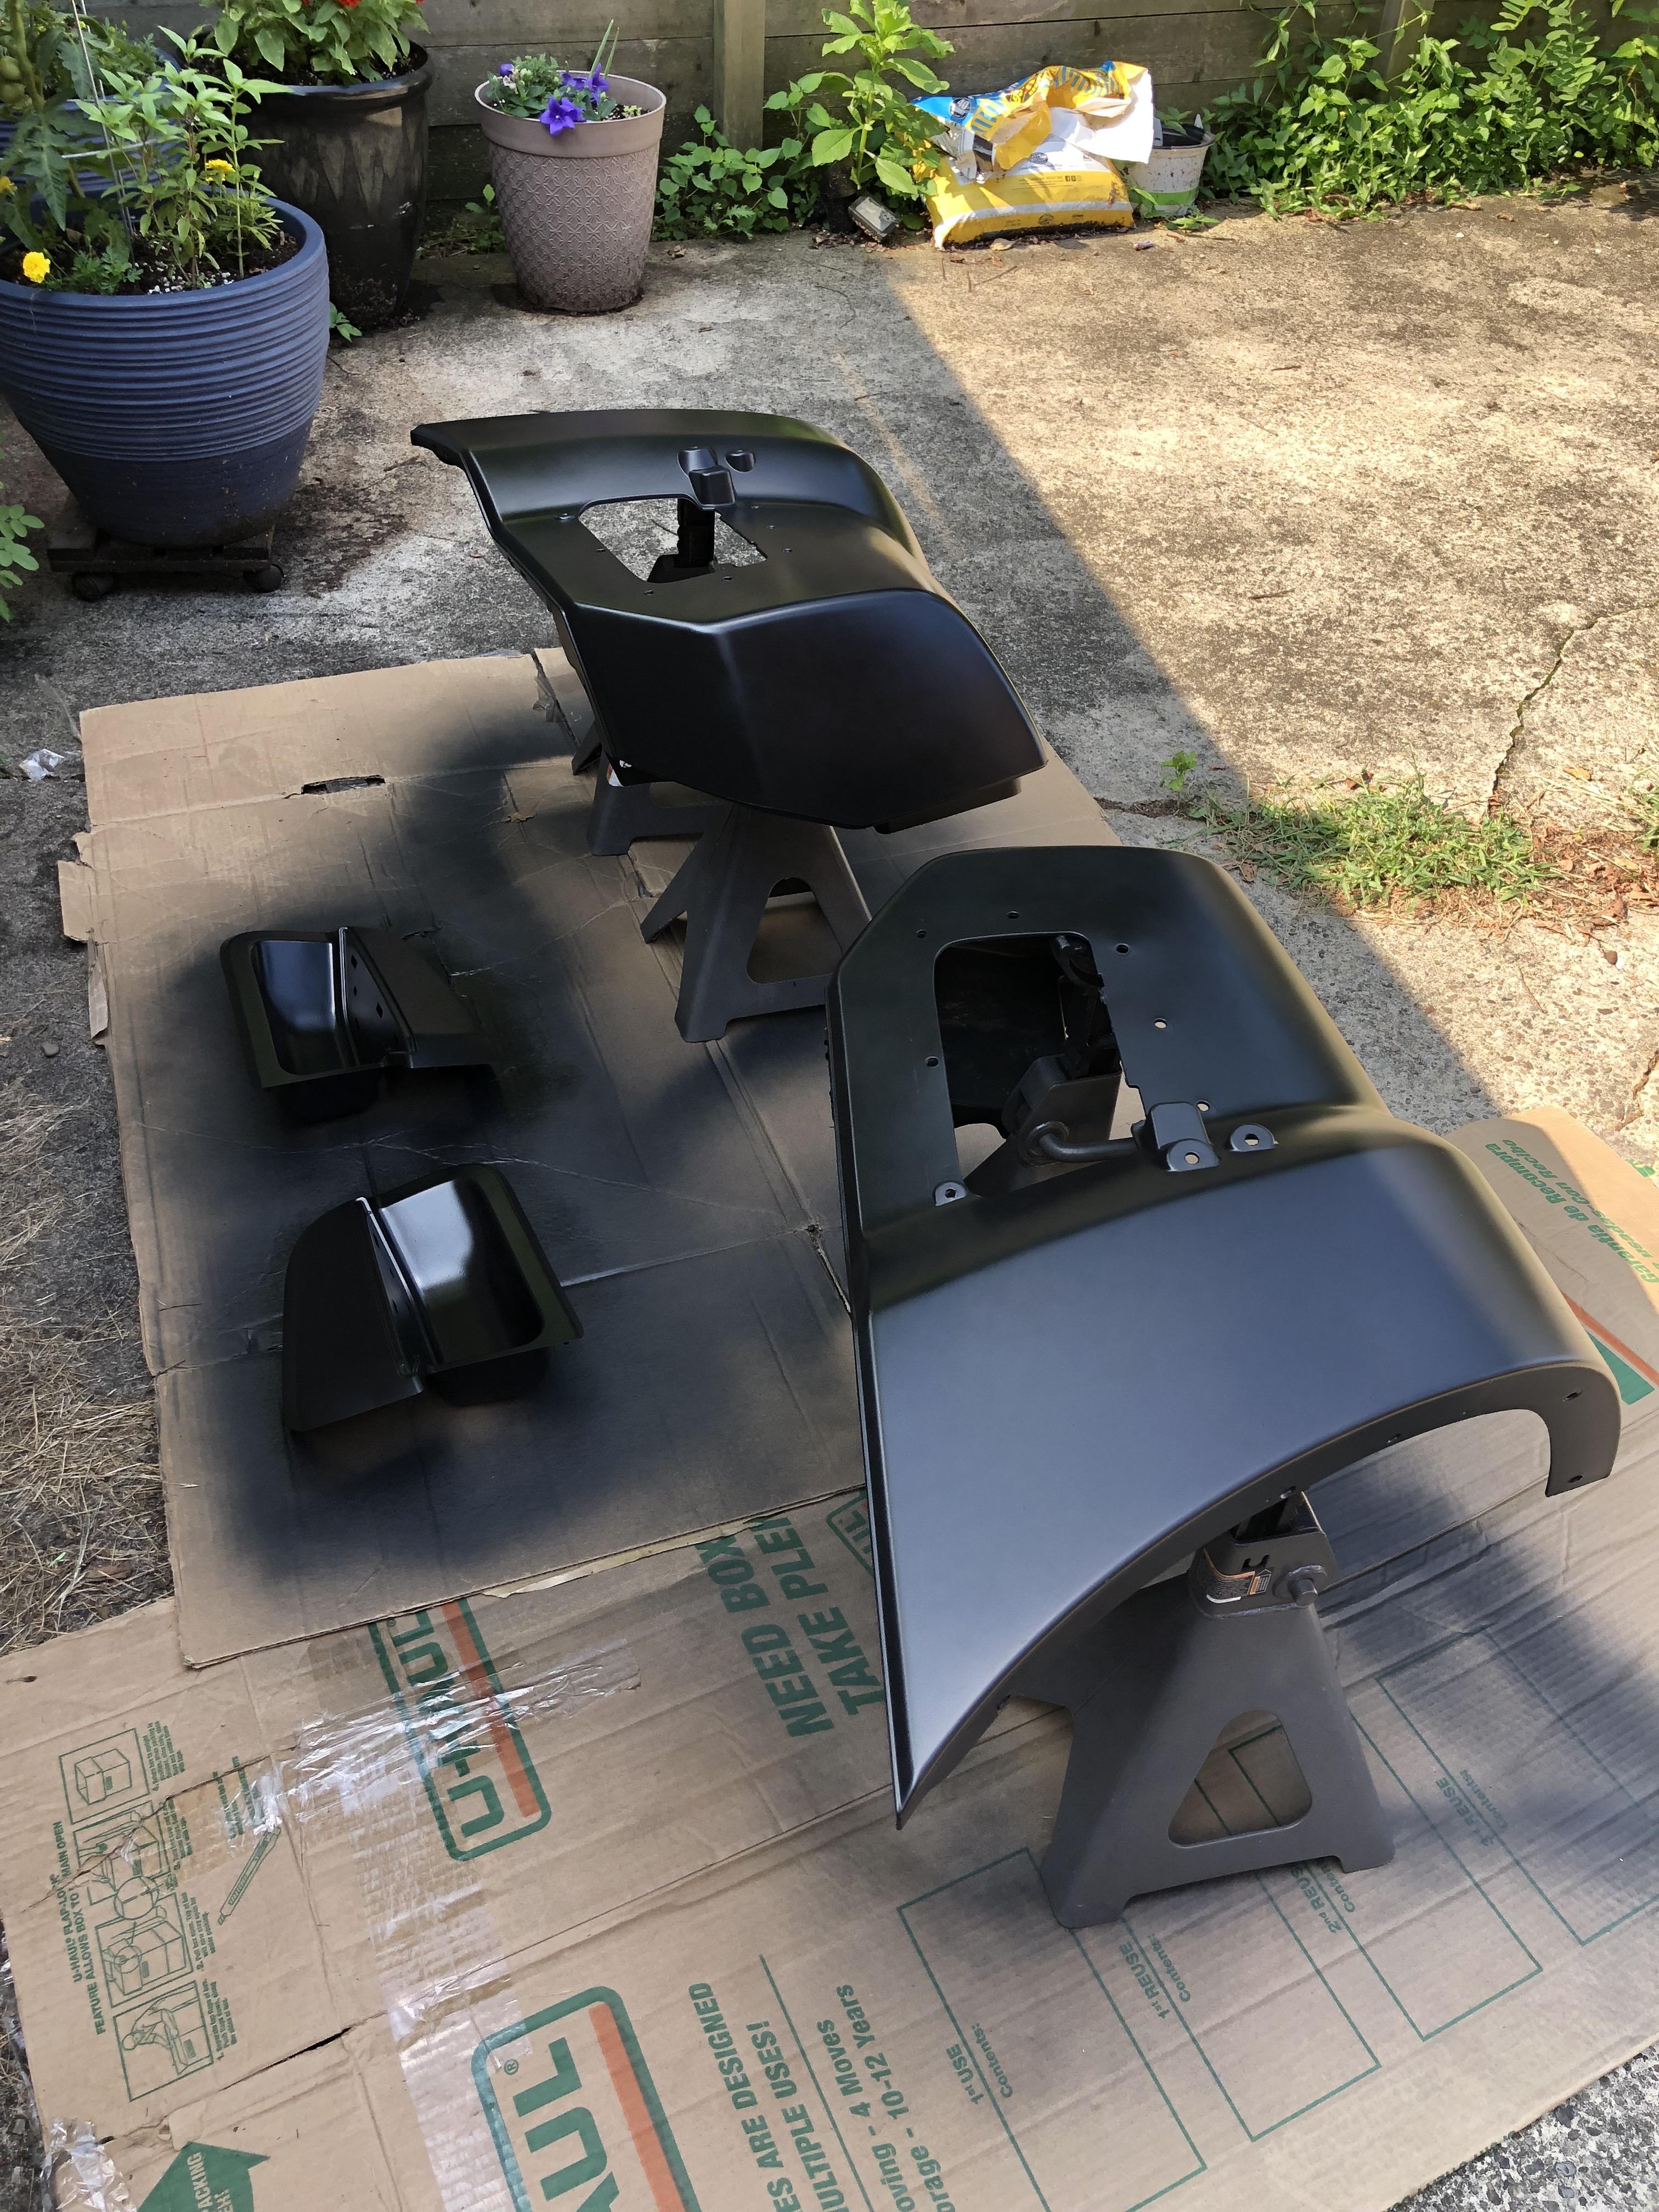
• > Painted Front Bucktooth Grill - Flat Black
• √ Front Fender Trim and Melt Mod
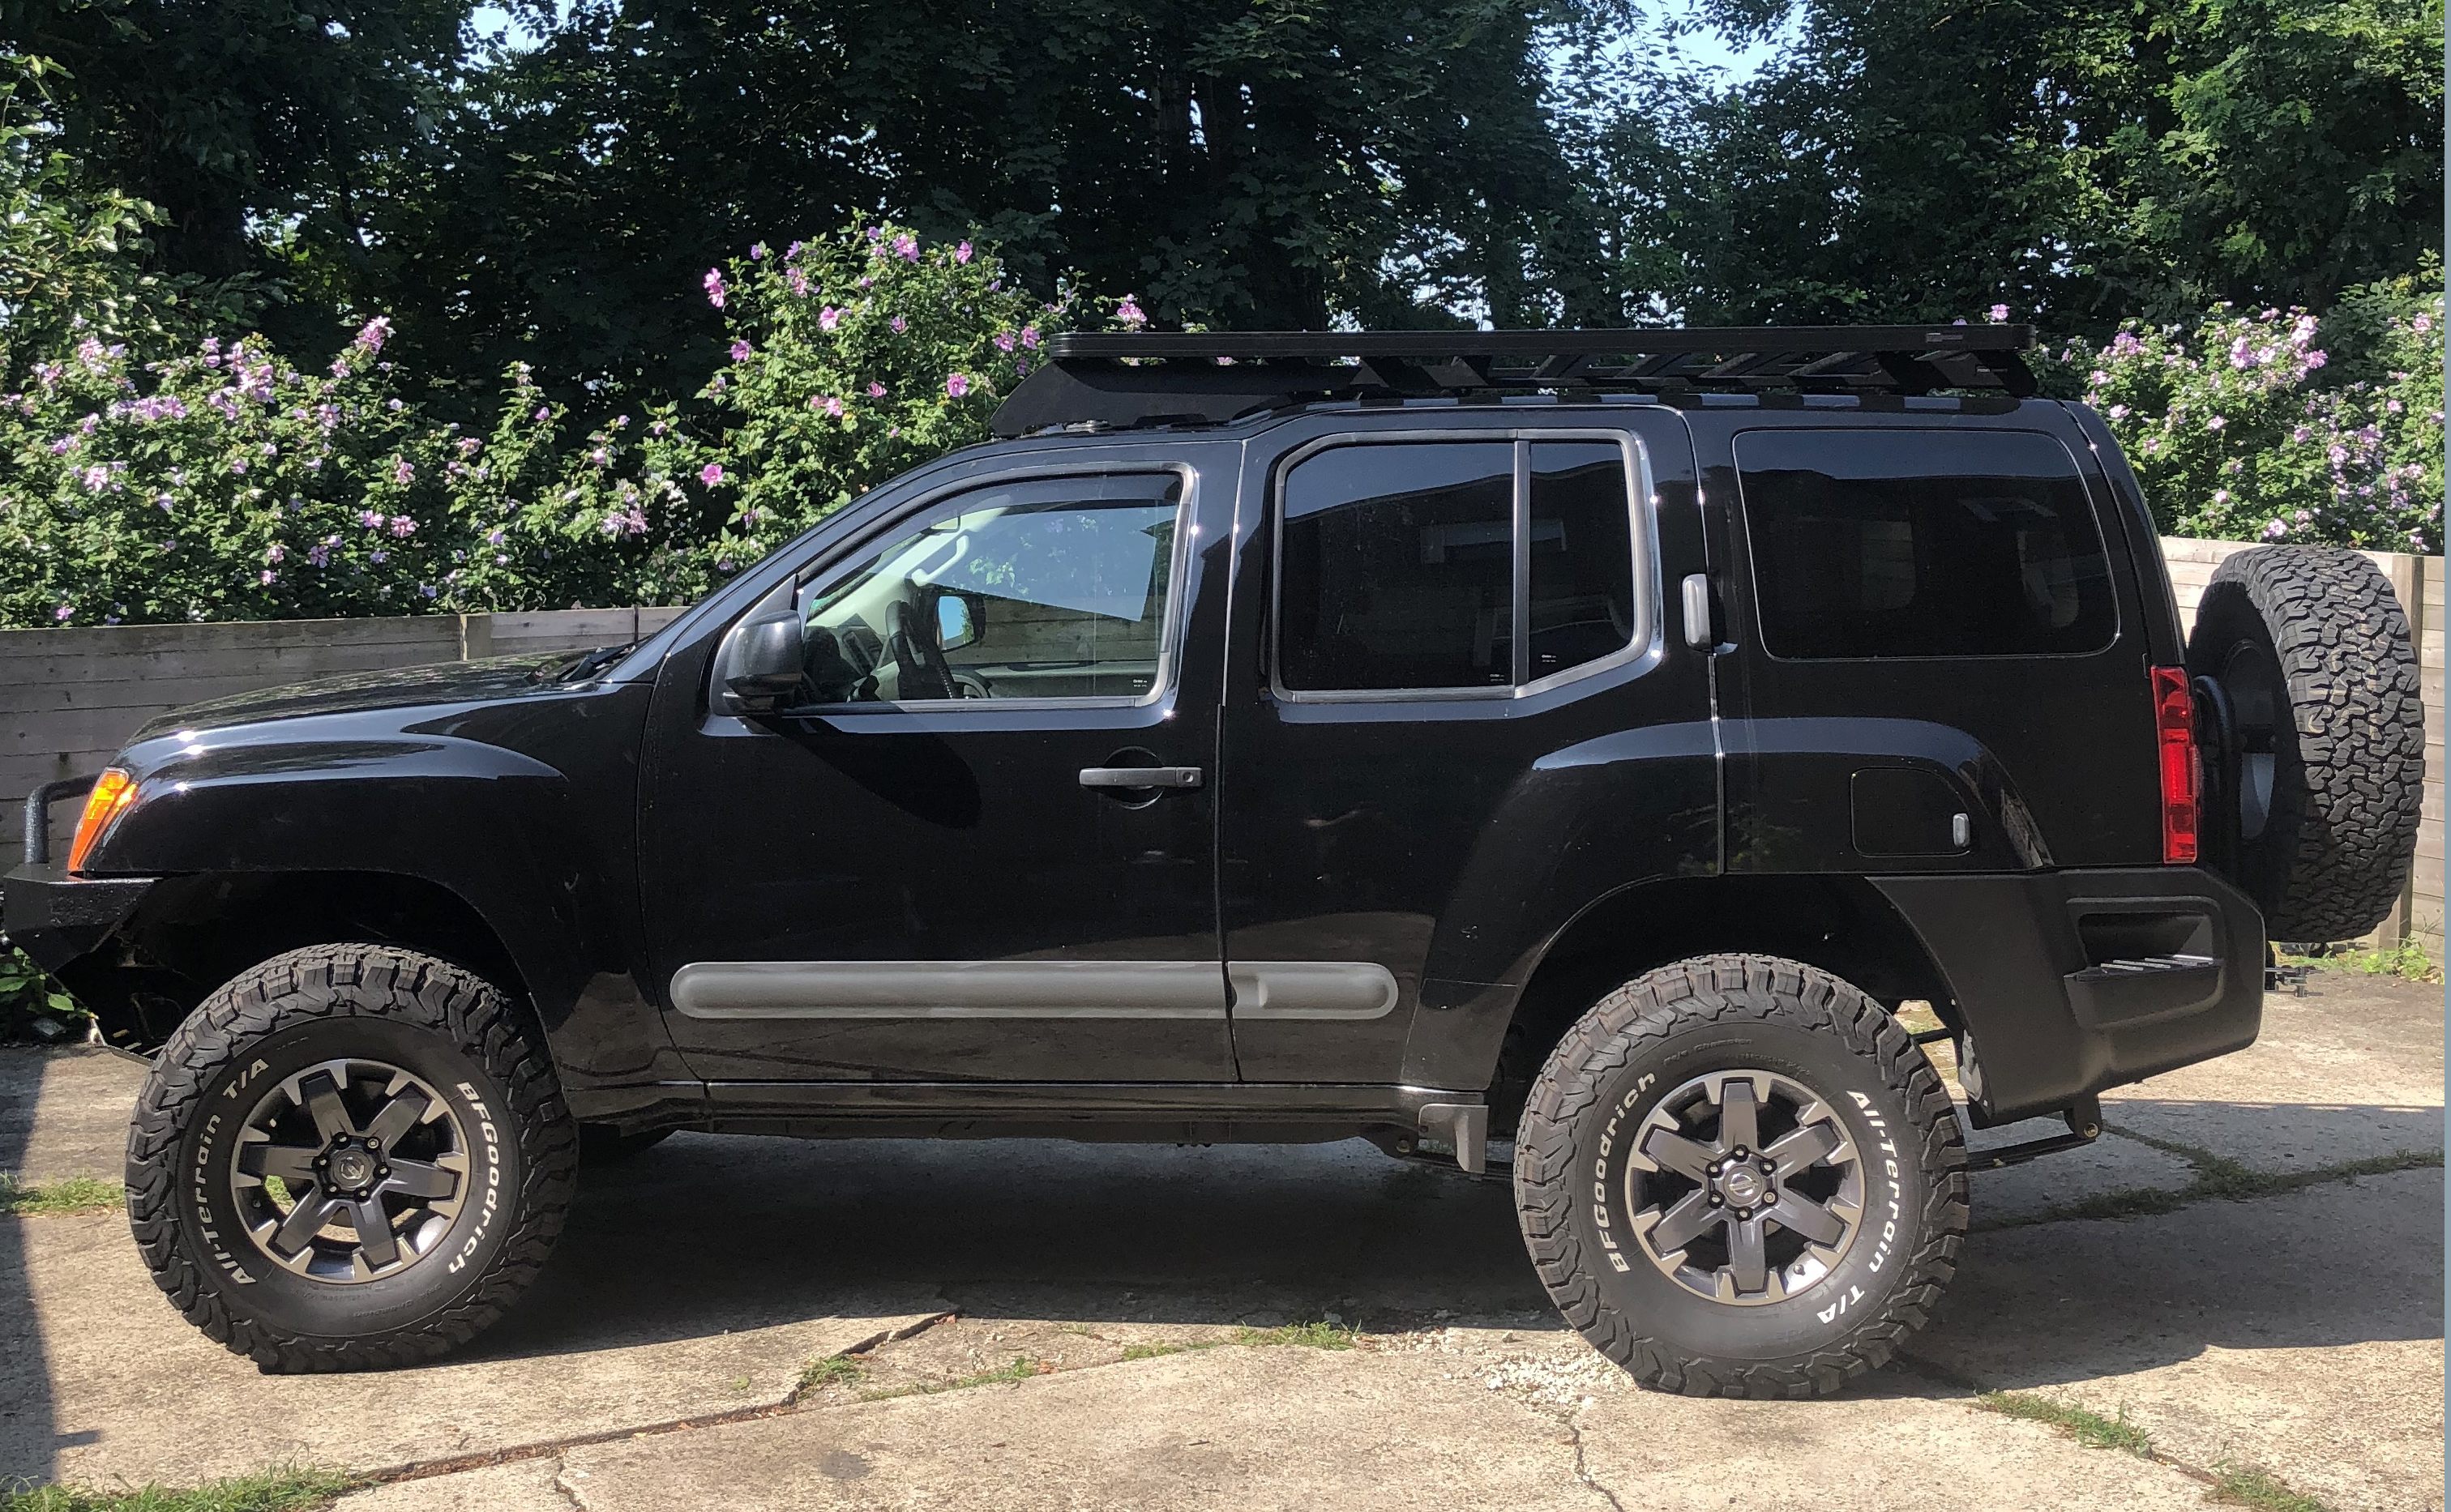
• √ ARB Awning 2000
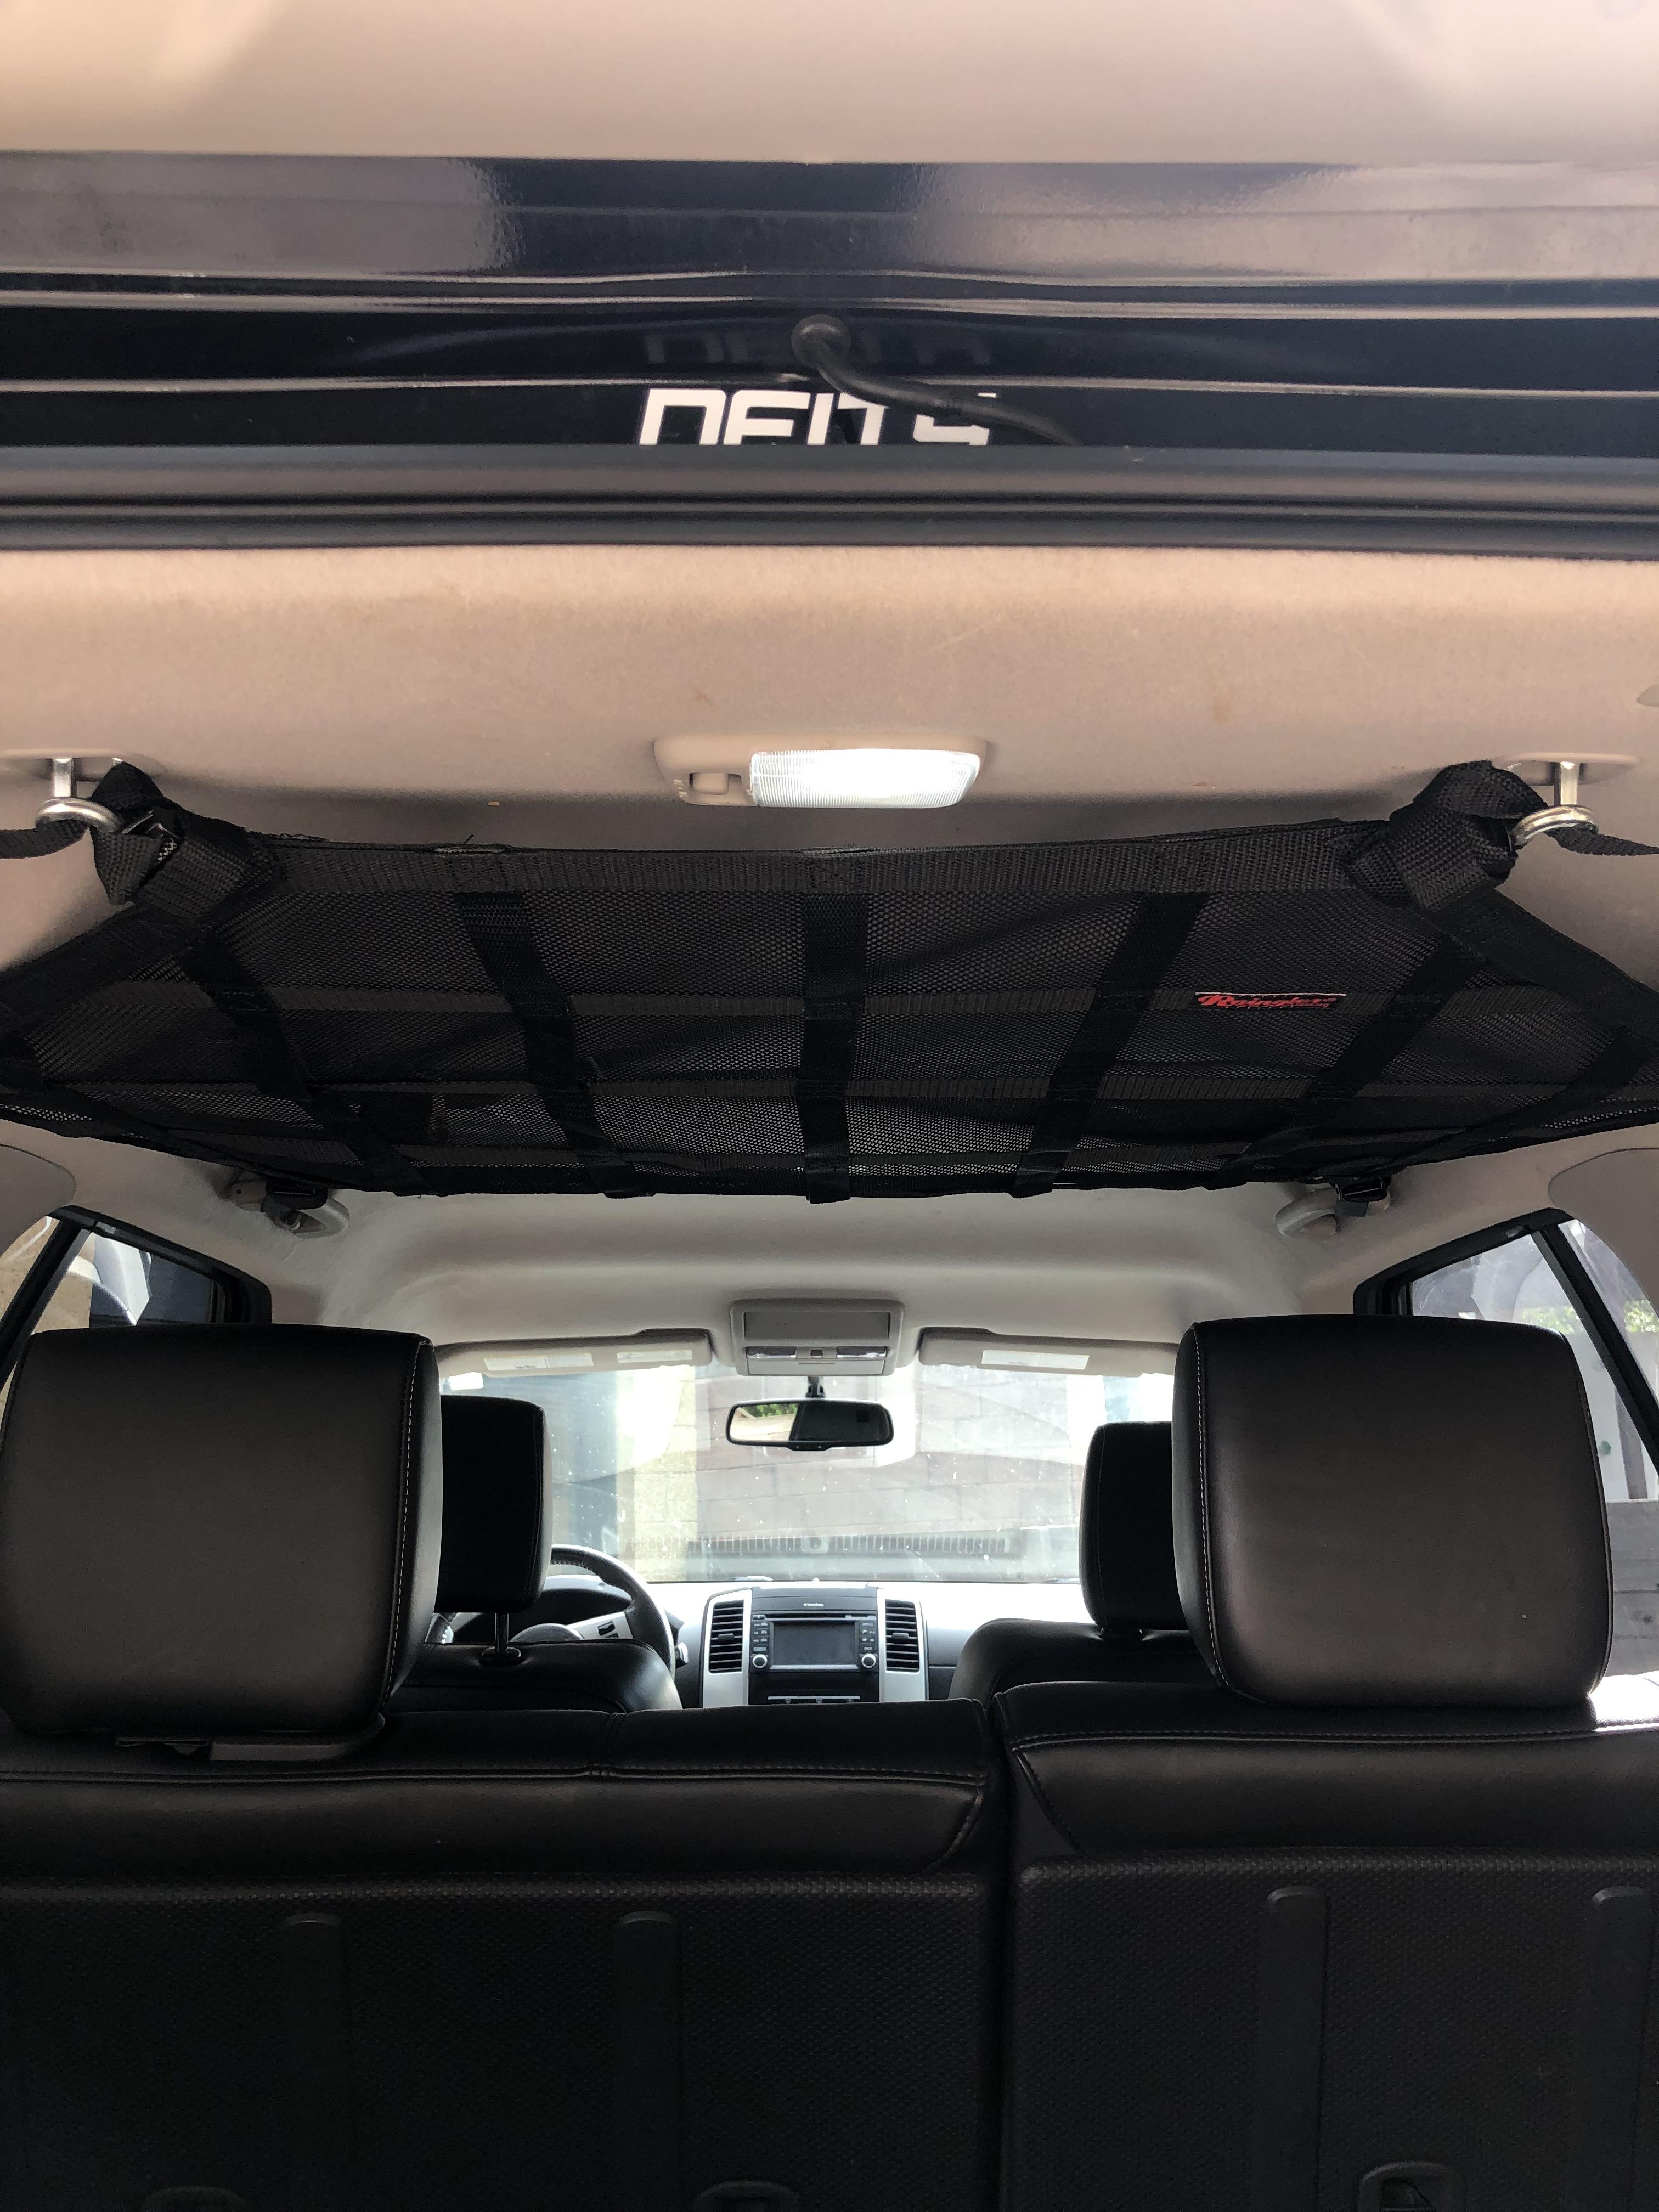
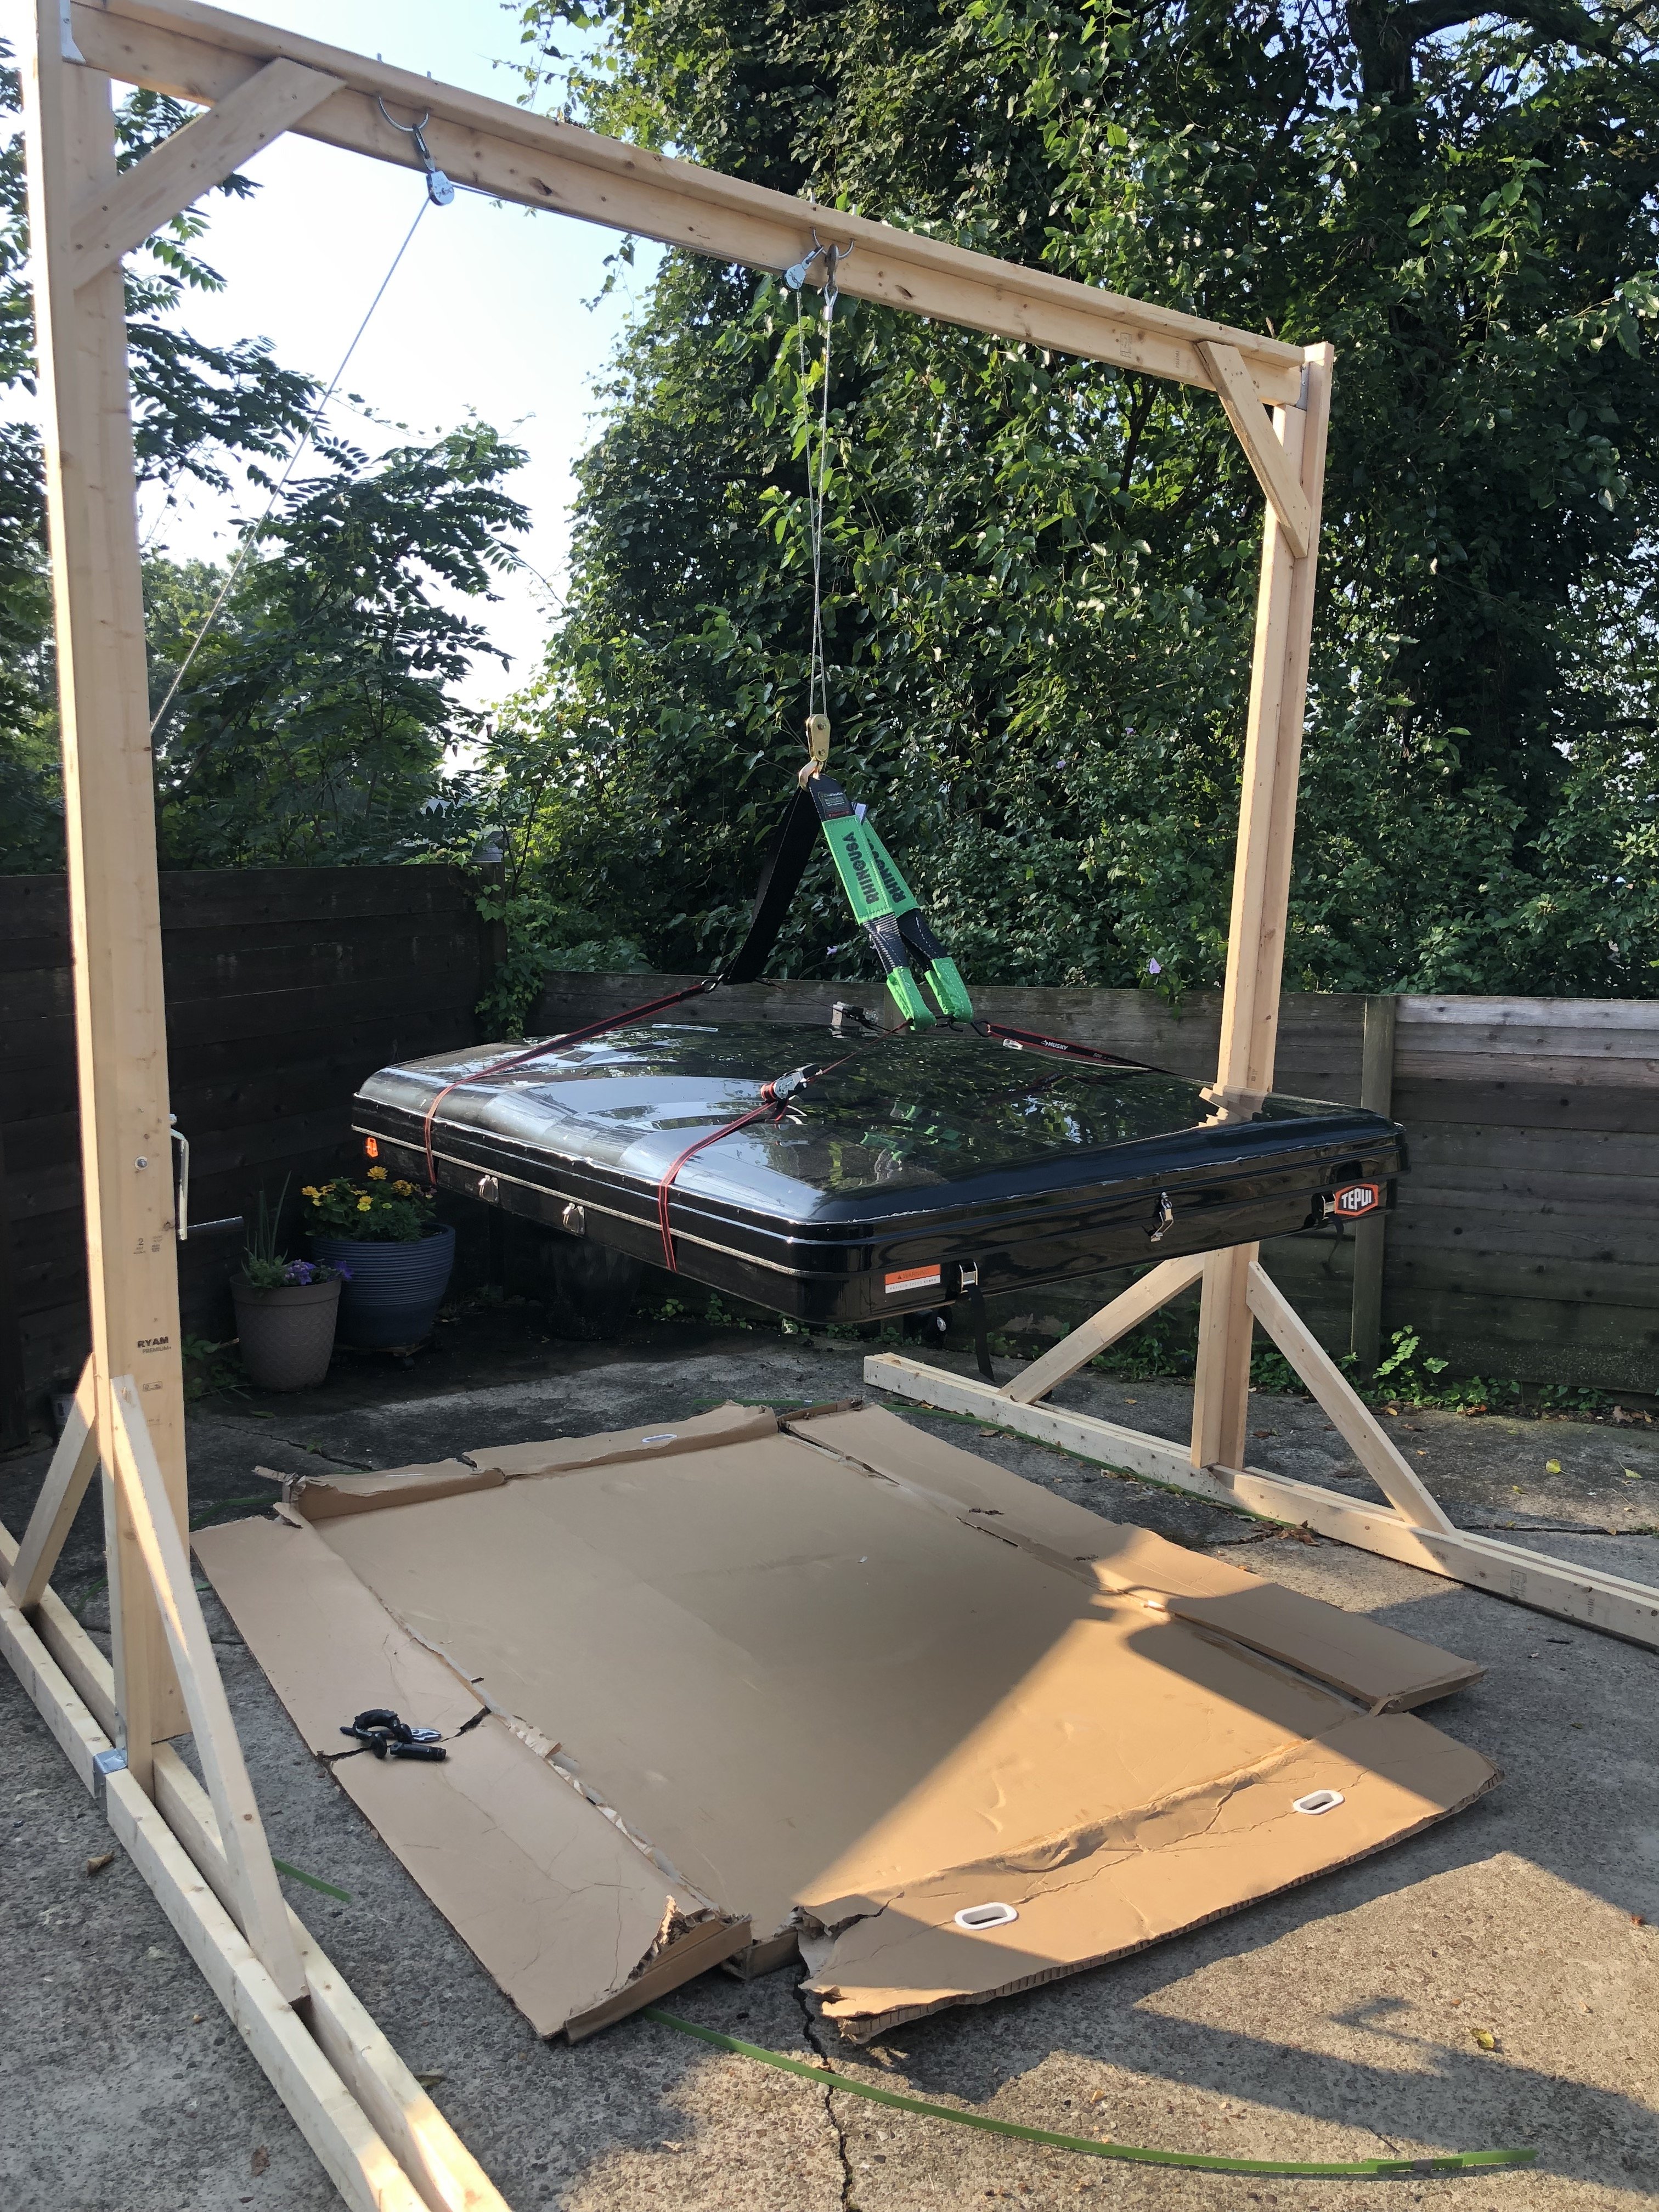
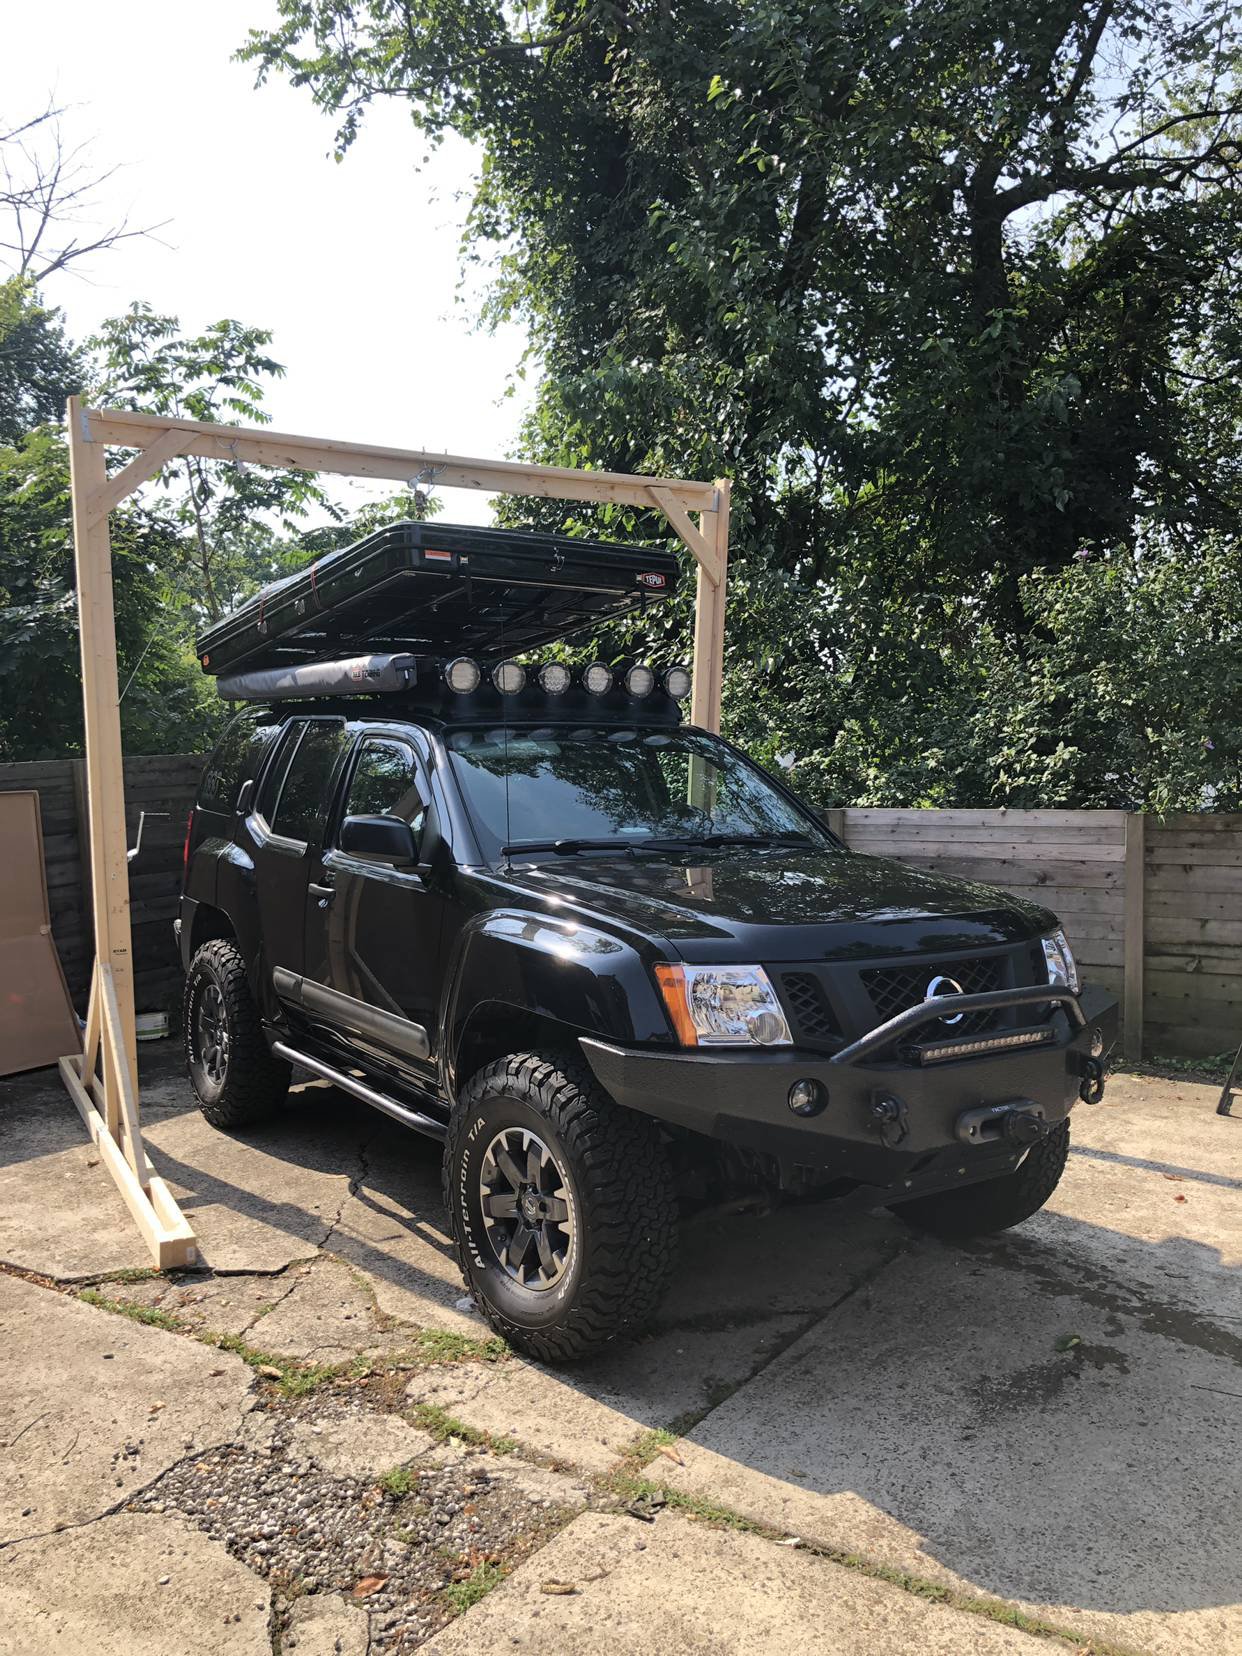
• √ Tepui HyBox Roof Top Tent
• > Gobi Passenger Side Ladder
• √ Rockslide Engineering Spare Tire Rack Kit (Rotopax Mounts)
• √ Rotopax 2 Gallon Gasoline Pack x 2
• √ Rotopax 2 Gallon Water Pack x2
Armor:
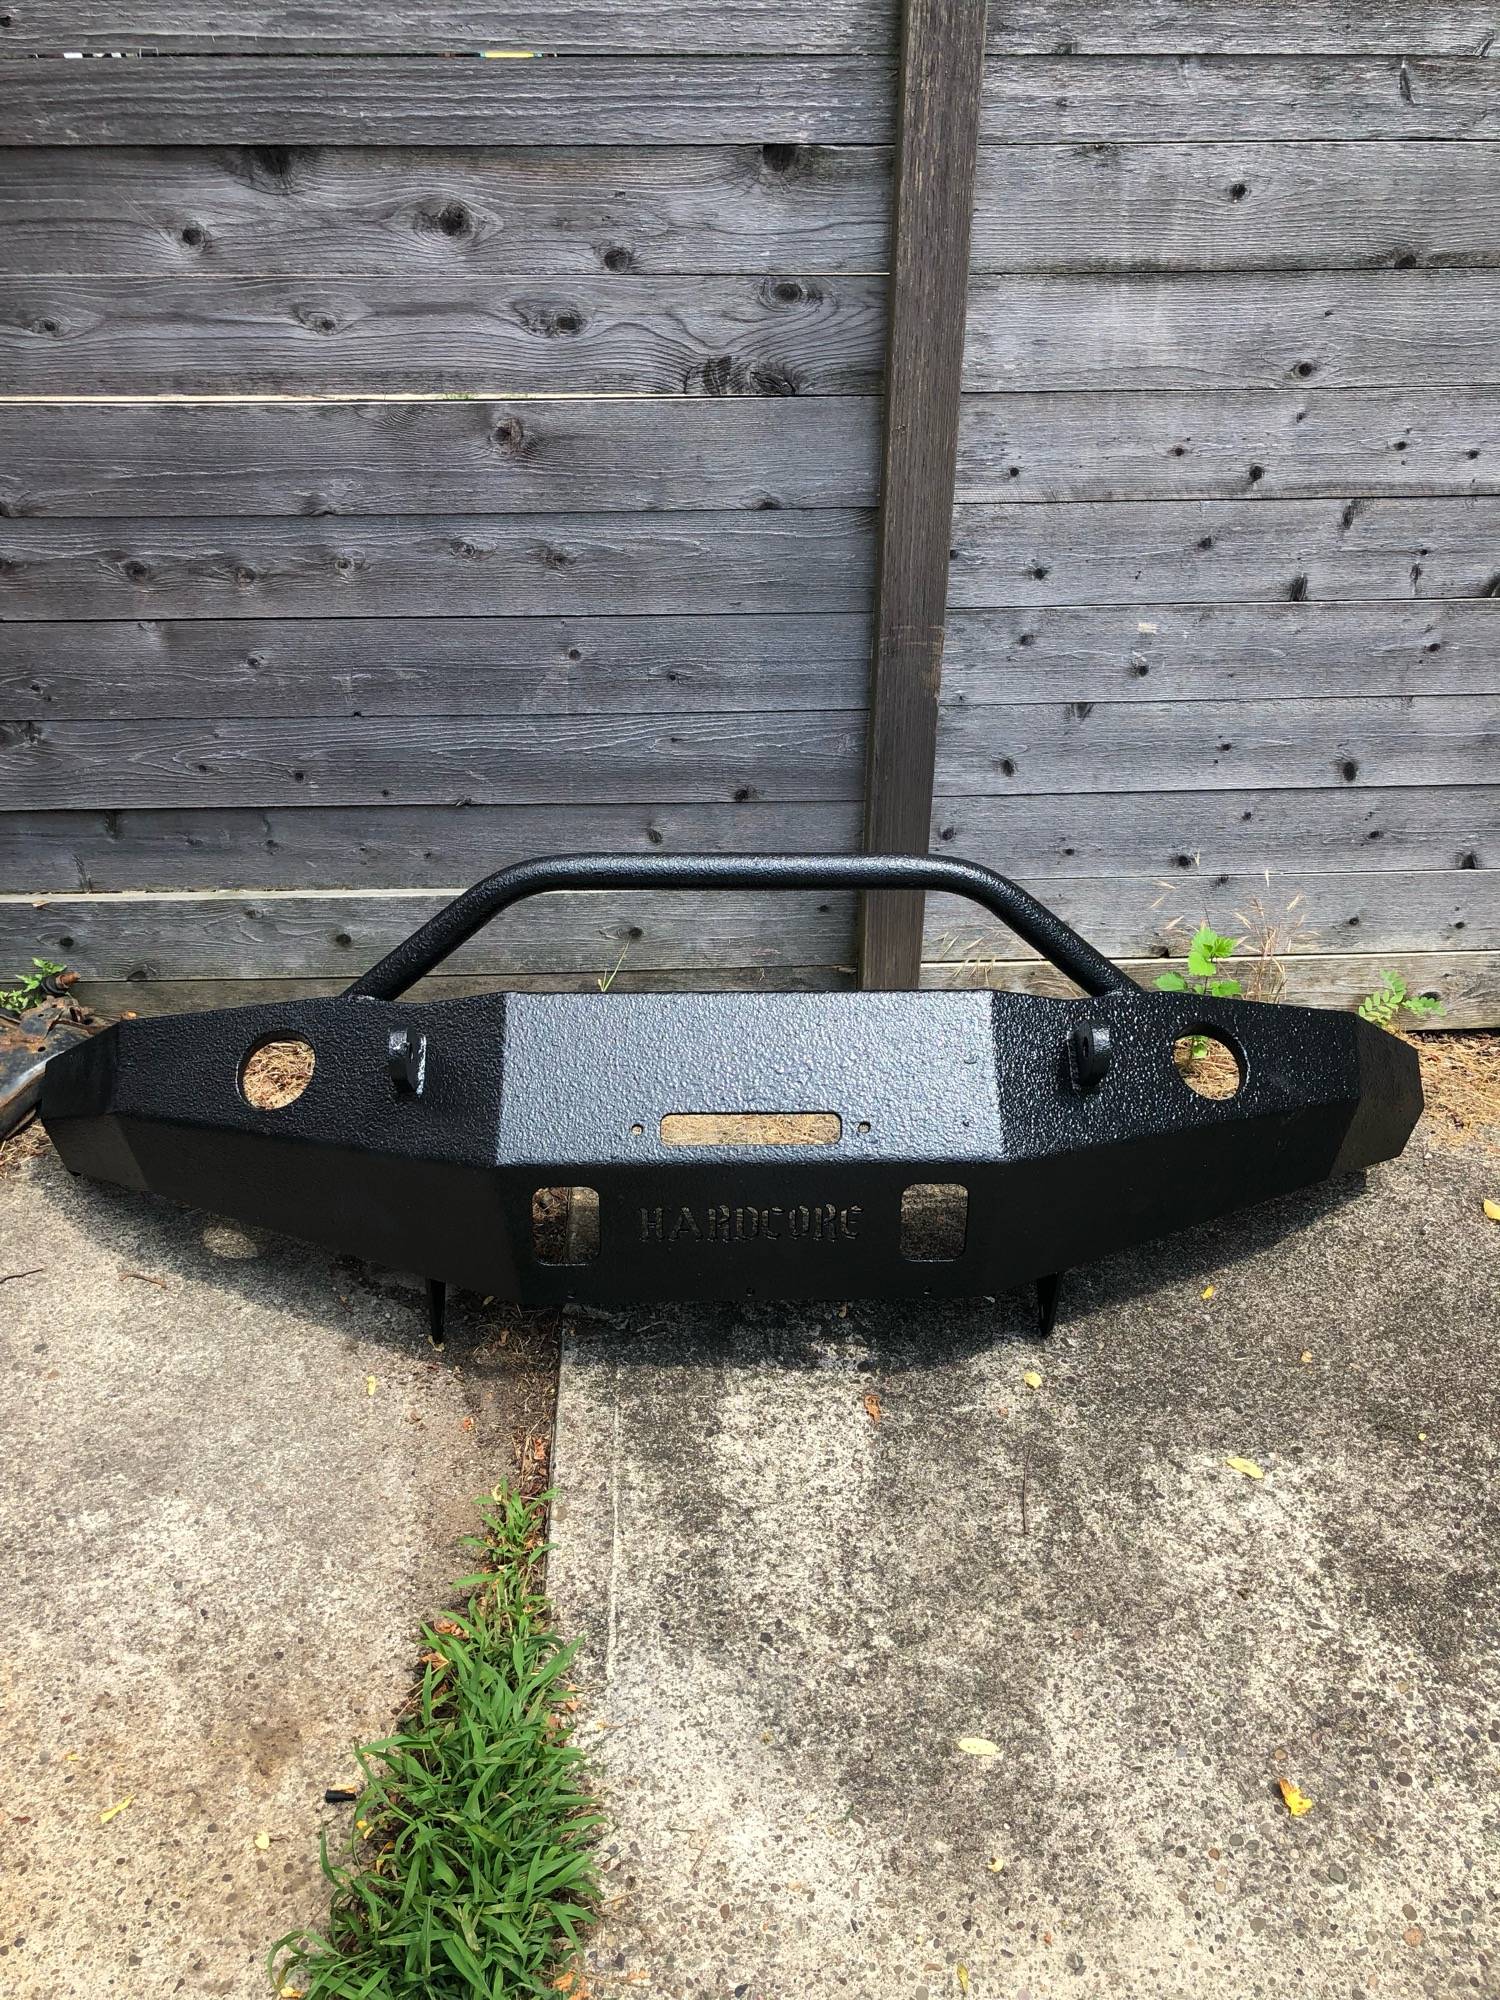
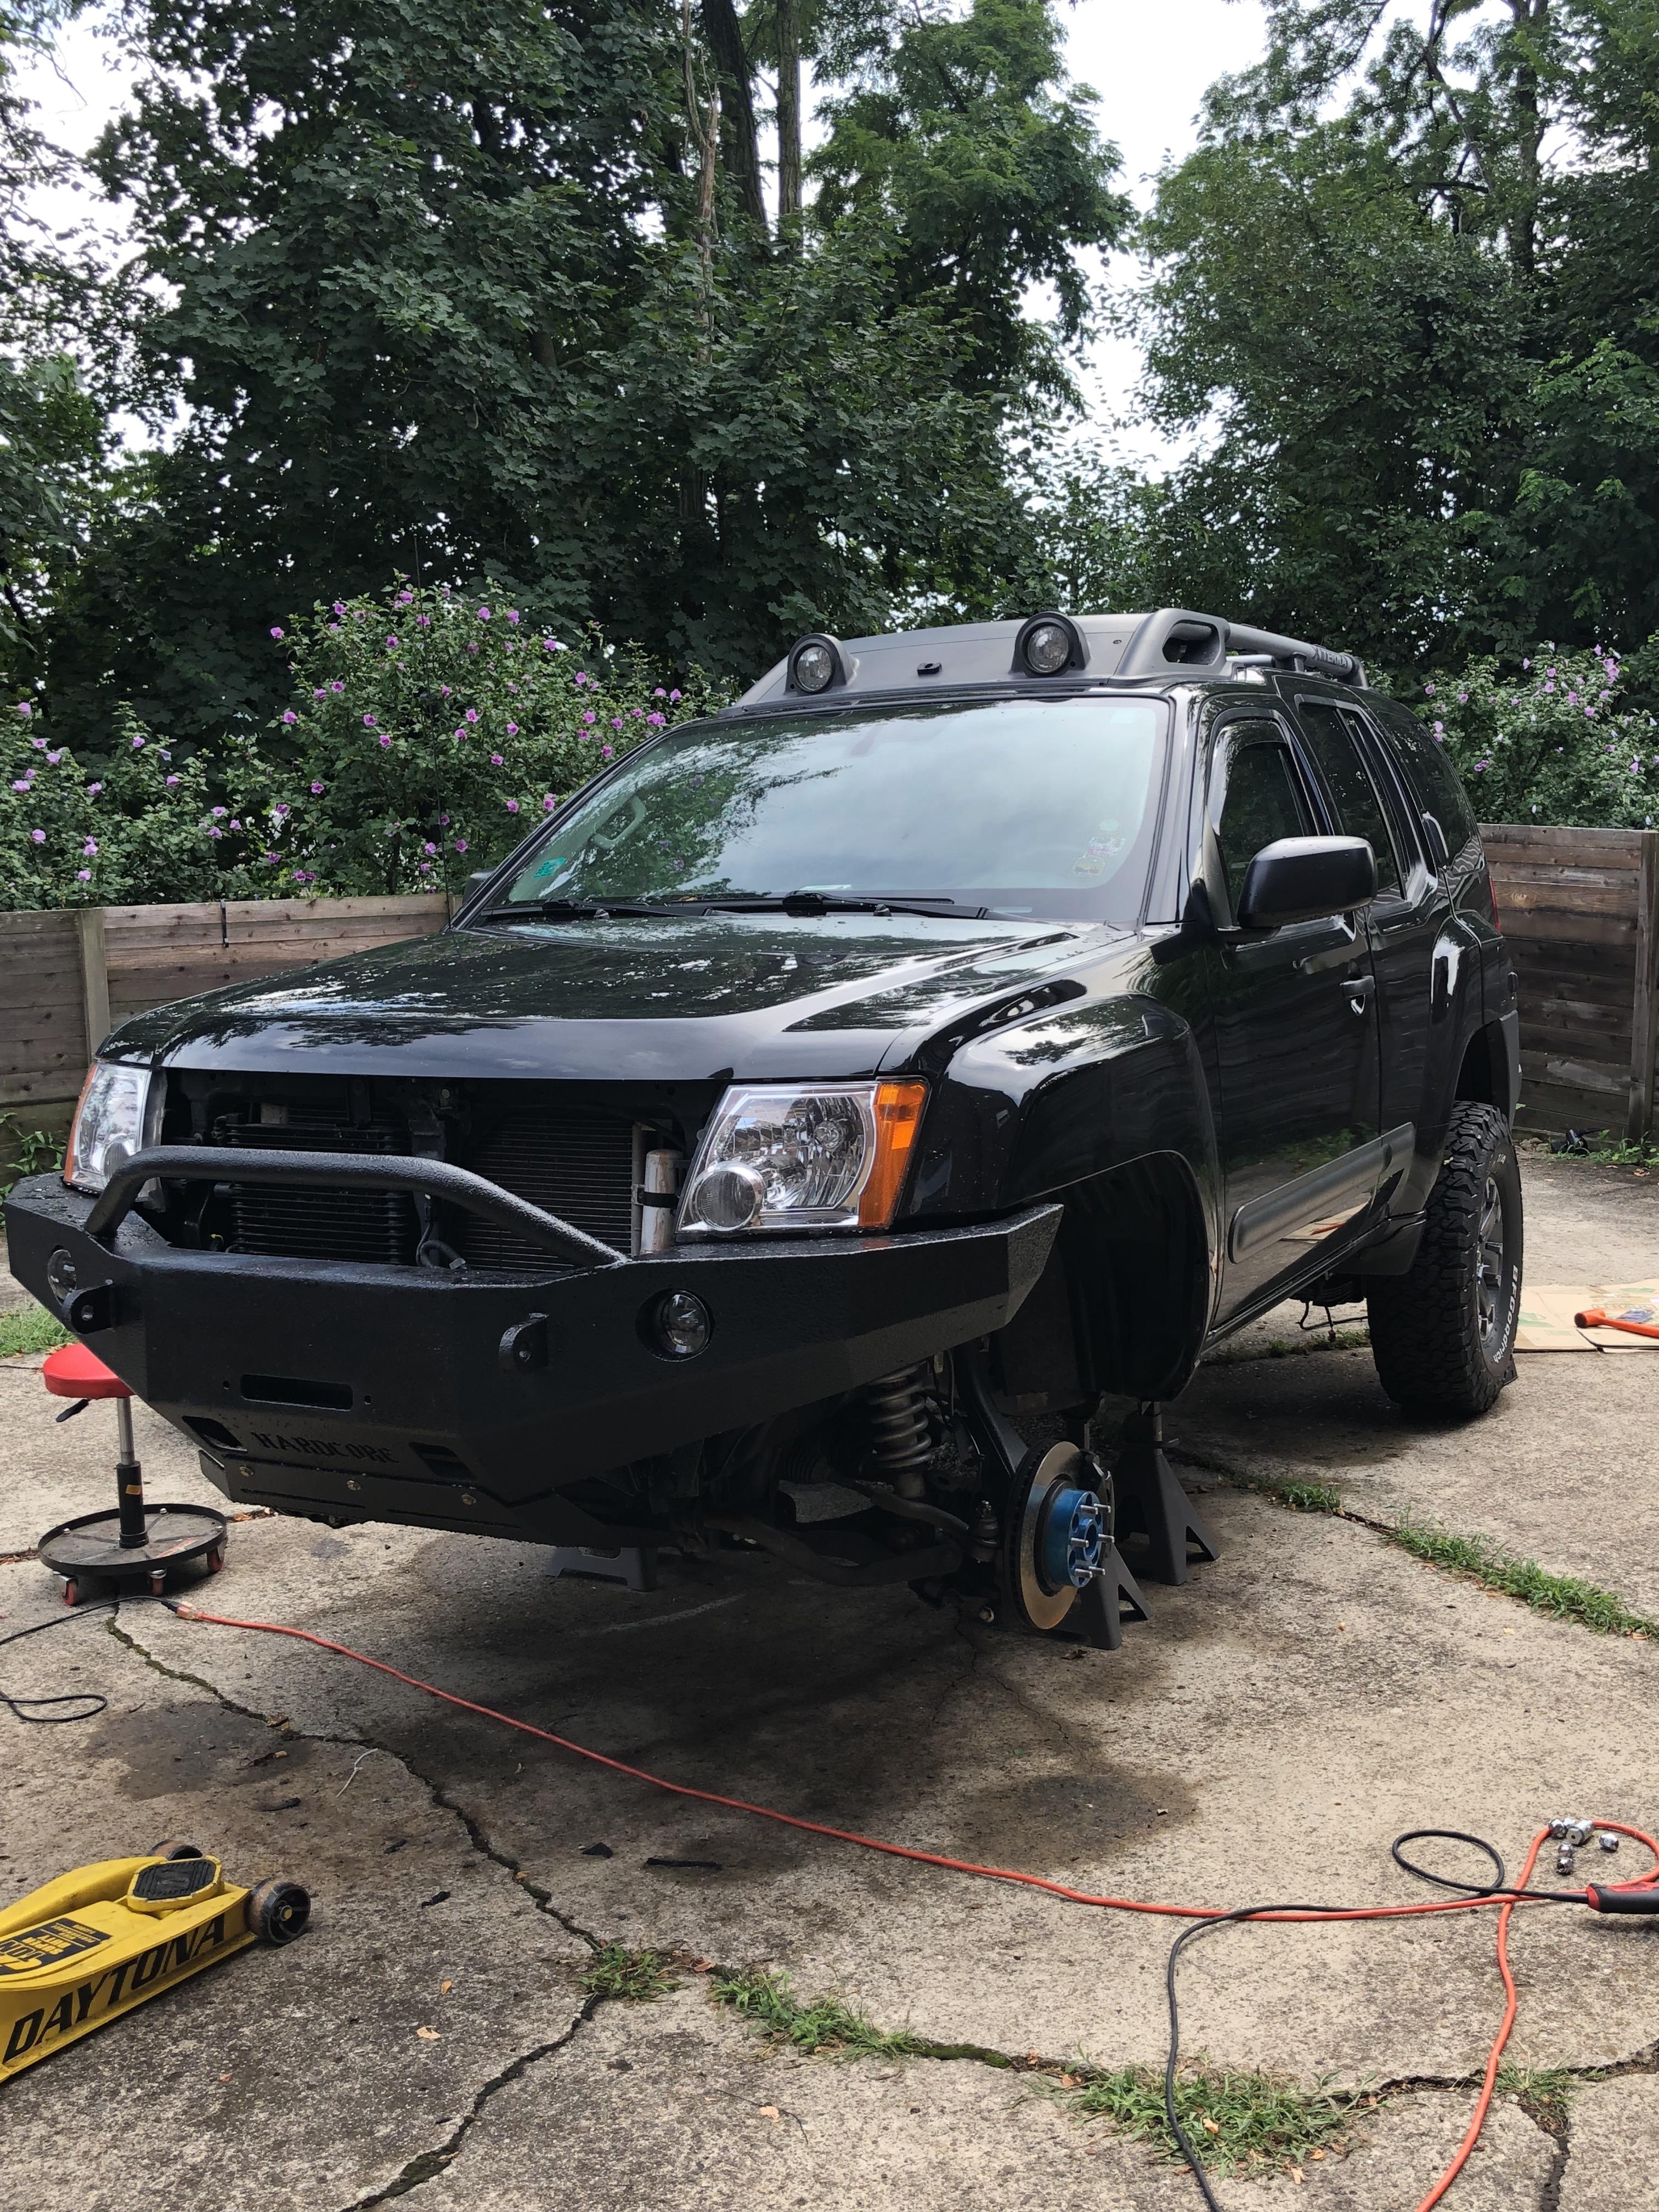
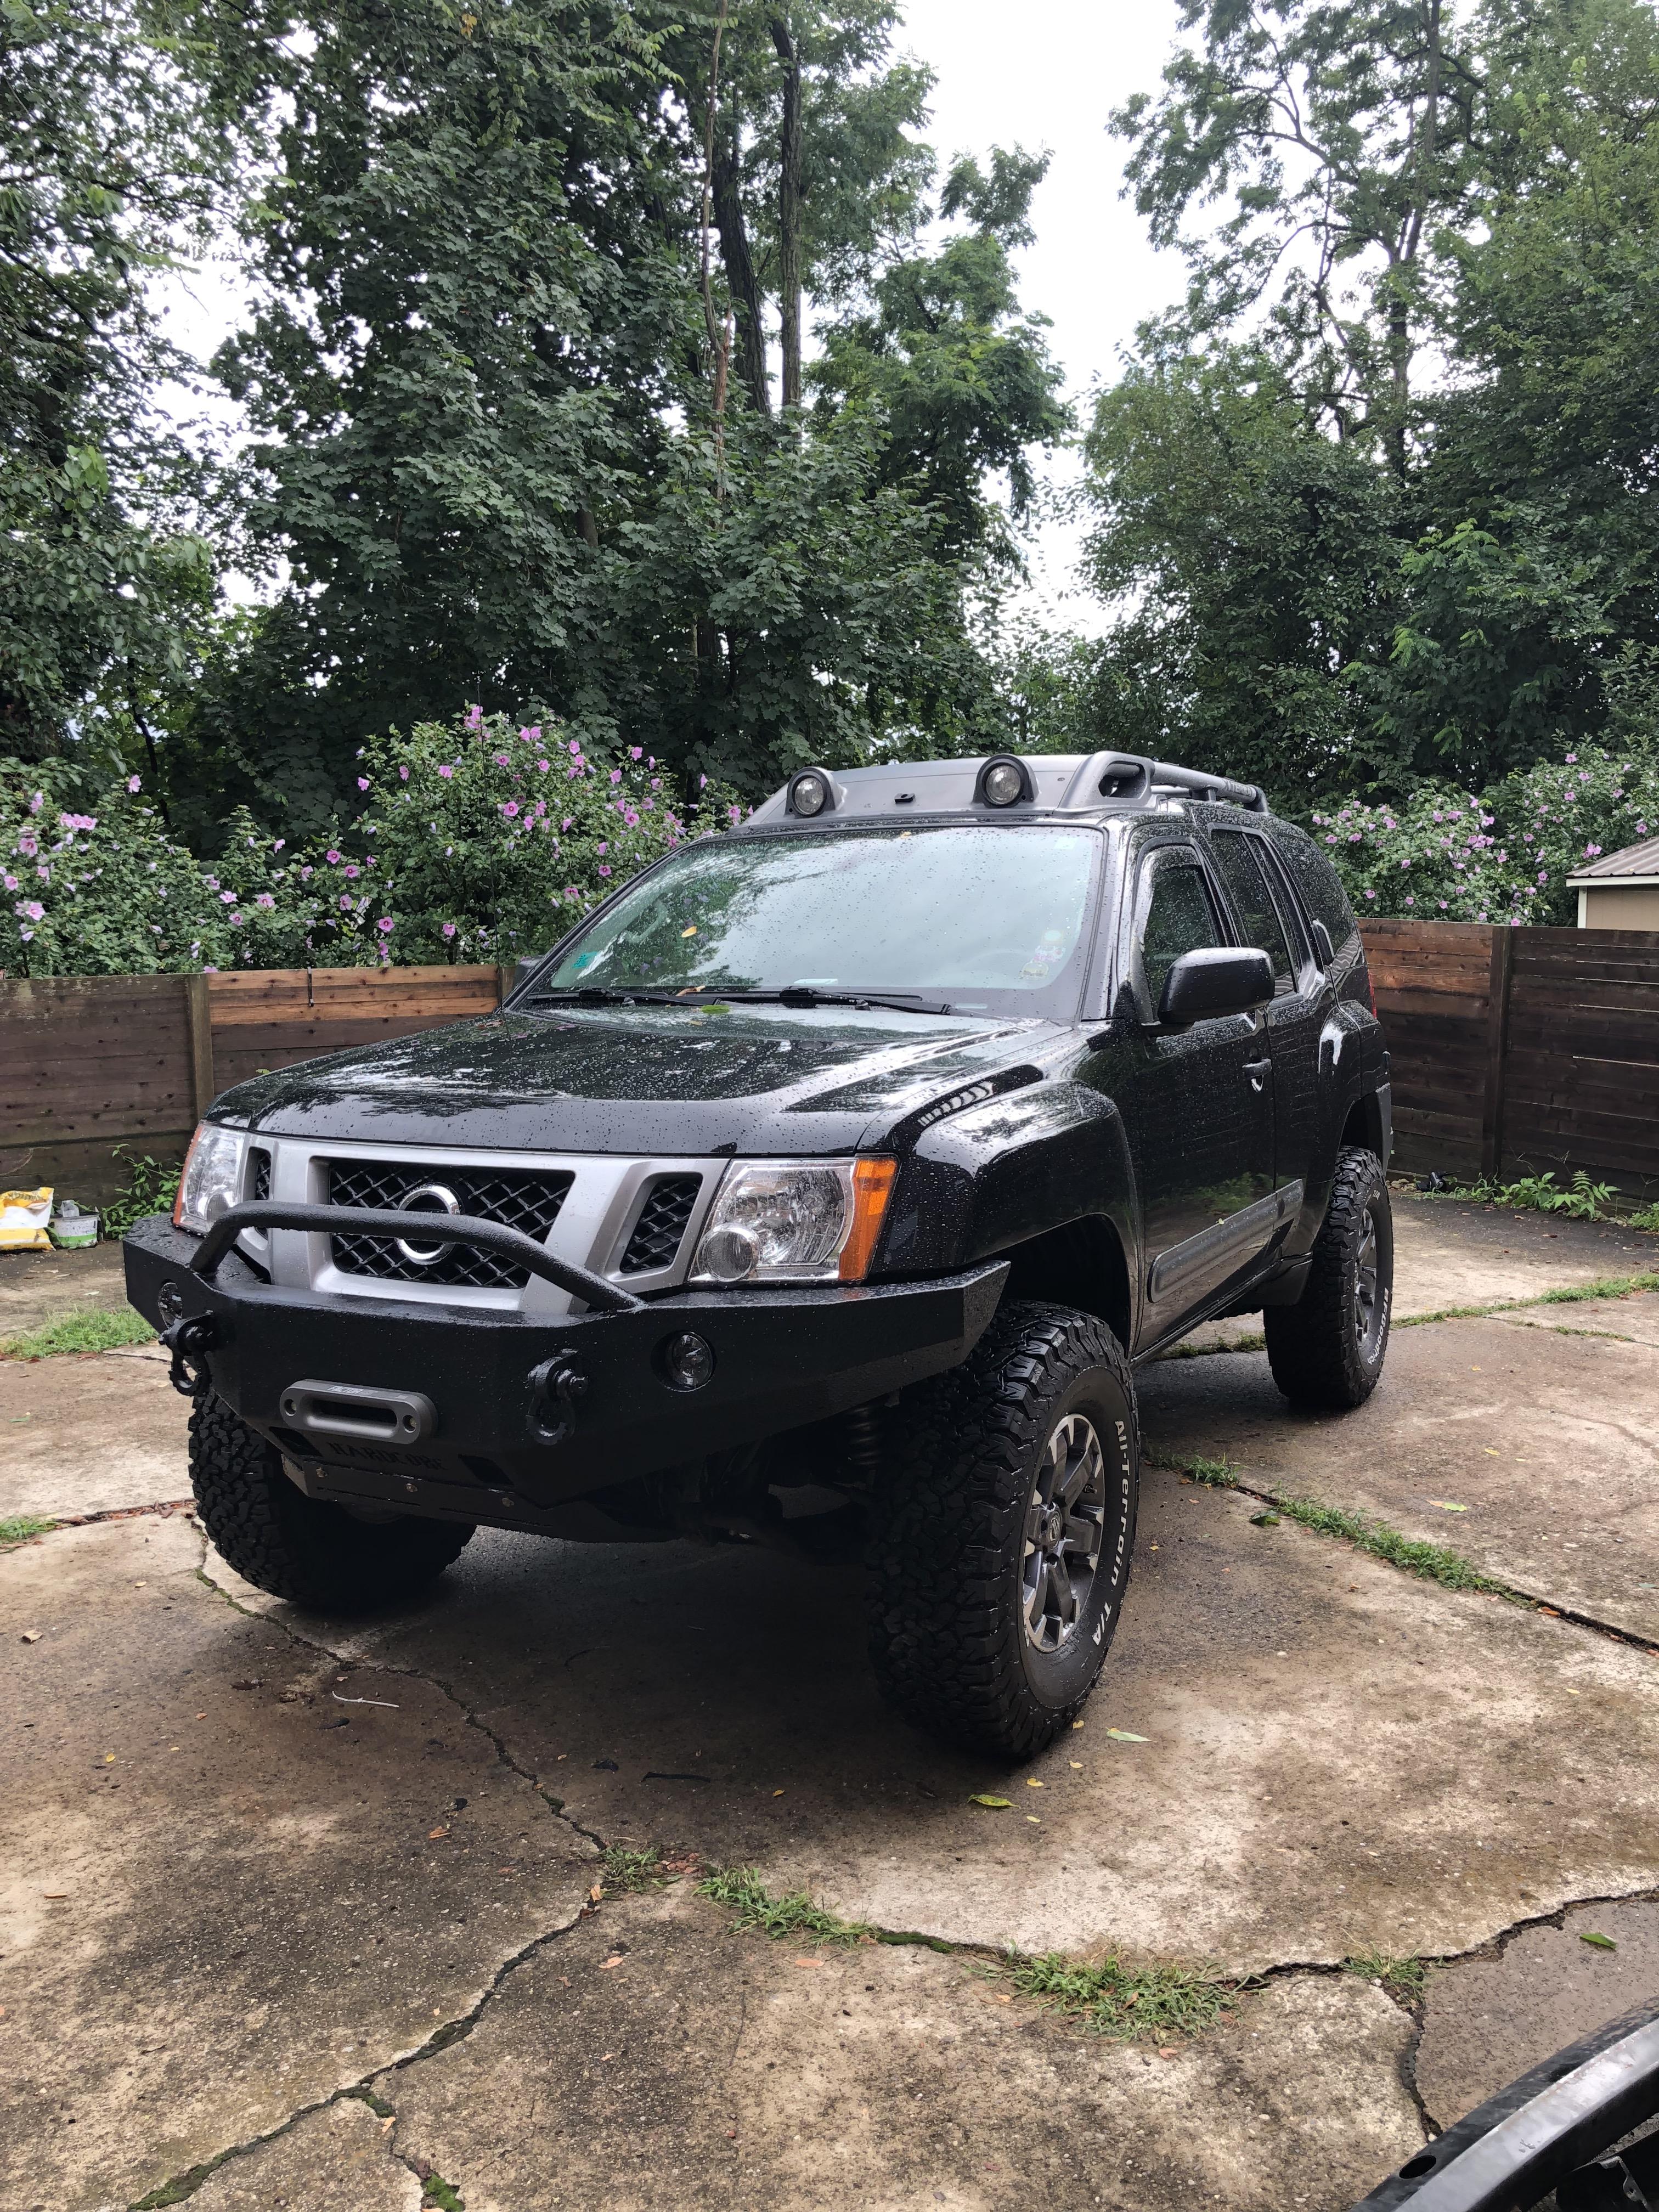
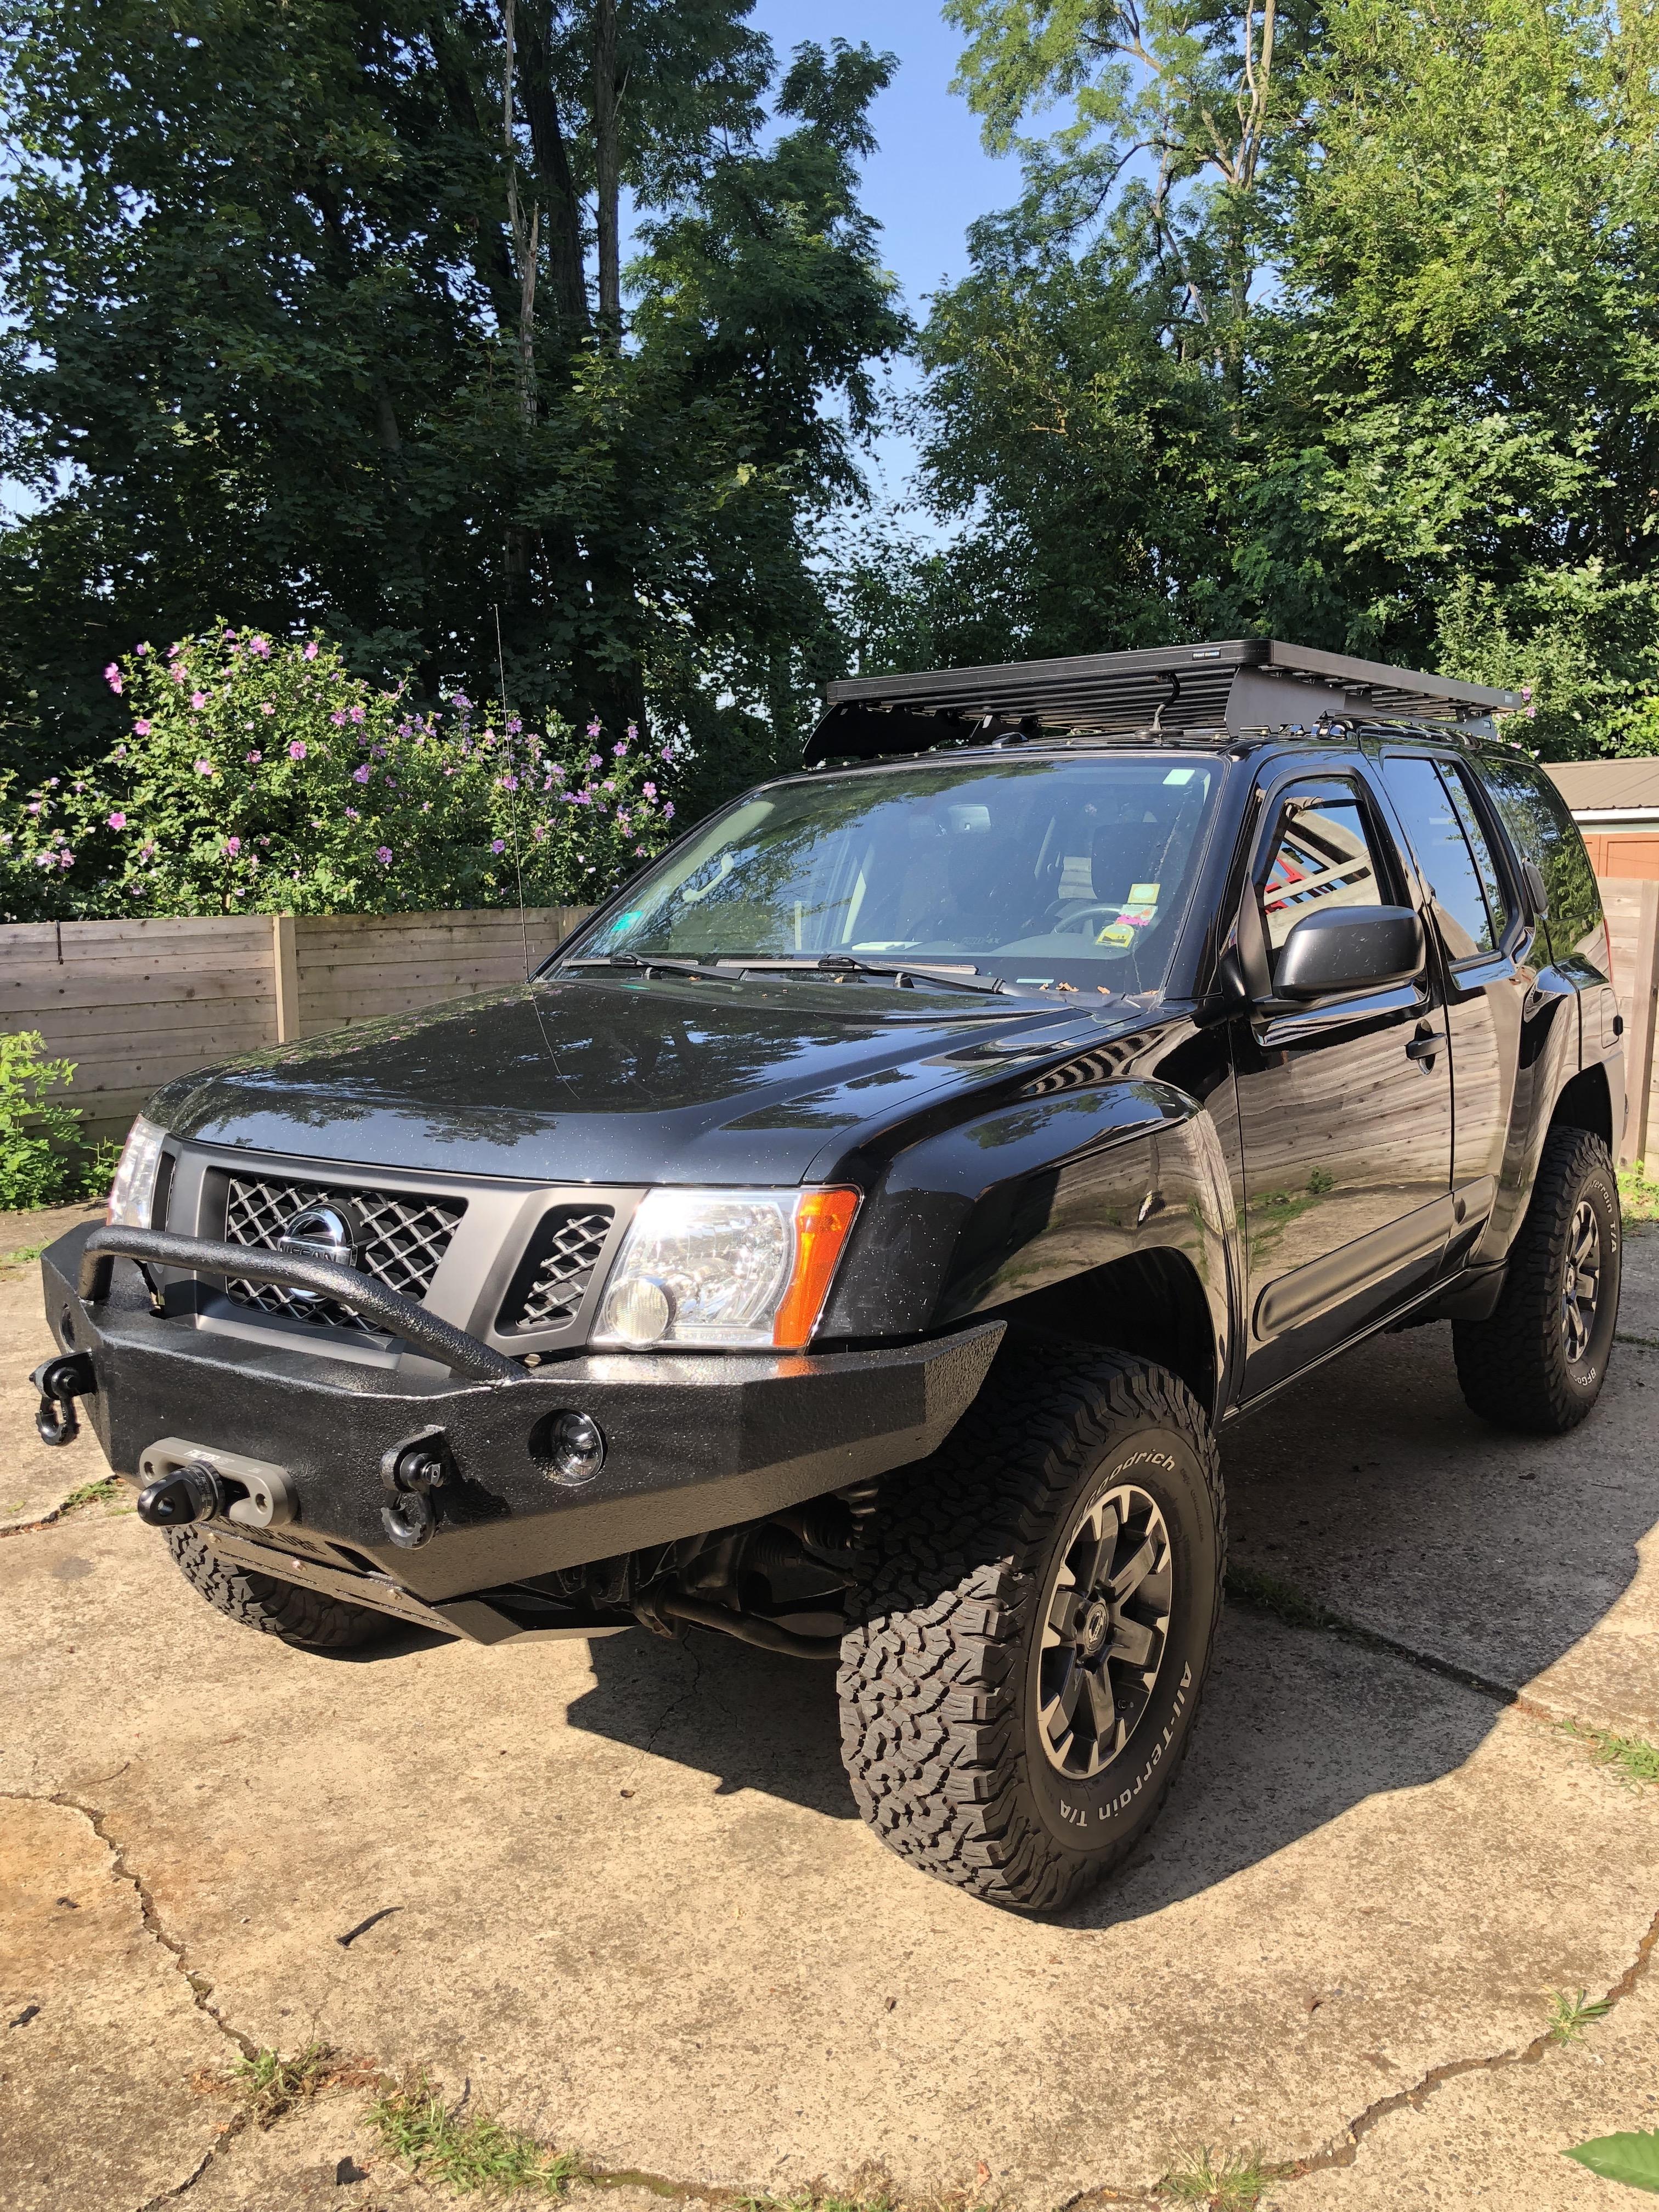
• √ Hardcore Off-Road Front Bumper w/ Pre-Runner Bar
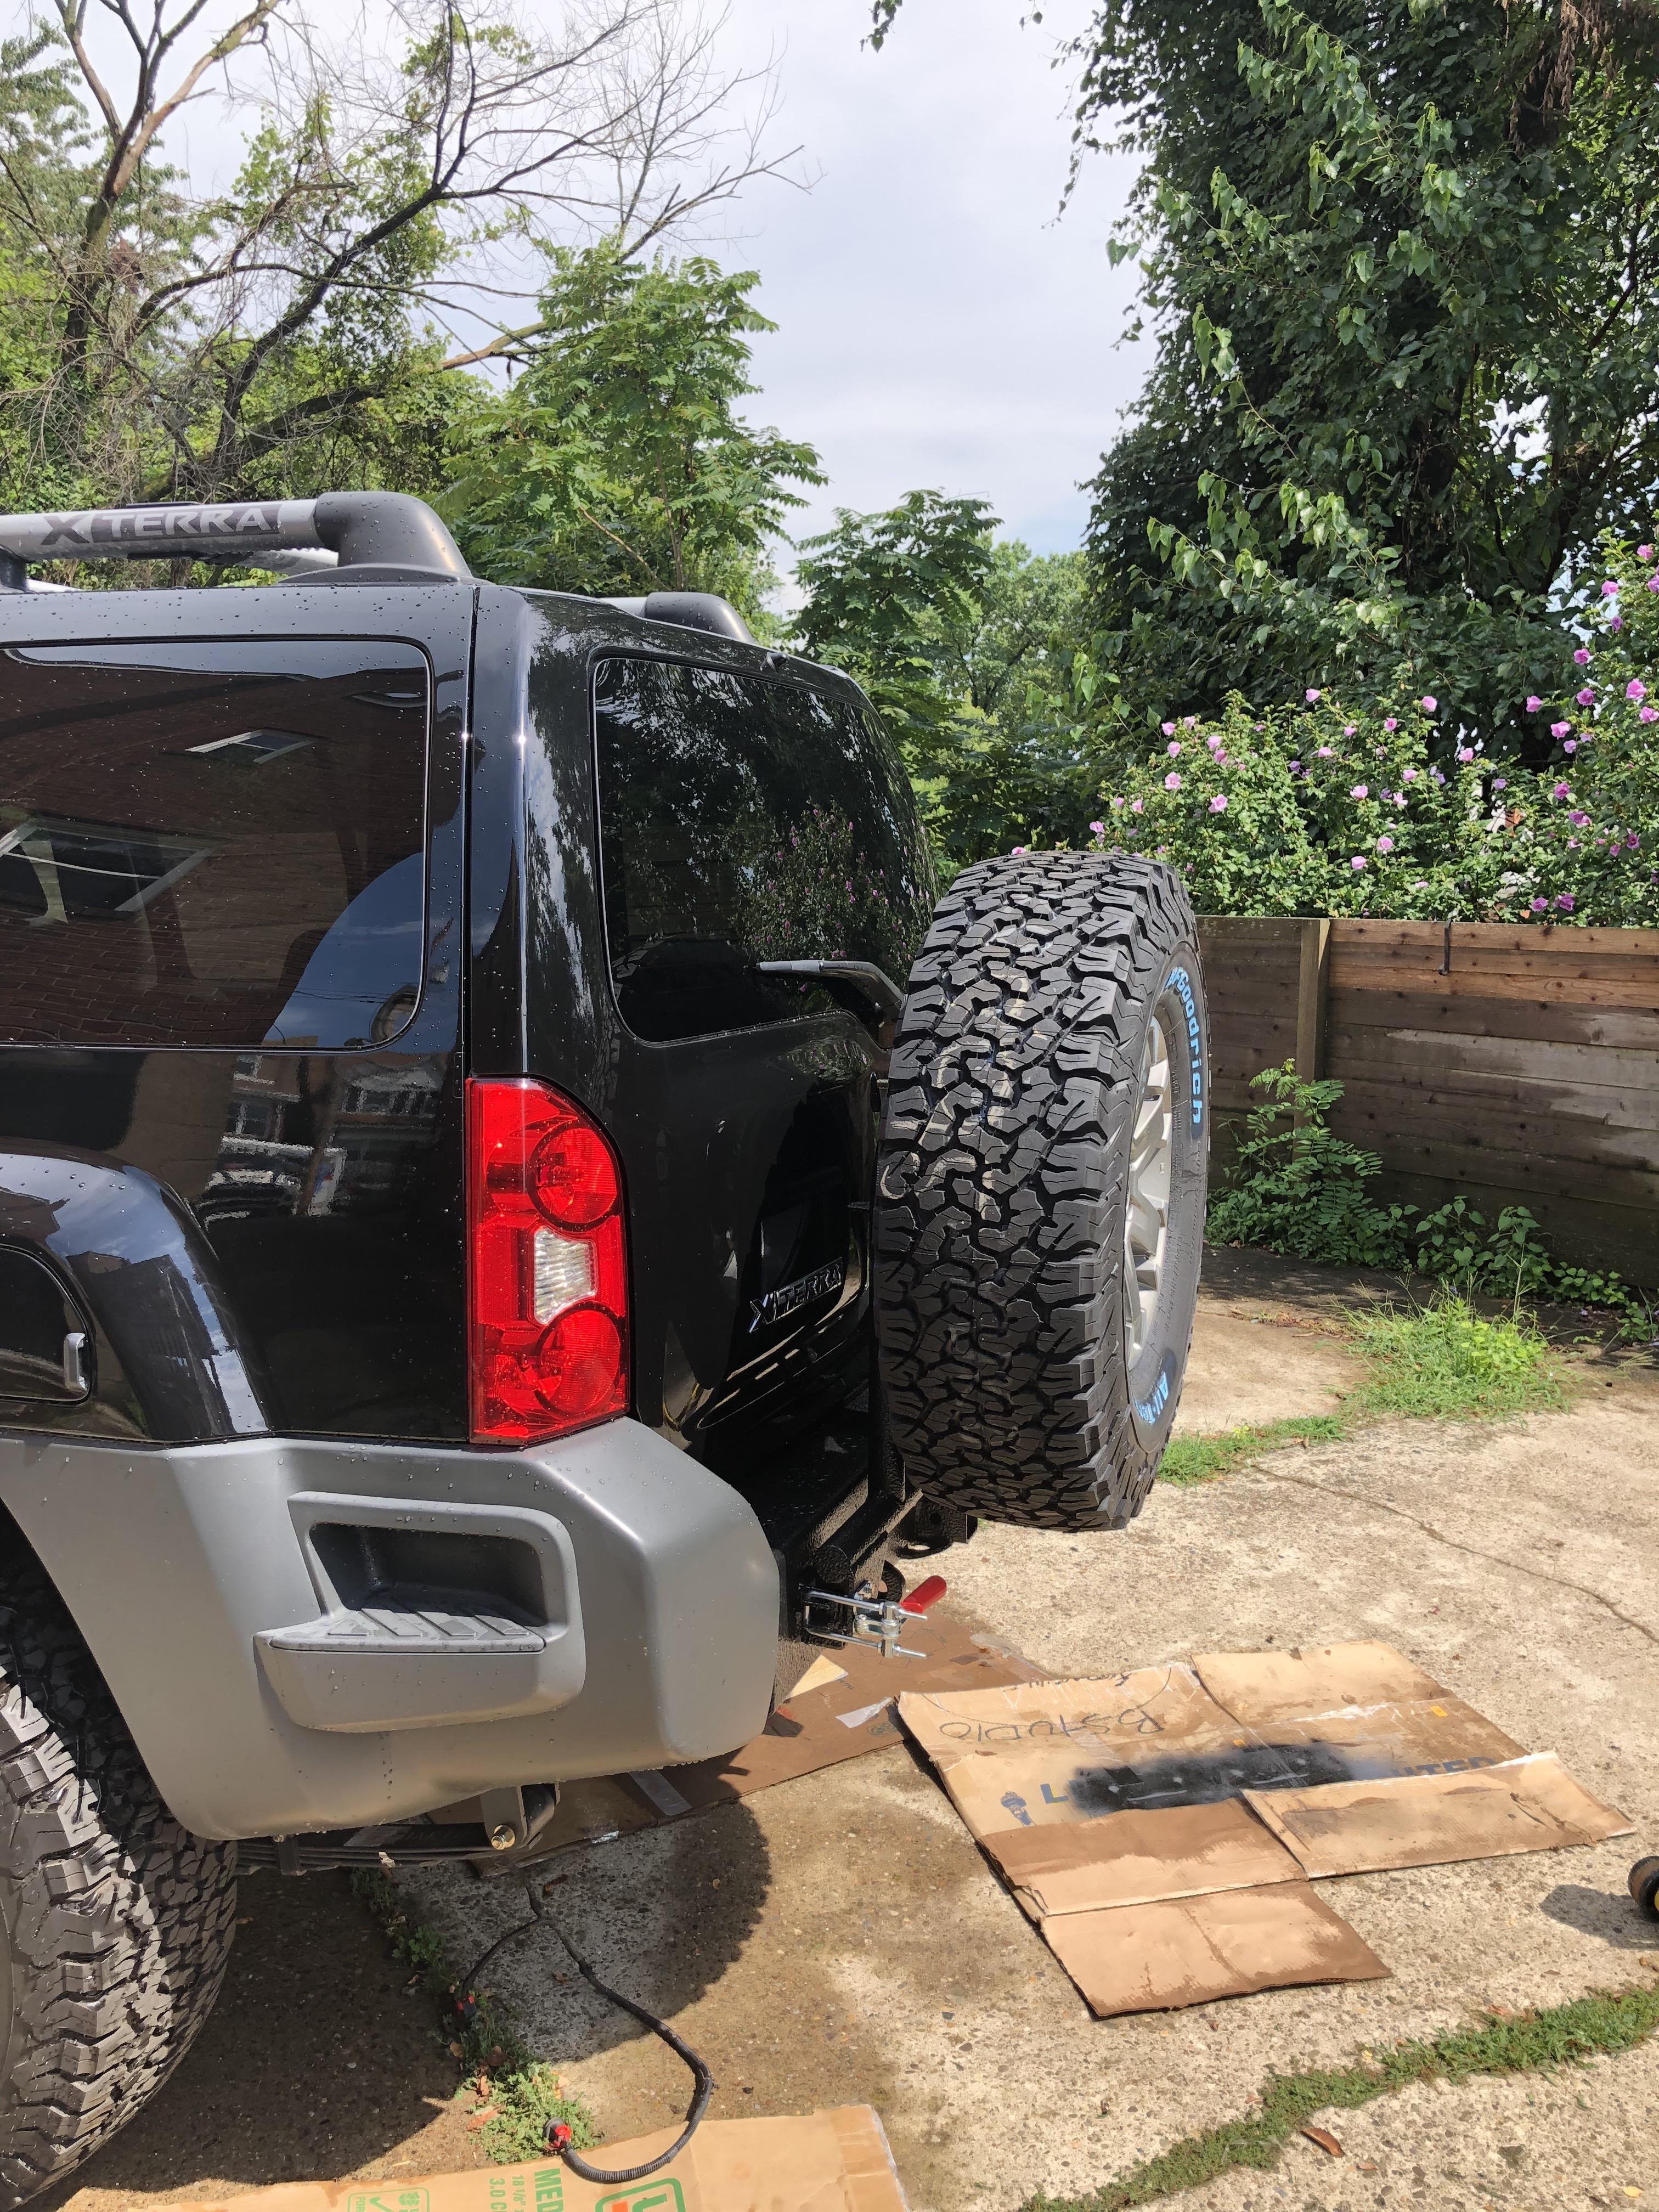
• √ Hardcore Off-Road Rear Bumper w/ Tire Carrier, Reinforced Hitch, Hi-Lift Mount, CB Mount
• √ Front Runner Slimline II Roof Rack
• √ White Knuckle Off-Road Sliders
• √ 4x4 Parts Aluminum Full Skid Plate Kit
• √ ARB m226 Rear Differential Cover
Recovery/Comms:
• √ Smittybilt X20 10,000lb Winch with Synthetic Line
• √ Factor 55 1.5 Fairlead
• √ Factor 55 Prolink
• √ Motormic 3/4" 57,000lb D-Ring Shackles
• √ Bubba Rope Gator Jaw 52,000lb Soft Shackles
• √ ARB CKMA12 Air Compressor with Bumper Mounted Chuck
• > Maxtrax Recovery Boards
• √ Midland MXT400 GMRS Radio
PHOTOS
The day after I bought the truck I drove it from Chicago to Moab. 4 Days later it made its first off-road trek, completing the 100 mile White Rim Trail in bone stock attire.

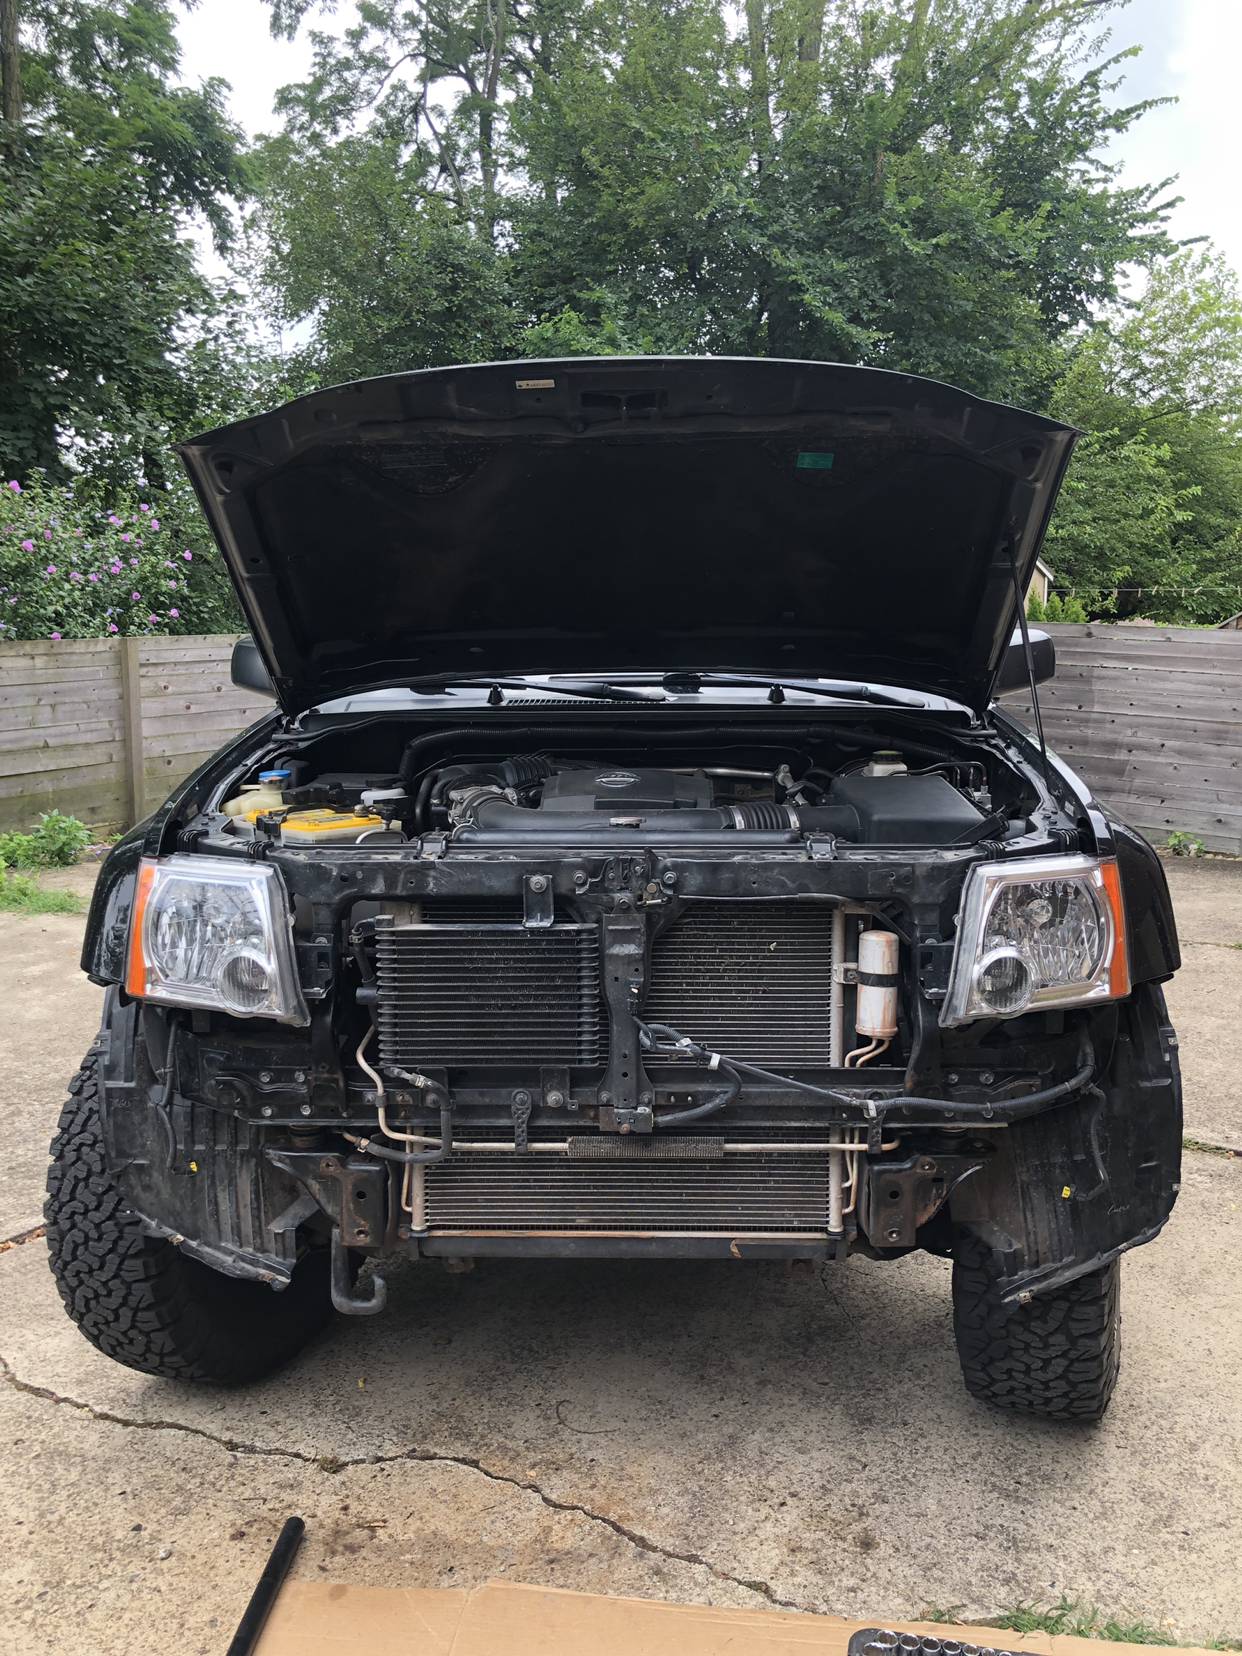
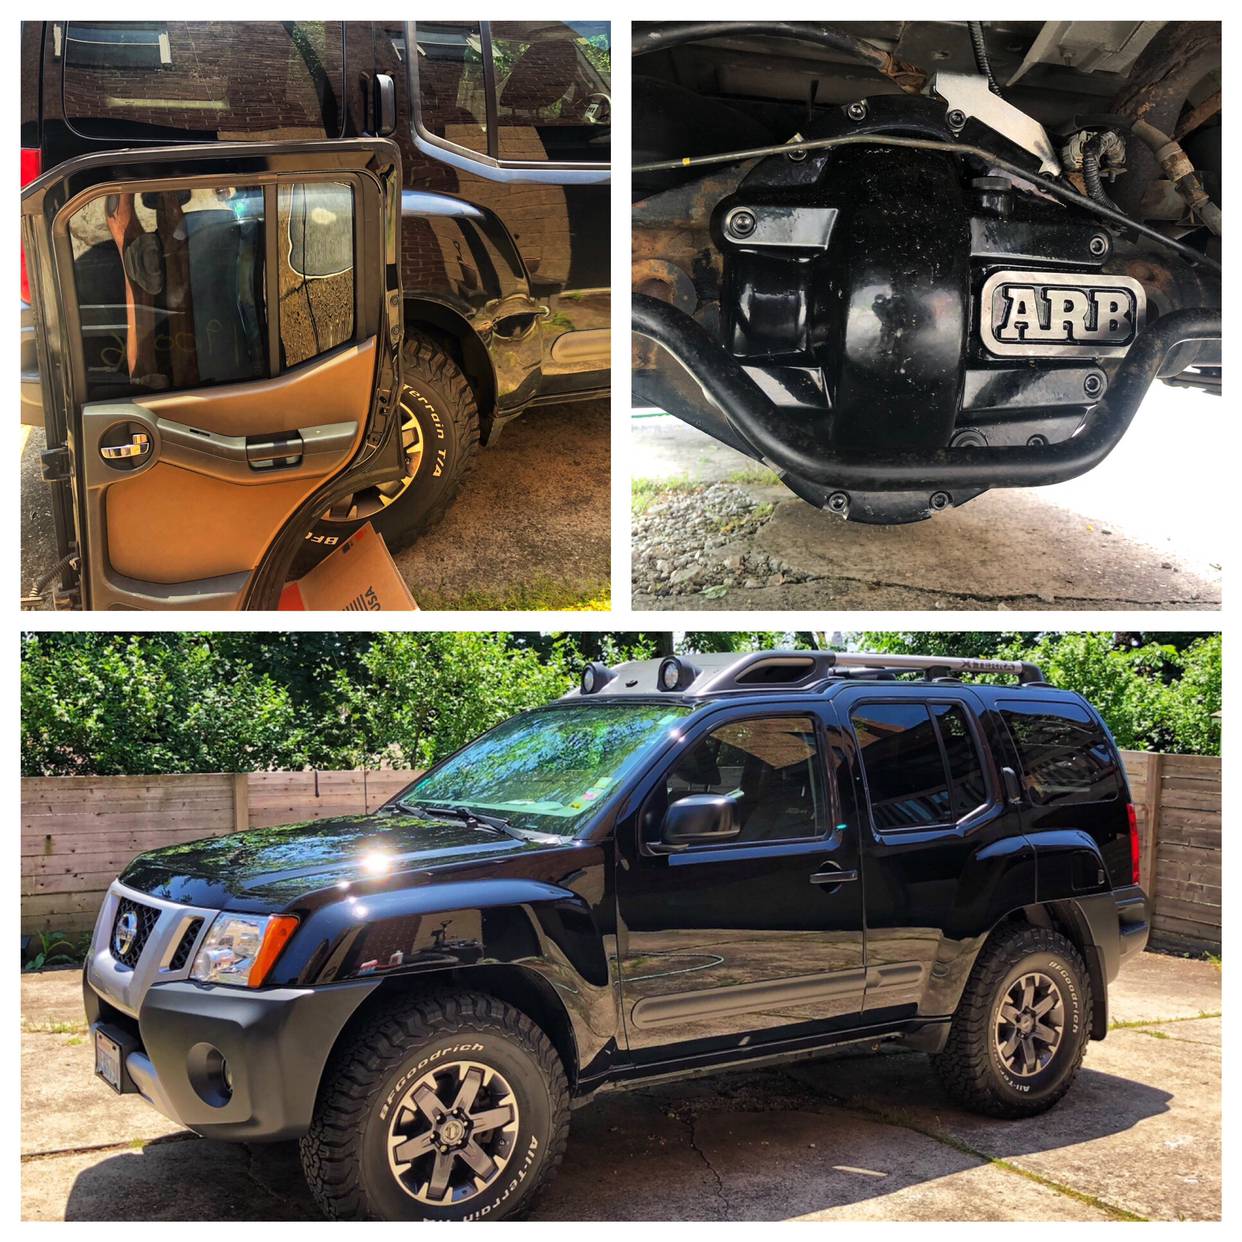
Fast forward 50k miles to May 2019. I managed to put a pretty good dinger in the rear passenger door on a rock while in Moab in April. Luckily X's are abundant in salvage yards and I found a complete door for $150. Swapped the harness, speakers and interior panels to get it back to sexy. This is where I decided to start the build, drained the rear diff and swapped the cover for the ARB, swapped the original Hankook 265's for BF Goodrich K02 285's.
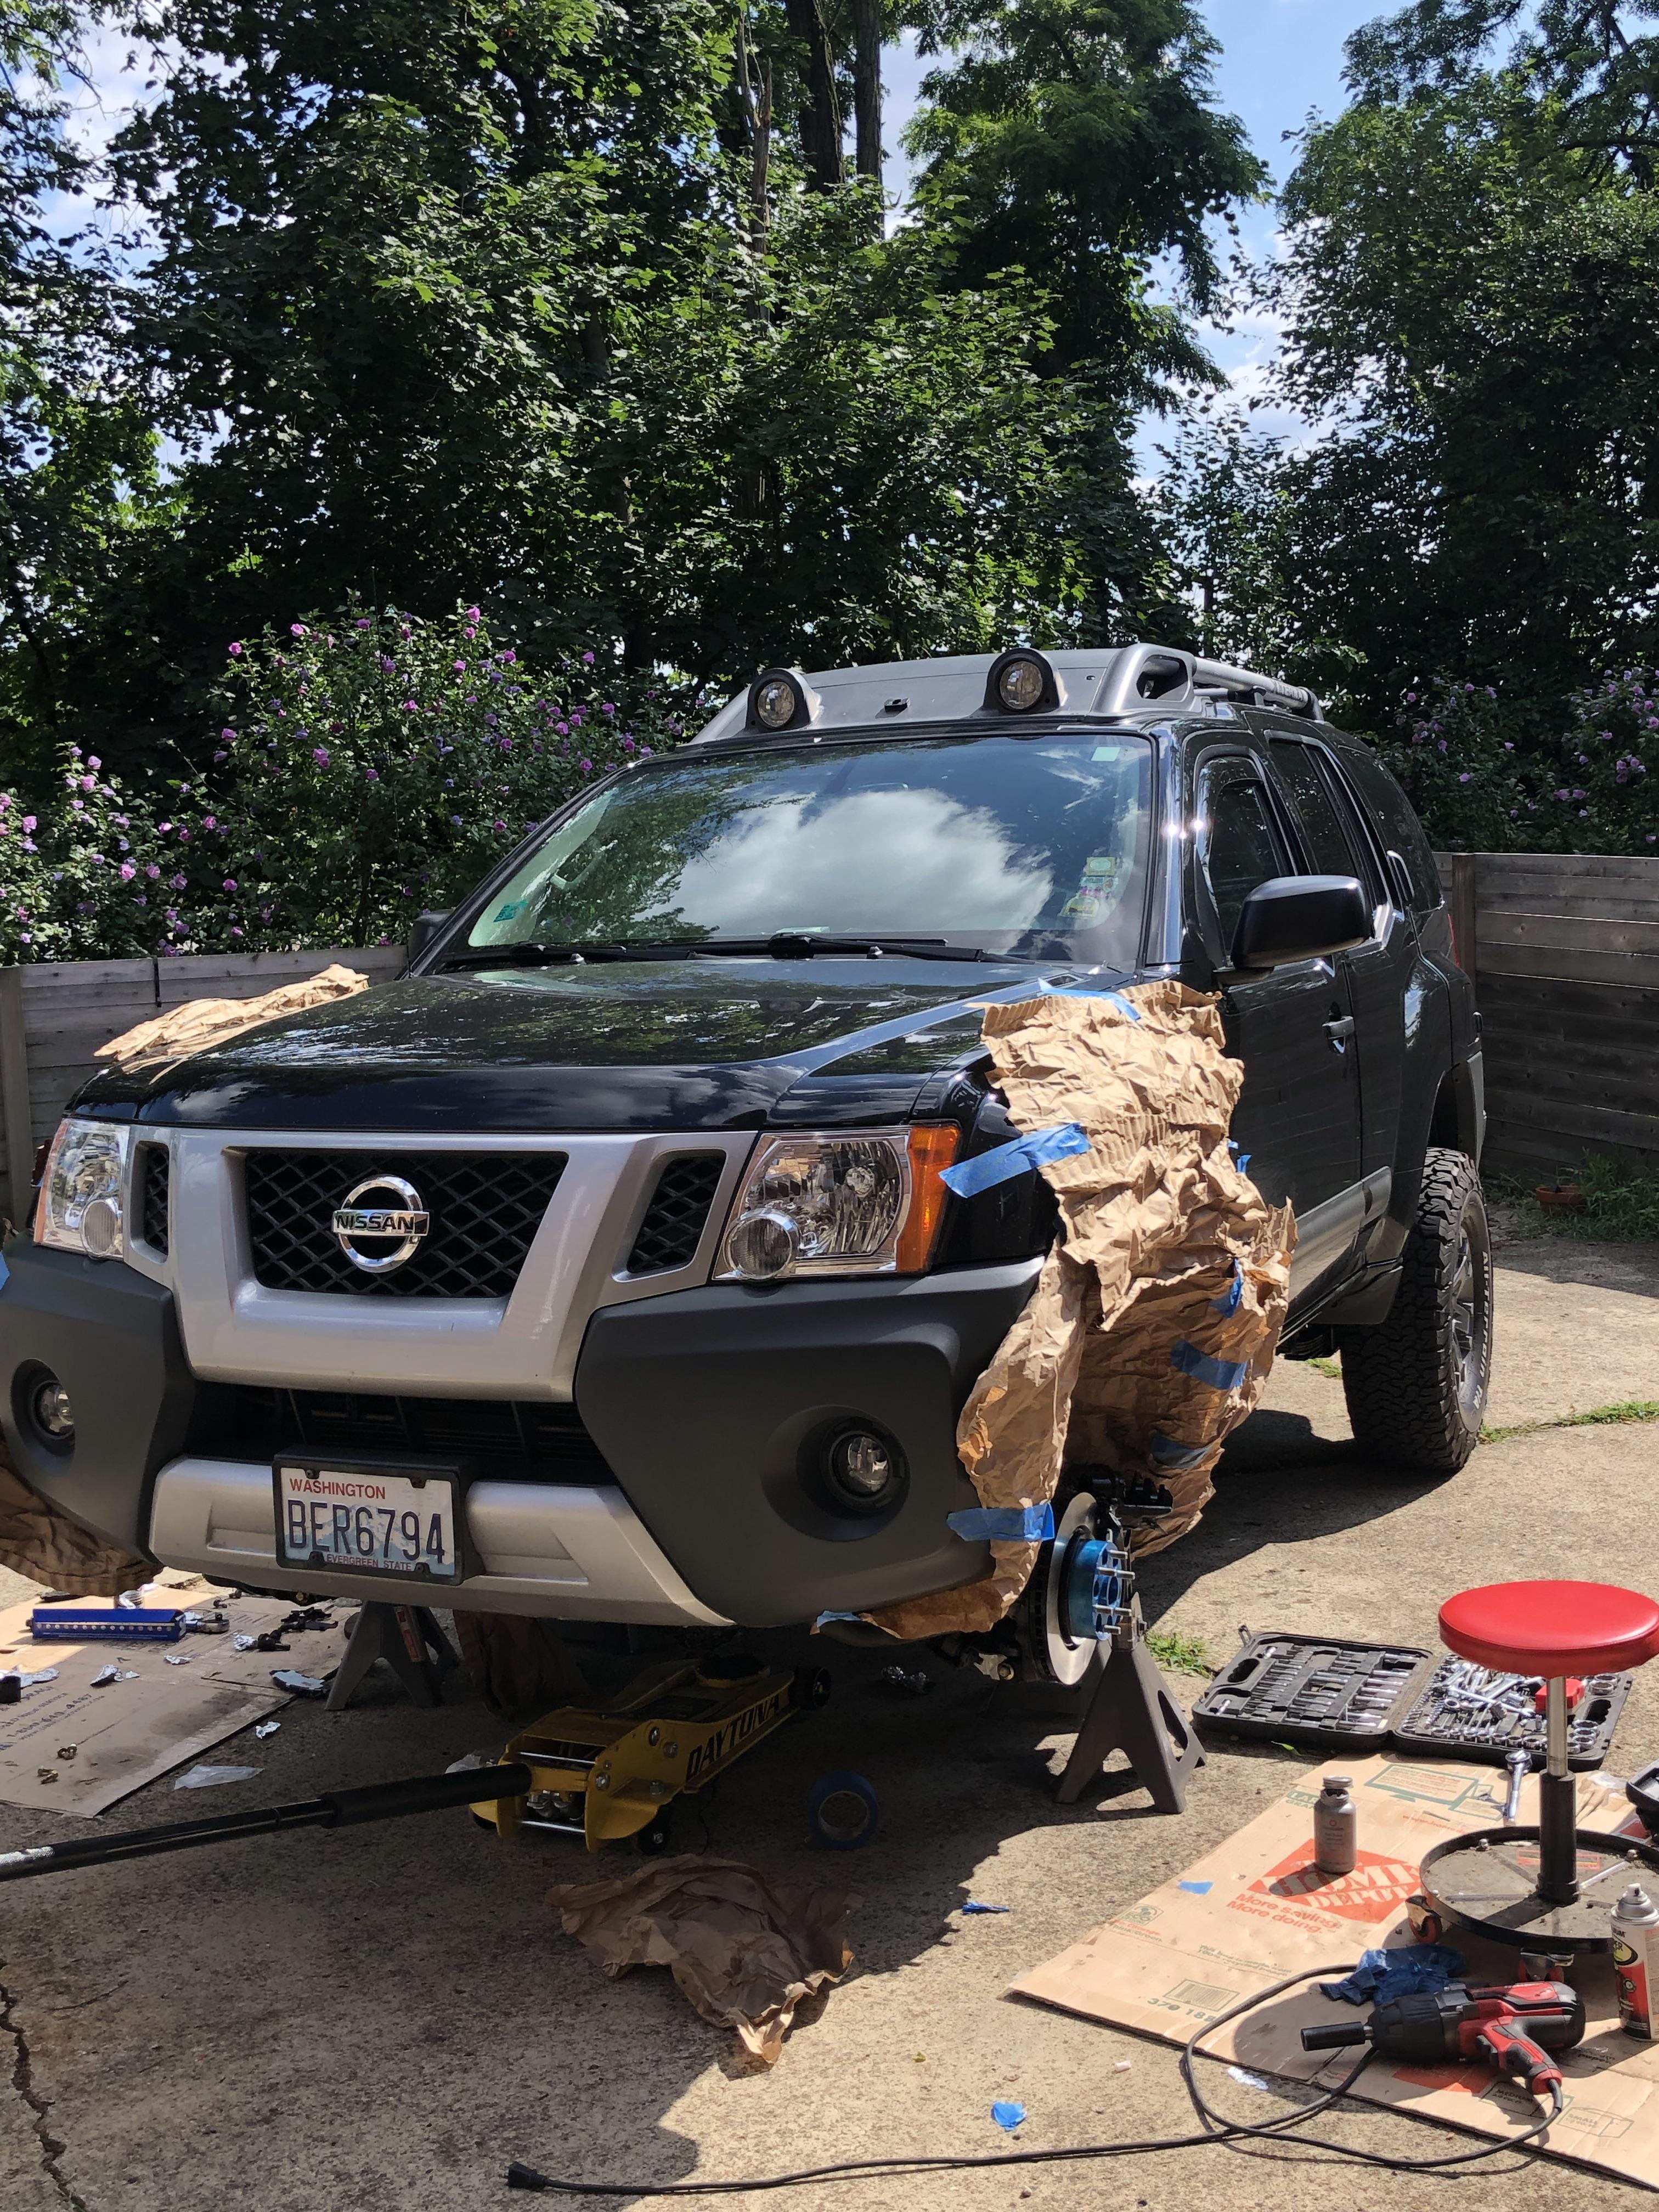
Onto the suspension, which was tired after 50k miles. Sourced everything from PRG, Nisstec, OME and Radflo. All we're very helpful and quick to deliver. Longest wait was the shocks from Radflo which still only took 21 days from order to delivery.
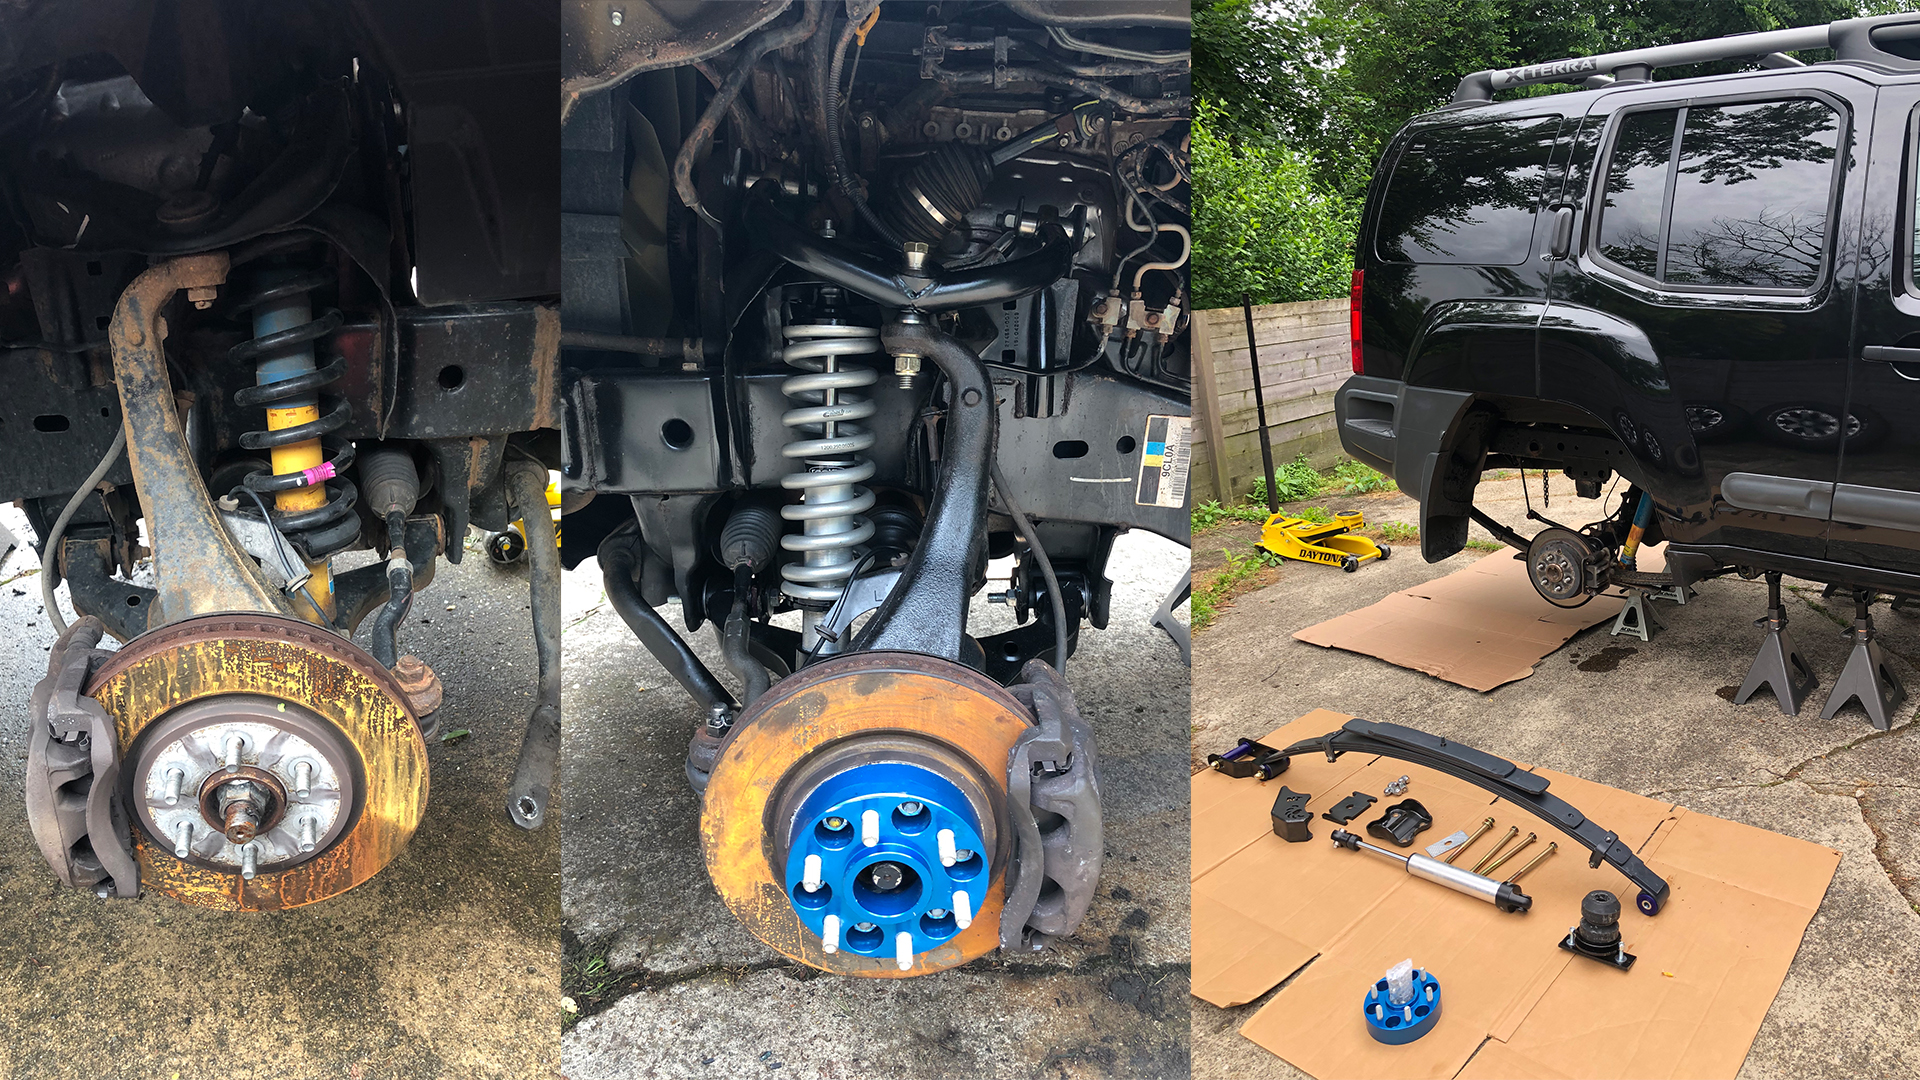
Of course nothing ever goes totally smooth and the front LCA bolts were fully seized. 4 hours of cutting, grinding and swearing, they were finally out.
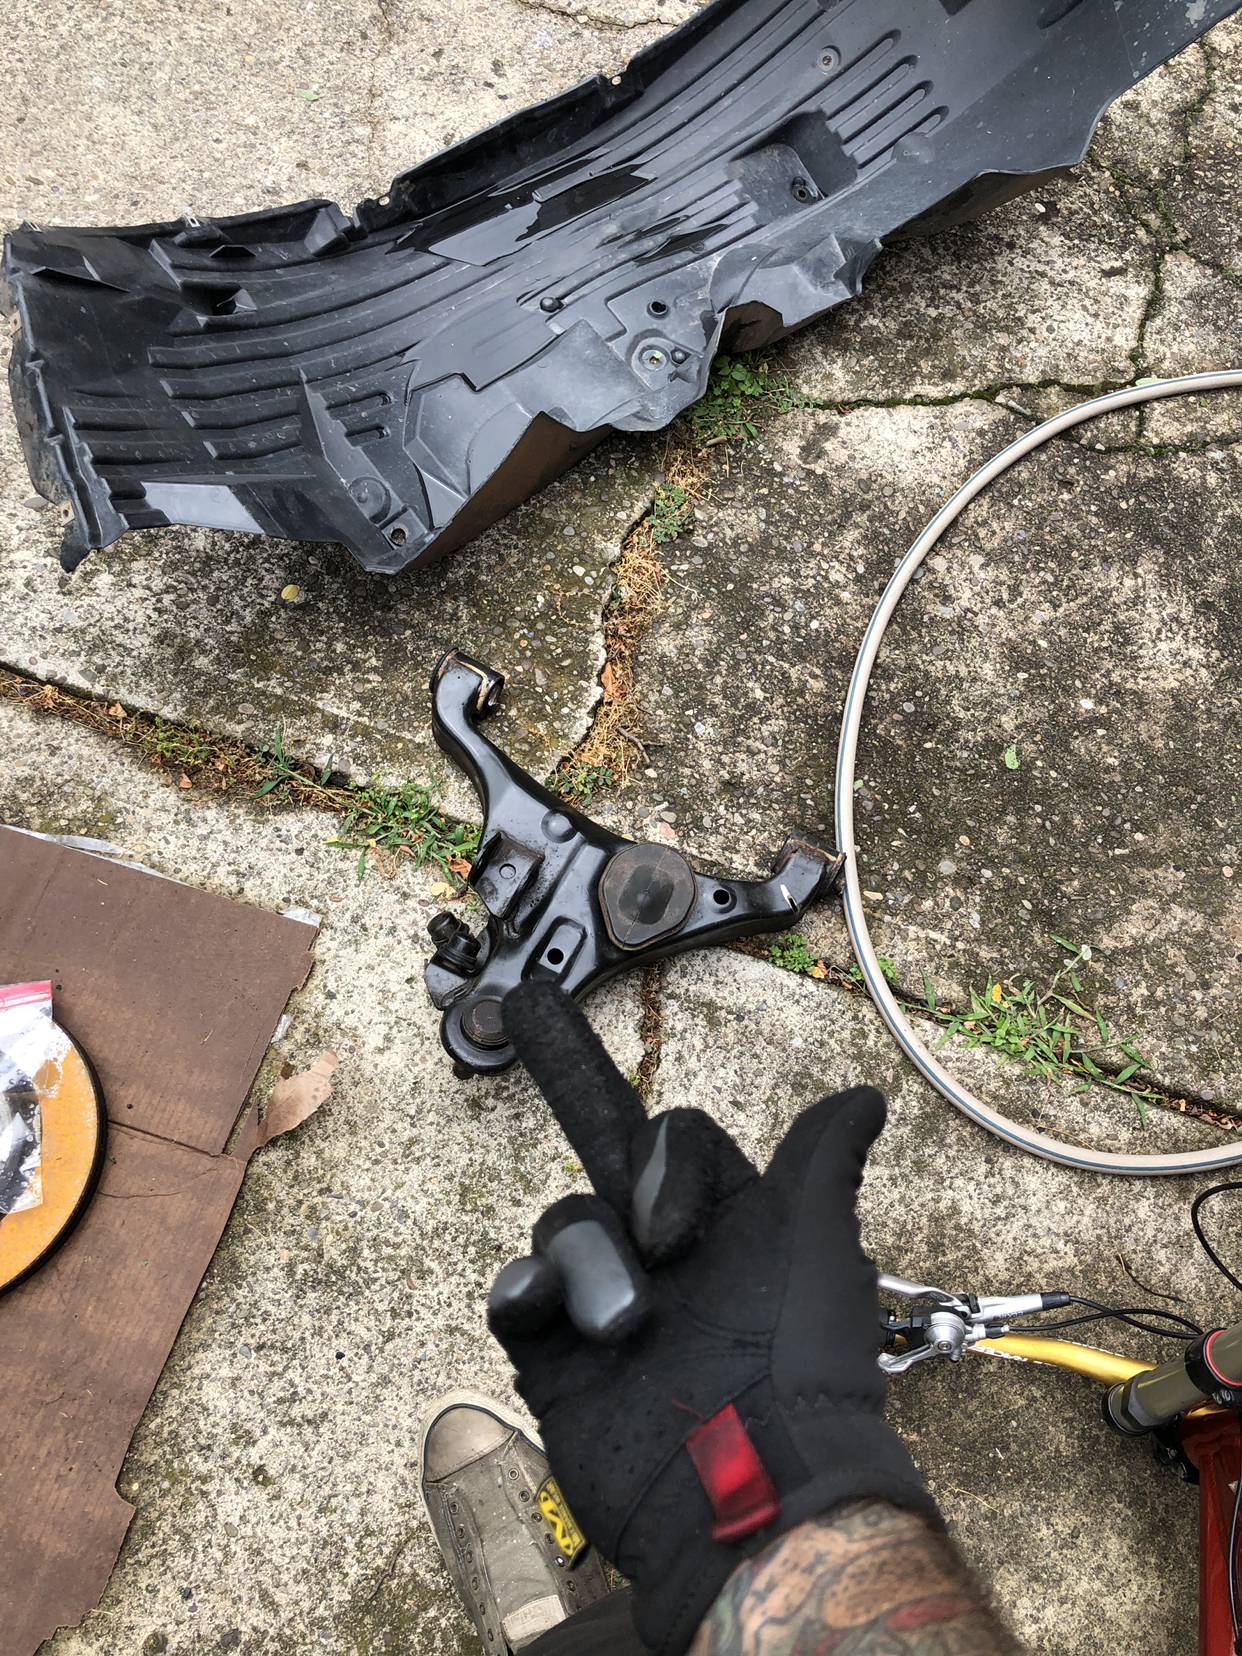
Since the truck started life in Chicago, went to Seattle and is now in Pittsburgh, it's seen it's share of crap weather which means rust is always a concern. While tearing things down I am also hitting all the frame welds with VHT Rust Convertor and then giving it a fresh coat of undercoating to help stop the cancer.
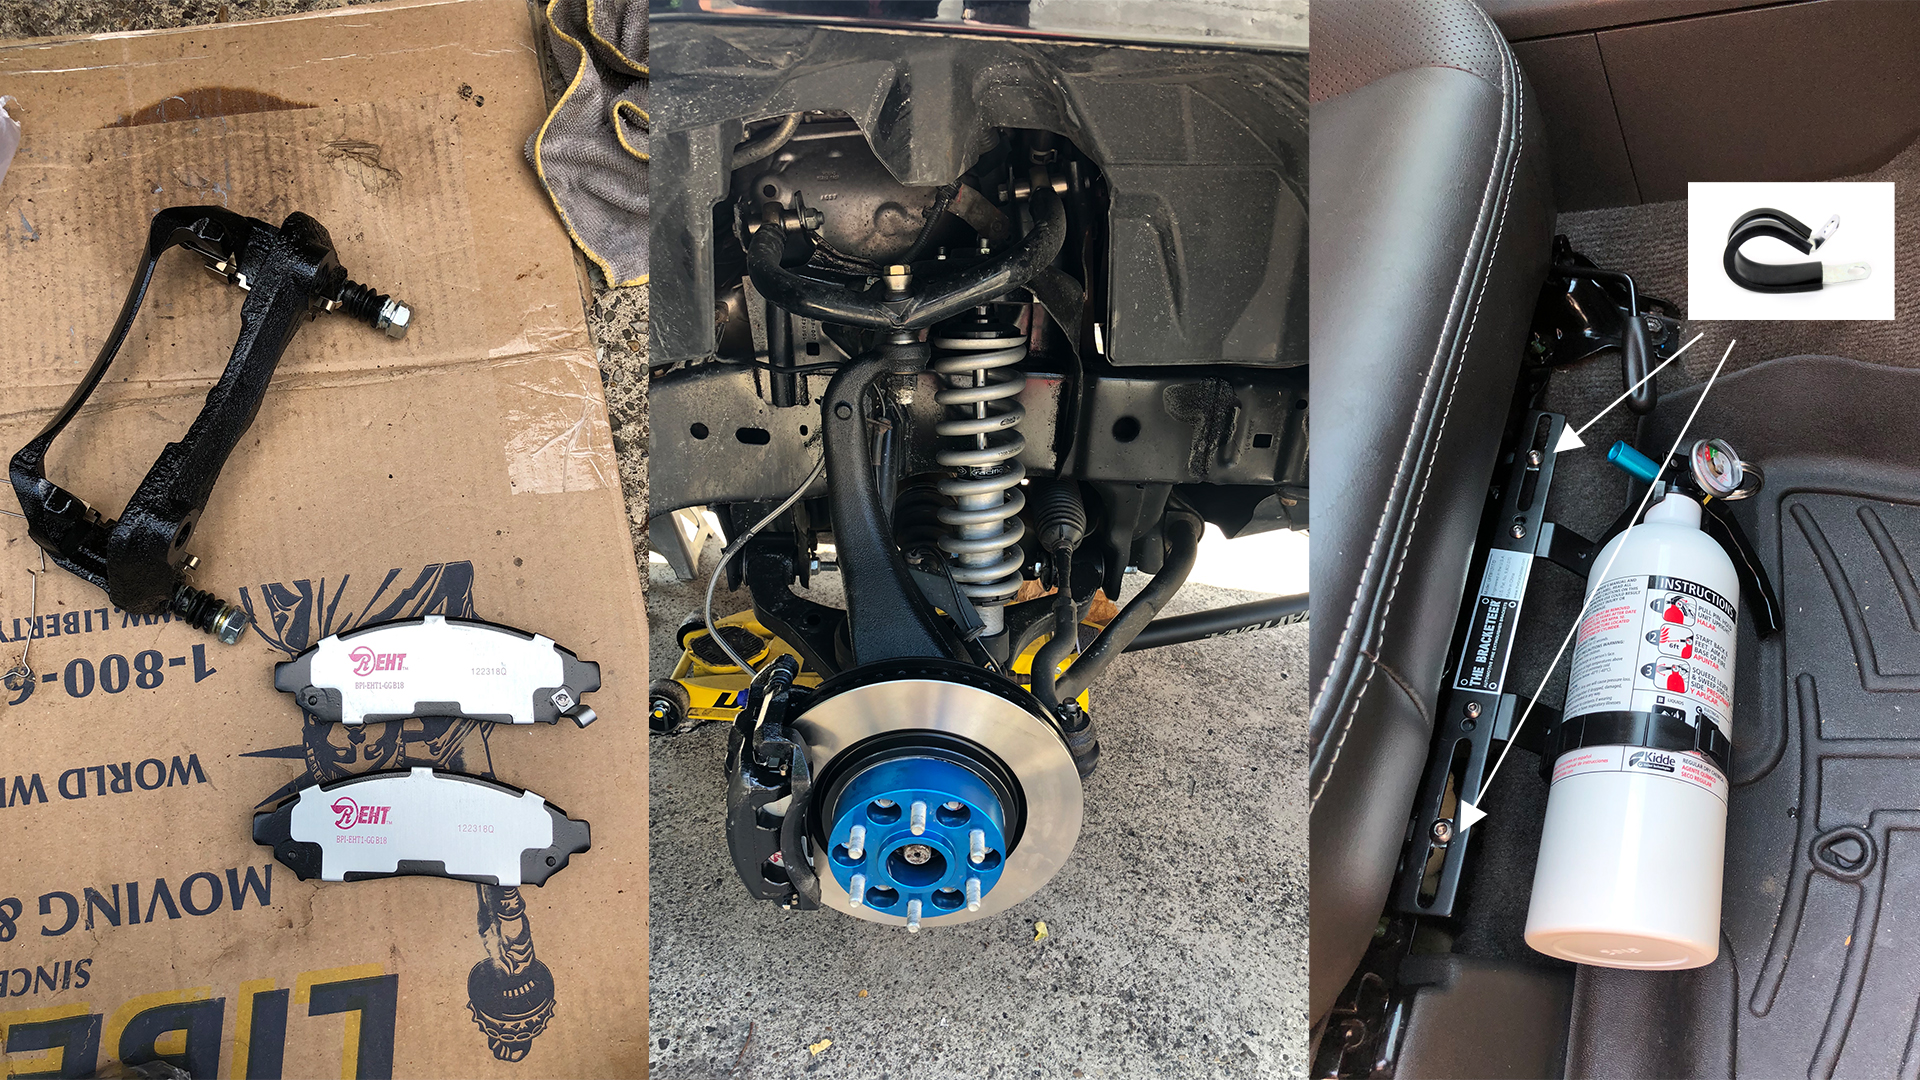
Next work was rebuilding the brakes. Full tear down of the calipers, new seals, guide pins and hardware along with a fresh coat of paint. Swapped the Napa Premium Pads and Rotors (which never felt great) to Raybestos Element 3 pads and Specialty rotors. Replaced all the rubber lines with braided stainless and did a full fluid flush to Motul RBF 660 DOT 4. Much better...
Also figured out a mounting solution for a fire extinguisher under the passenger seat incase I blow myself up.
Hello there! Friends call me "six" and this is my build thread for the 5th Xterra I've owned since pre-ordering one of the first 700 SE's to ship in October of 1999. I've had an X (or 2) in the driveway every since. I am an Executive Creative Director, designer and professional photographer currently living in Pittsburgh PA but I split my time between PGH, NYC and SLC for work. I've done almost 900,000 miles in the seat of my Xterras over the past 20 years and finally decided the 15' Pro 4X would be going into the "forever garage" with my other toys. I just started building it out a few months ago once it hit 50k miles and was paid off. I'm not a mechanic, but am very mechanically inclined and use it as a means to get my hands dirty and escape my day to day corporate stress. I have done all the work up to this point myself, making good progress in my free time and weekends to get it to where it sits today. My goal is to have it finished by September 19' in order to make the trek out to Utah for a month of work and play.
Username: six60six
Make: Nissan
Year: 2015
Model: Xterra
Trim: Pro 4X
Color: Super Black
Purchase Date: July 2015
Factory Options:
• Leather Interior
• Rockford Fosgate Audio
• Fog Lights
• Auto-dim/compass mirror
• Reverse Camera
• Tow Package
• Rear cargo privacy cover
• Rear cargo organizer
• Side Molding
• Mud Flaps (Removed)
• Pro 4X Floor Mats
Legend:
Mark | Means
√ | Done!
> | In-progress
$ | Want
X | Removed/Destroyed
MODS
Suspension/Steering:
FRONT:
Lift: 3"
• √ Radflo 2.0 Coilovers with 700# Eibach springs set to 2" lift with Nisstec 1" top hat spacer
• √ Trimmed coil buckets
• √ PRG Upper Control Arms
• √ Moog Lower Control Arms with greaseable ball joints
• √ Moog Inner and Outer Tie Rods
• √ Timbren Bump Stops
• √ Moog Greasable Camber Bolts
• √ Super Pro Sway Bar Bushings
REAR:
Lift: 3"
• √ Radflo Emulsion Extended Shocks
• √ Old Man Emu Dakar Leaf Packs
• √ NissTec Adjustable Shackles Set to Middle
• √ NissTec Shock Skids
• √ NissTec U-bolt Flip Kit
• √ Timbren Active Off-road Bump Stops
• √ Super Pro Full Poly Bushing Kit
• √ Off-Road Gorilla Rear Differential Breather Mod
• √ 3 Degree Steel Shims
Engine/Exhaust/Drivetrain:
• √ m205 3.36 Front Differential
• √ Nissan OEM V8 Pathfinder Front CV Half Shafts
• √ Airflow Snorkel
• $ aFe Mach Force XP Cat Back Exhaust
Brakes:
• √ Raybestos Element 3 Brake Pads
• √ Raybestos Specialty Brake Rotors
• √ NissTec Stainless Steel Braided Lines - Front & Full Rear
Wheels:
• √ Stock 2015 Pro 4X 2-Tone Charcoal Rims Including Spare
• √ 285/75R-16 BF Goodrich K02
• √ Spidertrax 1.5" Wheel Spacers Front + Rear
Electrical:
• √ Odyssey 34r-pc1500t Battery
• √ Ultimate Battery Terminals with Top Post Adapters
• √ 10" 0 AWG Extended Battery Lead Wires (Battery to factory harness)
• √ Morimoto 2 Stroke 2.0 LED Headlights
• √ Morimoto XB LED Projector Fog Lights
• √ Morimoto X-VF LED Amber Front Turn Signals
• √ Morimoto XB LED Amber Marker Lights
• √ Morimoto X-VF LED Red Rear Turn Signals
• √ Morimoto X-VF LED Red Brake Lights
• √ Morimoto XB LED Red Third Brake Lights
• √ Morimoto Festoon XB LED Interior Lights
• √ Diode Dynamics XP80 LED Off-Road Roof Lights
• > Trigger 6 Shooter Bluetooth Wireless 6 Channel Relay
• √ Morimoto XBT Bluetooth RGB Controller
• √ Morimoto Profile Pixel RGB Rock Lights
• √ Goal Zero 400 Lithium Power Pack
• √ Goal Zero Boulder 100 Solar Panel
Fluids:
• √ Mobil 1 Synthetic Every 5000 Miles
• √ Nissan Genuine Matic-S (Transmission)
• √ Amsoil ATF (Transfer Case)
• √ Amsoil Severe Gear (Differentials)
• √ Motul RBF 660 Synthetic DOT 4 Brake Fluid
Interior:
• √ 2lb DOT Fire Extinguisher under passenger seat with modded Bracketeer mount
• √ WeatherTech Floor Liners - Front & Rear
Exterior:
• X Rear Passenger Door
• √ WeatherTech Front Window Visors
• > Painted Rear Bumper Corner Plastics - SEM Black Bumper Paint
• > Painted Side Moldings - SEM Black Bumper Paint
• > Painted Front Bucktooth Grill - Flat Black
• √ Front Fender Trim and Melt Mod
• √ ARB Awning 2000
• √ Tepui HyBox Roof Top Tent
• > Gobi Passenger Side Ladder
• √ Rockslide Engineering Spare Tire Rack Kit (Rotopax Mounts)
• √ Rotopax 2 Gallon Gasoline Pack x 2
• √ Rotopax 2 Gallon Water Pack x2
Armor:
• √ Hardcore Off-Road Front Bumper w/ Pre-Runner Bar
• √ Hardcore Off-Road Rear Bumper w/ Tire Carrier, Reinforced Hitch, Hi-Lift Mount, CB Mount
• √ Front Runner Slimline II Roof Rack
• √ White Knuckle Off-Road Sliders
• √ 4x4 Parts Aluminum Full Skid Plate Kit
• √ ARB m226 Rear Differential Cover
Recovery/Comms:
• √ Smittybilt X20 10,000lb Winch with Synthetic Line
• √ Factor 55 1.5 Fairlead
• √ Factor 55 Prolink
• √ Motormic 3/4" 57,000lb D-Ring Shackles
• √ Bubba Rope Gator Jaw 52,000lb Soft Shackles
• √ ARB CKMA12 Air Compressor with Bumper Mounted Chuck
• > Maxtrax Recovery Boards
• √ Midland MXT400 GMRS Radio
PHOTOS
The day after I bought the truck I drove it from Chicago to Moab. 4 Days later it made its first off-road trek, completing the 100 mile White Rim Trail in bone stock attire.
Fast forward 50k miles to May 2019. I managed to put a pretty good dinger in the rear passenger door on a rock while in Moab in April. Luckily X's are abundant in salvage yards and I found a complete door for $150. Swapped the harness, speakers and interior panels to get it back to sexy. This is where I decided to start the build, drained the rear diff and swapped the cover for the ARB, swapped the original Hankook 265's for BF Goodrich K02 285's.
Onto the suspension, which was tired after 50k miles. Sourced everything from PRG, Nisstec, OME and Radflo. All we're very helpful and quick to deliver. Longest wait was the shocks from Radflo which still only took 21 days from order to delivery.
Of course nothing ever goes totally smooth and the front LCA bolts were fully seized. 4 hours of cutting, grinding and swearing, they were finally out.
Since the truck started life in Chicago, went to Seattle and is now in Pittsburgh, it's seen it's share of crap weather which means rust is always a concern. While tearing things down I am also hitting all the frame welds with VHT Rust Convertor and then giving it a fresh coat of undercoating to help stop the cancer.
Next work was rebuilding the brakes. Full tear down of the calipers, new seals, guide pins and hardware along with a fresh coat of paint. Swapped the Napa Premium Pads and Rotors (which never felt great) to Raybestos Element 3 pads and Specialty rotors. Replaced all the rubber lines with braided stainless and did a full fluid flush to Motul RBF 660 DOT 4. Much better...
Also figured out a mounting solution for a fire extinguisher under the passenger seat incase I blow myself up.