

Benefactor
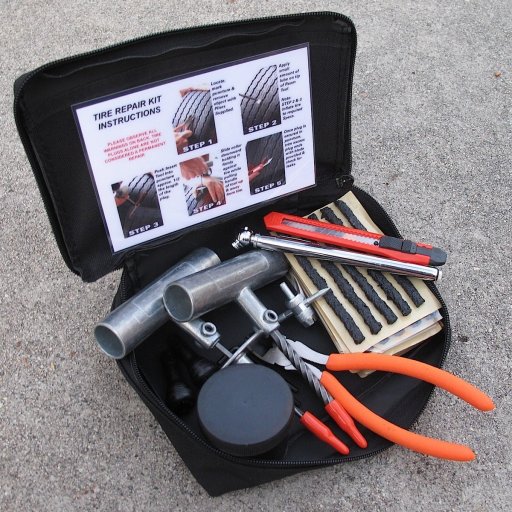
Here's another excerpt from my training manual, this time on plugging a tire. The demo kit below is the UTP Tire Repair Kit, available at winchline.com. For an overview of the pieces in kit, checkout my YouTube video at the bottom of their page.
Stuck with thorns, pinched by rocks, or driven over a bolt, a punctured tire is bound to happen. Having a small repair kit can make easy work of getting the tire plugged and holding pressure again. However it is best to mount the good full size spare and make the plugged tire the new spare. Take an assessment of how the puncture happened. If it was a random object on the trail, chances are low that it will happen again. But, if it was from a thorn, or sharp rocky terrain, and it’s likely to happen again, decide if it’s worth going forward and risking more punctures.
Tire plugs should only be used on the tread face. Any damage to the shoulder is un-repairable and the tire should be removed from service immediately. The sidewalls do not have the proper construction to hold a plug in place. However in extreme situations, inserting 4-6 plugs in a sidewall tear has been known to get off the trail. Another extreme situation is when sidewall tears can be stitched. This repair is designed for tires that use inner tubes, but even a tubeless could be stitched, plugged, and sealed with shoe goo enough to limp back to civilization. This does require removal of the tire from the wheel which is not covered here.
Tire shops, for the most part, won’t touch a tire that has been plugged or otherwise “field repaired”. For liability reasons they have their own process of a plug/patch combo that is installed with the tire off the wheel. On the other hand, there are multiple reports of people driving 10,000+ miles on a plugged tire with no issues. Always have a professional assess the tire in any case after damage has happened.
Sometimes the puncture can easily be found by sound or by feeling for the escaping air. But other times, using a spray bottle with soapy water, or even spit can work well (look for small bubbles) to find the puncture. It’s usually best to remove the tire from the vehicle and inspect the whole tire for punctures. Use a silver colored marker or chalk to mark the location of a puncture. It will allow you to easily find the punctures again after the inspection.
When you have found the object(s) in the tire you must remove them. A good repair kit should have something to grab and pull out the object, like a pair of side cutters. Once the object is removed the hole has to be widened to fit the plugs as well as have clean edges of the hole for a better seal. The reamer tool is tapered and spiraled to make the puncture large enough for the plug to fit. Insert the reamer and follow the path of the puncture. You may have to twist the tool so it screws into the tire a bit. Once in, the reamer tool needs to be shoved in an out of the tire multiple times. It can take a lot of effort to do this. A tool with a T shaped, metal handle will allow a better grip and give you an easier time. A small dab of provided grease on the tip makes the job a little smoother as well. Some people keep the reamer tool in the tire to prevent more air escaping.
Peel off one of the sticky rope plugs from the backing paper, making sure to only touch the tips of it. Never let it touch the ground or otherwise get contaminated. It will lose the ability to form a proper seal. Pull the plug halfway through the end of the insertion tool tip and shove it into the puncture. This tool has an opening for the plug at the tip and is split, so the plug can stay inside the tire. Be sure to follow the same angle and path as the reamer tool. The handle should also be T-shaped for the same reasons as the reamer tool. Once the plug is in the tire, continue pushing until the handle bottoms out on the collar. Avoid twisting the insertion tool in the hole during this part. Once inserted, give the handle a good tug while holding the collar against the tire, until the whole thing pulls out. The plug should be in the hole with two tails sticking out. Cut these with a razor at the top of the tread lugs. Failure to do so can lead to the plug pulling out of the tire.
Leaving long tails can cause the plug to pull out on the trail. If a plugged tire has to be driven on, do not reduce the pressure as low as the other tires. This keeps the hole from deforming as much, which can allow air to escape around the plug, or cause the plug to fall out completely. Use soapy water to confirm the plug is leak free before driving away.

