Off-Road Ranger I
- 981
- First Name
- Gwendolyn
- Last Name
- vdL
- Member #
-
30410
- Ham/GMRS Callsign
- KN6YFJ
Over the last 1.5 years we've slowly converted our 4Runner into a comfy camping/overlanding setup, and I'd though I share some of the things we've done. I'll start with our drawer system. I've done a bunch of woodworking before, so that gave me a head start. I have a small 10x12 workshop, and a patio to put my tools so I have more space for larger projects. The major tools I used were a basic contractor table saw that can fit a dado stack, a miter saw, and a track saw. The design was inspired by a great many other designs we saw on YouTube and in person at the 2021 Overland Expo West in Flagstaff.
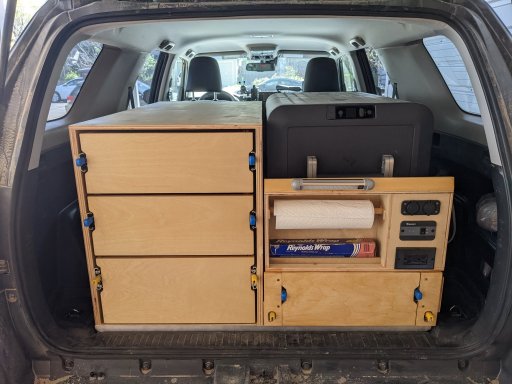
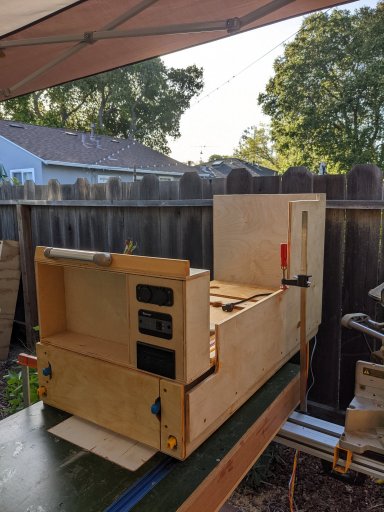
We removed the back seats and I put in a piece of plywood as a base plate over the rear seat area. The drawers are split into two boxes, one a full box with three drawers, the other an open box with a low double drawer that holds the fridge and the kitchen. Both boxes are 41" deep, which leaves a good bit of space over the rear seat for a 'garage', where we keep our chairs, storage boxes with tools and recovery gear, ladder, table, jerry cans, etc. Behind the front seats we have a vertical sheet of ply that has all the electronics, which can fold down with hinges so we can access the two Li-Ion batteries that sit in the rear seat foot wells. I'll post more details on that in the future.
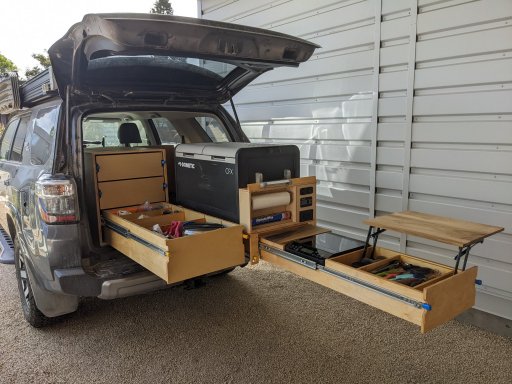
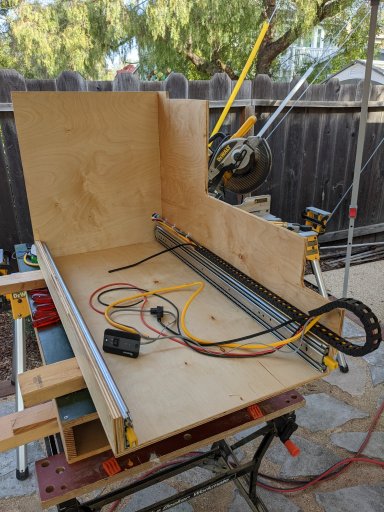
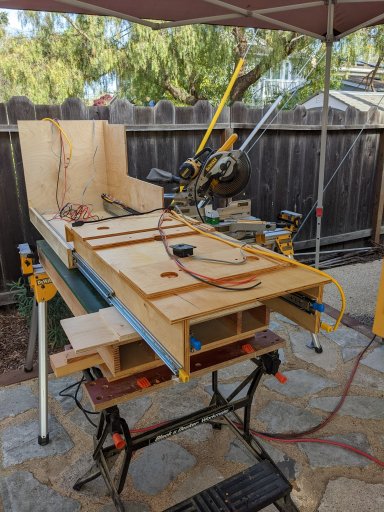
The base plate is made from a 4x8' sheet of 3/4" ply, cut to size using the track saw and jigsaw. The base plate is bolted to the car using existing bolt holes. The back of the boxes is mounted to the base plate using an aluminum L-profile. The front of the boxes are tied together using an aluminum L-profile glued to aluminum flat bar, and bolted to the car using the existing D-rings in the back. The boxes sit on the carpet (I wanted the sound dampening). All panels that get slides attached or have dados are 3/4" ply, the other panels (such as drawer bottoms and backs) are 1/2". Someday I might rebuild the whole thing with a lighter material/design, but for now this ticks the functionality and sturdiness boxes.
The 3 drawer box is pretty simple, just plywood, dados/rabbets and glue (& screw where needed). I'm a big fan of dados since they make assembly so much easier when you work just by yourself. Things just slot into place, and it's strong too. I pre-cut dados in the side so we can put in dividers for better organization. This is one of the drawers.

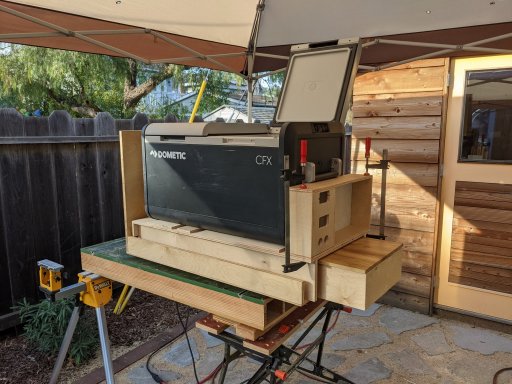
The fridge / kitchen box was a real head scratcher. I was able to fit a plastic drag chain above the slider, which keeps the cables nicely tucked away as you slide out the fridge. The cables run to the little box in front of the fridge, which has the inverter remote switch, USB power, an LED light, and a 120V outlet from the inverter. The power cable of the induction cooktop stows away underneath the cooktop, and we plug it into the outlet when we pull out the kitchen. Ideally the cooktop would be hardwired and use another drag chain, but that would take up too much valuable space. I ran out of plywood, otherwise I would have made the right side full height, so you can store things more easily next to that side panel (over the rear right wheel well). The wood strip that the LED light is mounted on was an afterthought, but it turns out to be really handy for keeping your devices secure when we charge them using the USB outlet.
There are definitely things that could be changed to make it lighter, even just cutting away material where it's not needed, but for now it's really great to have an efficient camp storage and kitchen setup. Induction cooking is really great, no hassle with gas bottles, it's fast, and it works great on windy days. We have 200 Ah of Li-Ion and 200W solar (on our RTT), which is a bit tight for staying at camp for more than two nights if you don't have full sun and want to cook more elaborate meals (which we enjoy doing). We'll probably add 200W of portable solar, so we can augment it and are less dependent on the sun hitting the car.
Feel free to ask any questions!
We removed the back seats and I put in a piece of plywood as a base plate over the rear seat area. The drawers are split into two boxes, one a full box with three drawers, the other an open box with a low double drawer that holds the fridge and the kitchen. Both boxes are 41" deep, which leaves a good bit of space over the rear seat for a 'garage', where we keep our chairs, storage boxes with tools and recovery gear, ladder, table, jerry cans, etc. Behind the front seats we have a vertical sheet of ply that has all the electronics, which can fold down with hinges so we can access the two Li-Ion batteries that sit in the rear seat foot wells. I'll post more details on that in the future.
The base plate is made from a 4x8' sheet of 3/4" ply, cut to size using the track saw and jigsaw. The base plate is bolted to the car using existing bolt holes. The back of the boxes is mounted to the base plate using an aluminum L-profile. The front of the boxes are tied together using an aluminum L-profile glued to aluminum flat bar, and bolted to the car using the existing D-rings in the back. The boxes sit on the carpet (I wanted the sound dampening). All panels that get slides attached or have dados are 3/4" ply, the other panels (such as drawer bottoms and backs) are 1/2". Someday I might rebuild the whole thing with a lighter material/design, but for now this ticks the functionality and sturdiness boxes.
The 3 drawer box is pretty simple, just plywood, dados/rabbets and glue (& screw where needed). I'm a big fan of dados since they make assembly so much easier when you work just by yourself. Things just slot into place, and it's strong too. I pre-cut dados in the side so we can put in dividers for better organization. This is one of the drawers.
The fridge / kitchen box was a real head scratcher. I was able to fit a plastic drag chain above the slider, which keeps the cables nicely tucked away as you slide out the fridge. The cables run to the little box in front of the fridge, which has the inverter remote switch, USB power, an LED light, and a 120V outlet from the inverter. The power cable of the induction cooktop stows away underneath the cooktop, and we plug it into the outlet when we pull out the kitchen. Ideally the cooktop would be hardwired and use another drag chain, but that would take up too much valuable space. I ran out of plywood, otherwise I would have made the right side full height, so you can store things more easily next to that side panel (over the rear right wheel well). The wood strip that the LED light is mounted on was an afterthought, but it turns out to be really handy for keeping your devices secure when we charge them using the USB outlet.
There are definitely things that could be changed to make it lighter, even just cutting away material where it's not needed, but for now it's really great to have an efficient camp storage and kitchen setup. Induction cooking is really great, no hassle with gas bottles, it's fast, and it works great on windy days. We have 200 Ah of Li-Ion and 200W solar (on our RTT), which is a bit tight for staying at camp for more than two nights if you don't have full sun and want to cook more elaborate meals (which we enjoy doing). We'll probably add 200W of portable solar, so we can augment it and are less dependent on the sun hitting the car.
Feel free to ask any questions!