Family Overland Taco Truck Build

  • HTML tutorial

Enthusiast I

Hello Overlanders!

I'll be documenting various build of my family tacoma here - hopefully some of these will be useful information or just help stir up new ideas.

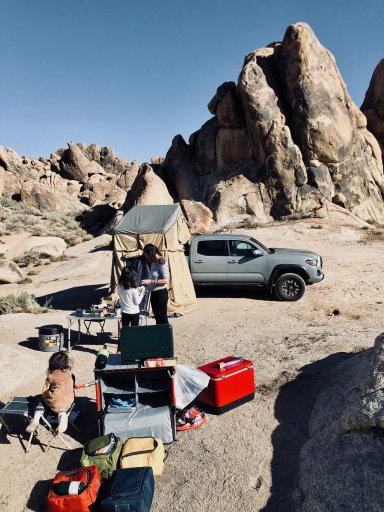
I've always enjoyed being outdoors and being out in nature. I've always enjoyed exploring various places and camping. However, with a family with little ones, its not easy to get out there and our options was really limited with how we were approaching it at the time. Once I started looking into overloading, I knew this was something this could be a way for the whole family to enjoy. Getting out there, adventuring and creating many memories. But our family car wasn't going to cut it, so I started down the route of building an overlanding rig.

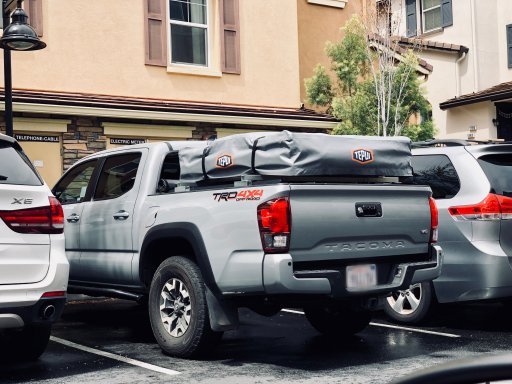
Here's my 2018 Cement DCSB TRD Off Road only a few days after I picked it up from the dealer.

DSCF1127.JPG

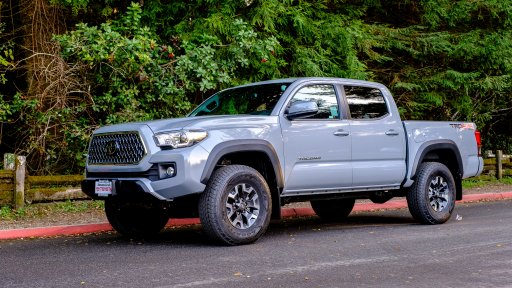
My wife and I couldn't stand the cheese grater grill we immediately replaced it with a TRD Pro grill - you know some aesthetic:)

IMG_1876.JPG

So here's our base platform.
 
  • Like
Reactions: freedomomelet

Enthusiast I

I ordered tons of stuff for a upcoming trip but some items wasn't going to arrive on time, like my RCI bed racks. So I just improvised as a temporary solution to mount my Tepui Autana 3 RTT.

Taking ideas from others via forums and youtube, I use electrical super struts as cross bars and used a combination of small D-rings and turnbuckles to tie down the super struts. Originally I used tie downs, but noticed they would loosen up overnight. So I went with something more solid. Although the turnbuckles does need to be retighten after a couple of days of driving.

IMG_2076.JPG

I used these turnbuckles at all four corners. The inner corners, I used just a single turnbuckle, but the outers I had to use two turnbuckles to reach the anchor point. On the strut itself, I installed truck bed stake pocket anchor point at each four corners.

Since I had an access tonneau cover on, I had to raise the super strut cross bars, so I just cut a 4" length strut bolted to the main cross bar in a T configuration.

Facetune_01-05-2018-14-19-50.JPG

Its pretty freakin sturdy. Its not the prettiest, and it cuts out a lot of space, but it fits the job it needs for the upcoming trip.
 

Enthusiast I

I also ordered some rock sliders from RCI which arrived before I was expecting it to. I ordered it in bare metal. Since I figured even power coated sliders will get beat up and need to be repainted it always.
IMG_2066.JPG

I ended up just scuffing it, primed it and painted with Rustoleum truck bed liner.
 

Enthusiast I

Next, I've been drawing up plans to create a pressurized water tank. I needed it to be used for drinking water, washing, and possibly even showers. It also had to be easily removable as a unit. And also had to have some insulation from the outside elements.

I ended up finding a 20 gallon RV water tank on Amazon and all the other components needed: 12v water pump, strainer, and water filter. Finding all the necessary fitting thats also lead free/BPA free was a PITA. I did numerous trips and spent numerous hours at Home Depot.

For insulation, I got some R-Tech home insulation panels from Home Depot. They had various thickness but I used thinner ones, I think it was 1/2" thick. I just used some liquid nails to glue the panels to the plywood box. The entire unit is 42"x 14" x 16". So it fits between the wheel humps in the truck bed.

The filler is a RV water tank filler with a small port for the air vent.

The water filter is a Culligan RVF-10 that uses a standard filter. Its intended to be to used to filter the water as it goes into the tank. But I'm using it to filter the water as it exists the tank. I think it comes with a D10 filter but I can improve the filtering with their D30 or D40 filters.

The water pump is 12V water pump with built-in pressure switch, again found on Amazon. It rated at 80PSI, 1.2Gpm flow rate and draws 5A. It should be enough.

IMG_2081.JPG
IMG_2082.JPG

I didn't have much time since we're scheduled to leave in a couple of days so I had to slap it all together and make at least functional.

I'll make the lid and pretty it up after the trip. But for now it works and "good enough" for the trip. Here's a short video of it working:

 
  • Like
Reactions: Shallow Water Steve

Enthusiast I

It was a last minute rush to get everything packed and loaded. I haven't even fully open the RTT yet, just getting mounted on the DIY mount. But we're off and headed to our 3 day trip going around Tahoe area and down south on HWY395 - stopping by places along the way. Then loop by southern Sequoia area then back up north on I-5 back to the bay area.

IMG_2242.jpg

IMG_2101.jpg

For the most part, everything worked ok. But definite need some more cargo space and lights. The pressured water tank worked great. There were some leaks only under pressure, but under normal didn't notice any major leaks. But still gotta work out some kinks.
 

Enthusiast I

And by the time I got back from the trip, my RCI bed racks arrived. The install was the super easy. But I had to modify the Access Tonneau rails to make it fit with the bed rack. There's a Tacomaworld member who did the same so I followed:).

This will definitely improve my cargo space. And also add additional 12" of headroom under the annex area on my RTT. The best part is I can still get in/out of my garage with the RTT on.

IMG_2285.jpg

Next up on the to-do's re-do the cargo area circuits, add the lights, and clean up the water tank install.
 

Enthusiast I

I've added some lights to the cargo area and work area. Something I noticed we really needed from the last trip out. I was a bit of hassle to carry flashlight or lanterns whenever I needed something from the truck I didn't get anything super fancy. Just some cheap generic LED lights from Amazon. Ribbon LEDs made from SMD5050 led. Also a cheap generic flood light that I mounted under the RTT to light up the work area.

IMG_2291.jpg IMG_2292.jpg

IMG_2294.jpg

Also cleaned up the switch panel mounted in the little storage box in the cargo bed.
IMG_2298.jpg
 

Enthusiast I

I was getting a bit nervous about my battery usage while out in the field. So I decided to go for a dual battery setup. All the kits out there is pretty pricey for me. I looked up the wiring diagram and its not complicated at all. So I decided to just DIY it.

Battery isolator:
There is what I considered really fancy battery isolators but seem pretty expensive - features that I don't really think I need. I mean some is 3X the price of the basic battery isolator. Just couldn't justify the really fancy ones since I just need it to isolate the secondary battery and charge when truck is on. So I ended going with this: PAC PAC-200 200-Amp Relay Battery Isolator
This one worked out well and its simple. When the 12V accessory terminal get power, it connects auxiliary battery. When it doesn't have power, it disconnects the auxiliary battery. Simple. And it works.

The Auxiliary battery:
I went with a quality group 35 AGM battery. Odyssey 35-PC1400T Automotive and LTV Battery. I heard Northstar is good, but also heard good things about Odyssey. Odyssey was a bit cheaper so I went it. I heard Optima isn't the same as before.

Wires:
I ordered some 4 gauge wires from Amazon along with terminals.

The battery mount:
I was planning to purchase one, but I had a trip coming up and the turn around time was too long for me. So I decided to make a mount. Just an overview of the materials I used.
  • 12"x12" 1/4" thick 6061 aluminum sheet from local Grainger
  • 3/8" threaded rod with flanged nuts from Lowes
  • Misc SAE and metric nuts (to mount the battery mount to the chassis)
  • Approximately 6" of 1-5/8" superstrut from Lowes
Before I started to cut anything with my cutoff wheel, I used a cardboard to make a template. Cardboard is much easier to cut and shape - cheaper if I mess up.
IMG_2600 2.jpg

The top side look like this. I tapped the base plate to where the threaded the rod goes in and used a flanged nut to lock in place. I made a square opening to be able to access a nut I need to bolt to the chassis.

IMG_2601.jpg

Here's the underside of the base place. I used threaded rods with flanged nut to mount the super strut to the base plate. The threaded rod is screwed into the base plate (which I also had to tap). This superstrut is needed to level out the base plate.

IMG_2604.jpg

Here's the battery mount in its place.

IMG_2606.jpg

Here's the battery mounted.

IMG_2610.jpg

I've wired everything up. But also installed a 100Amp circuit breaker between each battery for safety measures. This also allows me to manually disconnect the batteries with a flip of the circuit breaker.

Also installed a dual battery monitor.
IMG_2613.jpg

Here's a pic of the aux battery connected and charging.

IMG_2614.jpg

Here's a pic of the battery isolator disconnecting the battery. I put some load on the aux battery and I can see the volt drops only on the aux battery and not the primary. And also checked with a voltmeter. So everything works
 
Last edited:

Jaytperry89

Rank VII
Launch Member

Trail Blazer III

5,321
Idaho Falls, ID, USA
First Name
Jason
Last Name
Perry
Member #

16273

Service Branch
Army
Great thread, started looking cuz I plan on using super strut to build a rack system. I really like the water tank idea tho. Hope to see more projects. It was inspirational