@Zack
Hi all. I am going to be installing ARB drawers (specifically 2 of the RDRF945US) in my 5th gen 4Runner and I was wondering if anyone had experience with fabricating or modifying the Land Cruiser version of the trim panels? ARB currently does not make a 4Runner specific version.
Any suggestions welcomed!
I'm in process of doing so for my 4th Gen. The process is not terribly difficult.
Tools needed:
Cardboard - 2 sheets as wide as your drawers are front to back and about 1/3rd as tall as the interior width of your truck.
Pencil
Yard stick
Razor utility knife or larger X-acto type hobby knife
Tape, pins, or weights to hold things while you measure.
Conventions used:
Front = Front of the truck
Back = Rear of truck
Drawer Fronts are at the Rear of the truck in most installations. :D
Directions:
- Get the Drawers installed how you want them.
- Lay one sheet of the cardboard across the drawers and touching the side of the Drivers side truck. Make sure the stripes on the cardboard are parallel to the drawer fronts, the lines will help with the next steps. Tape or weigh it down so it stays in place. Make sure the cardboard is long enough that you have a solid 6"+ on top of the Drawer boxes.
- lay the yardstick across the cardboard and along the edge of the drawers. Draw a line from front of the truck to the back.
- Now at the front of the drawers, slide the yardstick along the front edge of the cardboard until it touches the inside wall of the truck. Measure the distance from the line (edge of drawer boxes) to the wall. Write it down on the cardboard, make a mark tying the measurement to the line that you measured along.
- Come down 4 cardboard lines (generally 3/4 - 1"), slide the yardstick along the front edge of the cardboard until it touches the inside wall of the truck. Measure the distance from the line (edge of drawer boxes) to the wall. Write it down on the cardboard, make a mark tying the measurement to the line that you measured along.
- Repeat measuring and marking till you reach the rear edge of the drawers. If you have tight curves (anything along the side of the truck with a radius tighter than the 3/4 - 1" line spacing we are using you can add extra measurements on the lines between the measurements to replicate that curve.
- Now measure the largest gap between the Inside wall of the truck and the edge of your cardboard. Note it next to the line you drew showing the edge of the Drawer boxes.
- Mark this "Drivers Top" and draw and arrow pointing to the front of the truck. You'll now have your measurements to pattern the edge of your driver's side.
- Repeat steps 2-8 on the passenger side.
Now using those measurements we'll create your pattern.
- Draw a parallel line inward from the original Drawer Box edge line by 1/4" more than the measurement of the largest gap between the inside wall of the truck and the edge of your cardboard. This is your new pattern reference line.
- Measure out each line from the new reference line and put a dot on the cardboard.
- When done drawing dots at each measurement, Use the yardstick and pencil to connect the dots starting at the front and working your way back.
- Cut 1/4" outside of the connect the dots line and you now have your rough pattern
- Check the fit on the drivers side. the edge should fit well to the inside wall of the truck and the new reference line should be 1/4" over the edge on top of the drawer box.
- Make any needed adjustments to fine tune.
- Just in case you're lucky flip the pattern over and see if the truck is symmetrical about center on the passenger side. If you're lucky you can use this pattern for both sides. if not repeat the steps above for the passenger side.
- This is your pattern, trace it on to your plywood that you will use for the flap.
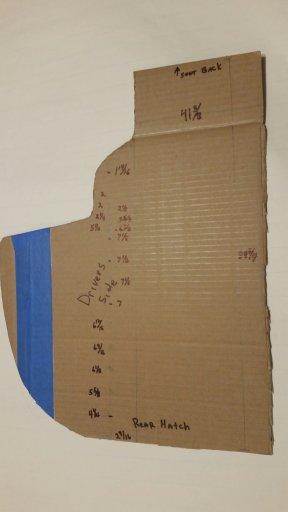
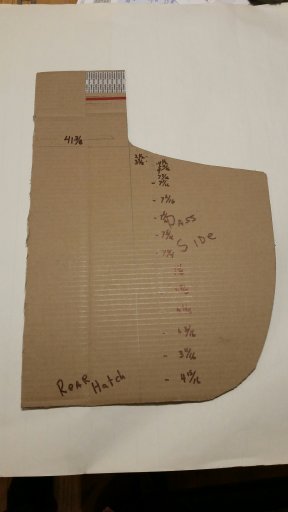
Here is an example of 2 of my templates:


- Cut the plywood with sabersaw, coping saw, bandsaw, what ever you have available.
- Test fit of wood side trim flap, Adjust points as needed.
- Take measurements for gap tolerance needed by hinges and mark the edge of the drawer boxes and adjust position of reference line before cutting the plywood flap to width.
- Sand edges smooth, round over, and finish as desired.
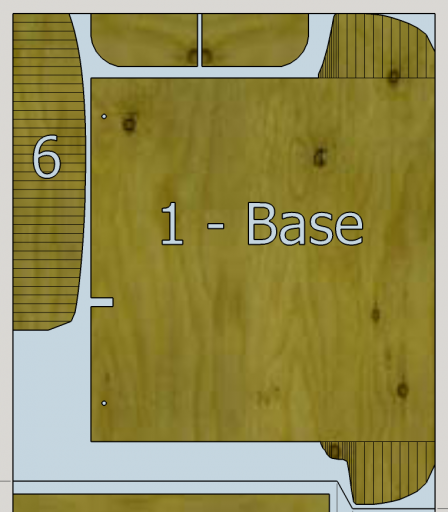
Here is an example showing a permanent Base plate design (1- Base) for my 4th Gen along with one of the side flaps (6) and some other parts. The lines you see on the Base plate "Ears" and Part 6 are the lines taken from the measurements made above. Note where the lines get tighter that is where I needed more measurements to get the profile to fit due to the tight radius of the wheel-well inner wall. The ears on the base-plate were designed to fit around the rear of the wheel-wells so I could use the factory hold down points that are under there but the single piece design meant that the box would need to be built in place within the truck and could not be removed without dismantling the box, so those ears were cut off after the first fit test.

Let me know if you have any questions.
Boort


