Hi Everyone,
This is my second thread on this forum. Thought it should be sharing my project. I am getting into it enough that it might provide some creative inspirations to others doing some builds.
There are all sorts of styles of overlanding so I think at the front end it is important to establish the goals for the build. I am not interested in building a rock crawler that will do highly technical trails. Nor am I interested in driving through mud for the sake of driving through deep mud till something new breaks. Cool if that is your deal, but my goals fall along some different lines. I am a hunter and fisherman and the rig I build reflects what I am passionate about doing. I am particularly passionate about duck hunting and bow hunting. It was the bow hunting that made me realize I wanted a rig that was much more capable. I decided I wanted to build a vehicle that could do 2 weeks completely off grid in the woods. It needed to be offload capable (with in reason). 4 season capable, and have the capacity for not only the 2 week stay but also the quick weekend get away. It also needed to transport my Wavewalk Kayaks for fishing and hunting and be a good highly mobile basecamp for the archery hunting adventures. Those were my goals. Not a big budget but a long time frame. I figure it will take me 5 years to get the rig to completion. I will put probably about 5-7K miles on it a year. My daily driver is a Nissan Leaf because most of my work is close to home. Sub does the heavy lifting on trips. My goals also influence what I choose to do first . So I may not go in the typical order of those who build up their rigs.
The platform: 97 Chevy Suburban 1500
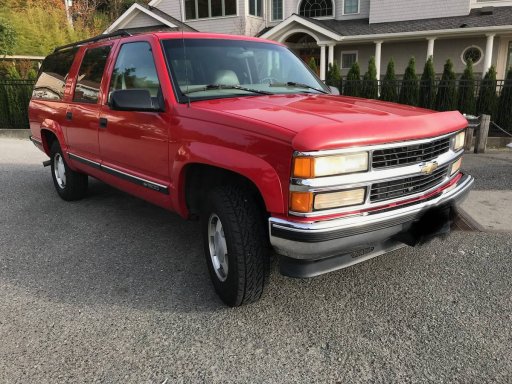
I chose this year and model of suburban for a couple of reasons. One it had barn doors. Once kids (4- now grown with families) got out of car seats we graduated from the minivan to the Suburban. Have owned 4 this is the 5th and last one. Suburban went away from the barn doors so your year options are limited. In addition some of the later years (99s in particular) had electrical gremlins. I found this one which had been garaged and used mostly for the grocery runs and the occasional trip. Here is the picture from the craigslist ad that I bought it from. I picked it up for about 3K and it had about 173K miles on it. Why not a 2500? I looked for one but what I found was VERY used vehicles. Most people pulled big trailers with them. I decided that I would do better with a 1500 since I was probably going to do a bunch of suspension work anyway. After the fact, I have actually been happy with my decision. I wasn't keen on the red color but have learned to appreciate it. I will make each post the progress I am making.
This is my second thread on this forum. Thought it should be sharing my project. I am getting into it enough that it might provide some creative inspirations to others doing some builds.
There are all sorts of styles of overlanding so I think at the front end it is important to establish the goals for the build. I am not interested in building a rock crawler that will do highly technical trails. Nor am I interested in driving through mud for the sake of driving through deep mud till something new breaks. Cool if that is your deal, but my goals fall along some different lines. I am a hunter and fisherman and the rig I build reflects what I am passionate about doing. I am particularly passionate about duck hunting and bow hunting. It was the bow hunting that made me realize I wanted a rig that was much more capable. I decided I wanted to build a vehicle that could do 2 weeks completely off grid in the woods. It needed to be offload capable (with in reason). 4 season capable, and have the capacity for not only the 2 week stay but also the quick weekend get away. It also needed to transport my Wavewalk Kayaks for fishing and hunting and be a good highly mobile basecamp for the archery hunting adventures. Those were my goals. Not a big budget but a long time frame. I figure it will take me 5 years to get the rig to completion. I will put probably about 5-7K miles on it a year. My daily driver is a Nissan Leaf because most of my work is close to home. Sub does the heavy lifting on trips. My goals also influence what I choose to do first . So I may not go in the typical order of those who build up their rigs.
The platform: 97 Chevy Suburban 1500
I chose this year and model of suburban for a couple of reasons. One it had barn doors. Once kids (4- now grown with families) got out of car seats we graduated from the minivan to the Suburban. Have owned 4 this is the 5th and last one. Suburban went away from the barn doors so your year options are limited. In addition some of the later years (99s in particular) had electrical gremlins. I found this one which had been garaged and used mostly for the grocery runs and the occasional trip. Here is the picture from the craigslist ad that I bought it from. I picked it up for about 3K and it had about 173K miles on it. Why not a 2500? I looked for one but what I found was VERY used vehicles. Most people pulled big trailers with them. I decided that I would do better with a 1500 since I was probably going to do a bunch of suspension work anyway. After the fact, I have actually been happy with my decision. I wasn't keen on the red color but have learned to appreciate it. I will make each post the progress I am making.