
Enthusiast III
This i s my 2018 Subaru Forester with a 6-speed manual.
I bought it in the fall of 2017 with 7 miles on the odo.
First up; wheels and tires. I replaced the stock setup with Method MR502 VT-Spec wheels 15x7 and General Grabber AT2's 205/75R15.

I built a roof cage a few years previously for an older model Impreza that I added to the Forester. Unfortunately I did not document the build but it's just some Sch.40 PVC pipe and fittings, surprisingly rigid.


I love the look of round lights over LED bars. I mounted a pair of Hella 500's to the bumper with a piece of Unistrut and then cantilevered some plates through the grill. Here's a CAD model of the assembly:


Sometimes when you go camping it's hard to find a good spot to set up the tent so I keep all my gear on the roof. This saves room inside the vehicle to sleep. I have two Plano cases, recovery tracks, a 5 gallon gas can and a shovel.


Another problem I was beginning to have was scraping the front bumper. To Increase the approach angle I bought a cheap bumper cover (to spare my stock painted bumper) and chopped it up prerunner style.


To help with the angles and ride height I installed a 2" lift kit made by Anderson Design & Fab. This is a body lift using strut spacers and rear multi-link spacers.


Under body protection made by Primitive Racing.

DIY 8' x 6' awning:
This is a 6' piece of 4" Sch. 40 PVC with a cap on one end and a clean-out on the other
(Update: I no longer use this. Swapped to an Ironman 6.5'x8' awning in 2021)


As a way to attach the tarp to the roof I liquid nailed a piece of 1" x .5" wood to the 4" pipe. Then I screwed male end snaps into the wood.

Here is the tool I used to attached the female end of the snaps to the tarp.


There area a total of 9 snaps and they hold quite a lot of tension. I grabbed some adjustable poles from Cabella's which I roll up inside the tarp and it all slides into the 4" pipe.


Decided on Falken Wildpeak A/T's 235/75R15 which are 29" vs the previous 27". The Forester is now 3" taller than stock.


New for the Forester in 2019: Hitch mounter tire/Rotopak carrier by Rigd Supply and ditch lights... and of course some gangly mudflaps made out of an old Weathertech trunk liner.


For a while I had the rear seats removed to gain more storage space but this took away a flat surface if I wanted to sleep in my car. First I 3D scanned the Forester then modeled a platform with hatches to access my gear underneath. The frame is made out of 2x2's and the top is 1/2" plywood.


The only addition in 2020 is a rear differential locker made by Torq-Masters. These 'Aussie Lockers' are a full-time mechanical locker without the use of a compressor, air lines, cables or electrical wiring. When turning, the device will ratchet allowing the wheels to turn at different rates, acting similar to an open diff. I've had noticeable improvements in uphill climbs and scenarios where one of my rear wheels is off the ground.

2021 was a busy year in my personal life, including a move from NY to AZ. I packed everything up and drove the Forester 2,300 miles with my dog and two cats. Arizona has certainly put myself and the Forester to the test! I am blown away at how many legitimate offroad trails there are here compared to NY and PA with somewhere around 70-80% of the state being public land. The most notable trails I have completed are just outside of Sedona; Outlaw Trail and Diamondback Gulch. However the forester has had some additional upgrades prior to conquering these trails since my previous post:
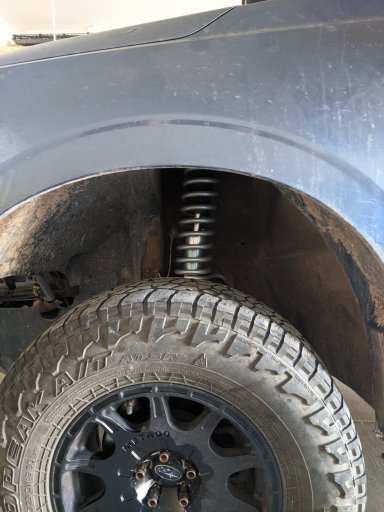
Flatout Suspension GR Lite adjustable coilovers. These allow me to fine tune my ride height and stiffness as well as provide more suspension travel. Although they're shown in the photo below, I also completely removed my front and rear sway bars.


RalliTEK Rock Sliders. These were not cheap by any means but probably the best investment so far. As opposed to the other Subaru 'rock sliders' in the market, these bolt to the pinch weld in several locations as well as the body at the front and rear.


The trails here in AZ have also convinced me to add the Primitive transmission and rear diff skid plates. A cheap rear bumper was also cut up and installed to help with the departure angle. Also around this time, I swapped out the old flimsy Subaru bottle with a tough Nalgene bottle to act as my windshield washer reservoir.


As much as I liked having the spare wheel/gas hitch carrier, it got snagged up on too many rocks since it hung off the rear bumper quite a ways. I ended up adding more unistrut to the roof crossbars to mount the spare tire up there. I also wired up some chase lights since it gets very dusty here in AZ and visibility is key when riding in a group. I didn't want to drill holes in the roof and since I was tying these lights into the same circuit as the ditch lights, I ran the wired up the windshield using KC's Wire Hider. And lastly I swapped out the DIY awning with an Ironman 4x4 6.5'x8' awning.


Seeing this vehicle transform over the past four years has been very exciting. My driving skills as well as the Foresters capabilities have grown far beyond what I originally imagined. Recently passing 50,000 miles on the odometer, I reminisce back to when I bought this car with 7 miles and only knew I enjoyed the outdoors and wanted a way to get further off grid on those weekend trips. And here we are in 2023 keeping up with Jeeps and Toyotas on some of the most challenging trails Arizona has to offer!
Thanks for checking out my build and stay tuned! Feel free to check out my instagram as well : vagrant_roo
I bought it in the fall of 2017 with 7 miles on the odo.
First up; wheels and tires. I replaced the stock setup with Method MR502 VT-Spec wheels 15x7 and General Grabber AT2's 205/75R15.
I built a roof cage a few years previously for an older model Impreza that I added to the Forester. Unfortunately I did not document the build but it's just some Sch.40 PVC pipe and fittings, surprisingly rigid.
I love the look of round lights over LED bars. I mounted a pair of Hella 500's to the bumper with a piece of Unistrut and then cantilevered some plates through the grill. Here's a CAD model of the assembly:
Sometimes when you go camping it's hard to find a good spot to set up the tent so I keep all my gear on the roof. This saves room inside the vehicle to sleep. I have two Plano cases, recovery tracks, a 5 gallon gas can and a shovel.
Another problem I was beginning to have was scraping the front bumper. To Increase the approach angle I bought a cheap bumper cover (to spare my stock painted bumper) and chopped it up prerunner style.
To help with the angles and ride height I installed a 2" lift kit made by Anderson Design & Fab. This is a body lift using strut spacers and rear multi-link spacers.
Under body protection made by Primitive Racing.
DIY 8' x 6' awning:
This is a 6' piece of 4" Sch. 40 PVC with a cap on one end and a clean-out on the other
(Update: I no longer use this. Swapped to an Ironman 6.5'x8' awning in 2021)
As a way to attach the tarp to the roof I liquid nailed a piece of 1" x .5" wood to the 4" pipe. Then I screwed male end snaps into the wood.
Here is the tool I used to attached the female end of the snaps to the tarp.
There area a total of 9 snaps and they hold quite a lot of tension. I grabbed some adjustable poles from Cabella's which I roll up inside the tarp and it all slides into the 4" pipe.
Decided on Falken Wildpeak A/T's 235/75R15 which are 29" vs the previous 27". The Forester is now 3" taller than stock.
New for the Forester in 2019: Hitch mounter tire/Rotopak carrier by Rigd Supply and ditch lights... and of course some gangly mudflaps made out of an old Weathertech trunk liner.
For a while I had the rear seats removed to gain more storage space but this took away a flat surface if I wanted to sleep in my car. First I 3D scanned the Forester then modeled a platform with hatches to access my gear underneath. The frame is made out of 2x2's and the top is 1/2" plywood.
The only addition in 2020 is a rear differential locker made by Torq-Masters. These 'Aussie Lockers' are a full-time mechanical locker without the use of a compressor, air lines, cables or electrical wiring. When turning, the device will ratchet allowing the wheels to turn at different rates, acting similar to an open diff. I've had noticeable improvements in uphill climbs and scenarios where one of my rear wheels is off the ground.
2021 was a busy year in my personal life, including a move from NY to AZ. I packed everything up and drove the Forester 2,300 miles with my dog and two cats. Arizona has certainly put myself and the Forester to the test! I am blown away at how many legitimate offroad trails there are here compared to NY and PA with somewhere around 70-80% of the state being public land. The most notable trails I have completed are just outside of Sedona; Outlaw Trail and Diamondback Gulch. However the forester has had some additional upgrades prior to conquering these trails since my previous post:
Flatout Suspension GR Lite adjustable coilovers. These allow me to fine tune my ride height and stiffness as well as provide more suspension travel. Although they're shown in the photo below, I also completely removed my front and rear sway bars.
RalliTEK Rock Sliders. These were not cheap by any means but probably the best investment so far. As opposed to the other Subaru 'rock sliders' in the market, these bolt to the pinch weld in several locations as well as the body at the front and rear.
The trails here in AZ have also convinced me to add the Primitive transmission and rear diff skid plates. A cheap rear bumper was also cut up and installed to help with the departure angle. Also around this time, I swapped out the old flimsy Subaru bottle with a tough Nalgene bottle to act as my windshield washer reservoir.
As much as I liked having the spare wheel/gas hitch carrier, it got snagged up on too many rocks since it hung off the rear bumper quite a ways. I ended up adding more unistrut to the roof crossbars to mount the spare tire up there. I also wired up some chase lights since it gets very dusty here in AZ and visibility is key when riding in a group. I didn't want to drill holes in the roof and since I was tying these lights into the same circuit as the ditch lights, I ran the wired up the windshield using KC's Wire Hider. And lastly I swapped out the DIY awning with an Ironman 4x4 6.5'x8' awning.
Seeing this vehicle transform over the past four years has been very exciting. My driving skills as well as the Foresters capabilities have grown far beyond what I originally imagined. Recently passing 50,000 miles on the odometer, I reminisce back to when I bought this car with 7 miles and only knew I enjoyed the outdoors and wanted a way to get further off grid on those weekend trips. And here we are in 2023 keeping up with Jeeps and Toyotas on some of the most challenging trails Arizona has to offer!
Thanks for checking out my build and stay tuned! Feel free to check out my instagram as well : vagrant_roo
Attachments
Last edited:


