Member II
Hey Everyone,
I started working on a project at the beginning of the quarantine to make my back seat area more efficient when I'm on the road. It consists of modular shelves which allow me to swap the rear seat back in with about a half hour of work (probably faster once I get used to it). Maybe someone will take inspiration from this (on what to do or what *not* to do). I haven't seen too many people who tried it this way. Maybe for good reason.

I started by building the passenger and driver side frames. This took a bit of finagling because I don't have much wood working experience. I tried to match the angle of the front seats while maximizing the amount of shelf I could squeeze in the space. I also wanted to get the shelf-bottoms as close to the floor as possible while still being level. I used a laser level to figure that out, but in case you're thinking of doing this with the same model truck, the top of the door compartment lip (the bottom one), is almost exactly level with the highest point of the floor. At any rate, this is a bit more tricky than just laying a plywood board across the floor, and requires one back leg to be about 5 1/4" shorter than the other. The picture above is the passenger side unit framed out. It will hold 2x 20L Scepter water cans, with a miscellaneous storage shelf in front.

Next, I built the driver's side unit. This one is intended to hold an inverter, fridge, and various gear. The shelves are salvaged from an old desk. Please don't give me grief about the joints. In addition to my lack of experience, I was doing this with less than ideal tools in a converted spare bedroom. I don't have a garage, basement, or yard. Plus, I've always been terrible at measuring. I live by that old saying "Measure ten times, cut at least three."

I started adding carpeting to the shelves to get an idea what it would look like, and then double checked that my inverter and big camera bag would fit. Each unit is secured on the rear seat studs using an 8" steel framing bracket I picked up from Home Depot (not pictured). I had to add some holes using a drill (also a jisaw and file because, like I said, I suck at measuring). I also ground down one side of the captive washer on the stock rear seat nuts with a bench grinder so that they would fit with the brackets in place.

I then proceeded to carpet both driver and passenger side units. Figuring out how to deal with the center section was tricky. Since both driver and passenger side units need space to first get them in the door and then get them situated, I couldn't just have three pieces that slide in from the side. I decided to build the center section so that it would fit in through the space between the front seats. The picture below is the support for that section. The center section is bolted down to lengths of 2x4, which are bolted onto the driver and passenger side sections.

The center section is three pieces: a lower shelf which sits flush with the lower shelf on the driver side; an upper shelf/cabinet which bolts to the lower; and a lid with latching door. With the frames of each of these finished, I enclosed them with 1/8" particle board and covered (mostly) everything in automotive carpeting.


While working on this project, I also added the 1500w inverter pictured, switched 12v outlets to the back wall, a fuse block for future electrical upgrades, rear flood lights to my roof rack, and interior lighting to the camper shell. I already used the fuse block to add a CB/10m radio, which fit nicely on the front of my new shelves.
I made a video of the finished product if you're interested in seeing more. .
Anyway, I'm not an expert at this kind of thing, but I think it turned out pretty good.
Happy Overlanding, and stay safe out there!!
I started working on a project at the beginning of the quarantine to make my back seat area more efficient when I'm on the road. It consists of modular shelves which allow me to swap the rear seat back in with about a half hour of work (probably faster once I get used to it). Maybe someone will take inspiration from this (on what to do or what *not* to do). I haven't seen too many people who tried it this way. Maybe for good reason.
I started by building the passenger and driver side frames. This took a bit of finagling because I don't have much wood working experience. I tried to match the angle of the front seats while maximizing the amount of shelf I could squeeze in the space. I also wanted to get the shelf-bottoms as close to the floor as possible while still being level. I used a laser level to figure that out, but in case you're thinking of doing this with the same model truck, the top of the door compartment lip (the bottom one), is almost exactly level with the highest point of the floor. At any rate, this is a bit more tricky than just laying a plywood board across the floor, and requires one back leg to be about 5 1/4" shorter than the other. The picture above is the passenger side unit framed out. It will hold 2x 20L Scepter water cans, with a miscellaneous storage shelf in front.
Next, I built the driver's side unit. This one is intended to hold an inverter, fridge, and various gear. The shelves are salvaged from an old desk. Please don't give me grief about the joints. In addition to my lack of experience, I was doing this with less than ideal tools in a converted spare bedroom. I don't have a garage, basement, or yard. Plus, I've always been terrible at measuring. I live by that old saying "Measure ten times, cut at least three."
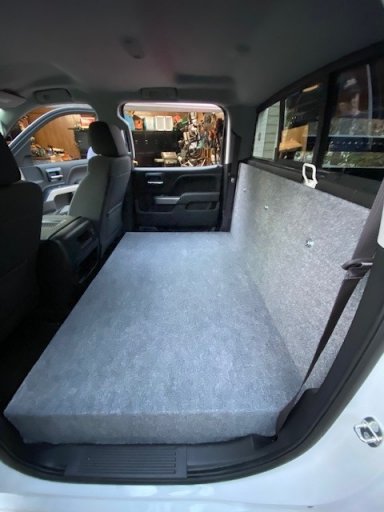
I started adding carpeting to the shelves to get an idea what it would look like, and then double checked that my inverter and big camera bag would fit. Each unit is secured on the rear seat studs using an 8" steel framing bracket I picked up from Home Depot (not pictured). I had to add some holes using a drill (also a jisaw and file because, like I said, I suck at measuring). I also ground down one side of the captive washer on the stock rear seat nuts with a bench grinder so that they would fit with the brackets in place.
I then proceeded to carpet both driver and passenger side units. Figuring out how to deal with the center section was tricky. Since both driver and passenger side units need space to first get them in the door and then get them situated, I couldn't just have three pieces that slide in from the side. I decided to build the center section so that it would fit in through the space between the front seats. The picture below is the support for that section. The center section is bolted down to lengths of 2x4, which are bolted onto the driver and passenger side sections.
The center section is three pieces: a lower shelf which sits flush with the lower shelf on the driver side; an upper shelf/cabinet which bolts to the lower; and a lid with latching door. With the frames of each of these finished, I enclosed them with 1/8" particle board and covered (mostly) everything in automotive carpeting.
While working on this project, I also added the 1500w inverter pictured, switched 12v outlets to the back wall, a fuse block for future electrical upgrades, rear flood lights to my roof rack, and interior lighting to the camper shell. I already used the fuse block to add a CB/10m radio, which fit nicely on the front of my new shelves.
I made a video of the finished product if you're interested in seeing more. .
Anyway, I'm not an expert at this kind of thing, but I think it turned out pretty good.
Happy Overlanding, and stay safe out there!!
Last edited: