2016 T4R Overland/Adventurer
- Thread starter mrn3ff
- Start date
You are using an out of date browser. It may not display this or other websites correctly.
You should upgrade or use an alternative browser.
You should upgrade or use an alternative browser.


@m.neff19
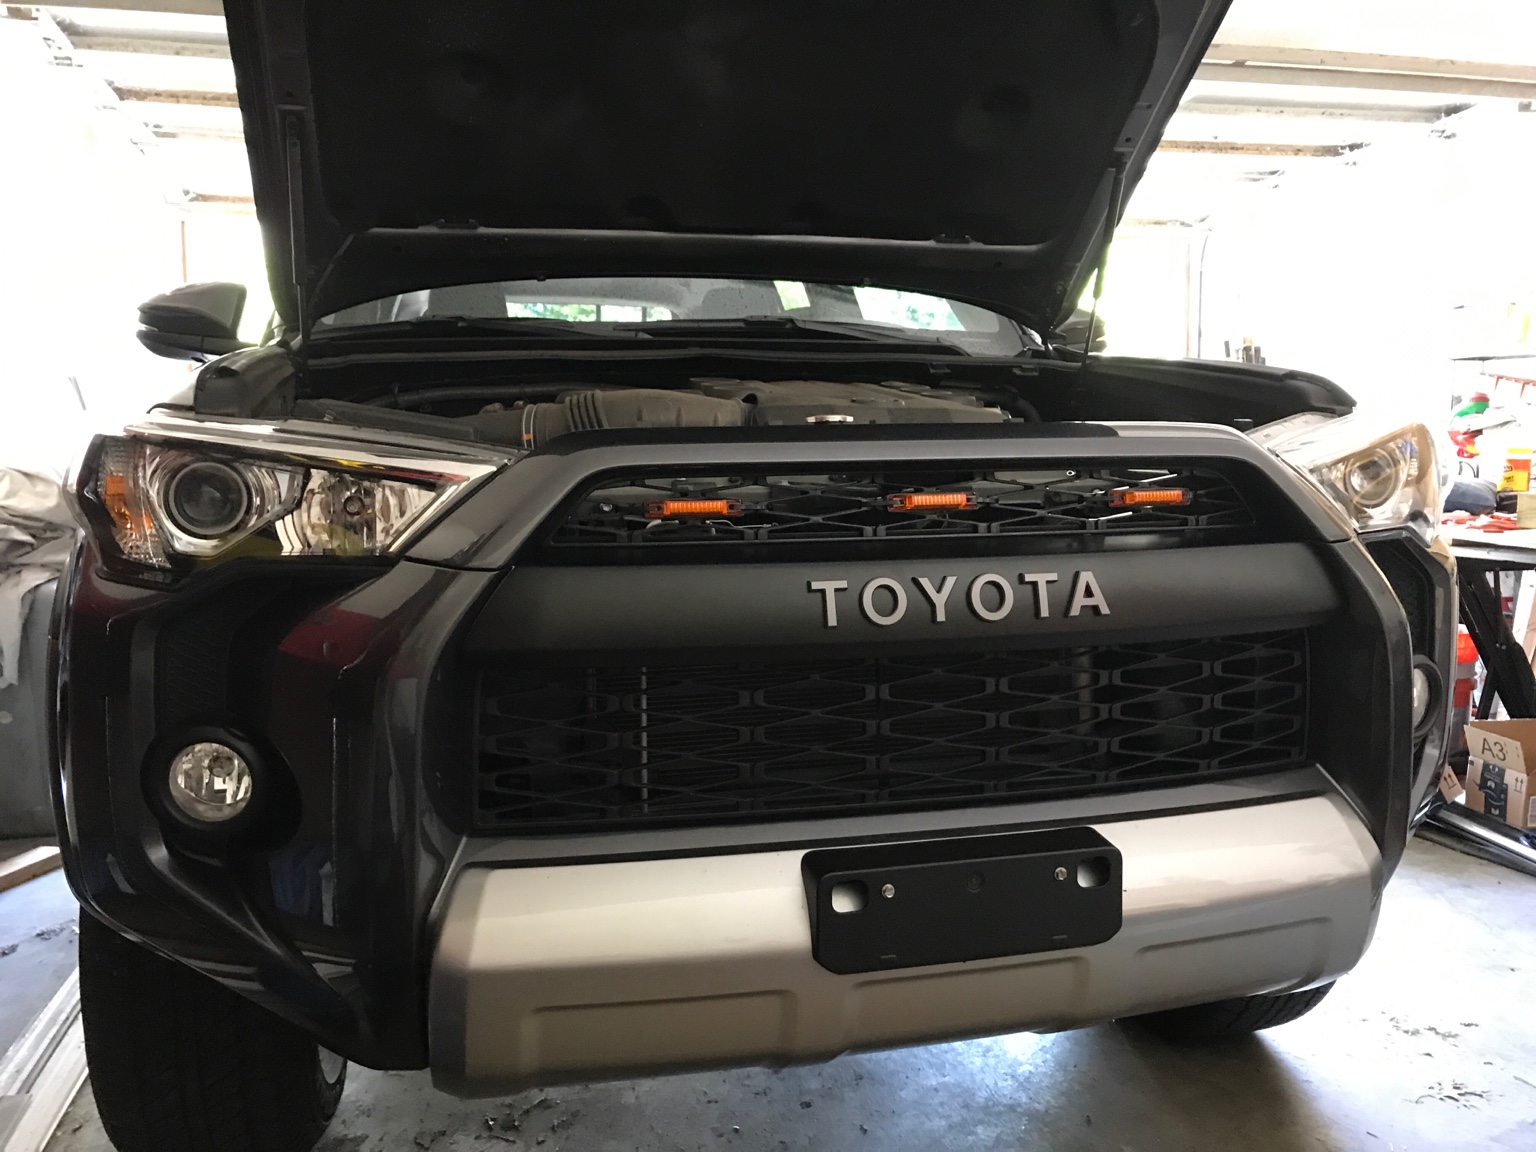
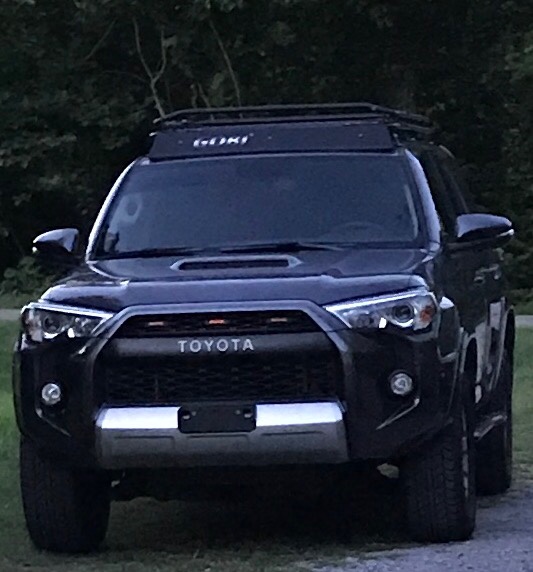
Welcome to the group. Nice Rig. What are those orange rectangles in your upper grill? Marker lights?
Boort
Thanks! Yea, they're just some cheap 4" amber lights from amazon. Was going to tap into the drl but ended up following a write up from Rock Creek Overland for the install.
Sent from my iPhone using OB Talk
Nice looking rig, any other mods coming up?
Sent from my iPhone using OB Talk
Thanks! Wheels/Tires, light bar, sso bumper, and rear bumper (cbi most likely).. Not necessarily in that order but that's what I'm after. Currently working on a drawer system/sleeping platform. Researching alternatives to plywood for material now..
Sent from my iPhone using OB Talk
Thanks! Wheels/Tires, light bar, sso bumper, and rear bumper (cbi most likely).. Not necessarily in that order but that's what I'm after. Currently working on a drawer system/sleeping platform. Researching alternatives to plywood for material now..
Sent from my iPhone using OB Talk
Nice! Keep sharing along the way.
Sent from my iPhone using Tapatalk
@m.neff19
What alternatives are you investigating for your sleeping platform? There are some awesome engineered plywood composites out there (foam core, flexible, and aluminum honeycomb core to name a few) all have pluses and minuses cost generally a big minus. I ask because for the cost, the strength to weight ratio of plywood is hard to beat. (ease of construction is also up there) It's stronger and weighs ~1/3 less than the same size of MDF, Similar strength, more resistant to water damage and easier to work than wafer/chipboard.
The sleeping platform in the bed of my truck is fir 2x4 frame with a deck of 3/4" CDX plywood (roofing scraps). It's lasted 15+ years and the cheap green astroturf carpet is the only thing that has worn out. Truth be told 3/4" is over kill were it not free I could have done it with 3/8". If I were to build another one I'd use 1/2" marine grade or baltic birch plywood for the base and 3/8" MG or BB plywood for the deck with higher quality marine carpet. Might bump up the base to 3/4" if building a full length 6' drawer.
For reference the queen size bed in my camp trailer uses 6 or 7 1x2" fir supports under a 1/4" plywood deck. Supports anything I've put on it. say 500-600 lbs.
Boort
@Boort
Thanks for the feedback!
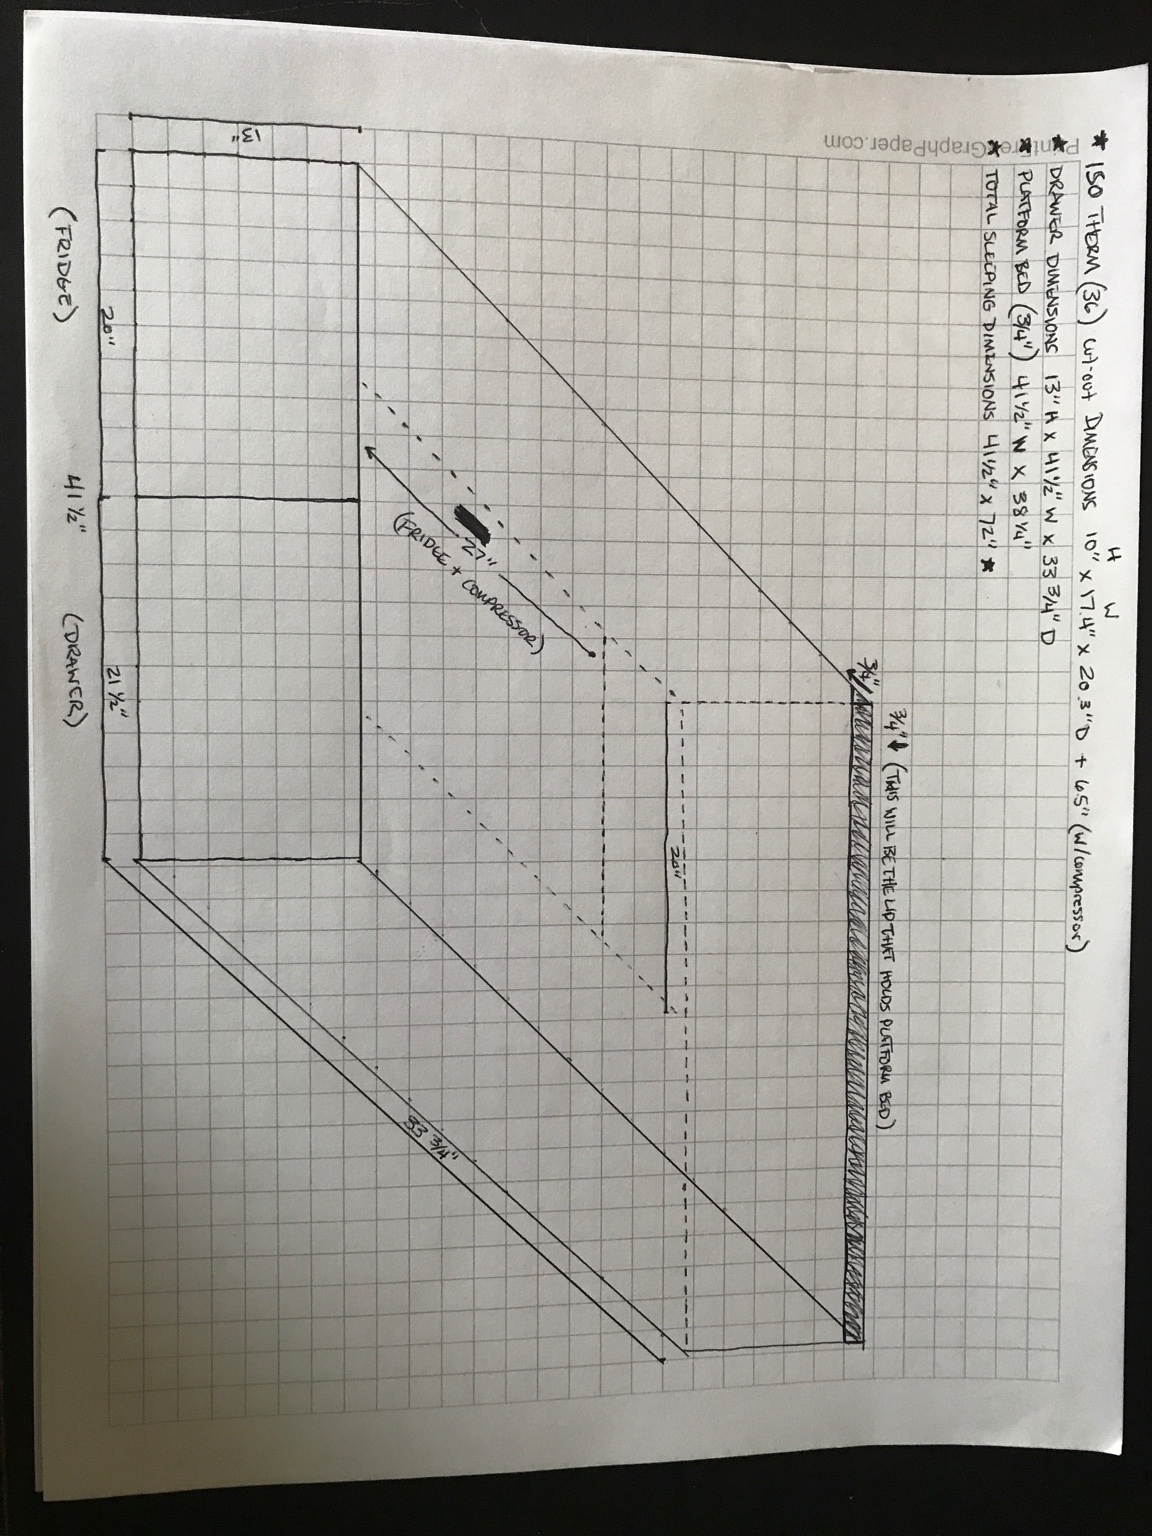
I've been looking into high density polyethelyne sheets (1/2"-3/4" thickness)... The price is very high compared to that of plywood and I'm not sure how sturdy it would be over a 30"-40" span. I'll try to throw up a sketch but the concept I'm after is to have the drawers be permanent and not interfere with the backseats. "2 drawers" - Isotherm 36 drawer fridge on one side and the other drawer be storage. Then a single sheet that would span the gap when the seats were down and lay flat on the drawer(s) in back when the seats were up. No matter the route there's definitely a cost/weight ratio question that will be the determining factor in materials I'm sure..
Thanks for the feedback!
I've been looking into high density polyethelyne sheets (1/2"-3/4" thickness)... The price is very high compared to that of plywood and I'm not sure how sturdy it would be over a 30"-40" span. I'll try to throw up a sketch but the concept I'm after is to have the drawers be permanent and not interfere with the backseats. "2 drawers" - Isotherm 36 drawer fridge on one side and the other drawer be storage. Then a single sheet that would span the gap when the seats were down and lay flat on the drawer(s) in back when the seats were up. No matter the route there's definitely a cost/weight ratio question that will be the determining factor in materials I'm sure..
@m.neff19
HDPE is awesome stuff, it's stout and machines like butter. But as you mention about 2-3X the cost of plywood. It's not light either. HDPE has a fairly low melting point (~250 Degs F) but becomes soft and will start to sag under it's own weight at much lower temps. HDPE is moldable at 180Deg F. Depending on the blend, I'd expect an unsupported 3/4" thick, 40" span to deflect 1/2" in the center under it's own weight after 4 hours in 130 Degs F. faster if there is any weight on top when heated. Be aware that all connections will need to be mechanical or welded (TAP Poly-Weld works) as I'm not aware of any glues that will bond HDPE longterm. I've used a standard 1/4"x20 TPI tap to drill and tap the holes, go slowly and keep the HDPE cold when drilling and tapping for best results. (I've packed it in ice for 30 mins before to get it good and cold so the threads are crisp.)
To cut the costs check your industrial salvage places for removed bathroom stall partition walls (generally 3/4" sheet sometimes 1") or used restaurant equipment dealers for industrial cutting boards (generally 1/2" or 3/4" sheet in 18-24" widths and 3-5' lengths), Some outdoor sign shops may use thinner HDPE and be able to vacuum form it for you for a custom fit.
Boort
Nothing special - pretty standard drawer concept but here's what I've got... with the height I may be extending the width in the back area to fill in the gaps/cover wheel wells. Just to give it a more built-in look. Collecting all the cardboard I can at the moment to determine the shape.
The more I think about it I really don't see there being a way around not supporting the span somewhere in the middle (around the 19" point of the 38.25" measurement).
Sent from my iPhone using OB Talk
The more I think about it I really don't see there being a way around not supporting the span somewhere in the middle (around the 19" point of the 38.25" measurement).
Sent from my iPhone using OB Talk
@m.neff19
Here is a quick Sketchup based on your drawing. I would Expand over the Wheel wells and use the space as pockets for various small gear. Be sure to include space for ventallation and wires. I added a large vent hole on Drivers side behind the fridge in this drawing. Slides mockups are sized to match these https://www.ovisonline.com/32-Locking-Drawer-Slides-Full-Extension-P1602.aspx I'd try to find a way to match the front of the storage drawer to the Fridge for that pro look.
Boort
Attachments
@m.neff19
Your welcome. I fixed up a few details (made each board into components so they can be adjusted more easily) Modified the top to have a half lap to cover and connect the back panel as well as engage with the forward board that will cover the folded down seats. (Not in the drawing)
I then broke down the components and arraigned into 4x8 sheets. As done now it will be 2 4x8 sheets of 3/4" and 1 of 1/2 material Could be easily done in just 1 and 1 by making the outside walls 1/2" instead of 3/4" or if you can get 5x8 material near you (More common in Baltic birch and Marine Grade Ply than construction lumber that I have readily available here) that would also get it down to 2 sheets.

All joints are designed to be glued and screwed (I generally use pocket hole screws for this type of work.) But the parts can easily be updated for Tongue+groove, finger joint, or dovetail construction depending on what tools you have available.
Regards,
Boort
Your welcome. I fixed up a few details (made each board into components so they can be adjusted more easily) Modified the top to have a half lap to cover and connect the back panel as well as engage with the forward board that will cover the folded down seats. (Not in the drawing)
I then broke down the components and arraigned into 4x8 sheets. As done now it will be 2 4x8 sheets of 3/4" and 1 of 1/2 material Could be easily done in just 1 and 1 by making the outside walls 1/2" instead of 3/4" or if you can get 5x8 material near you (More common in Baltic birch and Marine Grade Ply than construction lumber that I have readily available here) that would also get it down to 2 sheets.
All joints are designed to be glued and screwed (I generally use pocket hole screws for this type of work.) But the parts can easily be updated for Tongue+groove, finger joint, or dovetail construction depending on what tools you have available.
Regards,
Boort
Attachments
Ahh... Things have not gone in the order I anticipated them going with the build but I've made some additions to the ride. Recently purchased a set of Stealth Custom Series Ray10s and wrapped them in KO2's (275/70/17). Didn't think I would have any trouble with them rubbing but I guessed wrong. At full lock the wheels rubbed forward and in reverse. Removed the front mud flaps and was able to stop the rub forward but in reverse I was still hitting the bumper :( With all that said I jumped ship and bought suspension. Just got it out of the shop and will post some pics soon. Some other things I've done were sPOD install and Shrockworks Dual battery kit paired wit the National Luna split charge system. Still looking for a aux battery if anyone has suggestions - I'm all ears... @Boort one day soon I hope to get around to building out that drawer setup. Right now the build is all over the map but I'm happy with the progress!


Enthusiast III
Weird... i put 275 70 17 ko2 and have had zero rubbing... stock wheels on mine though...Ahh... Things have not gone in the order I anticipated them going with the build but I've made some additions to the ride. Recently purchased a set of Stealth Custom Series Ray10s and wrapped them in KO2's (275/70/17). Didn't think I would have any trouble with them rubbing but I guessed wrong. At full lock the wheels rubbed forward and in reverse. Removed the front mud flaps and was able to stop the rub forward but in reverse I was still hitting the bumper :( With all that said I jumped ship and bought suspension. Just got it out of the shop and will post some pics soon. Some other things I've done were sPOD install and Shrockworks Dual battery kit paired wit the National Luna split charge system. Still looking for a aux battery if anyone has suggestions - I'm all ears... @Boort one day soon I hope to get around to building out that drawer setup. Right now the build is all over the map but I'm happy with the progress!
View attachment 32744 View attachment 32745 View attachment 32746

@m.neff19
I understand. The Ride is coming along great. Liking the look of the new rims.
Did you do the sPOd install? How was it? I'm thinking of one to cut off my tow controller and add some LEDs in the future.
Boort
Thanks
I did... the install was really straightforward. The most difficult part was getting the fat adapter end through the firewall. I ended up making a funnel with an icing tip and a lot of electrical tape and soap for lubricant. Started on the inside and pushed it through the rubber (same spot the ebrake cable goes through - took two people / one inside, one under the hood). Once the cable was through the rest was a breeze. Disassembled the center console and pulled the cubby out. Took an 1 1/2" drill bit to the back of the cubby to run the cable through. Still not sure how satisfied I am with the switch mount but it's working for now with some 3m tape holding it in the cubby. It looks good but not sure about the longevity of 3m tape. I'll throw some photos up of the switch from inside soon (and where I ran it through the firewall).
Sent from my iPhone using OB Talk
@mrn3ff
3M has lots of different tapes. Not sure what you used. Looking at the rolls on the hook in the garage, I've used 38582 and 03609 in various applications. Both are super strong, have no problems with vibration, and weather the elements well. These are usually available at better autoparts stores (I usually get it at my local NAPA) one is for attaching automotive moldings and I don't remember the recommended application for the other. Either should hold the switch in place for years to come.
I'd like to see pics of the interior install when you get the time.
Boort
... Still not sure how satisfied I am with the switch mount but it's working for now with some 3m tape holding it in the cubby. It looks good but not sure about the longevity of 3m tape.
I'll throw some photos up of the switch from inside soon (and where I ran it through the firewall).
3M has lots of different tapes. Not sure what you used. Looking at the rolls on the hook in the garage, I've used 38582 and 03609 in various applications. Both are super strong, have no problems with vibration, and weather the elements well. These are usually available at better autoparts stores (I usually get it at my local NAPA) one is for attaching automotive moldings and I don't remember the recommended application for the other. Either should hold the switch in place for years to come.
I'd like to see pics of the interior install when you get the time.
Boort
