Enthusiast III
Ok, so this is my first thread. If i butcher this, please forgive me.
So i have a 2006 dodge megacab 1500 5.7L hemi slt

The most common question i get from people is why i put 1500 badges on a 3/4 ton truck...I didn't, that's how dodge made these trucks. From 2006 to 2008 dodge made the megacabs on the 2500 chassis, thats because they needed a "heavy duty" half ton and they weren't quiet sure if this truck would sell. I mean if you look at the bad points, the blind spots are huge and the truck weighs just under 7,000lbs. And i'm not talking about just the rear blind spots, people disappear behind the A pillars all the time and i'm looking like ace venture bouncing around in the driver seat trying to see the clueless dimwit that's stepping off the curb without looking up from their phone. The 06s had some nice new features but nothing to wow you on the slt package. so since they didn't want to put the r&d into an independent front suspension for a 1/2 ton version and make a separate solid axle 3/4 ton diesel version, they said " just take the 05 3/4 ton frame and and suspension and add an extra body mount and do the r&d on the body" so what you were able to get for 2 years was a 1500 with aam 10.5 straight axles, and a 5.7L with no egr or multi cylinder shut off and gets 10mpg. BUT, what you also got and everyone forgets, is you get a front end that was designed to carry an 1,100lb cummins diesel. so when you have a gas v8 thats in the ball park of 350lbs, you have an over engineered suspension to handle it. the stock ball joints and tie rods were still tight as all get out and were far far far off from needing replacement. "how do you know they were stock?" because my dad and i have been doing all the needed maintenance to it since it was new.
My dad bought this truck in 06, new off the lot, for a little over $36k, because my brother and I are both 6'5" and no other back seat gas engine truck could come close to this comfort level. My dad was tired of me pushing my knees into his back seat, i called it lumbar support, he called me a disappointment. So after we all grew up and moved out and started our own lives, my dad still had this truck and just drove it to work and home, that was it. it's done a bunch of road trips across the U.S. and taken really good care of us all while being very reliable and cheap to maintain, but they have an ecoboost f150 they drive more and gets better mpg. So when i told him i wanted to buy it from him in 2017, he said sure, i flew down to Texas from Virginia, and picked up my new to me truck. We originally bought it in Wyoming. so theres the story i love telling and people hate hearing, look at my cool axle swap.

Power wagon axles and leafs for one hell of deal in NC, 6 hour drive down and a chat with a nice lady that parts out dodges and i got my new set up. PW axles come with 4.56 gears and electric lockers, so super cheap off road goodness for me, like i mentioned my truck uses all 2500 suspension and drive train components. so this is a bolt in swap

Shes driving through the woods to pull the axles out of the bushes they've been sitting in for 3 years or so.

rear AAM 10.5

front AAM 9.25
they've been sitting in the garage for over a year at this point and i've finally got all i need to do the swap so i wire wheeled them down and got ready to por 15 them

front looks good, time to blast them with some parts cleaner and clean all the magnets off

rear locker

so much over spray, i am not a professional painter by any means, but its tough stuff and looks legit.

all loaded up and off to my buddys shop to put them in

forgot to mention i got the PW leafs as well, these will lift the rear 2" over stock, so its the same height as the 2500 version but the load limit is lower since the are PW leafs.

hey that was easy, pulled and prepping the new axle by swapping on the brakes and making sure everything else is good. Note how small the 1500 springs are.

new axle in with my best friend and shop supplier Cam, if it wasn't for him i would've been doing this in the driveway and would've been screwed! always have good friends on your side

putting my brother in law to work, 18years old and trying to get in the diesel mechanic field, after today he's not as excited about doing it full time. I'm trying to convince him to become an electrician instead, I was a heavy diesel mechanic in the air force for 7 years and even though im only 28, I'm in pain a lot of the time and constantly having to watch my posture and lifting techniques.

klm steel braided brake lines

see how much bigger the springs are? they're 2" lift springs for the diesel version, no one makes lift springs for the gas so it might sit a little nose high. i might get a synergey 1" rear raising shackle later on. but for now it'll be fine. DO NOT USE THESE COILS!!!! Ok so I thought I would be able to use these on they would work alright, turns out rough country coils have the flex of an I beam and since these are for the cummins model it made it even worse. i thought this would work because synergy mfg said on their site that if you have a gasoline mega cab, you need to use their diesel lift springs. So i thought it would be the same here, it was not, they gave me 3.5" of lift and wrecked my shocks. I'm convinced these also cause some mechanical problems since the control arms couldn't cycle properly and the ride was too stiff. stock control arms are good to 3" of lift, past that and a long arm kit, or longer control arms are needed. So instead of cycling, they just kept jamming into the frame like a stabbing motion, couple that with the little to no flex and it was a bad ride. Go with thuren fab instead, their xs coils lifted it 2.5" over stock and were a huge improvement. and i used their overland shocks as well and they are great for what they are and the price.

rear pulled, some may be asking how i'm using the same shocks with the 2"lift? i bought billstein shocks that are able to work with 0-2.5" lift kits.

running out of time sunday night, couldn't take picks of the install, but thats the new one in there.

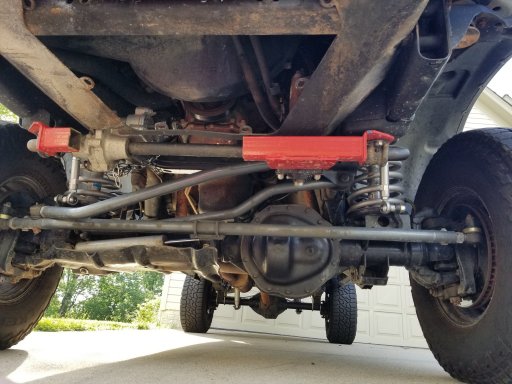
the alignment shops attempt at setting up the steering, i gave them a great set of instruction right off the website for the synergey mfg heavy duty steering. but i guess they didn't want to read it and i was promptly told that "its aftermarke, thats not our fault"

the proper way the steering should be, you can see where my steering stabilizer was binding on the bar. heim joints for my sway bar are a little cock eyed. i actually have a power wagon disconnecting sway bar im going to be installing. just trying to find a way to remove the computer with the electronic disengagement device. i'm going to try a rubricons smart bar delete and see if i can get it to work with the pw bar, or use it as a template to have a machinist i know make me a custom one.

rear end, we couldn't get the old brake line from frame to axle off yet and i had to drive this to work so we are going back at it at a later date. we'll also weld on some bolts so we can bolt the lines from caliper to axles up higher. Rancho sent me the wrong U bolts so thats why theres a stack of washers under each nut. new ones just got here today so should be a quick swap. (Check out the original 06 spare tire, might have to swap that out soon lol)

this truck lives to haul bikes and fun weekend stuff, so everything i'm doing will hopefully make it where i can take it further out on the trails before braking out the dirt bikes, i just got a new ktm 300xcw though, soooo i might not make it too far before i break that out. (stock before swap)

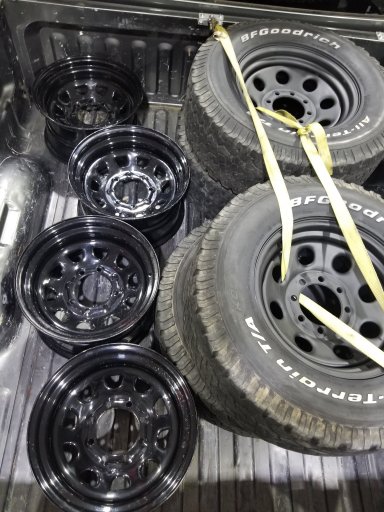
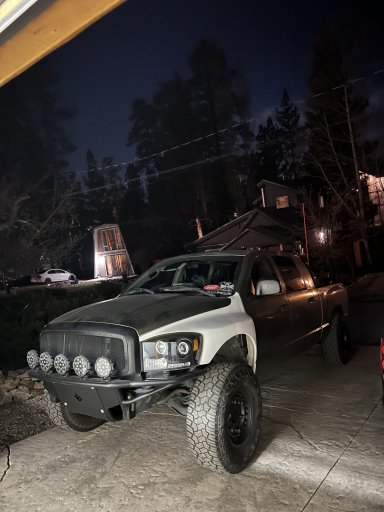
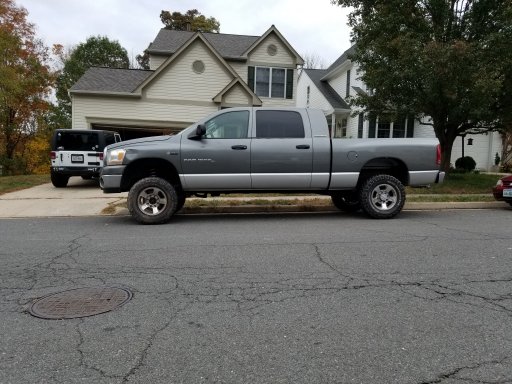
how she sit now, i have a new set of 35/12.50/17s i just haven't got the chance to mount and balance yet.

and again, thank you to my bff cam and his beautiful wife mandy for letting me use his shop and helping me for repayment in beer. (me in background explaining whats for dinner)
So i have a 2006 dodge megacab 1500 5.7L hemi slt
The most common question i get from people is why i put 1500 badges on a 3/4 ton truck...I didn't, that's how dodge made these trucks. From 2006 to 2008 dodge made the megacabs on the 2500 chassis, thats because they needed a "heavy duty" half ton and they weren't quiet sure if this truck would sell. I mean if you look at the bad points, the blind spots are huge and the truck weighs just under 7,000lbs. And i'm not talking about just the rear blind spots, people disappear behind the A pillars all the time and i'm looking like ace venture bouncing around in the driver seat trying to see the clueless dimwit that's stepping off the curb without looking up from their phone. The 06s had some nice new features but nothing to wow you on the slt package. so since they didn't want to put the r&d into an independent front suspension for a 1/2 ton version and make a separate solid axle 3/4 ton diesel version, they said " just take the 05 3/4 ton frame and and suspension and add an extra body mount and do the r&d on the body" so what you were able to get for 2 years was a 1500 with aam 10.5 straight axles, and a 5.7L with no egr or multi cylinder shut off and gets 10mpg. BUT, what you also got and everyone forgets, is you get a front end that was designed to carry an 1,100lb cummins diesel. so when you have a gas v8 thats in the ball park of 350lbs, you have an over engineered suspension to handle it. the stock ball joints and tie rods were still tight as all get out and were far far far off from needing replacement. "how do you know they were stock?" because my dad and i have been doing all the needed maintenance to it since it was new.
My dad bought this truck in 06, new off the lot, for a little over $36k, because my brother and I are both 6'5" and no other back seat gas engine truck could come close to this comfort level. My dad was tired of me pushing my knees into his back seat, i called it lumbar support, he called me a disappointment. So after we all grew up and moved out and started our own lives, my dad still had this truck and just drove it to work and home, that was it. it's done a bunch of road trips across the U.S. and taken really good care of us all while being very reliable and cheap to maintain, but they have an ecoboost f150 they drive more and gets better mpg. So when i told him i wanted to buy it from him in 2017, he said sure, i flew down to Texas from Virginia, and picked up my new to me truck. We originally bought it in Wyoming. so theres the story i love telling and people hate hearing, look at my cool axle swap.
Power wagon axles and leafs for one hell of deal in NC, 6 hour drive down and a chat with a nice lady that parts out dodges and i got my new set up. PW axles come with 4.56 gears and electric lockers, so super cheap off road goodness for me, like i mentioned my truck uses all 2500 suspension and drive train components. so this is a bolt in swap
Shes driving through the woods to pull the axles out of the bushes they've been sitting in for 3 years or so.
rear AAM 10.5
front AAM 9.25
they've been sitting in the garage for over a year at this point and i've finally got all i need to do the swap so i wire wheeled them down and got ready to por 15 them
front looks good, time to blast them with some parts cleaner and clean all the magnets off
rear locker
so much over spray, i am not a professional painter by any means, but its tough stuff and looks legit.
all loaded up and off to my buddys shop to put them in
forgot to mention i got the PW leafs as well, these will lift the rear 2" over stock, so its the same height as the 2500 version but the load limit is lower since the are PW leafs.
hey that was easy, pulled and prepping the new axle by swapping on the brakes and making sure everything else is good. Note how small the 1500 springs are.
new axle in with my best friend and shop supplier Cam, if it wasn't for him i would've been doing this in the driveway and would've been screwed! always have good friends on your side
putting my brother in law to work, 18years old and trying to get in the diesel mechanic field, after today he's not as excited about doing it full time. I'm trying to convince him to become an electrician instead, I was a heavy diesel mechanic in the air force for 7 years and even though im only 28, I'm in pain a lot of the time and constantly having to watch my posture and lifting techniques.
klm steel braided brake lines
see how much bigger the springs are? they're 2" lift springs for the diesel version, no one makes lift springs for the gas so it might sit a little nose high. i might get a synergey 1" rear raising shackle later on. but for now it'll be fine. DO NOT USE THESE COILS!!!! Ok so I thought I would be able to use these on they would work alright, turns out rough country coils have the flex of an I beam and since these are for the cummins model it made it even worse. i thought this would work because synergy mfg said on their site that if you have a gasoline mega cab, you need to use their diesel lift springs. So i thought it would be the same here, it was not, they gave me 3.5" of lift and wrecked my shocks. I'm convinced these also cause some mechanical problems since the control arms couldn't cycle properly and the ride was too stiff. stock control arms are good to 3" of lift, past that and a long arm kit, or longer control arms are needed. So instead of cycling, they just kept jamming into the frame like a stabbing motion, couple that with the little to no flex and it was a bad ride. Go with thuren fab instead, their xs coils lifted it 2.5" over stock and were a huge improvement. and i used their overland shocks as well and they are great for what they are and the price.
rear pulled, some may be asking how i'm using the same shocks with the 2"lift? i bought billstein shocks that are able to work with 0-2.5" lift kits.
running out of time sunday night, couldn't take picks of the install, but thats the new one in there.
the alignment shops attempt at setting up the steering, i gave them a great set of instruction right off the website for the synergey mfg heavy duty steering. but i guess they didn't want to read it and i was promptly told that "its aftermarke, thats not our fault"
the proper way the steering should be, you can see where my steering stabilizer was binding on the bar. heim joints for my sway bar are a little cock eyed. i actually have a power wagon disconnecting sway bar im going to be installing. just trying to find a way to remove the computer with the electronic disengagement device. i'm going to try a rubricons smart bar delete and see if i can get it to work with the pw bar, or use it as a template to have a machinist i know make me a custom one.
rear end, we couldn't get the old brake line from frame to axle off yet and i had to drive this to work so we are going back at it at a later date. we'll also weld on some bolts so we can bolt the lines from caliper to axles up higher. Rancho sent me the wrong U bolts so thats why theres a stack of washers under each nut. new ones just got here today so should be a quick swap. (Check out the original 06 spare tire, might have to swap that out soon lol)
this truck lives to haul bikes and fun weekend stuff, so everything i'm doing will hopefully make it where i can take it further out on the trails before braking out the dirt bikes, i just got a new ktm 300xcw though, soooo i might not make it too far before i break that out. (stock before swap)
how she sit now, i have a new set of 35/12.50/17s i just haven't got the chance to mount and balance yet.
and again, thank you to my bff cam and his beautiful wife mandy for letting me use his shop and helping me for repayment in beer. (me in background explaining whats for dinner)
Attachments
Last edited:


.jpg")