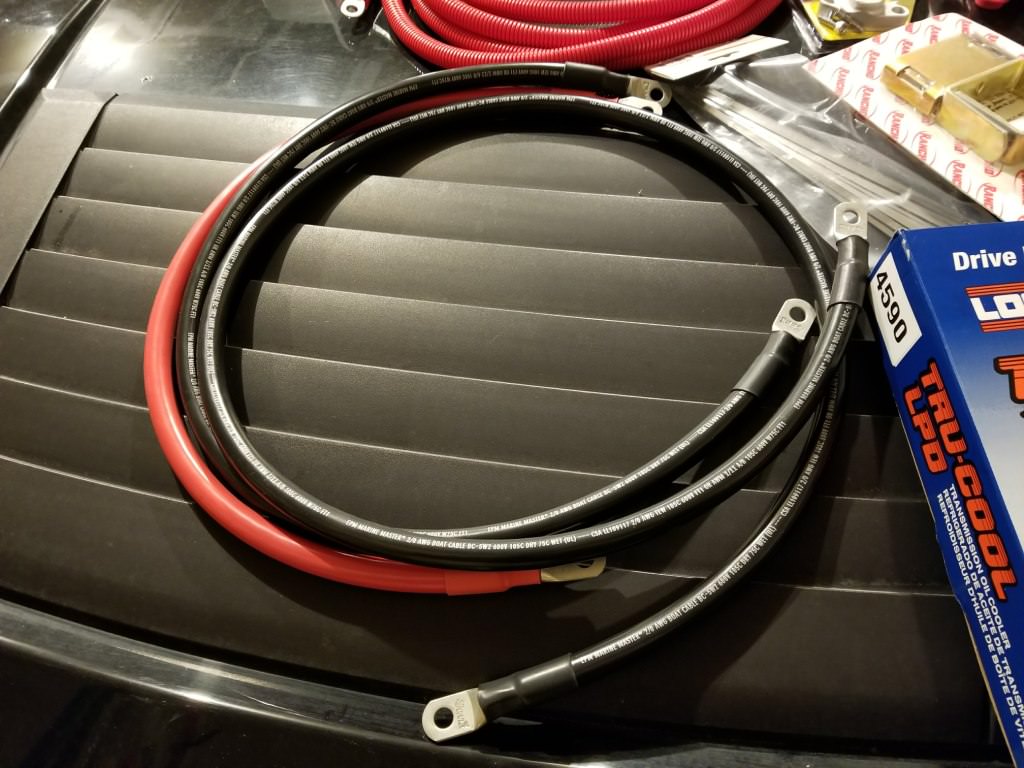
'08 Hummer H3 Alpha build

  • HTML tutorial

JPaul

Rank V
Member

Pioneer I

2,596
Mendon, UT, USA
First Name
Paul
Last Name
Allen
Member #

11021

Ham/GMRS Callsign
N1JPA
Here is what I ended up with. The baseline ended up being 29.25" center to center, and 6" from the front of the bumper to the center of the first hole. Then the rest of it I was able to line up using the measurements CJ provided me.


I test fit it all again to make sure everything lined up the way I wanted it to and that I had in fact measured right. I did one side first and verified it was all good and then simply replicated the measurements to the other side. I had to redo the first attempt after changing the battery in my digital calipers because a couple of the measurements were off just enough to cause the three bolt holes to not align with each other correctly.

Once that was all done then it was time to drill the holes. I did this in four steps, first using a 1/8" bit to get the hole started in the right place, then stepped up using slightly larger bits until I got to the final 1/2" bit to finish off the holes. Never start with a bit that large unless you don't care at all about alignment, because you're holes WILL wander and quite a bit at that. Fortunately I was close enough that I only had to slightly coax the third bolt on each side in, but all that took was using my ratchet to thread it in.

Here it is after drilling and removing the tape:


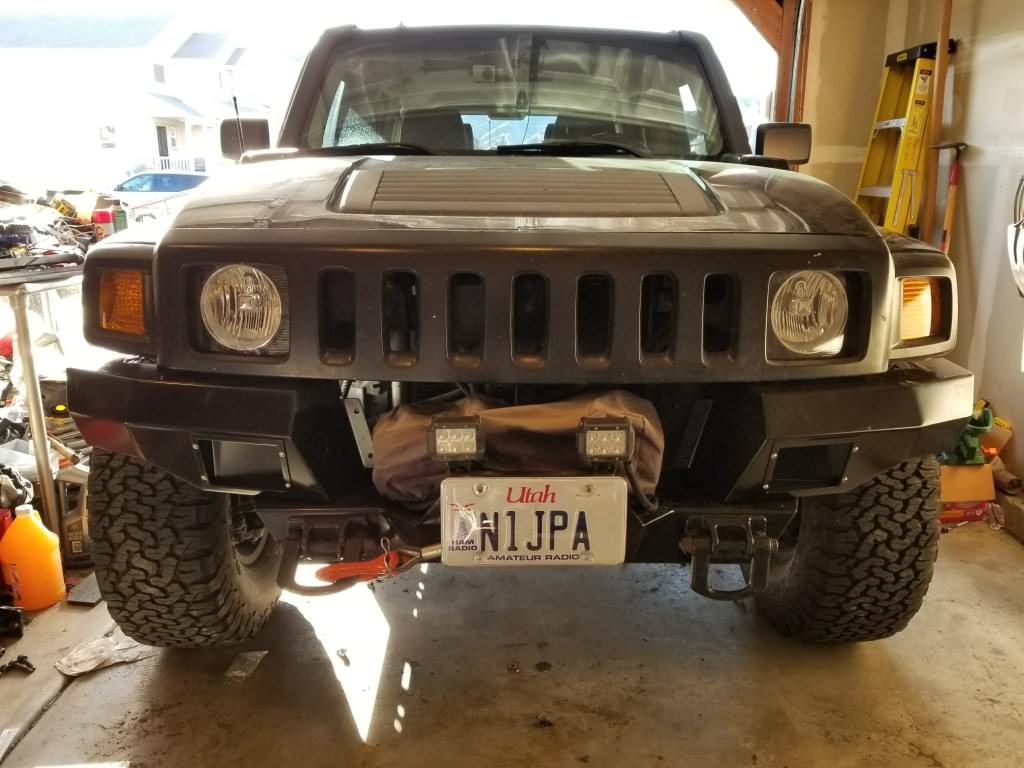
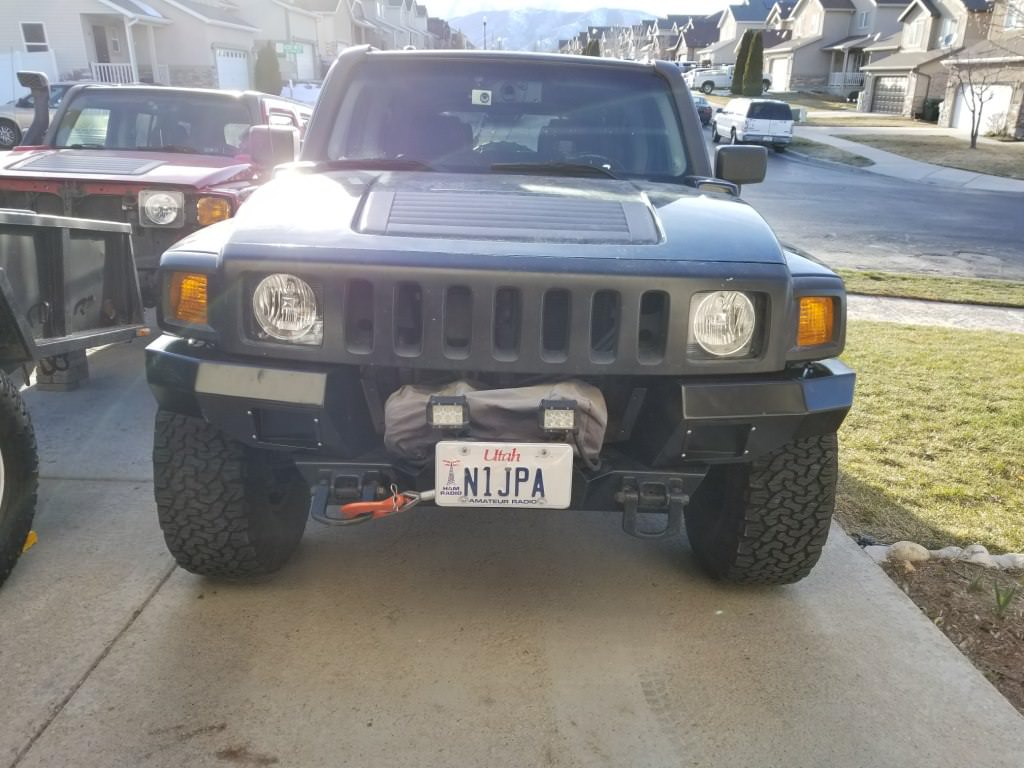
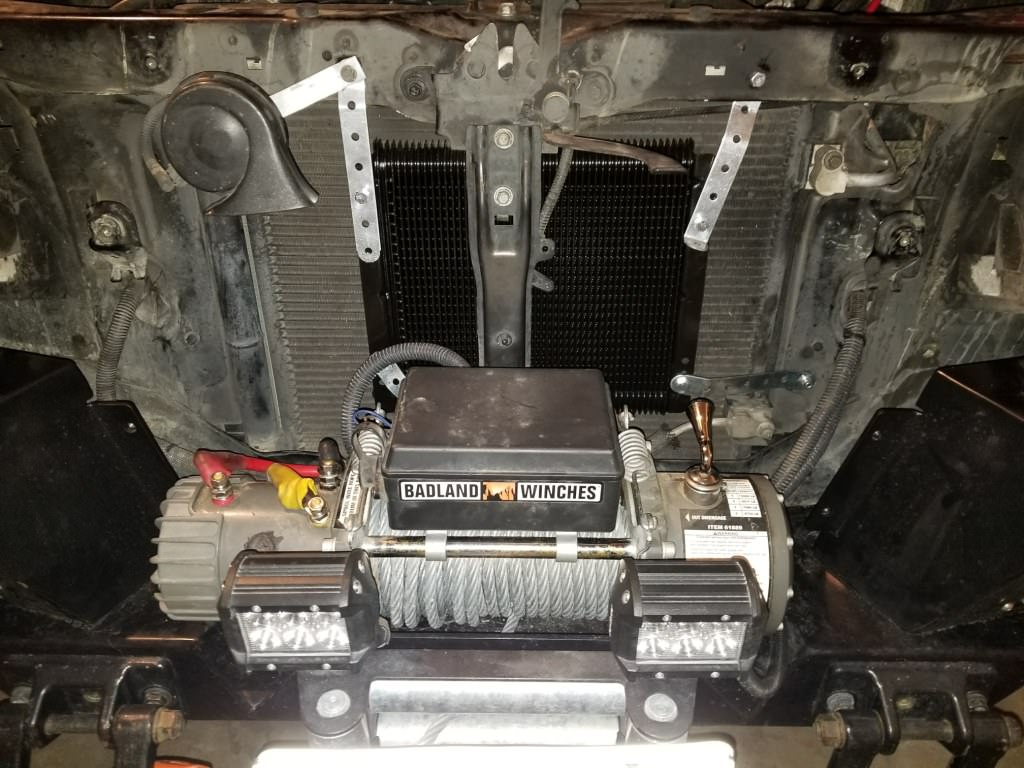
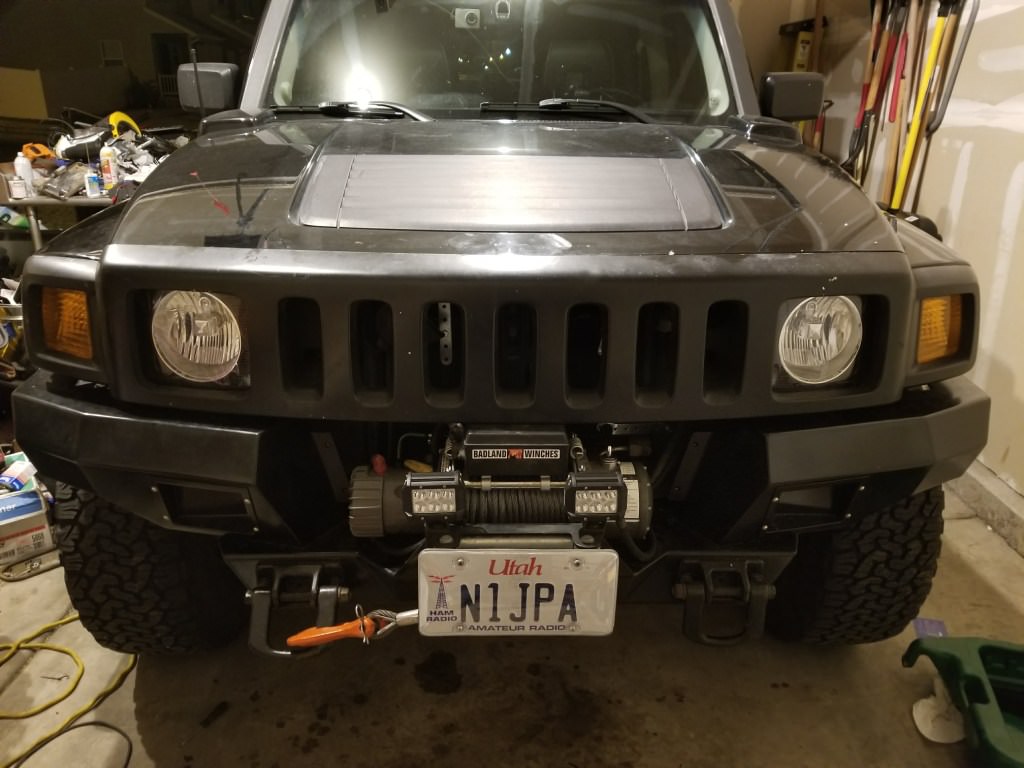
And then all bolted up:


JPaul

Rank V
Member

Pioneer I

2,596
Mendon, UT, USA
First Name
Paul
Last Name
Allen
Member #

11021

Ham/GMRS Callsign
N1JPA
Last steps are to actually install it on the Alpha. Seeing how the whole thing is made with 3/16" steel it now weighs a fair bit. I'm glad I pulled the winch off, because just the bumper and the winch alone were barely light enough for me to handle on my own. I would not have been able to lift it by myself with the pods and the winch attached.

Ready to go on:


And bolted in place:


Winch mounted, cover put on the winch, grille installed, and license plate mounted to the clip on bracket I made the first go around using a few old plates as backing and Maglite clips to attach it to the fairleade rollers. This time around I finally added the license plate protector I bought ages ago to help keep the plate nice. Since these are my callsign plates, I'm going to be a bit pickier about keeping them in good shape. The winch is a 12K pound Badlands winch I picked up shortly after I first got my red H3, I snagged it for just $200 during a Harbor Freight parking lot sale, it was an open box item they had discounted by $100, and since they were selling brand new ones for $300, they knocked this one down to $200.


A shot of it outside:


If the truck looks lopsided, that's because it was. I had messed around with the torsion bars when I first got it and had to change out the axle. Somehow the front had ended up at about 26" from center of wheel to bottom of the fender. It really should have only been about 23.5" at most. Not sure how it happened, but I think that is what lead to the failure of the CV boot. At any rate, once I had the bumper and winch all on there I went ahead and re-leveled it. Now it's sitting right at 23.5" center of wheel to fender which is about perfect.


The winch isn't fully hooked up yet, I just need to attach the cables to the battery, but I have some military terminals sitting here that I just got from Amazon to replace the stock ones. The stock terminals on these are known for causing issues, and I had already replaced the ones on my red H3 with some brass terminals I had on hand. I've also wondered if on the Alpha they are causing weird issues because my Ultragauge has intermittently been showing the voltage at around 12.9 volts instead of 14 volts or so while driving. I'm hoping the new terminals will correct that. No codes or anything have been thrown because of it yet at least.
 
  • Like
Reactions: tbisaacs

JPaul

Rank V
Member

Pioneer I

2,596
Mendon, UT, USA
First Name
Paul
Last Name
Allen
Member #

11021

Ham/GMRS Callsign
N1JPA
After dinner and getting the girls in bed I spent some more time on the Alpha, this time installing the Tekonsha P3 brake controller I picked up. At first I mounted it on the left of the steering wheel, but that ended up being a bad location because my knee would hit it while getting in and out of the truck.


So the next step was moving it over to the right side, but I put it up fairly high and then discovered that it was in the way of the ignition. Oops.

So I moved it down lower which worked out better anyway because I could see the screen a lot better through the steering wheel, and I can rest my hand on my knee and be able to manipulate the controls as well as the manual brake lever.


It's a good thing I went with the P3, because right off the bat after getting the wires crimped together with the OEM pigtail, it started complaining about the brake line being shorted to ground. I noticed that it wouldn't always do it and would clear after a random period of time, but then come back up with that warning. I wracked my brain trying to think of what could possibly be causing an intermittent short to ground for the trailer brake wire, then finally remembered and issue others have had with the harness at the rear bumper rubbing against the body and shorting out.

Opening up the gate and looking down at the harness and sure enough, it was rubbing through. Bummer. I didn't have this issue on my red H3, it cleared it just enough to not be a problem, and I added some insulation to it in order to prevent it from happening later. Guess it's too late on the Alpha. The brake wire is rubbed through enough that it really should be repaired or replaced.


JPaul

Rank V
Member

Pioneer I

2,596
Mendon, UT, USA
First Name
Paul
Last Name
Allen
Member #

11021

Ham/GMRS Callsign
N1JPA
Since the popup tent trailer I'm taking down to Moab has brakes, I have to get that fixed pretty soon. I need to see if I can just get a new harness or if I should just repair the line. Honestly with where it is at it wouldn't be too bad a job to cut the wire and crimp it back together, or just crimp a ferrule right over it to restore the effective gauge of the wire.

Another issue I discovered is that the transmission lines running into the cooler in the radiator are leaking at the quick connect fitting where the lines enter into the fittings. It's a brand new radiator so I'm pretty surprised at that. Right now my options are to either try pulling the lines out and seeing what's causing the leak and if it's possible to fix it (unlikely), replacing the radiator (which is stupid seeing how it's basically new), or bypassing the in-tank cooler completely and adding an external stacked plate cooler. Honestly the latter is probably going to be the route I take. I've thought about doing that for the red H3 for a while now, and since I'm definitely going to be hauling a trailer around now when going camping, I'm probably just going to be better off with the external cooler.


On a happier note, I moved the majority of my stuff I keep in the back of the H3 (my recovery gear, some tools, straps, rope, etc) from the red H3 and the bags they were (mostly) all in to the MTM crates I bought and have them all in the Alpha now. I still need to go through them and re-evaluate what I really need/want to keep in there, but at least now I have most of my stuff in the Alpha.


I still need to move the ARB fridge over, but I'm probably going to wait a while longer until I see if I can get the rear power all installed. I have a 2/0 15' cable coming on Tuesday for the main supply to go from the battery in the engine bay all the way back to the rear pillar on the driver side. I also have a couple 2/0 cables coming to provide the ground path, I'll have a cable up at the battery going to the frame, and the other will be at the back pillar down to the frame. I have a Blue Sea SafetyHub 150 on the way as well to provide power distribution for the rear. This way I can wire in my ARB twin compressor in the rear, as well as my 750W inverter and my ARB fridge. My Icom 706MkIIG is probably going to go back there as well, I have the remote cable and bracket for the head so I can have that up front. The only place I could think of up front for the Icom's body was under my seat, and I just don't like the idea of having something like that low down where it runs the risk of getting wet (in case of a deep water crossing or something, like the sunroof leaking).

I spent a lot of time trying to figure out what kind of power I wanted in the rear, and ultimately determined I wanted to be able to have a minimum of 150 amps supplied with no more than roughly 3% voltage drop, and theoretically the 2/0 cable will provide that. Even if it's more like 4% I'll be happy with that. Then all my accessories in the back will have plenty of power and can run as efficiently as possible. With the cables, fuseblock, fuses and other items I'm only spending about $250 for the whole setup thanks to some good deals I landed.
 
  • Like
Reactions: jim carter

JPaul

Rank V
Member

Pioneer I

2,596
Mendon, UT, USA
First Name
Paul
Last Name
Allen
Member #

11021

Ham/GMRS Callsign
N1JPA
So I got the 15' cable in today, and wouldn't you know it, the seller apparently doesn't know the difference between 2/0 gauge cable and 2 gauge cable, even when 2 gauge is all that is printed on the cable jacket... :rage:

I messaged them though and they gave me a call about it. They are going to send me a 3/0 gauge cable that is 18' long instead and let me keep the 2 gauge cable as well. So that's pretty good service right there. Now my current capacity will be even better with almost no voltage drop. I also might be running the cable on the outside now along the frame rails instead of through the body. We'll see how it all really fits. I'm a little bummed though because now I want to get some 3/0 ground cables to match it instead of the 2/0 I bought, but that's going to have to wait until later, if I even decide to really change that part of it.
 

JPaul

Rank V
Member

Pioneer I

2,596
Mendon, UT, USA
First Name
Paul
Last Name
Allen
Member #

11021

Ham/GMRS Callsign
N1JPA
This past week I have received a bunch of goodies that I've ordered for the Alpha with still some more on the way.


JPaul

Rank V
Member

Pioneer I

2,596
Mendon, UT, USA
First Name
Paul
Last Name
Allen
Member #

11021

Ham/GMRS Callsign
N1JPA
So Saturday was spent fixing the two major issues that have come up that needed to be addressed before my trip to Moab at the end of the month.

First up was the trailer brake wire that had rubbed through. I had to pull the bumper off to make this easy, and after that it really wasn't too bad a job other than having to run out to find some Deoxit. (Guitar Center ended up having some, interestingly enough)

Here's a better shot showing the damage:


Fortunately the two wires next to it ended up being OK, I thought they had also been rubbed through the insulation.

This is supposed to be 12 gauge I think...


Apparently I expected too much from Deoxit, I was expecting it to actually remove the blackening on the copper wire (which occurred from the copper being exposed to the elements after the insulation was rubbed through), but it didn't really seem to do anything. So I fanned out the wires and used a bronze fine bristle wire brush and scrubbed them clean:


The Deoxit probably helped, and should help protect the wire as well now.
 

JPaul

Rank V
Member

Pioneer I

2,596
Mendon, UT, USA
First Name
Paul
Last Name
Allen
Member #

11021

Ham/GMRS Callsign
N1JPA
Once the wire was cleaned I spliced it together using a crimp that has adhesive lined heat shrink. This will make it a permanent fix and seal out the elements.


Then I wrapped it using some 3M self vulcanizing rubber tape. Frankly it's all I had on hand, I have no idea where my regular electrical tape is and didn't want to waste more time looking for it, but I think this is better anyway as it adds quite a bit of buffer between the wires and the body now.


And here it is back in place. It still rubs against the body, and while I could have left it loose instead of clipping it back onto the bumper I was concerned about it ending up rubbing against some other edge later on. I modified the mounting clip though so that it allows the connectors to angle down, now it still rests against the body but it isn't exerting very much pressure at all against it, so it should last quite a while. I'm going to make sure to inspect it periodically to make sure it's not still an issue.


JPaul

Rank V
Member

Pioneer I

2,596
Mendon, UT, USA
First Name
Paul
Last Name
Allen
Member #

11021

Ham/GMRS Callsign
N1JPA
I also took a quick moment to finish hooking up the brake controller, now that the wiring was fixed. It's much happier now.


JPaul

Rank V
Member

Pioneer I

2,596
Mendon, UT, USA
First Name
Paul
Last Name
Allen
Member #

11021

Ham/GMRS Callsign
N1JPA
Something I thought I'd take a shot of and share, the H3 has a great spot for a flashlight right next to the seat. I don't even use clips since I've never had this one roll anywhere. It's a worklight from Lowes (their Kobalt brand) that uses Lithium Ion batteries and has the charger built into it (including the plug that goes into a 110v outlet), and it came with a AA battery box as well so I can have that spare. I use this light for all my work on the truck, through honestly I really should by a proper worklight, while this does last all day, it'd be a lot nicer to have one that just plugs into the wall.


JPaul

Rank V
Member

Pioneer I

2,596
Mendon, UT, USA
First Name
Paul
Last Name
Allen
Member #

11021

Ham/GMRS Callsign
N1JPA
On to the next fix, the transmission cooler. When I crawled under the Alpha again yesterday to start on this, I noticed that even though I had wiped the bottom of the radiator clean the weekend before, it was already sopping wet with lots of drips forming of transmission fluid. I was able to determine that it was in fact coming from the passenger side cooler line where it entered the radiator. I think it had actually gotten worse since the week before.

So to start, I made some measurements to see how the Long transmission cooler would fit, and determined I needed to move the AC line again. This time I put it back out in front of the nose and zip tied it along the bottom. That will keep it out of the way of the winch.


After a fair bit of test fitting, determining where to attach the brackets, how to run the cooler lines, etc, I finally landed on this location. Fortunately there ended up being pre-existing holes I could use on the body for all four brackets.


You'll notice I also pulled off the winch control box from it's previous location, partly to facilitate the installation, and partly because I decided with the addition of the transmission cooler and a bigger engine so it's going to go on top of the winch instead. I did a test fit and found that the grille just barely fit with the control box on top of the winch.
 

JPaul

Rank V
Member

Pioneer I

2,596
Mendon, UT, USA
First Name
Paul
Last Name
Allen
Member #

11021

Ham/GMRS Callsign
N1JPA
At this point I went ahead and redid the routing of the winch power cables and mounted the controller. Previously I was passing the power cables up at the uppr right through the same hole the AC line ran through, but then I noticed a second hole on that same side lower down. This was more favorable since then I didn't have to worry about the power cables rubbing against the AC line. A few cuts with my knife and the cables routed perfectly.


They still aren't hooked up yet, I want to swap out the batter terminals first. That should happen this week sometime.
 

JPaul

Rank V
Member

Pioneer I

2,596
Mendon, UT, USA
First Name
Paul
Last Name
Allen
Member #

11021

Ham/GMRS Callsign
N1JPA
Next up was plumbing the lines. I removed the factory hose crimps from the hard lines next to the front of the engine and pulled the hoses off. Since the stock cooler lines turned out to be aluminum (which made it a lot easier to use the flaring tool with) I cut up the portion I removed that ran into the radiator to use as 90 degree bends.


Then I cut off the ends that went into the radiator and turned them into plugs to help prevent future contamination or leaking of coolant if somehow the cooler that is still in the radiator develops a leak.


Then I plumbed the lines using the hose provided in the kit and some fuel injection clamps. The hoses drop down under the radiator and below the sway arm and back up to the hard lines that run back to the transmission. I made sure to plumb it so that the fluid flows from the bottom of the cooler to the top to prevent air pockets. The hoses do rest on the skid plate though, so I want to try and figure out a way to keep that from happening so that they don't rub through. I also want to get some split loom that is big enough to go around the hoses to help protect them. All the split loom I have right now is too small.


And all buttoned up. I finally finished this all up at 3AM Sunday morning, mostly because I was being extremely particular about everything and trying to make sure this was as optimal as I could make it. I wanted it to be a once and done deal, rather than rushing it and then having to go back later and redo it. I do still want to go back and pull the brackets off and paint them black so that they blend in, and probable replace the hardware with stainless steel, but that's all minor tweaks.


The transmission cooler is a Long 4590, it's supposed to be good for up to 28,000 GVWR but as an add on cooler to the factory cooler. Since I'm completely bypassing the factory cooler I wanted to make sure I had plenty of cooling for the transmission, particularly since I have lots of mountains around here and will be towing a trailer more frequently. It's supposed to have a built in bypass, but if I find that it's overcooling (particularly during winter is my concern) then I'll add in a thermal bypass later on. I also picked this one up for just over $80 shipped, so why not?
 
  • Like
Reactions: tbisaacs

JPaul

Rank V
Member

Pioneer I

2,596
Mendon, UT, USA
First Name
Paul
Last Name
Allen
Member #

11021

Ham/GMRS Callsign
N1JPA
So it's been raining since yesterday afternoon, and this morning I came out to the truck to discover a puddle of water in my Huskyliner floor mat on the driver side. Further inspection revealed that not only is the carpet underneath completely sopping wet as well, but the same thing happened on the passenger side. This means my sunroof drains are either blocked, or more likely the lines came off somewhere on each side since it was dripping down from the sides and there is not a pool of water in the sunroof tray at all.

Just what I need after spending all that time cleaning and drying the carpet just a few weeks ago, especially right before my Moab trip. Fortunately the weather forecast has it dry after Monday. Unfortunately until Monday the forecast is more rain. I think I might put duct tape over the sunroof seam in the meantime to stop the flow of water. I'm not going to be able to work on this until after the Moab trip, I've been swamped at work and still have a bunch of stuff to get done before the trip.
 

JPaul

Rank V
Member

Pioneer I

2,596
Mendon, UT, USA
First Name
Paul
Last Name
Allen
Member #

11021

Ham/GMRS Callsign
N1JPA
Temporary fix:


This is actually some pretty good tape, I was able to apply it while it was still raining and it stuck, I just squeegeed out the water as i put it down and it held just fine. We had a roll at work which is when I did this. I should pick up a roll or two and keep one in the Alpha.


When I got home from work I pulled out the carpet. I had checked it after lunch and the passenger side had a pool of water underneath and the foam rubber under the carpet was completely soaked. Fortunately since I've done it before pulling the carpet out only took about 15 minutes, then cleanup and putting the seats and trim back in maybe another 15 to 20 minutes. I put the Huskyliner mats back in, and it honestly doesn't look too bad since everything is black. I'm definitely considering just bedlining the floorpan and leaving the carpet out. I do take this off road and will be using it more and more for camping so it's just going to keep getting dirty. Either way the carpet will be out for a couple weeks while it dries and I consider my options.


JPaul

Rank V
Member

Pioneer I

2,596
Mendon, UT, USA
First Name
Paul
Last Name
Allen
Member #

11021

Ham/GMRS Callsign
N1JPA
Made progress on the list of things to get done before Moab, plus I snuck in some extra work. First up was fixing some exhaust leaks. When I had the carpet in the noise from them wasn't bad at all really, but after pulling the carpet out I realized just how loud the ones on the passenger side were. I knew it was going to drive me nuts on the long drive to and from Moab so this became a priority repair.

I picked up some aluminum tape from Lowes (medium temp, 300 degrees) and used that to wrap around a couple of the welds that had some pinholes in them. I had some metal zip ties from Harbor Freight that I used to keep the tape from unraveling, just in case. Unfortunately that didn't seem to really help much, so I took another look and realized it was mostly coming from the exhaust clamp. I noticed that it wasn't really holding onto one of the pipes so I pulled it off. Turned out it had been installed backwards (its one of those clamps that has one side smaller than the other for slip fit joints), so I turned it around and reinstalled it and now the exhaust is much, much quieter. There are still a few more pinholes I'd like to fix, but one joint is right up against a heat shield clamp so I can't get any tape around it. I have some muffler patch compound I'm going to use, but I'll put that on another day, the worst of it is fixed now.


Next up I pulled the power supply for the rear dash camera out of the red H3 and installed it into the Alpha. This way it will power on automatically when the key is turned on, and I can ditch the cord running all the way through the Alpha from the aux power up front. It's wired into a power supply line for the rear wiper motor that comes on with the ignition.


This time I took the window surround off and filed a notch into it for the cable to pass through without being pinched. On the red H3 I didn't do this and I could tell the cable was starting to show signs of rubbing through the insulation.


JPaul

Rank V
Member

Pioneer I

2,596
Mendon, UT, USA
First Name
Paul
Last Name
Allen
Member #

11021

Ham/GMRS Callsign
N1JPA
Once that was all done I checked my list of things to do and remembered that I had noticed at least one of the mounting bolts for my winch didn't look like I had tightened it down all the way, so I got back under there and sure enough it was loose. Good thing I didn't need to use it before now. I tightened it up and checked the others to make sure I had torqued them down all the way, they were all OK.

The last thing for the day was swapping the wheels and tires between the red H3 and the Alpha. On my red H3 I was running Goodyear Duratrac's in a 33" size (285/75R16), while the Alpha had 35" BFG KO2's (315/76R16). While the KO2's looked great on the Alpha, this is my daily driver more than anything so fuel economy is important to me (somewhat, let's not kid ourselves, it's a blood Hummer), as is strain on the drivetrain. Other factors include my trailer plans, I already lucked out on a set of matching Duratrac's for the trailer tires and since I'm planning on pulling a trailer pretty much any time we go camping (which is hopefully going to become more frequent now) it will be a lot easier for the engine and drivetrain to handle the strain with the 33" tires vs the 35" tires, especially since most of my trips will likely involve mountain passes to climb up and over. Also I have a full set of five of the Duratracs so I have a matching spare, while the spare I had on the Alpha with the KO2's was not matching, it was a mud terrain tire.

Another factor is that the I just prefer the way the H3 handles with 33" tires vs the 35" tires. When I took the Alpha out after putting the Duratracs on I noticed it felt lighter and a bit more sure. While I was swapping the tires around I stopped and weighed one of the Duratracs and one of the KO2's. The Duratracs came in at 75 pounds per wheel/tire while the KO2 came in at 92.2 pounds per wheel/tire. That's a difference of 17.2 pounds per tire, adding up to almost 69 extra pounds of unsprung weight and rotational mass. That's quite a bit really. Plus it's soooo much easier to manhandle the 33" Duratracs than the 35" KO2's, that extra 17 pounds plus the larger size makes them kind of a huge pain to work with.

I get that 35" tires are better for rock crawling and other things, and they really do look quite good on the H3 (and it's nice that you don't have to do a lift to fit them), but the reality is that I go rock crawling maybe once a year or so, twice if I get lucky. The rest of my time is spent driving to and from work and around town, and hopefully more frequently on dirt tracks going camping/overlanding. The 33" tires are perfect for me for that application.


Sorry for the poor shot, I just barely took it and I already had the Alpha in the garage for the night. I'm not pulling it out to get a better angle just for everyone else.


I still need to get the roof rack on and the CB antenna mounted, as well as look at rebuilding the spare front axles I have to make sure I've got some good spares for the trails. I'm getting down to the wire here, there is less than a week left before my Moab trip, and I'm probably going to be having to go into the office at night on Monday, Tuesday, and Wednesday to run updates on some of the web servers, so that will take up a lot of my spare time unfortunately. I also still need to go check over the popup trailer I'll be borrowing and make sure it's all ready to go for me. I'd really like to leave Friday afternoon after work if possible, but we'll see how it all goes.
 

JPaul

Rank V
Member

Pioneer I

2,596
Mendon, UT, USA
First Name
Paul
Last Name
Allen
Member #

11021

Ham/GMRS Callsign
N1JPA
Almost forgot, one of the other things I did was to straighten the rear wiper arm. The stock setup is horrible, it basically cleans only half the rear window. Straightening it and re-clocking the arm allows it to clean a much more usable section of the rear window.


jim carter

Rank I
Launch Member

Traveler I

Since the popup tent trailer I'm taking down to Moab has brakes, I have to get that fixed pretty soon. I need to see if I can just get a new harness or if I should just repair the line. Honestly with where it is at it wouldn't be too bad a job to cut the wire and crimp it back together, or just crimp a ferrule right over it to restore the effective gauge of the wire.

Another issue I discovered is that the transmission lines running into the cooler in the radiator are leaking at the quick connect fitting where the lines enter into the fittings. It's a brand new radiator so I'm pretty surprised at that. Right now my options are to either try pulling the lines out and seeing what's causing the leak and if it's possible to fix it (unlikely), replacing the radiator (which is stupid seeing how it's basically new), or bypassing the in-tank cooler completely and adding an external stacked plate cooler. Honestly the latter is probably going to be the route I take. I've thought about doing that for the red H3 for a while now, and since I'm definitely going to be hauling a trailer around now when going camping, I'm probably just going to be better off with the external cooler.


On a happier note, I moved the majority of my stuff I keep in the back of the H3 (my recovery gear, some tools, straps, rope, etc) from the red H3 and the bags they were (mostly) all in to the MTM crates I bought and have them all in the Alpha now. I still need to go through them and re-evaluate what I really need/want to keep in there, but at least now I have most of my stuff in the Alpha.


I still need to move the ARB fridge over, but I'm probably going to wait a while longer until I see if I can get the rear power all installed. I have a 2/0 15' cable coming on Tuesday for the main supply to go from the battery in the engine bay all the way back to the rear pillar on the driver side. I also have a couple 2/0 cables coming to provide the ground path, I'll have a cable up at the battery going to the frame, and the other will be at the back pillar down to the frame. I have a Blue Sea SafetyHub 150 on the way as well to provide power distribution for the rear. This way I can wire in my ARB twin compressor in the rear, as well as my 750W inverter and my ARB fridge. My Icom 706MkIIG is probably going to go back there as well, I have the remote cable and bracket for the head so I can have that up front. The only place I could think of up front for the Icom's body was under my seat, and I just don't like the idea of having something like that low down where it runs the risk of getting wet (in case of a deep water crossing or something, like the sunroof leaking).

I spent a lot of time trying to figure out what kind of power I wanted in the rear, and ultimately determined I wanted to be able to have a minimum of 150 amps supplied with no more than roughly 3% voltage drop, and theoretically the 2/0 cable will provide that. Even if it's more like 4% I'll be happy with that. Then all my accessories in the back will have plenty of power and can run as efficiently as possible. With the cables, fuseblock, fuses and other items I'm only spending about $250 for the whole setup thanks to some good deals I landed.

I'm looking for someone who has put a fridge in their h3. want to see how yours fits!
 

JPaul

Rank V
Member

Pioneer I

2,596
Mendon, UT, USA
First Name
Paul
Last Name
Allen
Member #

11021

Ham/GMRS Callsign
N1JPA
So it's been a bit since I updated this, mostly because I haven't really had time to do much on the truck thanks to work consuming far more of my time than I would like it to. Since the last post I hauled a pop-up camper down to Moab and spent a few days down there with my daughters and a bunch of the Hummer guys. It pulled the trailer really well so I was pretty happy with that.

Unfortunately skip forward to just a couple weeks ago or so and I discovered the Alpha has started making a new noise. This one sounded like a metallic scraping/rubbing in time with the engine speed. At first I thought maybe it was something in the transmission since that is where the noise seemed to be coming from, and lately I had been noticing that it seemed to be slipping in 1st and the 1st-2nd shift was a fair bit harder than it used to be. I tried checking the flexplate to see if that might be the issue, but from what I could tell it was fine. I ended up giving up and spent last Saturday pulling the transfer case and transmission to see if I could track down what the problem really is. Considering the Alpha has 160,000 miles on it I wasn't surprised it started having issues, I just wish it wasn't so soon after picking it up. But fortunately I still have my red base H3 so I have something to drive until I can get the Alpha fixed.

So after pulling the transmission (which is a terrible job when you don't have a post lift or a pit by the way and especially when you're doing it by yourself) I still couldn't determine where exactly the noise was coming from. The flex plate was perfectly fine, and when I spun the torque converter I didn't get any noise, and the transmission fluid looked nice and clean. So after some back and forth I tried starting the engine up without the transmission attached, and after putting the starter back on and hooking up the park/neutral switch to the harness I was able to start it, and lo and behold I heard the noise again. It was definitely the engine then. I put my mechanics stethoscope on the passenger side valve cover and this time I could hear a lifter ticking in sync with the scraping sound. Bummer.

So starting on Tuesday I think I began the process of pulling the engine out. I don't have a lot of free time right now thanks to my job, but I was able to get about an hour or so in each night except for tonight which I was able to get a few hours in. Everything is disconnected from the engine and the motor mount bolts are all cracked loose, so tomorrow I should be able to pull the block out and start tearing it down. Hopefully nothing was majorly damaged in the engine, particularly the block, crank, and rods. Otherwise I might be looking at just buying a re-manufactured engine. Either way I really hope I can get this all done and put back together in the next two to three weeks, since I have a trip to Colorado to go camping with my family at the very end of June, and I wanted to be able to bring the Alpha and my trailer to haul everything in rather than trying to pack it all in and on the truck. We'll see how it all goes, but considering I was able to pull the engine and transmission in a week's time I think I'll be ok, barring any major issues with the block and such.