05 Toyota Sequoia Overland Build

  • HTML tutorial

A-Aron

US Rocky Mountain Region Local Expert Utah
Launch Member

Off-Road Ranger I

3,394
Enoch, UT, USA
First Name
Aaron
Last Name
Tiede
Member #

15719

Ham/GMRS Callsign
KJ7LIJ
I love it! You have turned a lot of great ideas into reality.
Thanks, it had been a lot of work, a lot of brainstorming, and a lot of planning. And to be honest a lot of fun!
 
  • Like
Reactions: JCWages

A-Aron

US Rocky Mountain Region Local Expert Utah
Launch Member

Off-Road Ranger I

3,394
Enoch, UT, USA
First Name
Aaron
Last Name
Tiede
Member #

15719

Ham/GMRS Callsign
KJ7LIJ
A, this is really taking shape, you do nice work! Love the CAD! (Cardboard Aided Design) that's my favorite tool.

Dan.
Thanks Dan, lol, in my defense . I did draw it up in SketchUp first..haha
 

RogueSequoia

Rank 0
Launch Member

Traveler I

60
Denver, CO, USA
Member #

16701

Hey Aaron, followed you over here from the FB group to watch your build progress.

Couple of things, are you going to see that brush guard? I am going to have a front bumper built but it's a bit off. And, do you have the specs for that roof rack written down, and did it bolt onto the OEM holes?

Thanks man, love what you're doing.
 

DirtyPenguins

Rank III
Launch Member

Member III

703
Lansing, MI, USA
Member #

17428

I'm thinking about a sequoia for the room ,but it'll be my daily driver. So I'm thinking stay with a tundra but go newer (2nd gen). Currently have a gen 1 tundra extended cab. Just dont know what to do at the moment. So I'll just keep what I got ,but be a minimalist about it. Lol
 

A-Aron

US Rocky Mountain Region Local Expert Utah
Launch Member

Off-Road Ranger I

3,394
Enoch, UT, USA
First Name
Aaron
Last Name
Tiede
Member #

15719

Ham/GMRS Callsign
KJ7LIJ
Hey Aaron, followed you over here from the FB group to watch your build progress.

Couple of things, are you going to see that brush guard? I am going to have a front bumper built but it's a bit off. And, do you have the specs for that roof rack written down, and did it bolt onto the OEM holes?

Thanks man, love what you're doing.
Hey man, glad you followed me over here.. I can send you the measurements for the rack.. as for the brush guard, got a guy looking at it now, but don't know if he's going to buy it, he's trying to fit it to his 03 tundra, should know tomorrow. Are you in Utah? Pm me on FB and I'll send you the rest of the photos and measurements for the rack.
 

A-Aron

US Rocky Mountain Region Local Expert Utah
Launch Member

Off-Road Ranger I

3,394
Enoch, UT, USA
First Name
Aaron
Last Name
Tiede
Member #

15719

Ham/GMRS Callsign
KJ7LIJ
I'm thinking about a sequoia for the room ,but it'll be my daily driver. So I'm thinking stay with a tundra but go newer (2nd gen). Currently have a gen 1 tundra extended cab. Just dont know what to do at the moment. So I'll just keep what I got ,but be a minimalist about it. Lol
Can't go wrong with a Gen 2 Tundra.. had an 07 Crewmax 5.7l for about 2 yrs and I'd get another in a heartbeat.. my F-150 won't die.. so I can't justify it yet..lol let me know if there is anything I can help with, I love the Sequoia as well, I can give you input on either. Thanks for following.. new stuff coming soon!
 
  • Like
Reactions: DirtyPenguins

A-Aron

US Rocky Mountain Region Local Expert Utah
Launch Member

Off-Road Ranger I

3,394
Enoch, UT, USA
First Name
Aaron
Last Name
Tiede
Member #

15719

Ham/GMRS Callsign
KJ7LIJ
Electrical
Ok, so I finished up my electrical setup over the weekend (minus some new lights I plan for the new bumper) but I've had a few guys ask me about things, so here is the update and the technical stuff.

I mentioned earlier in the build that I have 2x 18ah AGM batteries back in my storage system, I'll talk a little more about that here, also, the setup I have for the secondary battery in the engine compartment, and how all the systems work together.

Power sources:
1- Primary Battery - Stock battery location - Standard Group 27 Vehicle battery.. it starts the Rig and has never left me stranded.. so for now, I'll just keep using it.
2- Secondary Battery - Mounted between the ABS controller and air filter box over the passenger wheel with custom mounting plate I had to fabricate. Currently I installed a group 65 Duralast Gold with 150 min reserve power and 850 CCA.. why do you ask? I had one in the garage that needed a home. I built the battery tray to handle a group 27 or group 31 for when I get around to purchasing a Deep Cycle AGM for that position.
3- 2x 18ah AGM wired in parallel - these batteries are used to power the water sprayer, overhead lights I wired in the rear hatch, usb chargers and a 12v socket for a fridge or heated blanket.

The 2 batteries in the engine compartment are wired with an automatic battery isolation solenoid .. it connects the battery when the detected voltage output is over 13.6 volts, and automatically disconnects the batteries from each other when the voltage drops below 12.8 volts. The batteries are connected to the solenoid with 2ga 100% copper battery cables and the aux battery has a 200amp in line fuse. Each battery is grounded to the Chassis independently. The isolation solenoid has a manual switch to connect the batteries in an emergency situation IE: to jump the main battery in case of failure or in case the alternator fails and extra power is needed.

From the AUX battery I ran a 8ga wire to my Busbar that serves as the common power supply to all of my aux lights (they are wired through a relay box mounted by the brake booster) and other AUX equipment. From this busbar I have a 10ga fused wire that runs into the center console for "always live" plugs and devices like CB radio, USB chargers for navigation equipment..etc.


From the Center console busbar I have a 12ga fused wire that runs to a relay and switch that can be turned on to charge the 36ah AGM setup in the rear storage compartment. It is controlled manually so the load can be isolated to only the AGM supply, or shared with the AUX battery if needed. I tend let the storage batteries charge whenever the motor is running unless I am running high draw equipment like a winch, in which case, I want to reserve the storage batteries for their purpose.. or potential use as emergency power.

Wanda has a 130+ amp Alternator that doesn't have any issues keeping things charged or running AUX lights.. etc. I have a digital meter for each battery to monitor voltages that will be installed in my new center console switch panel.IMG_20190202_171917.jpg


Hope this information is useful to those that are asking, it is a good solution for me and keeps me powered up.


ABTK01

Rank I
Launch Member

Traveler I

271
Orlando, FL, USA
First Name
RAFAEL
Last Name
VALLE
Member #

16700

Forgotten note from Death Valley: Suspension needs more travel - possible solution = disconnect/possible removal of front and primary rear sway bars.

After much research and discussion with our small group of Sequoia off road enthusiasts... I decided to remove the sway bars for a few days and get a feel for Wanda's performance.

Plan was to drive around the neighborhood, then nearby trail, then work up to normal driving conditions around town, highway, freeway etc..

That all happened in about an hour.. answer: should have removed the sway bars a long time ago... ride quality is much better, minimal body roll change, suspension rides smoother and quieter, and my goal of more suspension travel was accomplished. A few days later I ventured out with the trailer to experience the same results.

You can see our on-going discussion about the removal of anti-swaybars here: https://www.overlandbound.com/forums/threads/who-has-their-anti-sway-bars-removed.21602/

Watch her flex... (that isn't even maxed out..) View attachment 83507 Mission accomplished!

This picture is from this weekend with the Southeast OB group at Withlacoochee State Forest-Citrus Unit. WITH my sway bars intact. My driver side rear tire is off the ground! Sway bars are coming off before our next outing in two weeks.
 

Attachments

A-Aron

US Rocky Mountain Region Local Expert Utah
Launch Member

Off-Road Ranger I

3,394
Enoch, UT, USA
First Name
Aaron
Last Name
Tiede
Member #

15719

Ham/GMRS Callsign
KJ7LIJ
This picture is from this weekend with the Southeast OB group at Withlacoochee State Forest-Citrus Unit. WITH my sway bars intact. My driver side rear tire is off the ground! Sway bars are coming off before our next outing in two weeks.
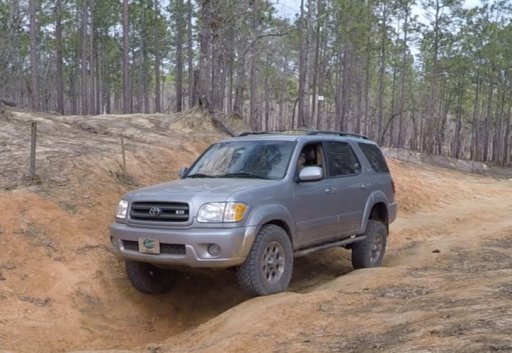
Pretty sweet man, you'll be surprised at the performance difference the sway bars cause. Keep me updated! I'd love to hear how things turn out.
 
  • Like
Reactions: ABTK01

NC-Trooper

US SouthEast Region Member Rep
Launch Member

Member III

3,278
Charlotte
First Name
John
Last Name
Holland
Member #

4197

such a rad build. nice work on the rear bumper and roof rack.

What welder do you use?
 

A-Aron

US Rocky Mountain Region Local Expert Utah
Launch Member

Off-Road Ranger I

3,394
Enoch, UT, USA
First Name
Aaron
Last Name
Tiede
Member #

15719

Ham/GMRS Callsign
KJ7LIJ
such a rad build. nice work on the rear bumper and roof rack.

What welder do you use?
Miller 140 most of the time, for the big stuff my buddy has a fabrication shop, and I go use his Miller 220s when needed.
 
  • Like
Reactions: DirtyPenguins

A-Aron

US Rocky Mountain Region Local Expert Utah
Launch Member

Off-Road Ranger I

3,394
Enoch, UT, USA
First Name
Aaron
Last Name
Tiede
Member #

15719

Ham/GMRS Callsign
KJ7LIJ
Feels like I haven't updated the thread here in forever.. but I finally have something to share. Spent the last week or so cutting, welding and grinding on this bad boy.. All of the plate is 3/16" still that I bent on a press brake after cutting the design out on a CNC Plasma cutter. Tube is 2" .125 Steel. It is attached to the frame via a new cross member I had to weld between the frame rails along with 2 mounting points I added to the frame, for a total of 6 grade 8 bolt-in points. Nuts are welded to plates that where then welded to the inside of the frame. All in all.. its pretty beefy. I sprayed it with primer so I have some front end protection over the weekend on some trails. Next week I'll take it back off and weld on the light mounting tabs and possibly a hoop up front. IMG_20190214_230019.jpg IMG_20190214_213334.jpg
 

A-Aron

US Rocky Mountain Region Local Expert Utah
Launch Member

Off-Road Ranger I

3,394
Enoch, UT, USA
First Name
Aaron
Last Name
Tiede
Member #

15719

Ham/GMRS Callsign
KJ7LIJ
ITS ON!!

Got a chance to test the new front bumper out Saturday.. the approach angle is SOOO much better! It is tough, fairly light (around 50-55lbs) and will serve my purpose quite well. I also mounted some 30 watt LED 5" Spot lights and a hoop, which I think aesthetics called for...IMG_20190218_141101.jpg IMG_20190218_142421.jpg

On Monday the winch arrived and I found an hour to get it bolted on and hooked up. Decided on the X-Bull 13k (I pull the camper quite a bit and wanted a little extra umph if needed) but didn't' want to commit to a $900+ winch because I'm not sure what features I do and don't want. The x-bull has really good reviews, a decent warranty, and is designed by Aussies.. made in China. Waterproof, and comes with nice Neoprene cover to keep UV and Rain exposure to a minimum.

IMG_20190218_174725.jpg IMG_20190218_184856.jpg

I didn't like the Clevis hook just hanging around and want to limit rope exposure as I decided to go with a synthetic line.. so I welded a nice little spot to hook to.

IMG_20190219_234539.jpg

Now I'll just wait for the trim pieces that go around the lights to come in and a chance to use the winch.. after I re-spool it under a load.... of course!
 

DirtyPenguins

Rank III
Launch Member

Member III

703
Lansing, MI, USA
Member #

17428

ITS ON!!

Got a chance to test the new front bumper out Saturday.. the approach angle is SOOO much better! It is tough, fairly light (around 50-55lbs) and will serve my purpose quite well. I also mounted some 30 watt LED 5" Spot lights and a hoop, which I think aesthetics called for...View attachment 86674 View attachment 86675

On Monday the winch arrived and I found an hour to get it bolted on and hooked up. Decided on the X-Bull 13k (I pull the camper quite a bit and wanted a little extra umph if needed) but didn't' want to commit to a $900+ winch because I'm not sure what features I do and don't want. The x-bull has really good reviews, a decent warranty, and is designed by Aussies.. made in China. Waterproof, and comes with nice Neoprene cover to keep UV and Rain exposure to a minimum.

View attachment 86676 View attachment 86677

I didn't like the Clevis hook just hanging around and want to limit rope exposure as I decided to go with a synthetic line.. so I welded a nice little spot to hook to.

View attachment 86678

Now I'll just wait for the trim pieces that go around the lights to come in and a chance to use the winch.. after I re-spool it under a load.... of course!
That looks great. You do some amazing work! Thanks for sharing with us