Pachyderm, or "Pac", a 2017 GMC Canyon

  • HTML tutorial

Pathfinder I

1,212
Canada
First Name
Craig
Last Name
PereferNotToSay
I've seen where the knob was relocated somewhere else but I forget where. The thread was on Coloradofans. I bet you could wire in an additional LED and mount it somwwhere higher on the dash. The '17+ trucks have an icon in the center cluster that lights up when in Auto4wd or Hi,Lo.
Interesting! I wonder if we have a setting wrong on ours, as it's a '17 -- there's no icon that we can see. Or maybe GM did a mid-year adjustment and it's just a matter of flashing the system with new firmware.

Or maybe the lamp on ours burned out :D Sometimes it's the simple and obvious solution!

Edit: I just looked at the owners manual, and it looks like there is a dash lamp for trucks with a manual transfer case. There are two instrument cluster variations, both with the lamp, but later in the manual it describes the 4x4 lamp as only for trucks with the manual transfer case. There should be a way, then, to trigger it on the autos I should think.
 
Last edited:

Pathfinder I

1,212
Canada
First Name
Craig
Last Name
PereferNotToSay
JC you are a hero. Always coming in with solutions to the problems I invent! I've gone from owing you a cold one to owing you several, and by the time I get this build complete you will be a majority shareholder of a brewery somewhere :D

Thanks for the links!
 
  • Haha
Reactions: JCWages

JCWages

Rank V
Launch Member

Pathfinder I

2,271
Grass Valley, CA, USA
First Name
Justin
Last Name
Wages
Member #

18693

JC you are a hero. Always coming in with solutions to the problems I invent! I've gone from owing you a cold one to owing you several, and by the time I get this build complete you will be a majority shareholder of a brewery somewhere :D

Thanks for the links!
LOL I'll settle for a tour of your local trails someday. :sunglasses:
 
  • Like
Reactions: ChasingOurTrunks

Pathfinder I

1,685
Pacific Northwest
First Name
Steve
Last Name
Claggett
Service Branch
U. S. Army
Anyone find out yet if the dana44 diff skid plates for jeeps fit our trucks yet?
They do not, but AEV makes a boron steel diff skid. It's a 10 minute install, tight fit so you don't loose clearance. If you are thinking about a diff skid you should look at the 589Fab shock relocation kit. Moves the shocks to the outside of the frame for a much needed improvement in rear axle clearance.
 

Boostpowered

Rank VI

Member III

4,879
Hunt county, TX, USA
First Name
Justin
Last Name
Davis
Member #

14684

They do not, but AEV makes a boron steel diff skid. It's a 10 minute install, tight fit so you don't loose clearance. If you are thinking about a diff skid you should look at the 589Fab shock relocation kit. Moves the shocks to the outside of the frame for a much needed improvement in rear axle clearance.
Im going to find out if it fits our dana 44s the aev is pretty much a copy of what im talking about. When i actually break a shock mount ill be welding some Shock tabs and truss higher up on the axle. Dana 44 is a kind of weak axle they start bending especially if youve done a gear swap and huge tires or hit rocks real hard often. So far ive not hit anywhere on my rear axle but the bottom of the diff, there are a couple chunks taken out of it and the ubiquitous candy cane effect on the driveshaft.
 
  • Like
Reactions: ChasingOurTrunks

Pathfinder I

1,212
Canada
First Name
Craig
Last Name
PereferNotToSay
Had a great little adventure in Pac this weekend. We have been hesitant to really thrash it off road until we get bumpers as the approach angle isn’t the best on Pac as he currently sits. However, the best option for our preferences would be the ARB bumper, but with it weighing in at 185 lbs (according to one vendor) we are waiting/researching lighter options. Still, the need for adventure was too great so off we went.

This little guy is like a mountain goat. We are coming from Ruby (Jeep Rubicon) so our standards and expectations for off road performance were very high, and I was grinning from ear to ear with how well Pac handled a few trails (Ice, snow, and mud). This thing is REALLY good off-road.

And we managed to snap a pretty good photo along the way:

11AA7229-69C8-45D5-8109-3F9846A78E10.jpeg
 

Pathfinder I

1,212
Canada
First Name
Craig
Last Name
PereferNotToSay
I have cross-posted this to Expo as well as ColoradoFans but figured I'd update this community as well. It’s been an eventful couple of years and I’ve not had the bandwidth and time to continue this build but today that changed.

I’ve posted elsewhere on Expo my reasons for going the route I did but the short version: I pulled all the plastics off my truck with the intention of building a winch-capable bumper out of aluminum that would, more importantly, provide front end protection in the event of an animal strike. When travelling remote, some bar work is a necessity in my books as a run-in with Bambi that disables the vehicle can compound into a safety risk pretty fast. This would be both light and robust. However the price of aluminum meant this was a rather expensive proposition — Plus, COVID has made everything that much harder to do for a hobbyist like myself, and so I abandoned the idea of building my own but not before I had pulled all the fascia and plastics off my Canyon (which is how I've driven it around for about 7 months) so I could get a good look at the hard mount locations. They looked to me to be identical to the Colorado, but I wasn't sure.

There are a limited number of bumpers available for the Canyons in the aftermarket, and all of the bumpers available for my rig were steel — and frankly, not exactly changing the world in terms of good design. If I was going to pay cash for a bumper instead of DIY-ing it, I wanted a bumper that was the best it could be. I could build the equivalent of most of these aftermarket bumpers -- plate steel welded together, mostly on the ethos of "if 1/8th is good, 3/8th is better" as opposed to clever gusseting or structural design -- for relatively little money, so I wasn't too sold on them. The only exception that I found to this rule was the Australian bars, specifically ARB, because they are crash-tested on the various platforms they use their bars on. They have impact crumple zones and other features -- in other words, real engineering -- that put them a cut above the rest. And, they are the preferred bar for 99% of professional remote-area travellers the world over.

Of course ARB don’t make their summit bar for the GMC Canyon, but they do make it for the Chevy Colorado. The trouble is I’ve been unable to find anyone whose fitted an ARB bumper to a Canyon — they SHOULD fit given they are the same platform, but it seemed nobody wanted to gamble the $2500 to see if the ARB would fit.

Well, I gambled.

IMG_1598.jpeg

Above is the dry-fit before I mounted the winch and lights, just as a proof of concept. It fits super well, with minimal trimming of the plastics — in fact there’s less trimming on the Canyon then the instructions call forin the Colorado. It’s not 100% done yet — the above was just the dry fit. I’m currently working on mounting lights and my winch so I can put it back on. So, if anyone is wondering if the Colorado summit bar fits the Canyon, the answer is 100% yes.


Here’s a few notes in case anyone else is wondering about the process:

ARB Instructions:

I read them over a dozen times or so until I could understand all the steps. But honestly the instructions aren’t the best. My goal was to trim as little as possible so I kind of went a bit slowly. I only removed enough plastic to access what I needed to/provide clearance for the mounts. Once I got the mounts on, I started adding back plastics piece by piece and trimming as I went along. I had to trim very little. I then dry-fit the bumper to see if it would fit (the instructions call for you to mount the winch and everything first). That’s when I posted that photo above. Once I mounted the winch, I did need to trim off a bit more plastic from the bottom of the grill.

Install Time:

I just started at around 11 am today, and called it quits at about 10:30 PM. I already had the front plastics off my truck (just the grill was left on). I did that to measure everything for my own bumper but when I decided to go a different route, I decided not to put it back on....7 months ago! There are plenty of YouTube videos on how to do this and if I remember correctly it was less than 4 hours on that part. So, this is definitely a two day job. I still need to wire everything up and bolt on the skids but otherwise it’s done.

A transmission jack makes this job much easier. I was able to adjust the height and the angles of the bar very easily so it was fairly simple to slot it in.

I don’t think the manual calls for it but for final fitment I put blue loctite on everything. I also sprayed down all the surfaces with steel on steel with Fluid Film as a rust preventative.

A few other notes:

For the air vents on the gassers, there is an “upper” set of vents and a “lower” set of vents. You will have to cut off the lower set of vents. I think the same is true on the Colorado but I’m not sure. The instructions don’t say anything about this other than to call ARB and they just say “remove them” but that approach will apparently throw codes so you have to trim them. For Canyons, the only things I found on mine to be careful of were the air temp sensor and the wiring going to the servo that controls the air flaps; cut or damage any of those systems and you’ll throw a code, but it’s easy to trim around it and leave most of it intact. On the canyon, I had to take off the entire lower flaps. It was an easy cut, but the entire upper flaps still function which is good.

IMG_1597.jpeg


It fits VERY close to the grill. I have a VR8000 Warn, and it fits, but it’s very tight. But it fits nonetheless!

IMG_1608.jpeg


IMG_1604.jpeg


The mounts fit fine but I did need to enlarge a couple of holes by a millimeter to get bolts through. That and a mallet that won’t mar the powder coat was enough to get it on there. I suspect this manual labour would be the same one either of the Twins; it’s more to do with manufacturing inconsistency than anything else.


On the Colorado, you have to trim the lower fascia for some filler pieces. This is a 4-6 inch gap on the Colorados. On the Canyons, that isn’t the case — it’s only an inch. I actually don’t think I will trim my factory bumper — this thing fits very close to the lights. I’m going to rivet on some black rubber trim later to tidy it all up.
IMG_1620.jpeg

IMG_1606.jpeg

Overall I’m pretty happy about this. Given these are identical vehicles mechanically, I don’t think I’ve compromised the function of the ARB design at all, and they have their reputation for a reason — this is an excellent bar. It’s very well engineered — most bars that I looked at were just plate steel welded or bent into shape, but the ARB has some very clever gusseting and reinforcement. Huge improvements to both protection and approach angles.

If anyone else is doing one on a canyon, feel free to ask me questions.
 

Pathfinder I

1,212
Canada
First Name
Craig
Last Name
PereferNotToSay
We are putting a bunch more work into Pac over the next few weeks so I’ll post updates as I’m able. We have been meaning to make Pac a more dedicated overland vehicle for some time, and decided to bite the bullet this spring to get it ready.

We are going to replace the cap, get our dual battery/12v and our water system installed, as well as set up our fridge. This will be a bit more robust than what we had in our Jeep — we want this to be set up for comfortable long-range touring, so that means living out of it as if it were home.

I started with building out the back cabinet and fridge slides.

FRIDGE SLIDE (nearly done)

This was pretty simple - I used some HD lockout drawer slides and some aluminum angle iron. It’s 2 inches by 4 inches, so there’s a longer edge. These runners will bolt through the truck bed and also act as an anchor for the entire drawer unit. I wanted a bit of extra height so I could use decent bolts and washers for that part, so I flipped around the angle to (short edge to large edge). I also figure this will give more support to the fridge when it is done.


FE16CFC6-5001-4AD4-94DD-801329D6E0E3.jpeg


Eventually, these will be tied together at both ends to form a stable rectangle but iI am waiting on material. I wanted to build these first as I wanted to build the rest of the cabinet around where my fridge was located, so with these put together I could account for everything (bolt heads adding width, function of the slides with tailgate, etc.).

DRAWER UNIT

The drawer unit is really the major part of the build for the back. It will house our second battery and a few other things. We wanted a design that would make the space in our truck usable and accessible. We decided to do utilities on one side, drawers on the other.

The entire thing is made of plywood. I used a KREG jig and screws —that is a handy tool if you are going to do something like this. It is both strong and fast to assemble. At least, that’s what the internet told me and my experience today has born that out. I have no idea, I’ve never done this before (I did build a box in my old Jeep that probably would have gotten a failing grade in a high school wood shop class so my carpentry skills are pretty limited.)

Because I’m not big into carpentry, I don’t have a ton of good woodworking tools. I bought the jig mentioned above just for this project (about $130 for the jig and screws), but beyond that I only have a Ryobi 18v circular saw and drill, so It doesn’t require much to bring this together. I found a long 2x4 aluminum stock made an excellent fence for making straight cuts, and a small foam brush was handy for spreading the glue on the boards before squeezing them together. A couple of clamps and a sander round out the tools so far.

I awoke bright and early this morning with 4 sheets of 1/2 inch plywood, and and got to work. I picked 1/2 inch because that seemed to be the most common thickness of wood that others have used for this application, and it was easy on the wallet ($230 for all of it).

1B8CDE2D-5498-47D5-B62C-E2518F1CA50A.jpeg

82334C91-FD2A-4FB4-9875-3D635A9FD71E.jpeg

For the drawer slides, I’m using 3/4 inch strips of UHMW plastic from Lee Valley. Not cheap ($75) but I wanted something that was very light weight and simple.

I didn’t take many pics of the process, but it’s basically measure, measure, measure, measure, measure, then cut, drill the pocket holes, glue and screw everything together. I watched a lot of YouTube videos in preparation and that’s a far better source than this post for a more detailed “how to”
 

Pathfinder I

1,212
Canada
First Name
Craig
Last Name
PereferNotToSay
More work done today, but lots more to do!

The bulk of the work this week has been coating the cabinet unit in verathane. It takes about 3 hours between coats, and since there are parts of the project I cannot get at depending on positioning, that’s 8 coats in total (4 one side, turn it over, 4 on the other). If I had spent extra on marine grade plywood, I think I could skip this step as my only desire is to give it some resistance to the elements and I plan to carpet it anyway.

I also got started on my electrical system. First, the cables. I’m using 2 AWG welding wire as my primary current carrier for the second battery, the inverter, and the DC to DC charger. It’s super rugged and above spec (but not by much - my DC to DC charger calls for 4 AWG given the length I’m using). It’s not cheap, but I had a bunch of it laying around from my old receiver mounted winch — I used to be able to move the winch from the front to the back of our old jeep, and so I fashioned an extension cord out of welding wire to plug it in, and that extension cord is no longer needed). Still though, I needed more!

I’m using a hydraulic crimping tool to put a 12-ton crimp and also solder the ring ends, followed by marine-grade heat shrink to seal everything up. Go figure, I’m two ring ends short on my last cable. Nearest ones are about 45 minutes away so I’ll get them tomorrow morning and finish.

Once the ring ends are together (colour coded heat shrink for positive and negative), I then feed them into an expanding tube loom material. This is intended for abrasion resistance. The welding cables are already super tough (one of the reasons I like it for this application) but this helps even more. I’m not sure it’s designed for this though so I will likely use additional loom material for the cabling running from the engine bay.

D059206C-A2B0-4D3E-B096-E38B675A7467.jpeg


Each cable is made to length for the accessory. These are laid out on a board that will eventually mount to the front of the canopy. I hope - I haven’t built the canopy yet so I’m not 100% sure this will fit. If not, I can make a new board. That space of the cab is open and not really used for much so I figured this was the least obtrusive spot to put all this stuff. Plus, it allows me to route the wiring behind it into the cabinet so that I can be intentional about where my wiring is running (I.e. avoiding pinch points, having cargo dropped on it, etc.


201D1E8C-A646-48E9-8B36-E29C830BC34A.jpeg


I want to keep all these things relatively accessible — I expect my water pump to fail regularly (though it never has) as we get a lot of cold temps up here and so I expect it to freeze up each winter but it’s 6 years and going strong. Kudos to FloJet, I guess!

Here’s a better view:

03025AB2-A200-4F8B-A556-EDC92036918E.jpeg


The Renogy unit is the DC to DC charger I chose. It will do what I need it to do, at a price point that’s hard to beat. We got it on sale and had a coupon code so we got a good deal.

I’m using Blue Sea fuse box with 12 circuits on it. I don’t plan to use all 12 I just like having options! This one was a split positive box which I didn’t want but I’ve fashioned a cable to bridge them together. I plan to run all my secondary electrical off this box, even for some in-cab items, because my experience in the past has taught me that the absolute last thing I want to do is compromise the stock harness in any way. The inverter is a 600 watt continuous sine wave. This is mostly for charging laptops and the like when we are in camp. It will go direct to the battery since it’s switched and fused independently. It was fairly cheap from Amazon.

The switch box will control the water pump and the canopy lights for now. We may add more in the future or we may try to rig the inverter to this panel - it would be easier to see when it’s on - but we will see.

Tomorrow is upholstery for the cabinets and trimming them, and then I’m on hold till next weekend I hope - my material for my canopy is hopefully coming this week.
 
  • Like
Reactions: dj_mccomas

Pathfinder I

1,212
Canada
First Name
Craig
Last Name
PereferNotToSay
Finished the drawer unit today. The entire thing is coated in outdoor carpet that is glued with spray adhesive and tacked with staples. Trim is aluminum angle iron and c-channel. I’m pretty happy how this turned out — it’s not perfect owing to my lack of carpentry skills but it will do the job nicely.

D64E9FE8-EBE0-4207-B851-8BDF9500EF87.jpeg
86F95C52-8819-4637-BF4F-B2CCEE9EEFC9.jpeg
The tailgate even closes properly which is a nice thing to be sure about at this stage of the project! I wanted my tailgate to be the “lock” for the drawers which meant it had to fit pretty tightly with narrow tolerances and not a lot of room for error, but I’m happy to say it works great — the drawers are snug up against the inside of the tailgate.
 
Last edited:

Pathfinder I

1,212
Canada
First Name
Craig
Last Name
PereferNotToSay
Awesome work on the project man, looks to be coming together great!
Thanks DJ! It's coming along nicely. We just got word that our canopy material has been delayed in shipping so it looks like it'll be a few weeks before we can do too much more to it. Final wiring and everything has to come after we've weatherproofed the tub as much as we can.
 

dj_mccomas

Rank V
Launch Member

Member III

2,268
Louisville, KY
First Name
DJ
Last Name
McComas
Member #

4527

Thanks DJ! It's coming along nicely. We just got word that our canopy material has been delayed in shipping so it looks like it'll be a few weeks before we can do too much more to it. Final wiring and everything has to come after we've weatherproofed the tub as much as we can.
Bummer about the canopy, but it's looking great man. Always feels good when a plan comes together like that for sure.
 
  • Like
Reactions: ChasingOurTrunks

Pathfinder I

1,212
Canada
First Name
Craig
Last Name
PereferNotToSay
Finally got my material for my cap, and began construction last weekend. Ended up not feeling the best so didn't get much done, but here's the update all the same. I'll put it in sections so people can skip to the part they are most interested in. This is a partial update - this stage of the project isn't done - and I considered saving this post for when it was finished but I like to show the mistakes along the way to benefit others so if I capture it while it's fresh I have a better chance of doing that.

You write too much, what's the short summary?

I'm about half-way done building a custom truck cap out of 1.5" aluminum extrusions. Skip down to the photos to see it coming together.

Background

It’s a bit of a long story, but I originally built my truck cap by welding aluminum tube, with the goal of eventually boxing it in/waterproofing it. However, as I got back into welding for the first time since starting the original rack a few years back, I was having all kinds of problems. I spent hours trying to figure out why my welder wasn’t working right, before finally ruling out everything except bad shielding gas. And thanks to some…lacking customer service from my welding gas supplier, I was in a bit of a pickle. Time is my most valuable commodity, and so I did a bit of a “reset” on my plan to still do this project affordably, but do so with a bit less of a time commitment than welding from scratch.


The Solution

After a lot of back and forth, I considered my three options.

1) Spend around ~$1100 and finish the rack as I intended, with a risk of needing to invest in a whole new welder if I am wrong about the gas and unable to get mine working ($$$$); that risks doubling or tripling the price of this project. If everything went well, this was by far the most affordable option, but it was also the option with the most cost-volatility with the unknowns on the welder. Plus, this approach would be the most significant investment of my time; getting good fit up and running beads takes a lot of hours. The end result would give me something that was plenty strong but only about 5/10 of what I really wanted because of my limited skills. I’d want to be consistently “stacking dimes” a lot more before committing to this approach.

2) Look to commercial options. I looked at several fibreglass canopies, but they did not have the robustness I wanted and were quite expensive for what they were. I looked to metal ones, but they were very expensive and not the most available items here in Canada. The RSI Smartcap caught my eye as I think that's the best Overland-ready cap on the market, but at nearly $5k that was a bit expensive. However, based on the "time saved" argument alone, I seriously considered the RSI because it had next-day delivery and could be assembled in a few hours. Part of me still wishes I went this route, but the $5k price tag meant missing out on a lot of summer adventures. Similar offerings from Alucab and others were priced similarly.

3) Look to a different material to build the cap. The solution I decided on was in the form of aluminum extrusion. It was the perfect mix of cost, versatility, strength, and speed of construction. I spent a lot of time designing & measuring on my iPad and learning about extrusion construction before pulling the trigger, but eventually I placed my order with a company called Faztek. This is the exact same product as 80/20 extrusions, which is the more popular extrusion company in the USA. As you can see below, I opted for the black anodized material; my thinking at the time was that by ordering black material I would save time and energy on painting and get a more "finished" look.

I will say that Extrusion is an absolute joy to work with, but it requires a different approach to fabrication than I've used in the past. Normally, I have a rough design in mind with a few very rough sketches, but I kind of build it organically -- measure, cut a piece, make sure it fits, repeat until done -- it's very much an iterative "build as you go" approach. Extrusion doesn't lend itself to that. You really do want to have your project fully designed on paper before diving in, down to every single fastener OR have a lot of extra fasteners and extrusions ($$) if you want to build as you go. It's easy to get into the zone of "build as you go", but then you find you've blocked off an extrusion channel that you need a T-slot nut in. Only happened a few times to me :) There are specialized nuts to do this but they just cost more and when I made my initial order, I was so confident that I could take my time and avoid these errors so I didn't buy any. I was wrong about that! I also estimated my fastener counts instead of figuring it out precisely, and so I was short on some other fasteners too.

The biggest barrier to working with extrusion is the shipping costs -- it's not the kind of thing you can run to the local Home Depot if you forgot a nut or a length of extrusion, so getting everything you need all at once will save you money and time. My $100 in extra fasteners has cost me an additional $100 in shipping (so double the price); that would have been easy to include in my initial order and come under the same shipping costs had I done this a bit differently.


tempImageWkKT8c.jpg


Assembly

When researching this build, I didn't find many people who have made truck caps out of 80/20 or similar extrusions. I did see Ripcord's excellent wedge-camper build that utilized extrusion for the camper, but not for the frame. So, I recognize I was doing things a bit differently on Pac yet again. From what I could glean from our comrades in the Vanlife movement, the downsides of extrusion are primarily making sure you pick a profile that is strong enough for the application, that the cuts are precise, and that there is something that prevents vibration from rattling the fasteners loose.

I'm certain my design is strong enough; I used some engineering calculators to ensure the load-bearing material could support a 1000 lbs point load with less than 1/16th inch of deflection. For extra strength, every piece of extrusion is supported by another piece of extrusion beneath it - in other words, instead of being supported only by a fastener, any load-bearing surface is supported by another solid surface (i.e. a vertical extrusion support) so the weight goes into the truck tub. The fasteners are all 5/16 bolts which have a shear strength north of 2000 lbs, but this gives an extra bit of support. Each fastener is secured with red thread locker, and each fastener and tapped hole is thoroughly cleaned with brake cleaner to make sure the thread locker works. I'm using the JB weld brand of red thread locker, and I'm confident these fasteners will not be coming out -- I realized I made an error (missed a T-nut) about an hour after one assembly and tried to take it apart to put the nut in, and the end result was a broken hex key. The Red JB Weld holds very strongly.

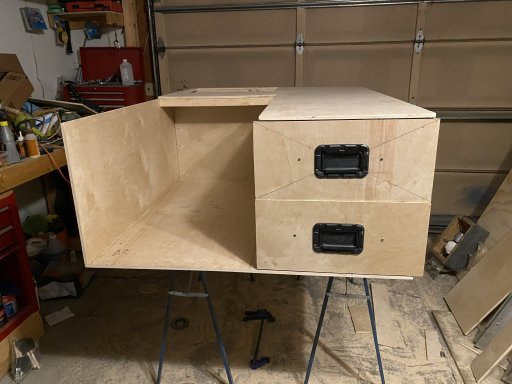
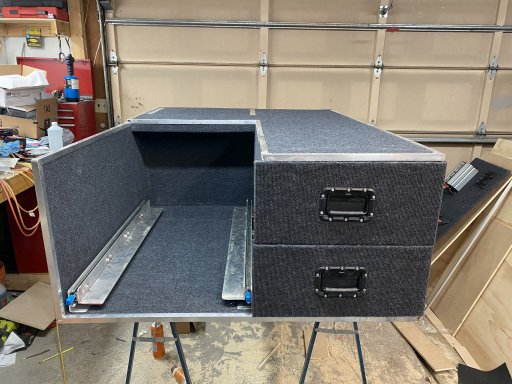
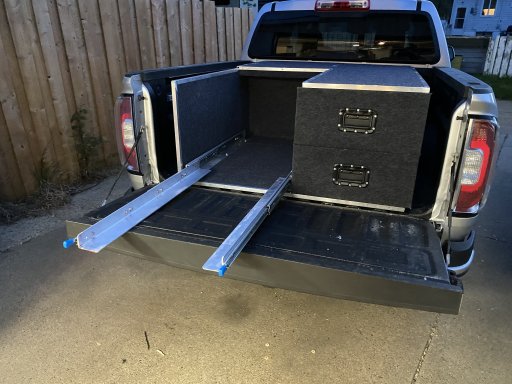
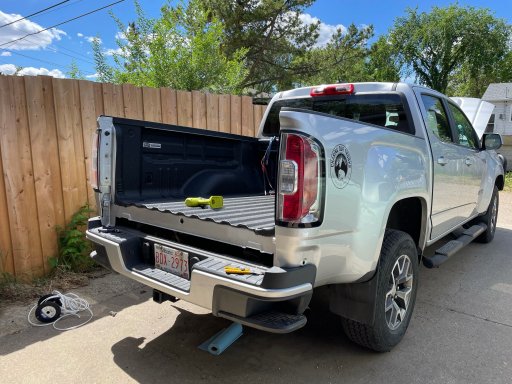
Here's some photos of the canopy coming together:

tempImageTOgp4k.jpg


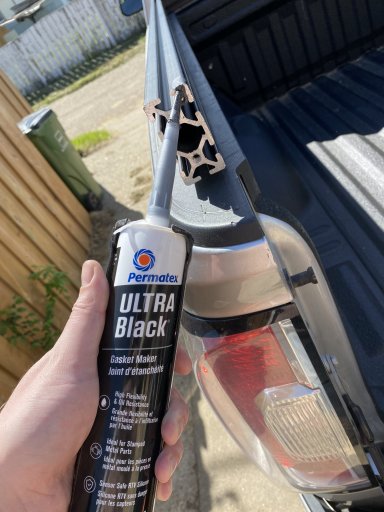
Every joint is sealed with gasket maker to enhance waterproofness (more on this another day as I have a whole solution for this problem of water/dustproofing).


tempImagekBTPFi.jpg

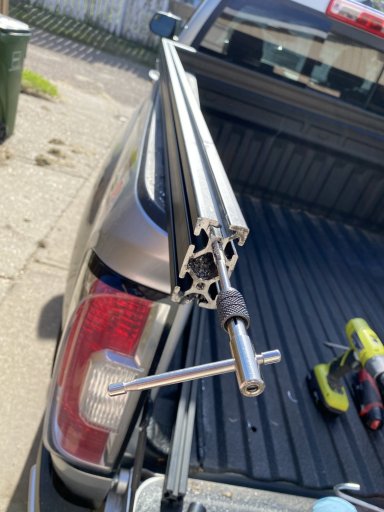
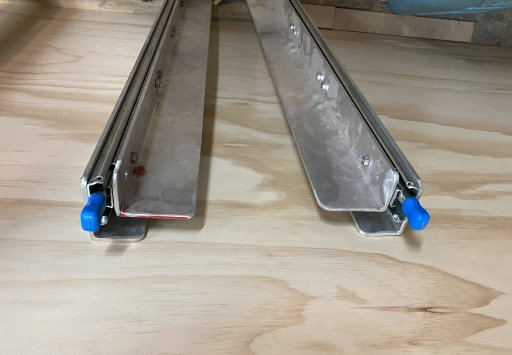
I had to manually tap the extrusion ends. This was a fair bit of work. If you dial in your design and know the exact lengths of the spans you need, you can get Faztek to tap these ends for you for $1.00 each. That's well worth it if you can swing it, because the majority of my time was spent tapping these holes; I decided against having Faztek do the machining because I wanted to trim the spans to a precise length myself (more of that "build as you go" approach, which as I've said, doesn't work well with this material). It's not hard to tap these ends - just takes time! I've also ordered a tool called a "Drill Tap" which is supposed to make this go quicker, but it arrives Saturday so I'll report back then if it's any good.


tempImageeW6g3G.jpg
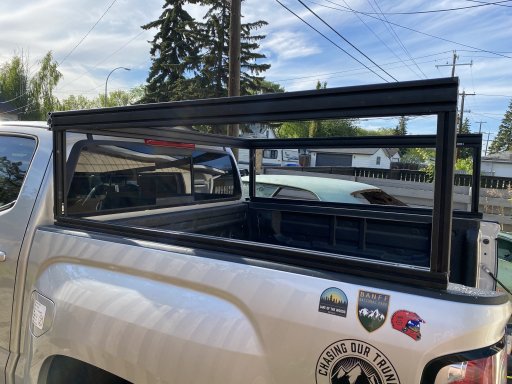
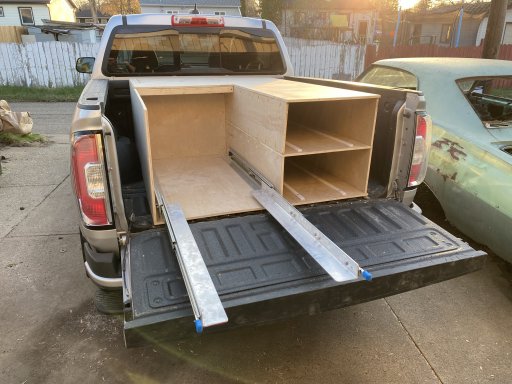
Testing to see if it fits.


tempImageTuauEg.jpg

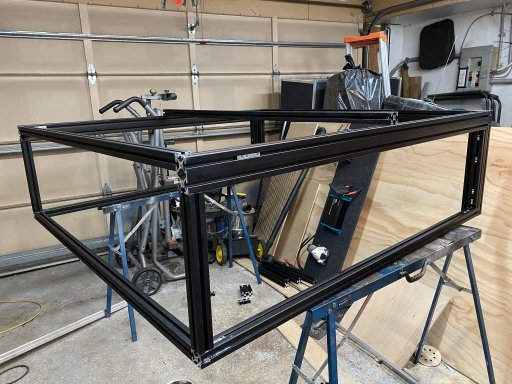
This went together fast - from a bundle of extrusion to the assembled frame in the above photo was only about a solid day of work in the garage, and I was going slowly as I've never worked with this material before. I made a few mistakes -- in one case I cut a piece too short, and as I mentioned there are a few extrusion channels that I need to wait for my "drop in" t-nuts to arrive because I blocked them off before installing all the nuts, but overall it was very easy. If I were to build another one, I think I can go from parts to full canopy in a day or less. Now, however, I'm just waiting on parts to arrive in the mail. My roof panels arrive next week, and once Faztek gets me my new order of T-nuts I should be able to finish this up. Stay tuned in about two more weeks for another update.
 

dj_mccomas

Rank V
Launch Member

Member III

2,268
Louisville, KY
First Name
DJ
Last Name
McComas
Member #

4527

Awesome work man, that aluminum extrusion really opens so much up if you are willing to dive in like you did. Looking forward to seeing the finished product!
 
  • Like
Reactions: ChasingOurTrunks

Pathfinder I

1,212
Canada
First Name
Craig
Last Name
PereferNotToSay
Awesome work man, that aluminum extrusion really opens so much up if you are willing to dive in like you did. Looking forward to seeing the finished product!
Thanks DJ! It's an incredibly versatile material and I plan to make use of it for a lot of other projects too. From table saw jigs to dog kennels to furniture in the house, this stuff has a ton of uses!

I appreciate the kind words and encouragement!
 
  • Like
Reactions: dj_mccomas

Pathfinder I

1,212
Canada
First Name
Craig
Last Name
PereferNotToSay
Set up the cabling for the electrical yesterday.

I am using 2 AWG welding cable (I think I mentioned that) and waterproof pass through grommets I got off Amazon. I also ran two powered circuits from the box to the front; my hope is that I can run all my cab accessories off the house system rather than the vehicles battery. This way, the stock system stays the way Mr. General Motors intended, and I never risk accidentally leaving my HAM on and draining the battery and stranding myself.

This was a much bigger job than I anticipated because to access the truck’s tub bulkhead I had to actually remove the tub from the frame and shift it back. 6 bolts underneath was enough to shift it for access.

1FA9EC0D-0950-486F-B9AA-DF331DBB0C95.jpeg

Waterproof grommets through the bulkhead of the tub:

tempImageSn4qE8.jpg

tempImageaUVkbK.jpg

In the above photo you can see the three cables coming through the tub. The two black cables are my positive and negative from my main battery. This may necessitate moving my DC to DC charger off my electrical board I posted before, but that's OK. The other cable is the two circuits. This will go directly into the cabinet unit from a few posts ago.

The cable itself is routed down between the cab and the tub and then alongside the frame rail, next to the factory harness. It then enters the drivers' inner fender area, and goes behind the inner fender liner and up into the engine bay. It's very protected against abrasion. First, the welding cable itself is jacketed in super thick, super sturdy rubber. I've seen this stuff get dragged and driven over in messy shop environments for years without being worse for wear, so it's pretty tough on its own. Then, it's coated in that blue poly sheathing. This stuff is also super abrasion resistant. Finally, the entire thing is sealed inside a plastic split-loom which gives it an extra layer of protection. I shouldn't have any problems with abrasion of the wiring.

Still waiting on parts to start up the cap again, but we're almost there! A few more solid weekends (assuming my parts come in!) and I should be done.
 
  • Like
Reactions: Mekcanix