

Pathfinder III
- 1,876
- First Name
- Kyle
- Last Name
- Betts
- Member #
-
13310
- Ham/GMRS Callsign
- KF0AWV
I've been wanting a trailer for several years now, but there always seems to be yet another reason not to. First it was the time to use it. Then it was potential career changes. The latest has been a potential move next year. I like working on things myself though, and DIY work CAN save money...sometimes. 
What I wanted was something that would carry camp kitchen gear, the cooler, a rooftop tent, an awning, and eventually a water tank. The plan was that this would not only give us more room in the vehicle, we could store our gear in it when not in use. I wanted it to have 12v power system and use the same wheel/tire size as my rig (FJ Crusier).
So I decided to try it. My uncle welds so I convinced him to teach me some and he agreed to help. I bought a 4x6 trailer kit from Home Depot along with a Timbren suspension, brake hubs (just in case), wheels/tires, and a max coupler. We were going to be home for Christmas, so I had everything shipped to my folks' house. Everything arrived and I inspected each item and started assembling the trailer kit. The plan was to use the trailer kit as a foundation, put the Timbren suspension on it, and build a cargo box on top. My cousins were all going to be home, so we were all going to work on it together and I prepared to provide plenty of beer...
I say it WAS the plan, because as soon as we got it all in the same spot we realized the Timbren suspension was WAY too beefy for the trailer frame - which looked to be 14ga galvanized c-channel. So two thoughts ran through my mind: 1) I now have a bunch of components I can't use with this frame that will cost a whole lot to return and 2) if I want to use these components I'm going to have to source a different frame. Now I realize in retrospect that it would have been smarter to FIND a 4x6 trailer with a more substantial frame...and my cousin even mentioned that at one point...after we had built a NEW frame from scratch...
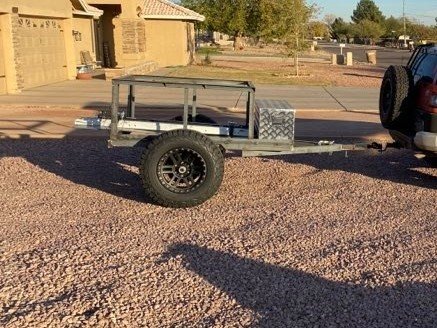
I ended up acquiring 1/8" wall 2x3" C-channel, a ton of 1/8" wall angle iron, hinges, latches, and sheet metal. And we started measuring and cutting. Using the trailer kit pieces as a guide we made a new trailer frame from the c-channel and added the max coupler to the tongue. The Timbren suspension was bolted to the frame about half-way, meaning that just shy of 2/3 of the frame was forward of the axles. It took us about a day and a half to measure, cut, square/level/plum the main frame pieces, attach the cross members and tongue supports, and then square and level the tongue itself. We started on a Wednesday afternoon and by Thursday evening the suspension and wheels were on as well. For added stability, we bolted a 1/8" wall, 2x3 tube was bolted between the left and right side suspension.
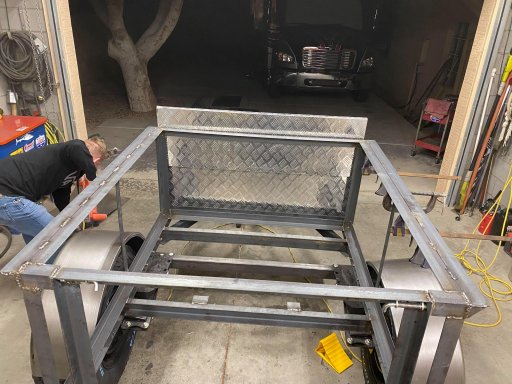
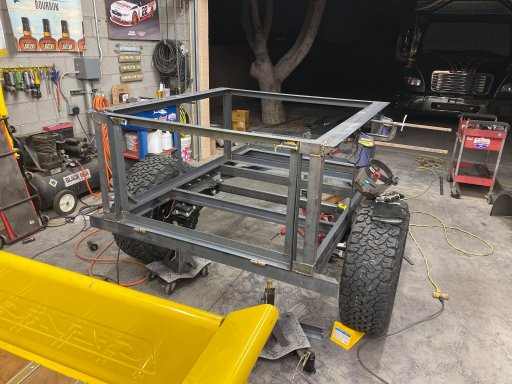
The next step was to build the frame for the cargo bed. We cut and welded lengths of the angle iron to the trailer frame to make a foundation, then started building up. I had a 15"x15"x48" aluminum tool box I wanted to mount at the forward edge of the trailer, so we made a foundation for that, then 2" behind it (to allow for the lid to open fully) we started the cargo bed. All the angle iron used to make the upper lip of the bed faces inward, and then I added lengths to the left and right side facing outward, braced by triangular supports. I made the frame for the tailgate and secured the hinges and latches. The cargo bed is 24" deep, and the top edge of it stands 50.5" high.
Aaaand, that's when I ran out of time. We had to head home and my wife had already been VERY gracious and patient about the project, so the last day of the trip was devoted to family time. It's gonna be a few months till I can get back to finish it up, but it's all I can think about now. They say misadventures make the best stories - one setback after another - it was great fun.
Things that still have to be done:
weld the cargo bed panels in place (14ga steel sheet).
1.5"x1.5" tube, 1/8" wall column supports for the cargo bed corners
finish the tailgate
install 20"x12" doors (custom fabricated) to the forward edge of bed walls
install 48"x12" door over forward edge of bed
install fenders
build/install bed cover
install ARB RF945 and RD945 in cargo bed
build bed rack for RTT
install RTT, ladder on driver's side
install 270 degree awning to passenger side
What I wanted was something that would carry camp kitchen gear, the cooler, a rooftop tent, an awning, and eventually a water tank. The plan was that this would not only give us more room in the vehicle, we could store our gear in it when not in use. I wanted it to have 12v power system and use the same wheel/tire size as my rig (FJ Crusier).
So I decided to try it. My uncle welds so I convinced him to teach me some and he agreed to help. I bought a 4x6 trailer kit from Home Depot along with a Timbren suspension, brake hubs (just in case), wheels/tires, and a max coupler. We were going to be home for Christmas, so I had everything shipped to my folks' house. Everything arrived and I inspected each item and started assembling the trailer kit. The plan was to use the trailer kit as a foundation, put the Timbren suspension on it, and build a cargo box on top. My cousins were all going to be home, so we were all going to work on it together and I prepared to provide plenty of beer...
I say it WAS the plan, because as soon as we got it all in the same spot we realized the Timbren suspension was WAY too beefy for the trailer frame - which looked to be 14ga galvanized c-channel. So two thoughts ran through my mind: 1) I now have a bunch of components I can't use with this frame that will cost a whole lot to return and 2) if I want to use these components I'm going to have to source a different frame. Now I realize in retrospect that it would have been smarter to FIND a 4x6 trailer with a more substantial frame...and my cousin even mentioned that at one point...after we had built a NEW frame from scratch...
I ended up acquiring 1/8" wall 2x3" C-channel, a ton of 1/8" wall angle iron, hinges, latches, and sheet metal. And we started measuring and cutting. Using the trailer kit pieces as a guide we made a new trailer frame from the c-channel and added the max coupler to the tongue. The Timbren suspension was bolted to the frame about half-way, meaning that just shy of 2/3 of the frame was forward of the axles. It took us about a day and a half to measure, cut, square/level/plum the main frame pieces, attach the cross members and tongue supports, and then square and level the tongue itself. We started on a Wednesday afternoon and by Thursday evening the suspension and wheels were on as well. For added stability, we bolted a 1/8" wall, 2x3 tube was bolted between the left and right side suspension.
The next step was to build the frame for the cargo bed. We cut and welded lengths of the angle iron to the trailer frame to make a foundation, then started building up. I had a 15"x15"x48" aluminum tool box I wanted to mount at the forward edge of the trailer, so we made a foundation for that, then 2" behind it (to allow for the lid to open fully) we started the cargo bed. All the angle iron used to make the upper lip of the bed faces inward, and then I added lengths to the left and right side facing outward, braced by triangular supports. I made the frame for the tailgate and secured the hinges and latches. The cargo bed is 24" deep, and the top edge of it stands 50.5" high.
Aaaand, that's when I ran out of time. We had to head home and my wife had already been VERY gracious and patient about the project, so the last day of the trip was devoted to family time. It's gonna be a few months till I can get back to finish it up, but it's all I can think about now. They say misadventures make the best stories - one setback after another - it was great fun.
Things that still have to be done:
weld the cargo bed panels in place (14ga steel sheet).
1.5"x1.5" tube, 1/8" wall column supports for the cargo bed corners
finish the tailgate
install 20"x12" doors (custom fabricated) to the forward edge of bed walls
install 48"x12" door over forward edge of bed
install fenders
build/install bed cover
install ARB RF945 and RD945 in cargo bed
build bed rack for RTT
install RTT, ladder on driver's side
install 270 degree awning to passenger side
Attachments
-
 101.6 KB Views: 59
 -
 629.9 KB Views: 29
 -
 595.3 KB Views: 29
 -
 581.8 KB Views: 28
