Off-Road Ranger I
- 676
- First Name
- Kaleb
- Last Name
- Hall
- Member #
-
14476
- Ham/GMRS Callsign
- KC3SCX
- Service Branch
- US Space Force
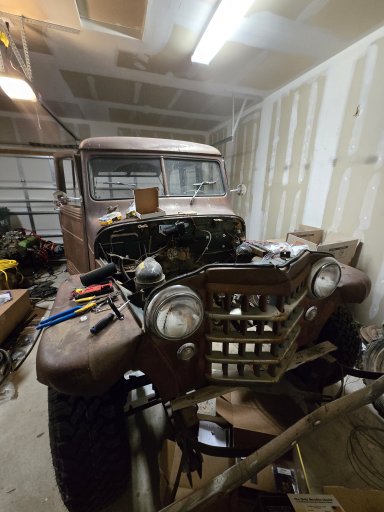
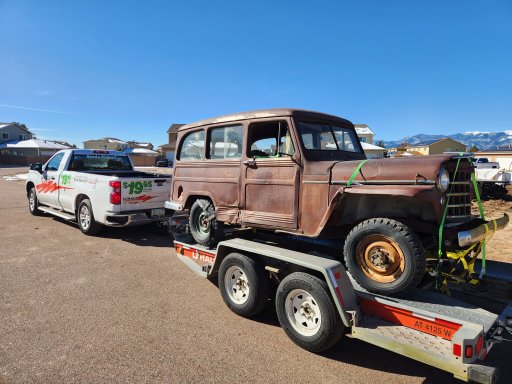
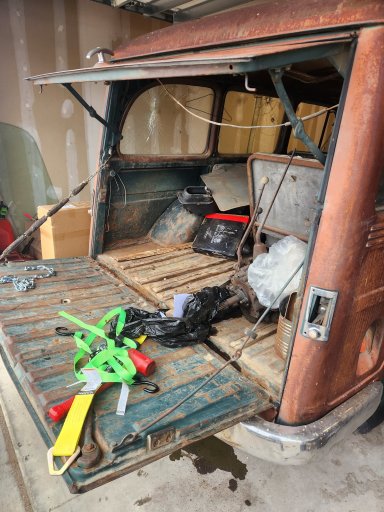
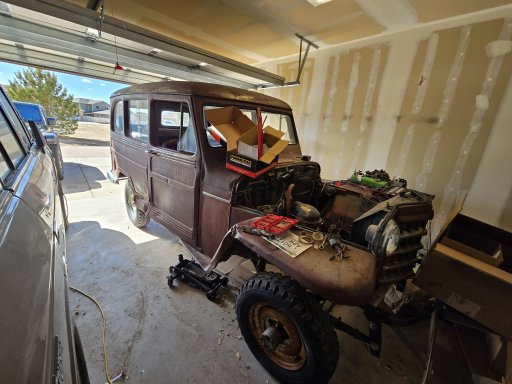
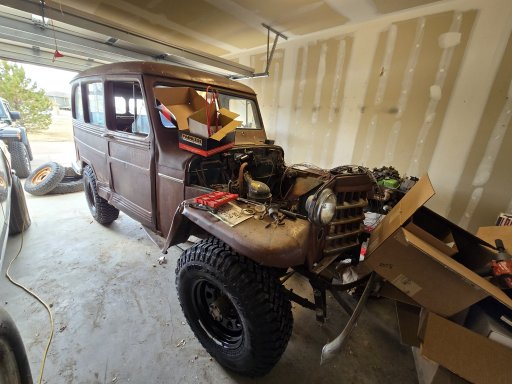
I've had a fair number of project rigs, ranging from Jeeps to Land Cruisers and 4Runners, but there's been one in particular that I've wanted for a long time and was only recently able to get one of my own: a Willys Wagon. As the post title implies, I was finally able to get one! The one I picked up, again as the title would suggest, was a 1953. It had been sitting for all told around 40 to 50 of its 71 years of life. The previous owner had purchased it in an attempt to bring it back to life, but realized he didn't have the time to put into it that it would need. Because of that, he had partially dismantled it already, removing the engine, transmission, and transfer case intending to rebuild all 3. He only got the engine rebuilt, though, which I think speaks to his good intentions. Here's some photos from the day I brought it home:
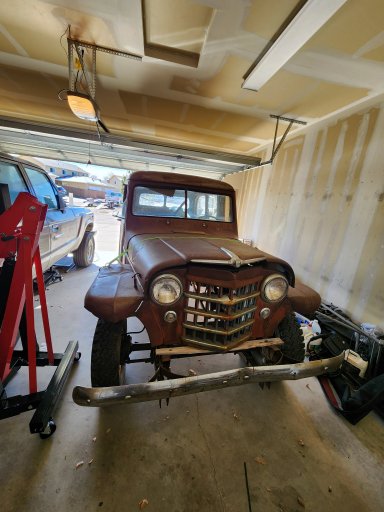
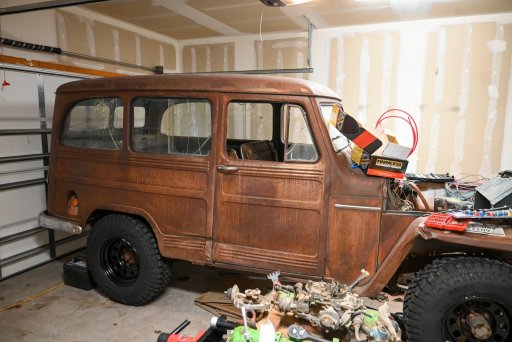
Upon getting it in the garage, I needed to take stock of what condition everything was in, what parts the previous owner had included, and make some decisions on what my final vision for the build would be. The first order of business would be deciding whether to put the stock drivetrain back in, or to swap it with something else. The stock motor is an F134 Hurricane, which despite its exciting name puts out a measly 72 horsepower. I'm very familiar with the engine and its performance, having daily driven my 1958 CJ-5 for 2 years. It conveniently has the exact same engine, transmission, transfer case, and axles as the Wagon, which gave me plenty of experience both with how the F134 performs and how to work on it. While I really do love the F134 in my CJ-5, part of its charm for that platform comes from the fact that it's about 2000lbs lighter than the Wagon, and is also too short for me feel safe running it at highway speeds even if it were capable of that. The Wagon, however, is something I'd like to be able to drive on road trips, not just in town. A few days after buying my Wagon, a friend of mine who has one similar, just a few years newer, but with the same engine in it let me drive his, which sealed the deal. The F134 was not for me. So out it came! The previous owner had loaded it and the transmission and transfer case in the back of the Wagon, which meant I needed to pull them out to get the project rolling.
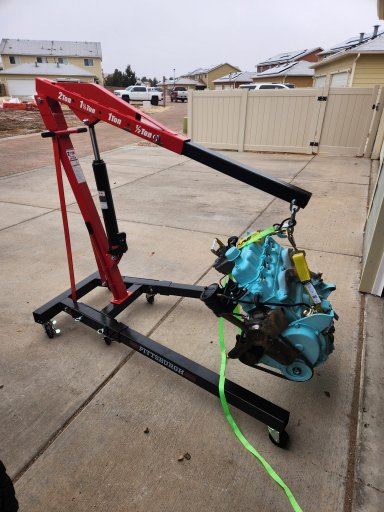
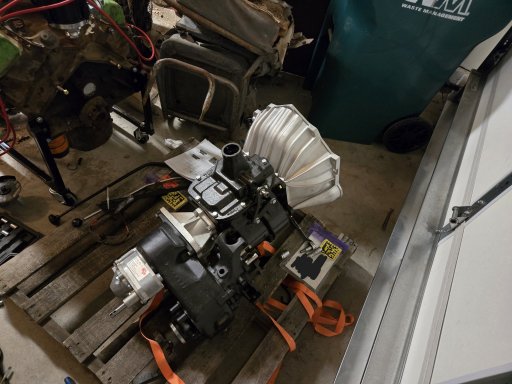
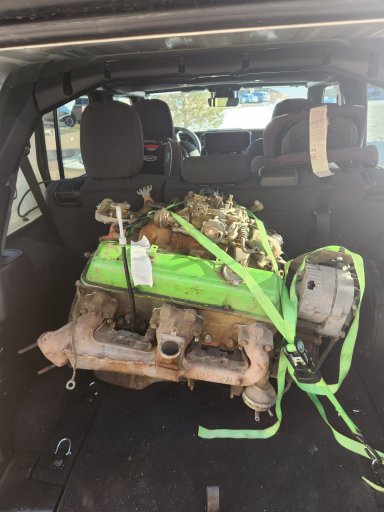
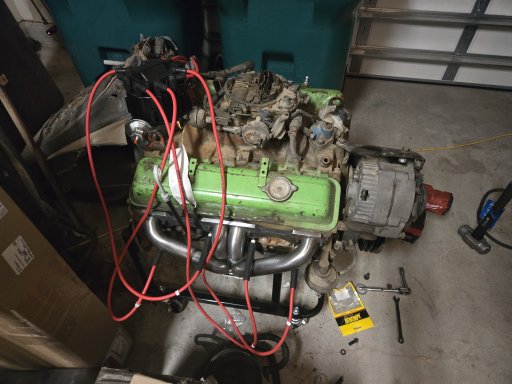
From what I could tell the F134 was very well rebuilt, which makes it great for either spare parts, or to hold on for a later project (either another early CJ-5 or a flat fender of some variety). With those out, I was able to sort through what was in the rig, which seemed to be all the parts that were missing from the interior and engine compartment. After some research, I decided to go with the tried and true small block Chevy engine swap. The idea being that there's a lot of parts support for not just the engine family, but for the swap itself. Additionally, it gives plenty of room to grow, should I want to upgrade it. However, I don't want to break axles, and since upgraded axles are not in the budget this year, I decided to get the cheapest, lowest power SBC that I could find. The idea being that it would allow me to upgrade later, once I have better axles, but provide some more power now. What I ended up finding was a Chevy 305 out of an early 80s C10 for $300. That certainly fits all of the requirements I was looking for, and the one I got was complete for that price to boot. And conveniently, it fit in the back of my Wrangler!
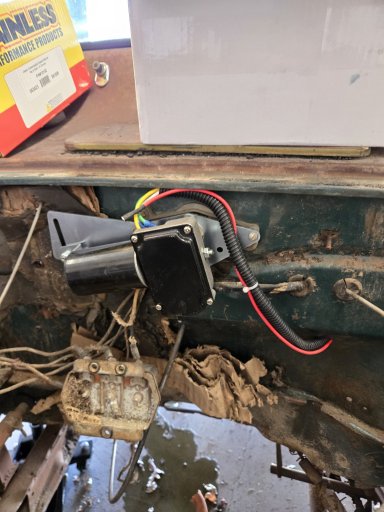
Engine acquired, I started work on the 12v and total rewire of the Wagon. Aside from its being 6v when I purchased it, after having sat for decades, there had been no shortage of rodents in it (which necessitated a thorough cleaning in the interior). What little insulation remained on the wiring was cracked and brittle, and I didn't trust any of it. So I started into a Painless Performance wiring harness, as well as adding a few necessary upgrades, such as a turn signal switch and electric wiper motor.
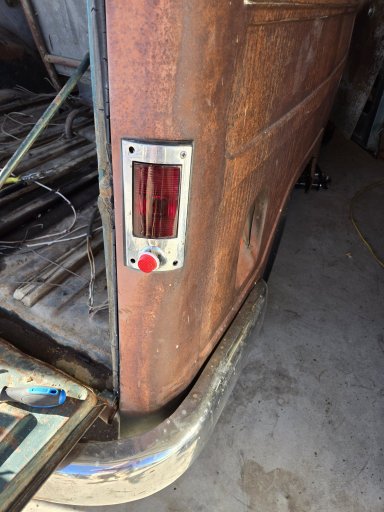
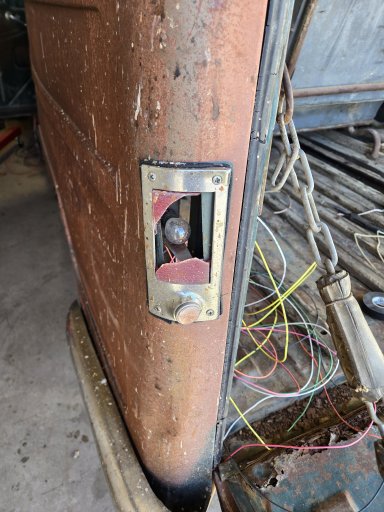
Additionally, I needed to replace the broken brake lights, which was a pretty simple job, and greatly improved the looks of the Wagon when done.
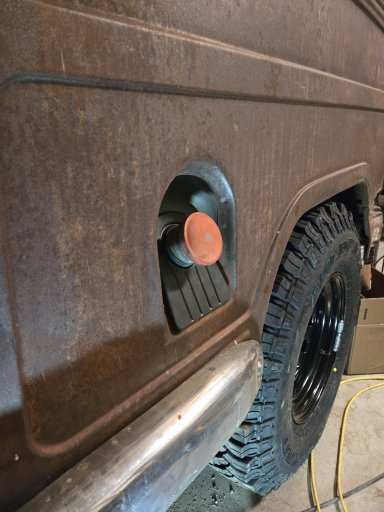
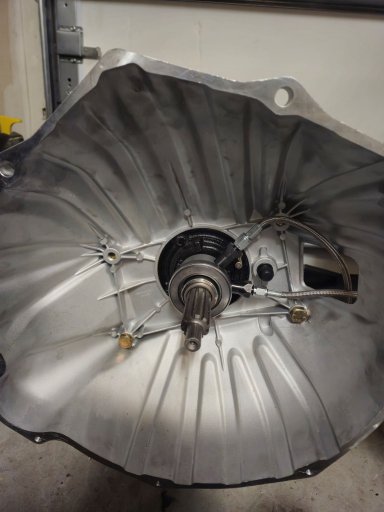
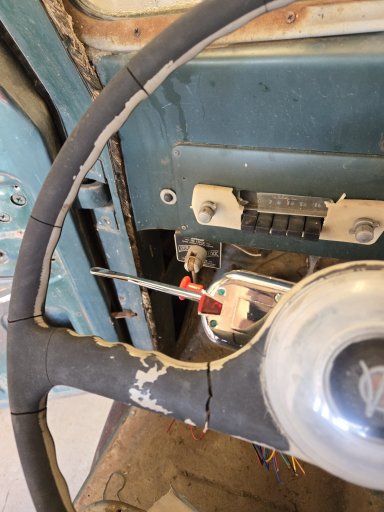
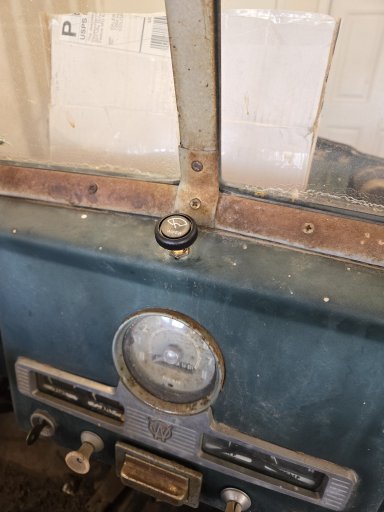
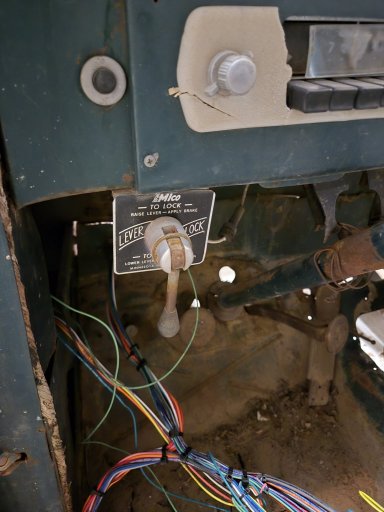
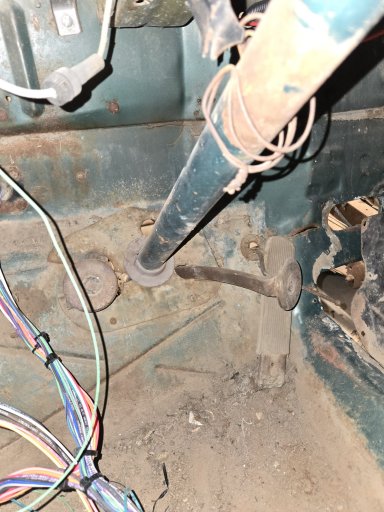
A neat discovery was what this little mechanism on the dash was. Titled the Mico Lever Lock, it's essentially an old fashioned line lock. While the Spicer 18 transfer case could be optioned with, and often was optioned with a parking brake on the rear driveshaft, my Wagon did not get that. Instead, it got a common dealer installed accessory which, when activated, holds pressure in the brake lines. It functions for both front and rear brakes, too, which makes it a very sturdy parking brake when all is functioning how it should.
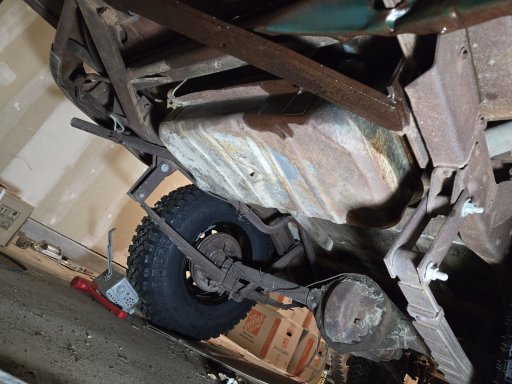
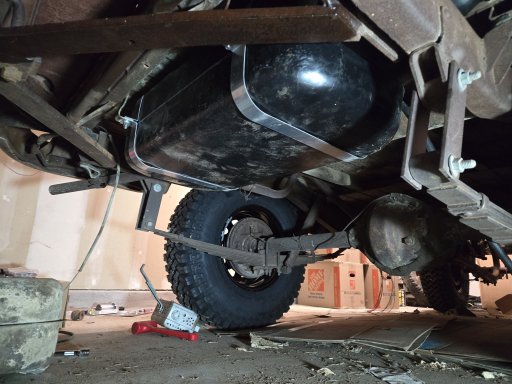
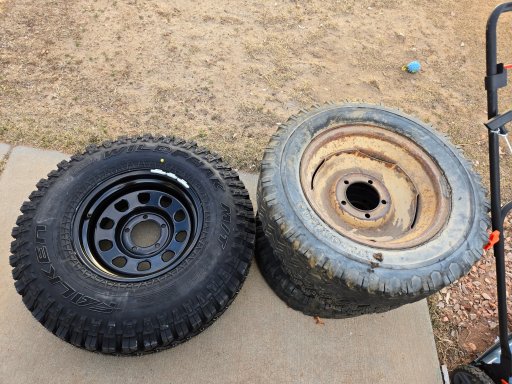
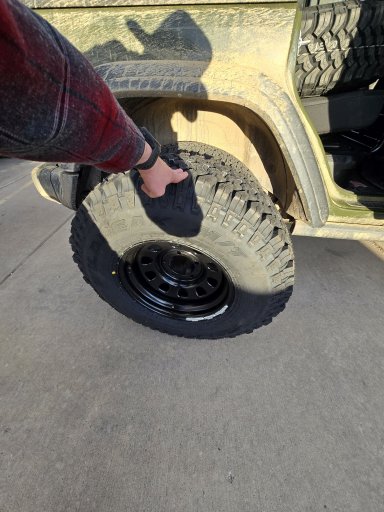
While this was all happening, my new wheels and tires arrived, which was an easy win in the project. I went with 255/85r16 Falken Wildpeak MTs. Aside from my general preference of tall/skinny tires on older rigs, the rather narrow nature of the rear wheel wells meant that I would need to either do a lot of lift or find a tire that fits in the wheel well. As hoped, the tires do in fact fit, if just barely, inside the wheel wells, which means I can keep a bit of a lower center of gravity with the new setup. I had planned to wait to install them until I got the lift kit and installed it (it's currently on an egregious shackle lift which amounts to bar steel with holes drilled for the springs and spring mounts) but I'm impatient and couldn't wait, so here's the results:
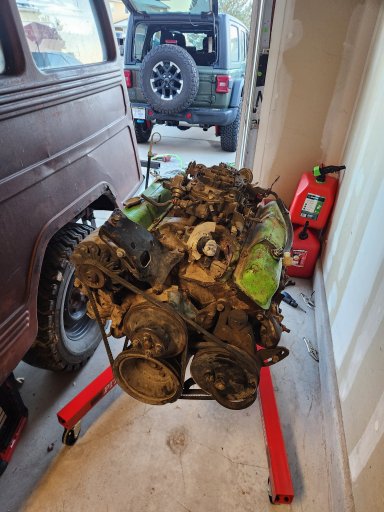
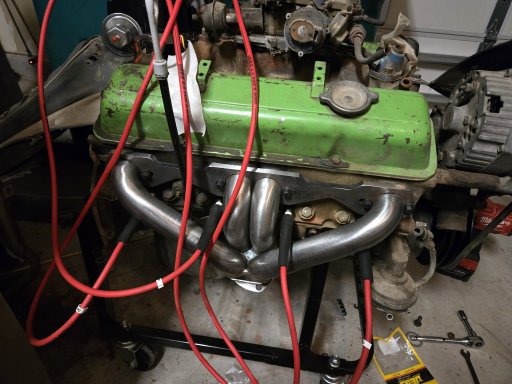
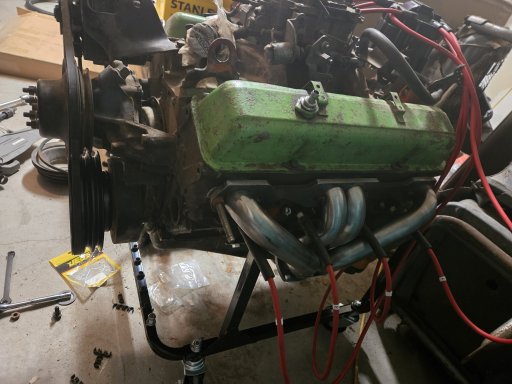
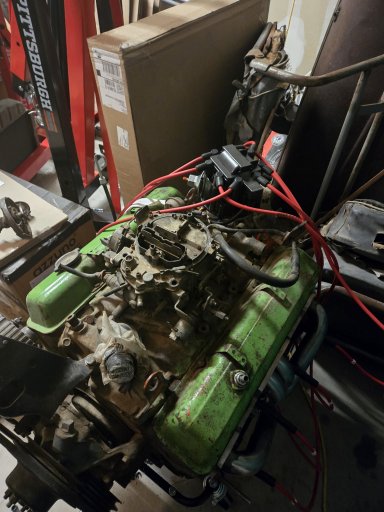
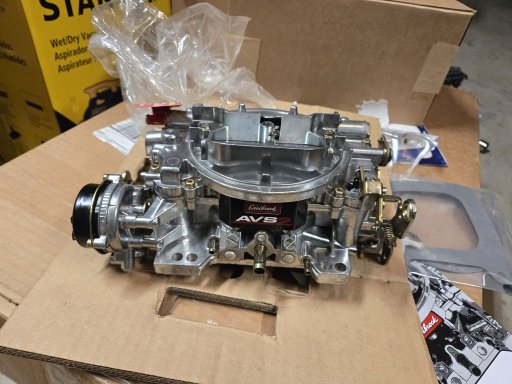
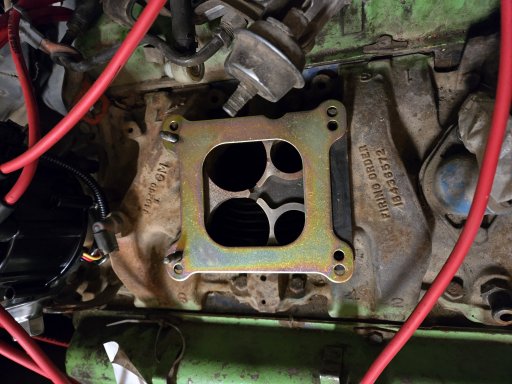
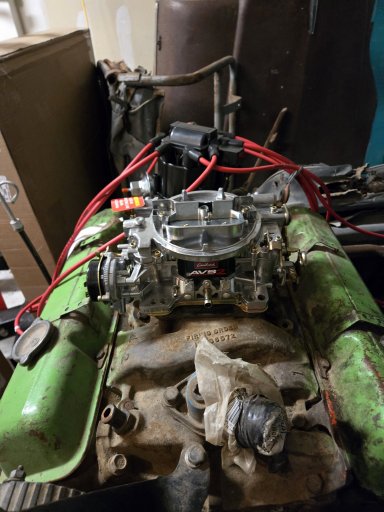
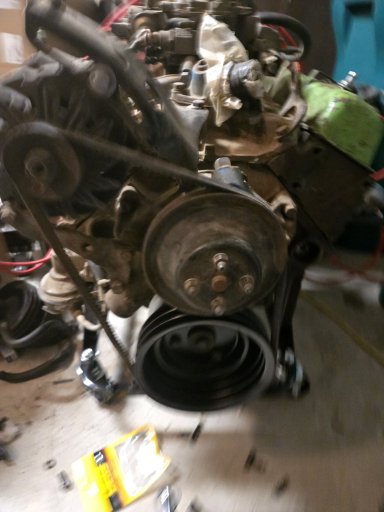
Next up was some engine prep. Aside from not wanting to deal with EGR, I wanted to save as much space in the engine compartment as I could, so I went with a set of shorty headers from Novak. Additionally, I switched to an HEI distributor, as the most common issue with these swaps is not having enough room for the distributor on the firewall. The shorter cap of an HEI setup usually fixes that. Don't worry about the length of the spark plug wires, they'll get shortened once the engine is in the bay. I ran the engine on the stand to time it and didn't want to cut them before I know for sure how I'll route them. One thing I learned while trying to time the engine was that it's got a bad carburetor. I've never been super fond of the quadrajets, and the prices for new carbs and/or rebuild kits sealed it for me. I went with an adapter and an Edelbrock instead. Long term I'd like to run a Holley Sniper, but again, the goal for now is just running and driving, so that can wait.
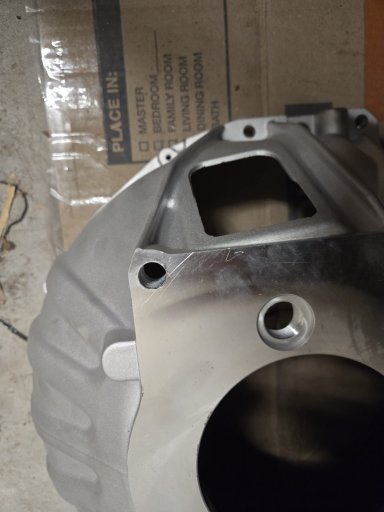
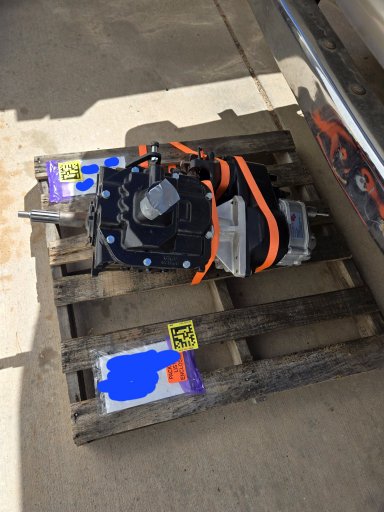
Just in time for the weekend, the rest of my drivetrain arrived! I'd ordered an SM420, Dana 18 with Tera Low gears (3.15:1 low range versus the stock 2.46:1) and an overdrive unit from Herm the Overdrive Guy in Washington. The end result with this is going to be a whopping 119:1 low range while on 33" tires. When I upgrade the axles I'll certainly be going to higher gears than the stock 5.38s, as those are wildly overkill with a v8, but for now they'll work. And I'll even theoretically be able to hit 70mph with the 30% overdrive at about 2800rpm or so. I won't be doing much at that speed, as the 5.38s will have the transfer case and axles spinning way faster than they are good for, but the option will be there if necessary.
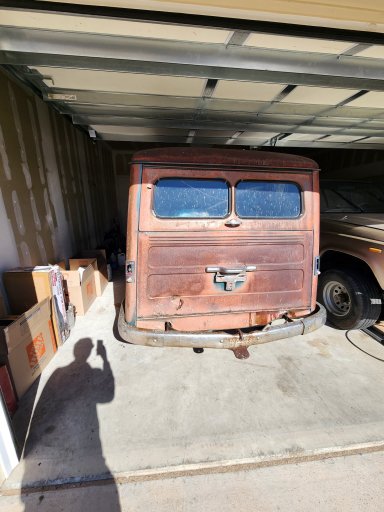
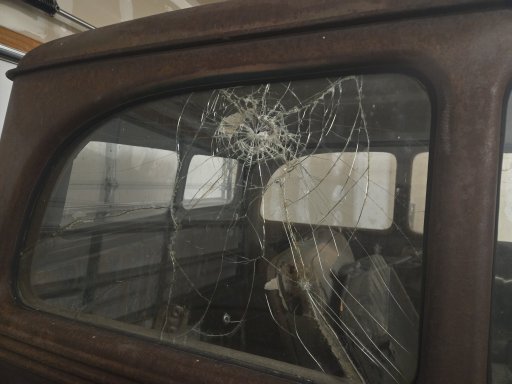
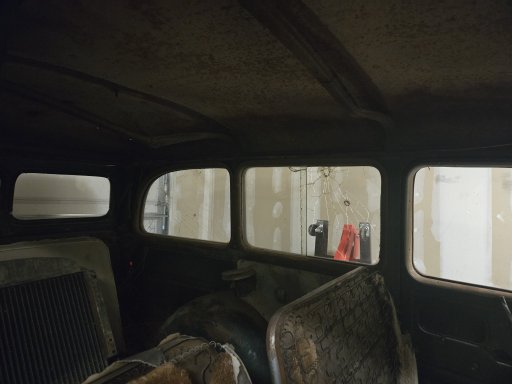
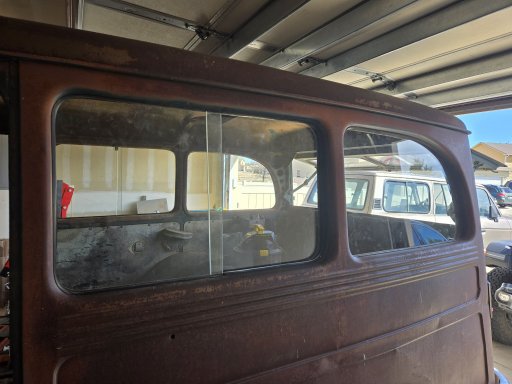
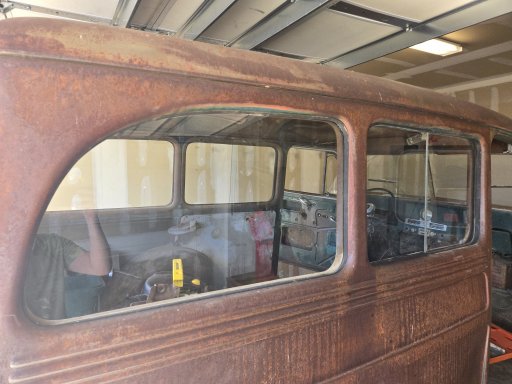
Ever unable to stick with one thing at a time, I started into the glass replacement and was able to get all be the door windows and windshield done. No more bullet holes now!
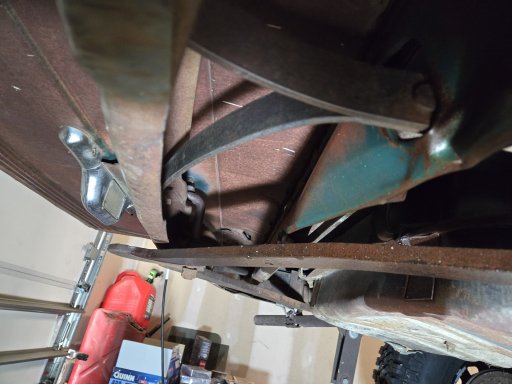
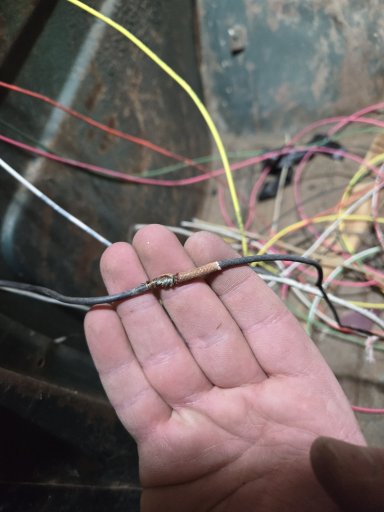
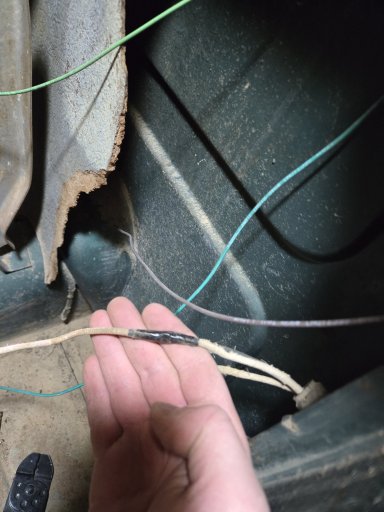
My further wiring work revealed even more reason to rewire everything: absolutely terrifying butt splices consisting of nothing more than twisted wiring covered by electrical tape.
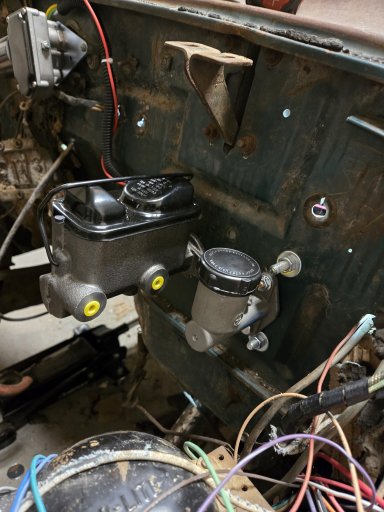
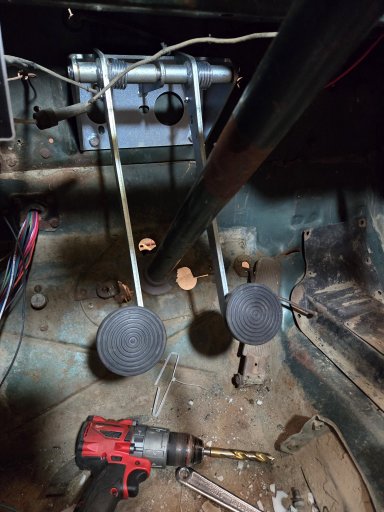
Finally, I got the hanging pedals mounted up. The stock setup for all 3 pedals has them pushing through the floor. That's fine for the gas pedal, as there's plenty of throttle linkages setup to work with that (and I got a Lokar pedal to replace it anyway that will work via cable while still pushing through the floor), but not so much for the clutch and brakes. There have been some people who have had success adapting the clutch linkage to non-stock transmissions, but it's complex. I found it much easier to just do a hydraulic swap which reduces all of that complexity. As for the brakes, the stock setup has the brake master cylinder mounted on the frame, right where the exhaust runs stock. Just about any exhaust setup I'll run will also have a pipe running there, and even under stock setups the fluid is known to boil from its proximity to the exhaust. So once again, it's easier and safer to just move the master cylinder to the firewall (turns out there's a reason modern cars made that switch). The pedal arms I got were able to utilize the stock pedals, which after a new set of pedal pads look like new.
That's all the progress I've made so far, and I apologize for the length of the post. This is 2 months of work all at once, and in the future I'll make sure to just update as things happen. I'm excited to get it done, though, and it's going to be a very fun rig, I think. Time will only tell, though. My goal is to have it all buttoned up in the next couple months, but we'll see if my abilities match my ambition.
Upon getting it in the garage, I needed to take stock of what condition everything was in, what parts the previous owner had included, and make some decisions on what my final vision for the build would be. The first order of business would be deciding whether to put the stock drivetrain back in, or to swap it with something else. The stock motor is an F134 Hurricane, which despite its exciting name puts out a measly 72 horsepower. I'm very familiar with the engine and its performance, having daily driven my 1958 CJ-5 for 2 years. It conveniently has the exact same engine, transmission, transfer case, and axles as the Wagon, which gave me plenty of experience both with how the F134 performs and how to work on it. While I really do love the F134 in my CJ-5, part of its charm for that platform comes from the fact that it's about 2000lbs lighter than the Wagon, and is also too short for me feel safe running it at highway speeds even if it were capable of that. The Wagon, however, is something I'd like to be able to drive on road trips, not just in town. A few days after buying my Wagon, a friend of mine who has one similar, just a few years newer, but with the same engine in it let me drive his, which sealed the deal. The F134 was not for me. So out it came! The previous owner had loaded it and the transmission and transfer case in the back of the Wagon, which meant I needed to pull them out to get the project rolling.
From what I could tell the F134 was very well rebuilt, which makes it great for either spare parts, or to hold on for a later project (either another early CJ-5 or a flat fender of some variety). With those out, I was able to sort through what was in the rig, which seemed to be all the parts that were missing from the interior and engine compartment. After some research, I decided to go with the tried and true small block Chevy engine swap. The idea being that there's a lot of parts support for not just the engine family, but for the swap itself. Additionally, it gives plenty of room to grow, should I want to upgrade it. However, I don't want to break axles, and since upgraded axles are not in the budget this year, I decided to get the cheapest, lowest power SBC that I could find. The idea being that it would allow me to upgrade later, once I have better axles, but provide some more power now. What I ended up finding was a Chevy 305 out of an early 80s C10 for $300. That certainly fits all of the requirements I was looking for, and the one I got was complete for that price to boot. And conveniently, it fit in the back of my Wrangler!
Engine acquired, I started work on the 12v and total rewire of the Wagon. Aside from its being 6v when I purchased it, after having sat for decades, there had been no shortage of rodents in it (which necessitated a thorough cleaning in the interior). What little insulation remained on the wiring was cracked and brittle, and I didn't trust any of it. So I started into a Painless Performance wiring harness, as well as adding a few necessary upgrades, such as a turn signal switch and electric wiper motor.
Additionally, I needed to replace the broken brake lights, which was a pretty simple job, and greatly improved the looks of the Wagon when done.
A neat discovery was what this little mechanism on the dash was. Titled the Mico Lever Lock, it's essentially an old fashioned line lock. While the Spicer 18 transfer case could be optioned with, and often was optioned with a parking brake on the rear driveshaft, my Wagon did not get that. Instead, it got a common dealer installed accessory which, when activated, holds pressure in the brake lines. It functions for both front and rear brakes, too, which makes it a very sturdy parking brake when all is functioning how it should.
While this was all happening, my new wheels and tires arrived, which was an easy win in the project. I went with 255/85r16 Falken Wildpeak MTs. Aside from my general preference of tall/skinny tires on older rigs, the rather narrow nature of the rear wheel wells meant that I would need to either do a lot of lift or find a tire that fits in the wheel well. As hoped, the tires do in fact fit, if just barely, inside the wheel wells, which means I can keep a bit of a lower center of gravity with the new setup. I had planned to wait to install them until I got the lift kit and installed it (it's currently on an egregious shackle lift which amounts to bar steel with holes drilled for the springs and spring mounts) but I'm impatient and couldn't wait, so here's the results:
Next up was some engine prep. Aside from not wanting to deal with EGR, I wanted to save as much space in the engine compartment as I could, so I went with a set of shorty headers from Novak. Additionally, I switched to an HEI distributor, as the most common issue with these swaps is not having enough room for the distributor on the firewall. The shorter cap of an HEI setup usually fixes that. Don't worry about the length of the spark plug wires, they'll get shortened once the engine is in the bay. I ran the engine on the stand to time it and didn't want to cut them before I know for sure how I'll route them. One thing I learned while trying to time the engine was that it's got a bad carburetor. I've never been super fond of the quadrajets, and the prices for new carbs and/or rebuild kits sealed it for me. I went with an adapter and an Edelbrock instead. Long term I'd like to run a Holley Sniper, but again, the goal for now is just running and driving, so that can wait.
Just in time for the weekend, the rest of my drivetrain arrived! I'd ordered an SM420, Dana 18 with Tera Low gears (3.15:1 low range versus the stock 2.46:1) and an overdrive unit from Herm the Overdrive Guy in Washington. The end result with this is going to be a whopping 119:1 low range while on 33" tires. When I upgrade the axles I'll certainly be going to higher gears than the stock 5.38s, as those are wildly overkill with a v8, but for now they'll work. And I'll even theoretically be able to hit 70mph with the 30% overdrive at about 2800rpm or so. I won't be doing much at that speed, as the 5.38s will have the transfer case and axles spinning way faster than they are good for, but the option will be there if necessary.
Ever unable to stick with one thing at a time, I started into the glass replacement and was able to get all be the door windows and windshield done. No more bullet holes now!
My further wiring work revealed even more reason to rewire everything: absolutely terrifying butt splices consisting of nothing more than twisted wiring covered by electrical tape.
Finally, I got the hanging pedals mounted up. The stock setup for all 3 pedals has them pushing through the floor. That's fine for the gas pedal, as there's plenty of throttle linkages setup to work with that (and I got a Lokar pedal to replace it anyway that will work via cable while still pushing through the floor), but not so much for the clutch and brakes. There have been some people who have had success adapting the clutch linkage to non-stock transmissions, but it's complex. I found it much easier to just do a hydraulic swap which reduces all of that complexity. As for the brakes, the stock setup has the brake master cylinder mounted on the frame, right where the exhaust runs stock. Just about any exhaust setup I'll run will also have a pipe running there, and even under stock setups the fluid is known to boil from its proximity to the exhaust. So once again, it's easier and safer to just move the master cylinder to the firewall (turns out there's a reason modern cars made that switch). The pedal arms I got were able to utilize the stock pedals, which after a new set of pedal pads look like new.
That's all the progress I've made so far, and I apologize for the length of the post. This is 2 months of work all at once, and in the future I'll make sure to just update as things happen. I'm excited to get it done, though, and it's going to be a very fun rig, I think. Time will only tell, though. My goal is to have it all buttoned up in the next couple months, but we'll see if my abilities match my ambition.
Attachments
-
 695.2 KB Views: 7
 -
 347.9 KB Views: 7