Corey's 2007 Toyota FJ Cruiser Build

  • HTML tutorial

Corey

Rank V
Launch Member

Influencer I

2,503
Auburn, WA.
Member #

1771

NVIDIA Shield Tablet/Ram Mount Installed 10-22-2016

I have been noticing a lot more rigs going on back country trips using a tablet device to run Back Country Navigator and other mapping apps instead of a dedicated GPS unit.

I have an iPad Air, but Apple products do not have a built in GPS chip, so you have to add a Bluetooth one.
Not a problem, but my iPad Air also has a Bluetooth keyboard/cover attached to it, and I really do not want to have to take it off each time, plus the iPad is a little big for my tastes to have in the FJ Cruiser on a trip.

I posted up a thread on Expedition Portal in their GPS/Navigation section, and a member posted the NVIDIA Shield 8" tablet as a good one to use.
It has a fast processor, and just about all Android based tablets have the GPS chip installed, no need for tethering to a separate Bluetooth GPS antenna.

I got a hold of Matt at Ram Mounts out of Seattle, WA., and asked him what type of mounts would work with my FJ Cruiser.
I got a RAM Tab-Tite cradle for the tablet, and a few mounts listed below in the links.
Currently using the suction cup one, have not installed the rod one, and I may not.
All of the items listed below in the links are available off of Amazon too, and that is where I got mine.

This tablet is also a gaming one, so you know it will be fast.
As soon as I turned it on yesterday, it prompted me for my homes Wi-Fi login, and then it asked me is I wanted to copy/transfer my apps and date from my HTC One Android phone over to the new tablet.
I choose not too, as I have a lot of apps that are not needed on the new tablet.
I did find a screen later where I would pick which apps to transfer, and I did.
Google Maps and Google Earth work perfect on the new tablet, and I also downloaded the Pro paid version of Back Country Navigator, and have been messing around with it here at home.
I had the free trial one on my phone, and after updated to the paid version on the new tablet, I also installed the paid one on my phone.

Kind of new to apps like this, so there will be a learning curve.
My main objective with the software is to log forest service roads I explore up at Greenwater, and also log future campsites I run across.
Then when I want to get back to them, the tablet will guide me.

Also put in a two port USB charger into the stock 12v outlet on the lower dash to power the tablet to keep its battery topped off when in use.

The suction mount is not holding good enough to my dash though, it loosens up after a bit, and that is not good.
Later today, or perhaps tomorrow I am going to mount the one that attaches with the passenger seat bolt, that should be better.
I could probably get the suction mount to work if I attached it to the windshield, but I really do not want it blocking the view.

Links:

NVIDIA SHIELD K1 8" Tablet - Black

SanDisk Ultra 64GB microSDXC UHS-I Card with Adapter

RAM Tab-Tite™ Cradle for 7" Tablets including the Amazon Kindle Fire & Google Nexus 7

RAM POD 18" No-Drill™ Vehicle Mount with B Size 1" Ball on Round Plate with AMPs Hole Pattern

RAM Twist Lock Suction Cup Mount with Long Double Socket Arm and 2.5" Round Base that contain the AMPs hole pattern

BackCountry Navigator TOPO GPS

Pictures:


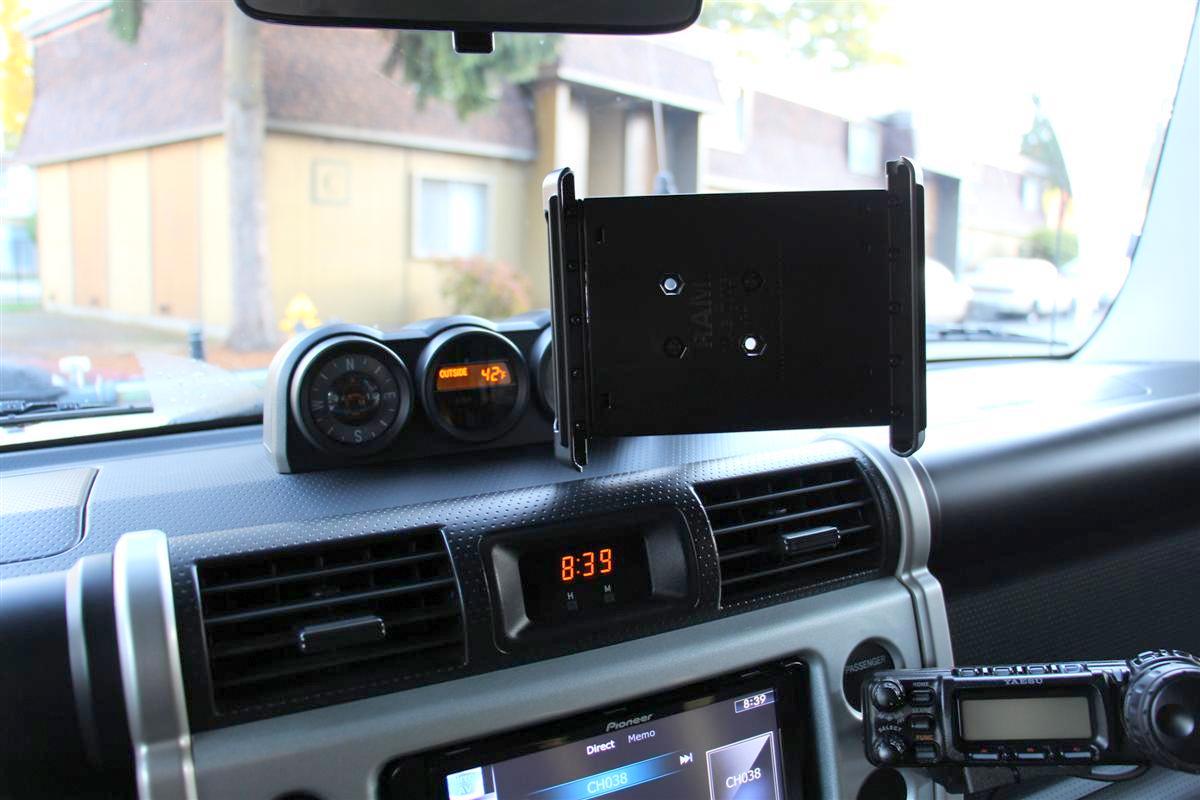
Cradle/mount with no tablet


Tablet inserted into the Tab-Tite plate and RAM mount


Screen showing the Back Country Navigator, you can see one of the swimming pools at my complex up and to the left of the yellow arrow


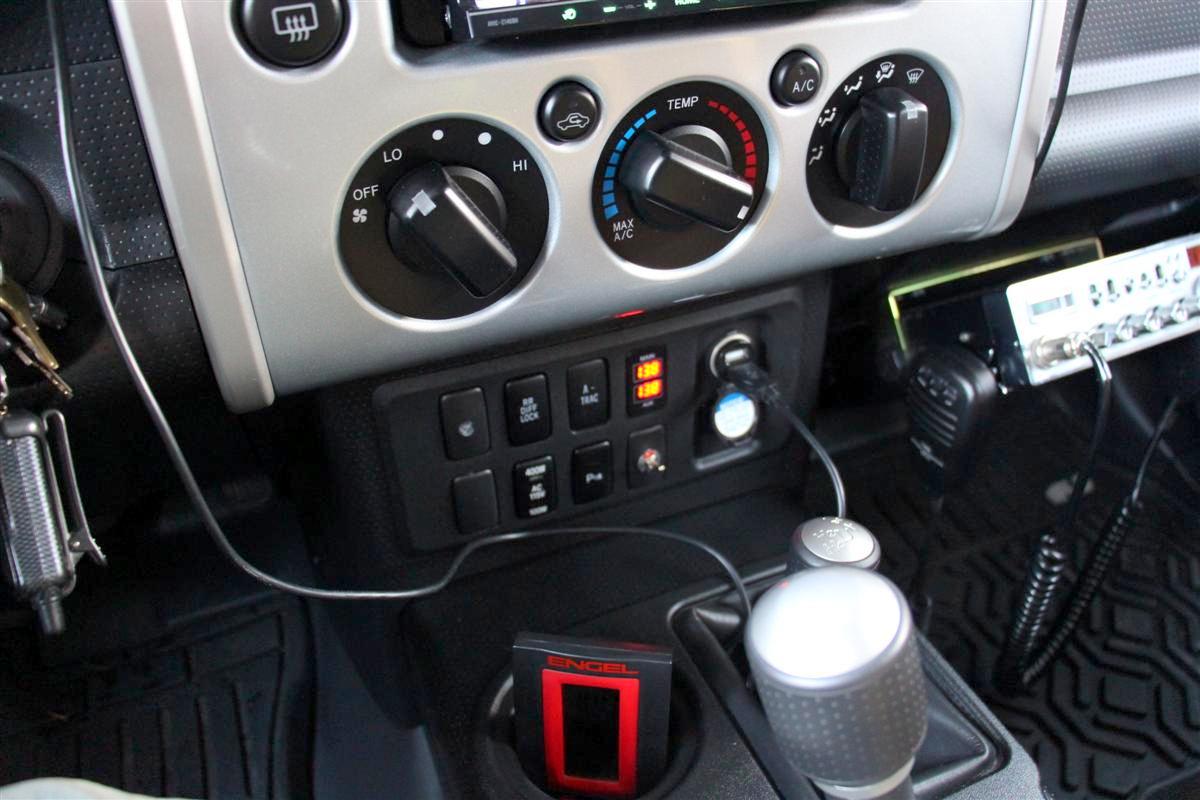
Two port USB plug, I have a ton of these, trying out a low profile one


They have a lot of informative videos on their YouTube channel too, and if you search Back Country Navigator, there are also a ton of end user videos.
https://www.youtube.com/user/crittermap/videos
 
  • Like
Reactions: VCeXpedition

Corey

Rank V
Launch Member

Influencer I

2,503
Auburn, WA.
Member #

1771

RAM Mount Finally Properly Installed 11-6-2016

Finally a dry morning!

I followed Zero's installation of his tablet and RAM arm/ball mount from fjcruiserforums website, and put the ball backing plate in the same position as he did.

This allows the tablet mount to be folded up flat against the flat surface that is just above the glovebox.
Simply unscrew the big plastic nut on the mounting arm to allow both ball ends to loosen, then you can adjust the angle up/down, and sideways of the tablet plate.

I drilled two small holes into the side of the dash, and used some screws that came with the mount.
It is nice and strong, and best part is I did not have to disassemble my dash by pulling the heater control/stereo surround panel off.
That would have been kind of a PITA as I would have had to unbolt the mounting bracket that holds the Yaesu ham radio faceplate too.

I use these flat USB cables too that I get off of Amazon, and no, I did take the time yet to shorten it up to make it look better, and I had not wiped down the black plastic yet either on the dash behind the mount, that all will come later.

Overall I am very happy with how the project turned out.
Cannot wait to hit Greenwater with it and start making some tracks and waypoints of some future campsites.

OK, on with some fresh pictures from today:


Ball mount screwed into the side of the dash


Mount folded up flat against the dash


Screen with the Back Country Navigator app opened, and the USB charging cable plugged in


Close-up angle


Wider angle


RAM backing plate mount without the tablet
 

NetDep

Rank V
Launch Member

Pathfinder I

2,055
St. George, UT, USA
First Name
Tim
Last Name
G
Member #

681

Following you here and from some other forums too - you have one cherry rig and some mad skillz!!!

Very nice!!

Wonder what you charge for the less mechanically inclined???????
 

Corey

Rank V
Launch Member

Influencer I

2,503
Auburn, WA.
Member #

1771

Following you here and from some other forums too - you have one cherry rig and some mad skillz!!!

Very nice!!

Wonder what you charge for the less mechanically inclined???????
Thanks Net, it has been a work in progress.
I have not done all the mods though, have paid for some of the harder wiring jobs.
 

1Louder

Rank VI
Launch Member

Member II

4,187
AZ
First Name
Chris
Last Name
K
Member #

1437

Ham/GMRS Callsign
K1LDR
RAM Mount Finally Properly Installed 11-6-2016


RAM backing plate mount without the tablet
Where you now have it mounted is the way to go. I use the X Grip mount from Ram vs the bulkier slide in and out version. Works great. This is an easy mod if you are willing to put a few holes in your "dash".
 

Corey

Rank V
Launch Member

Influencer I

2,503
Auburn, WA.
Member #

1771

Where you now have it mounted is the way to go. I use the X Grip mount from Ram vs the bulkier slide in and out version. Works great. This is an easy mod if you are willing to put a few holes in your "dash".
Thanks, do you have a picture of your setup?
The only problem with my mount is I have a nice silicone case I got off of Amazon for the tablet, and it will not fit into my mount, as it is too thick.
So I have to take it off.

But when using the tablet at home and for taking it outside for stargazing, the case makes it much easier to hold.
Case from Amazon
 

1Louder

Rank VI
Launch Member

Member II

4,187
AZ
First Name
Chris
Last Name
K
Member #

1437

Ham/GMRS Callsign
K1LDR
Thanks, do you have a picture of your setup?
The only problem with my mount is I have a nice silicone case I got off of Amazon for the tablet, and it will not fit into my mount, as it is too thick.
So I have to take it off.

But when using the tablet at home and for taking it outside for stargazing, the case makes it much easier to hold.
Case from Amazon
Here's a post on my old setup: http://aznet.com/fj-ipad-dash-mount/

Here's the new mount:
Ram Mount X-Grip III Universal Clamping Cradle for 10-Inch Large Tablets (RAMHOLUN9U
by Ram Mount
Link: https://amzn.com/B0085MDF52
 

Corey

Rank V
Launch Member

Influencer I

2,503
Auburn, WA.
Member #

1771

Rotopax And Ladder Mount Installed 1-7-2017

For quite awhile I have been trying out how to carry a few jerrycans of water or fuel on my rig.
Cannot put them on the roof since the roof top tent takes up the whole rack, and I do not have a swingout bumper to install a jerrycan holder on.

Last week I saw on Instagram a nice patch for a headliner (I collect them and install on my FJ Cruisers headliner) for Overland Equipped.
I had never heard of them, and I headed over to their site and saw they had a Rotopax mount that goes behind a ladder on a rig.
Well I have a ladder, so I emailed Matt from there and then talked to him on the phone and ordered up the plate, and I also got a sticker and two patches from him.

He told me what I needed from Rotopax, so I ordered up two white water only two gallon cans, the DLX Pack Mount, and an extension so I could add a second can.

Matt and I were not sure if this was going to fit, as I may be the first FJ Cruiser to have tried this, I am not 100% sure.
But as you can see from the pictures it turned out perfect.
The only thing is the cans block my Overland Journal oval sticker, so I will have to mount a new sticker.

The hardware Matt includes use 7/16" nuts, and most of my tools including my nice Craftsman ratchet wrenches I have in my home and rig are metric.
I tried a 12 mm ratchet, but a little too big.
Fortunately my neighbor had a closed end 7/16" wrench.
It was very slow with it, so I will now be ordering a standard ratchet wrench set.
If I had one, it would have gone a lot faster.

But I am very happy with the outcome here, I think it turned out great.
The water will be used for drinking water when camping, and save me a ton of room over carrying a big water container in my rig.

I hope this helps some other FJ Cruiser owners who have been wanting to add either fuel or water cans to their rigs.

Links:

HEAVY-DUTY ROTOPAX MOUNTING KIT - OVERLAND EQUIPPED

Rotopax Two Gallon Water Cans

DLX Pack Mount

1, 2 and 4 Gallon Extension

On with some pictures


All the parts spreed out with Matt's ladder mount on top of the left can
I did not know what those two plastic clips are, and Matt answered me over on Instagram that they clip together two cans if used side by side.


One can mounted, no T lock handle on yet

The second can will push in over that black part.


Both cans mounted and T handle turned and tightened down to hold both cans


Showing Matt's round black plate on the backside of the ladder, it bolts to the Rotopax mount


Yes, there is some rear window blockage, but I do not really use the window anyways with the Maxtrax mounted there, and it is worse when the chuckbox is loaded in the rear for a trip
 

NetDep

Rank V
Launch Member

Pathfinder I

2,055
St. George, UT, USA
First Name
Tim
Last Name
G
Member #

681

Something nice to see is someone that is always keeping an eye out and upgrading and/or taking advantage as new ideas/products come along. I don't have an FJ (although your thread makes me maybe wish......) but many of the reviews and ideas you post translate well to any Overland application. Thanks!!
 
  • Like
Reactions: Corey

Corey

Rank V
Launch Member

Influencer I

2,503
Auburn, WA.
Member #

1771

Something nice to see is someone that is always keeping an eye out and upgrading and/or taking advantage as new ideas/products come along. I don't have an FJ (although your thread makes me maybe wish......) but many of the reviews and ideas you post translate well to any Overland application. Thanks!!
Thanks Net!
And you are welcome.
I may get the locking T handle later, just in case the new cans decide to go for a walk and not come back.
 

NetDep

Rank V
Launch Member

Pathfinder I

2,055
St. George, UT, USA
First Name
Tim
Last Name
G
Member #

681

Thanks Net!
And you are welcome.
I may get the locking T handle later, just in case the new cans decide to go for a walk and not come back.
I am a long time believer in the Rotopax products and have had them in be bed of my Tacoma since the beginning. I recently got a Front Runner roof rack and mounted Rotopax base plates to the roof along with my MaxTrax. I never had a reason to have the locks when they were in the bed but considered it when they moved to the roof rack. I read quite a bit on the locks and decided not to get the locking mechanisms offered by Rotopax. More than a few mentions of frozen/rusted/non-functioning locks and I can't imagine much worse than being in the middle of nowhere having planned on fuel in reserve and not being able to access it!

Some of those commenting suggested a simple cable lock to secure the Rotopax but advised against using the actual lock offered by Rotopax. I am sure many have had great luck but I am enough of skeptic to shy away when those kind of contingencies are on the line. The pic is before I attached the Rotopax - I am running two sets of two-gallon connected containers. The old racks that attach to the bed rail in the truck will be replaced with two two-gallon water containers. unnamed-6.jpg
 
  • Like
Reactions: Corey

Corey

Rank V
Launch Member

Influencer I

2,503
Auburn, WA.
Member #

1771

That is a nice setup you have there.
Yes, I was also thinking about some kind of a cable and padlock.
I would not want one of the Rotopax ones to rust up on me and seize.
 

Corey

Rank V
Launch Member

Influencer I

2,503
Auburn, WA.
Member #

1771

Adventure Tool Company Tool Rolls 1-21-21

Notice I did not say installed, as these are not actually installed, but carried in my cargobox.

I first found out about tool rolls I think from the Hanson's at Overland Expo.
Then I joined Instagram awhile back and started following Adventure Tool Company.
And what got me to finally take a real close look at these fine tool rolls was a video by Expedition Overland featuring Jeff and Kurt from XO.
Kurt is also the owner of Cruiser Outfitters in Utah.


I checked out Paul and Amy's Adventure Tool Companies site, and I first bought the WrenchRoll, then a few days later ordered the SportRoll.
The former will be for my ratchet wrenches, and the latter will be for adjustable wrenches, pliers, etc.
I did not have room to put my screwdrivers in, so maybe I will order another tool roll.
I planned on putting them into the SportRoll, but some are too long for it.
I probably could take out the SAE ratchet wrenches since I only need metric for my rig, and put the screwdrivers into the WrenchRoll.
Will try that at another time.

Before I had my tools in my cargobox just loose, but sitting on toolbox liner.
These ATC tool rolls will keep the tools much better organized.
Plus these are made in the USA in Colorado, very happy to support a USA company.
I will include a link below in the links section where you can read about their company.

I do not think you are going to find better tool rolls out there, these are crafted perfection.
Oh, and they smell great too!

If you are looking for a great way to carry your tools in your off road/camping/overlanding/expedition rig, look no further than these fine tool rolls.
Give them a follow too on social media, as they are always posting up cool stuff.

Links:

Adventure Tool Company

About Paul and Amy's company

The WrenchRoll

The SportRoll (with zippered side pouch)

Pictures:


Check out the wrapping paper, old string, and the card, this is an old fashioned touch which I like, so much different than Amazon


The personal card is a really nice touch too


The WrenchRoll, and I do think I am going to put the screwdrivers in where the big SAE ones are on the left


WrenchRoll rolled up, nice buckle system


SportRoll filled with pliers and adjustable wrenches


Side by side, the SportRoll is smaller


All cargobox drawers open, ATC rolls in the middle drawer


Closeup of the two rolls in the middle drawer
 

Corey

Rank V
Launch Member

Influencer I

2,503
Auburn, WA.
Member #

1771

BAFX OBDII & Torque Pro Installed 1-28-2017

I have always thought about getting one of those scan gauge tools in the past, but never got around to it.
I saw a post the other day by @Lifestyle Overland on Facebook, and he had a tablet running in his 4Runner with the Torque app from Android running on it, and I was intrigued since I run an NVIDIA Shield tablet for the Gaia GPS/Mapping app in my rig for logging future campsites.

I asked him about the device he he was using in his OBDII port, and he said it was the BAFX Products one which is highly rated on Amazon.
I bought it via Amazon, and I went to the Play Store on my PC, and bought the Torque Pro app, and told it to send the file to my NVIDIA Shield tablet.
I like how you can be on a computer, but tell it to go to your phone of your tablet, very neat!

I have never looked at my OBDII port before, but I had an idea where it was since the emissions place hooks up their scanning cable to it when you go to get your emissions done here every other year.

I plugged in the device, and a red LED came on like it was suppose to.
Since the port has power all the time, the light will remain on when the rig is off, no biggy, very small current draw.

The instructions for the device to pair it with the Torque Pro app is very simple.
Have the scanner plugged into the port, fire up the rig, then go to your Android device and have it scan for new devices, and it said OBDII in there, and I selected it, typed in 1234 for the code.
Then you open up the Torque app, and it fired right up with the tachometer showing me my RPMs.
You have a few different screen you can go through, and I selected the one that shows all of the gauges on there such as tach, vacuum, water temperature, and a few others.
I will have to play around with it more later to see if I can add in more gauges.

Overall, I am pretty happy with it.

Links:

Android Bluetooth Wireless OBDII Reader & Scan Tool - For Android Devices Only

(Via Amazon)
BAFX Products 34t5 Bluetooth OBDII Scan Tool for Android Devices


Torque Pro (OBD 2 & Car) Not for IOS yet

Picture and a movie:


Corey

Rank V
Launch Member

Influencer I

2,503
Auburn, WA.
Member #

1771

Adventure Tool Company Medium Tool Pouch 2-11-2017

I bought another item from Adventure Tool Company, the medium sized tool pouch.
This one is for screwdrivers and misc. crap as you can see from the two Velcro patches on the pouch.
No more screwdrivers and other stuff rattling around in my smallest of my three cargo drawers.
The bag comes with one patch of your choosing, and you pay for a second patch, pretty nice to name what is inside of the pouch.

I also took some time and rearranged my drawers some, and pulled out the full size hammer.
I do not think I really need it, as the Gerber Bear Gryll's hatchet can be used as a hammer.
The plastic hammer you see if one I have had since my backpacking days 2.5 decades or so ago to drive in tent stakes.
I still use it to pound in tent stakes for my awning, the shower/crapper tent, and the Coleman lantern stand.

These tool bags are awesome, now go buy some!

Links:

Tool Pouches, available in two sizes, I went with the medium one as none of my screwdrivers are over a foot long

Pictures:


Pouch stuffed with screwdrivers and a few misc. crap items


The WrenchRoll, Tool Pouch, and SportRoll side by side


Drawers opened showing better organization


Closeup of all three Adventure Tool Company items