FULL-SIZE FUN— MOVED TO OVERLAND BUILDS

  • HTML tutorial

PapaDave

Local Expert Northern ID and North East WA
Member

Protector II

8,868
Coeur d'Alene, ID, USA
First Name
Dave
Last Name
Addington
Member #

10123

Ham/GMRS Callsign
KN6BKH
I moved this build thread over to Overland Builds
**note this thread is best viewed as a webpage vs the app

Full-Size Fun

This build thread is how I am going about solving my problems and making off roading and camping more fun. I have learned first-hand that if something is easier to do then it’s likely I’ll want to do it more. Many of my projects are universal to any rig.

I am a tinkerer and like to solve problems. I hate bins and built a DIY kitchen unit that was featured by Overland Bound’s YouTube channel and 900k views later I co-founded PullKitchen with my business partner producing high-end off road kitchens that you don’t need, but you might want. I am no longer a part of that venture but currently working on some interesting prototypes for problems we all experience on the trail….

Central to my build is my KB Voodoo ProMax rack, if you are interested in one or their VRS Rack hit me up for a discount code.

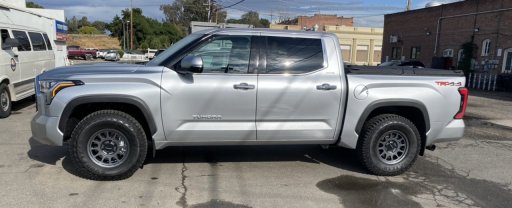
This is the current configuration of my ‘22 with 37’s added. How-to TABLE OF CONTENTS listed below:
D90EC7DE-5461-47AD-A48C-7DF6BE479B44.jpg

C01B5544-D835-474E-A573-7B85A2FF4792.jpg

43C443E4-AA75-44D8-B4D2-5B64DECFC071.jpg
18923AB5-3426-4E98-98ED-B747BE3F2D09.jpg

How it started
6B13946A-AEC0-4169-BBD3-5B8CCA8DB58F.jpg


TABLE OF CONTENTS

Click a link:
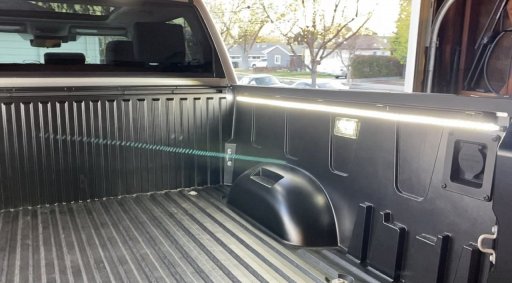
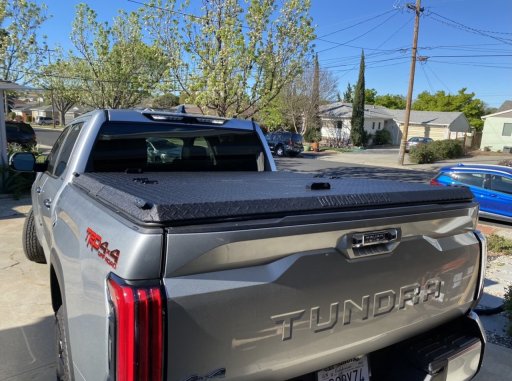
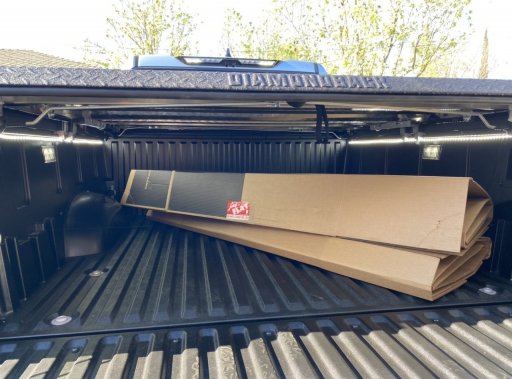
  1. Bed Lights and Diamondback Cover Install
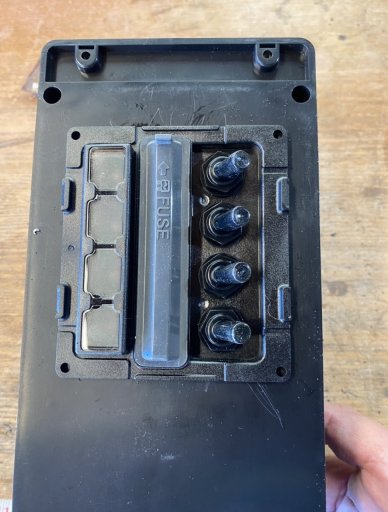
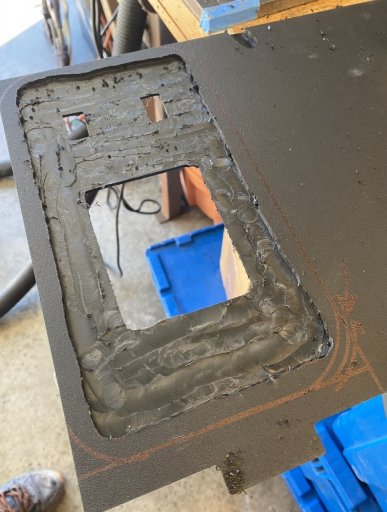
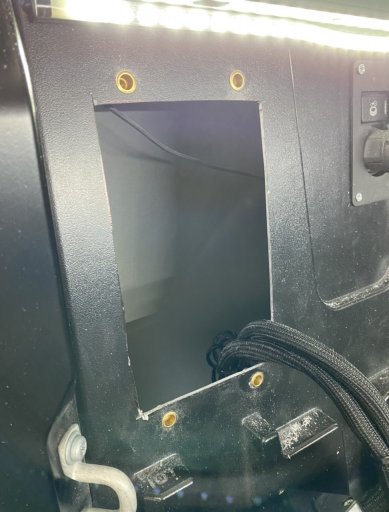
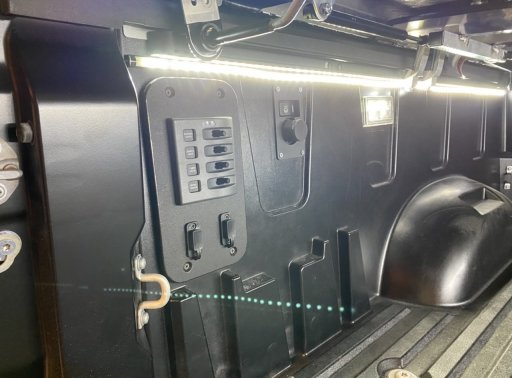
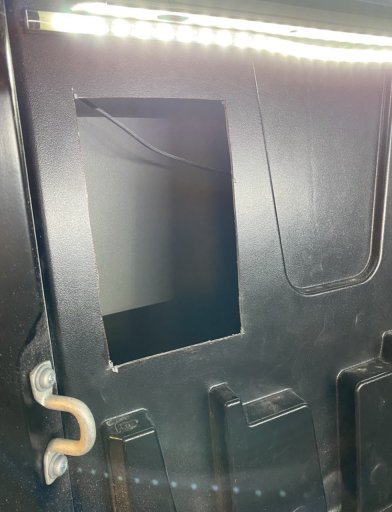
  2. Rear Bed Electrical Box Build
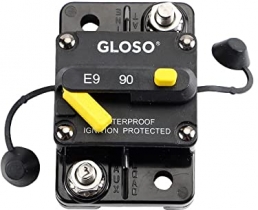
  3. Rear Bed Electrical Box and ARB Twin Compressor Install
  4. Wiring ARB Twin Compressor
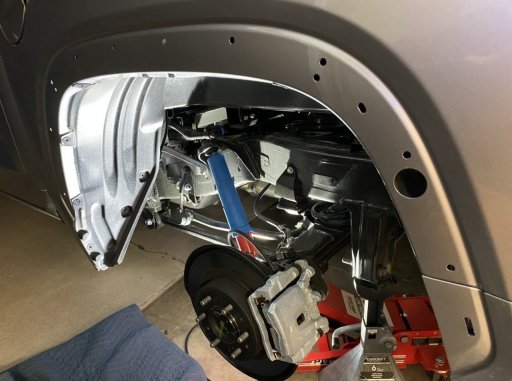
  5. Method 703 Wheels
  6. Yaesu HAM Install with Remote Head
  7. HAM Mic Extension and Install
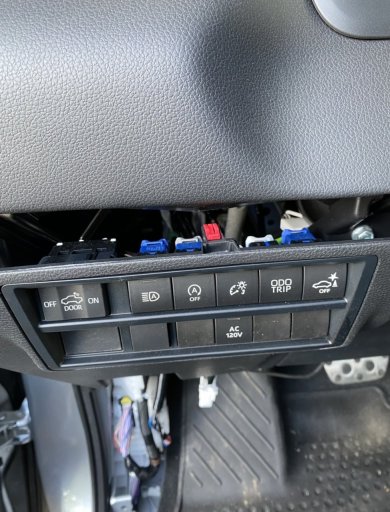
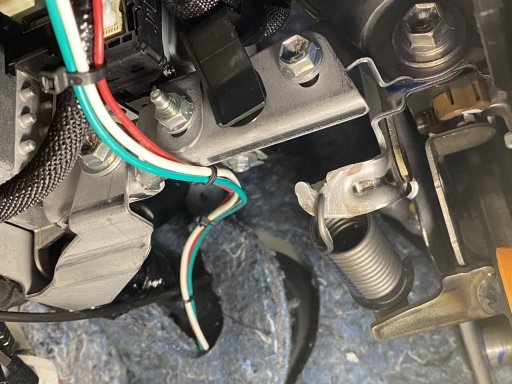
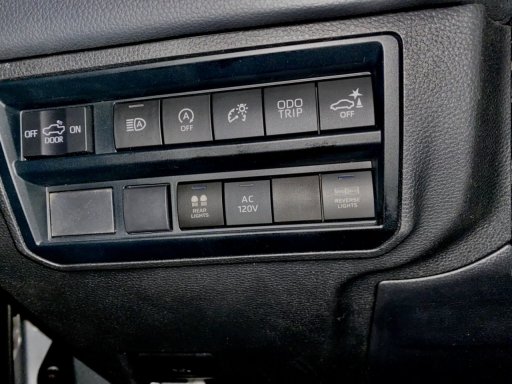
  8. Dash Wiring For KC Hilites Multi-Function Chase Light
  9. 12 Pin Plug to Power Rack and KC Hilites Chase Bar
  10. Rear Wiring to Chase Bar via the 7 Way Round Connector
  11. 3rd Gen Tundra Chrome Handle Delete


@Kent R @Michael
 
Last edited:

PapaDave

Local Expert Northern ID and North East WA
Member

Protector II

8,868
Coeur d'Alene, ID, USA
First Name
Dave
Last Name
Addington
Member #

10123

Ham/GMRS Callsign
KN6BKH
My Limited came with the Limited power option which includes the AC outlet in the bed and bed lights. The lights work good but I wanted great. The bed lights turn on with the overhead external rear light when you open the tailgate so I piggybacked off those. I was going to add a pin switch to the tailgate but wasn’t needed.

I bought these LED’s


$28 MICTUNING 2Pcs 60" White LED Cargo Truck Bed Light Strip Lamp Waterproof Lighting Kit with On-Off Switch Fuse 2-Way Splitter Cable Compatible with Pickup RV SUV and More
https://www.amazon.com/dp/B01JUE9OLM?ref_=cm_sw_r_cp_ud_dp_GJJDT1AMKXZJFCHJARDE
I was going to use this pin switch for it, if I had needed it


$7 Nickel Plated Pin Switch w/Polycarb Plunger and Rubber Boot
https://www.amazon.com/dp/B001TQPM6Q?ref_=cm_sw_r_cp_ud_dp_YHWRB3VCJD3NW706H64Q


If you have bed lights it is very simple to remove the lights and access the wiring behind them. They are a spring fit so you slide the light to the right and pop out the left side first. Then I mounted the LED’s, drilled ahole the size of the wire, and passed the wire through the bedside between the bed and fender. I routed it back to the existing light fixture and spliced it into the wiring. Pretty easy
6FAC6D61-753D-4CFD-9054-F97534546B83.jpg

1710975942235.jpeg
I received my Diamondback cover and installed it. Easy install and I love them. I had one previously on myTacoma and this is the SE model which can still handle 400lbs on top. I can walk on it, load on top of it, and yet it only takes 5 minutes to remove.
D80E2B6D-3EAE-40E5-B03D-1CDA07B137ED.jpg

1710975968166.jpeg
How it looks with the LED’s
1710975992011.jpeg
 
Last edited:
  • Like
Reactions: JeepingMike

PapaDave

Local Expert Northern ID and North East WA
Member

Protector II

8,868
Coeur d'Alene, ID, USA
First Name
Dave
Last Name
Addington
Member #

10123

Ham/GMRS Callsign
KN6BKH
I like to off road a lot and changing tire pressure is like changing shoes. If you are playing football on grass you aren't going to wear bowling shoes. The same is true if you are running forest roads, desert roads, or hitting rock gardens changing tire pressure helps with grip and comfort.

Some people opt for an SPOD (or similar) to control multiple functions of lights, compressor, and such from the cab. I found my work flow while camping was that most of my time was spent at the rear of my truck by the tailgate. So I decided to put my switches and compressor back there. I don’t like popping my hood to access the compressor because the truck needs to be running to power the compressor and it’s hot up there. To turn on a camp light I don’t want to have to open my driver’s door to access a control panel up front to turn on a light in the back.

I purchased a BlueSea water proof switch

$83 Blue Sea Systems 4304 Panel WD DC 12V Fused 4 POS Gry

https://www.amazon.com/dp/B0009PUDJE?ref_=cm_sw_r_cp_ud_dp_9FBRDAS2KZJ5M1J4VH1J
Water-resistant project box, large with flange

$13 Pinfox IP65 Plastic Project Box ABS Waterproof Electronic Enclosure Junction Box with Fixed Ear 7.8" x 4.7" x 3"

https://www.amazon.com/dp/B083GQ4BRP?ref_=cm_sw_r_cp_ud_dp_Y6BS6JWWGCXSZYKJNG5V
Water-resistant project box, small

$9 LeMotech Project Box ABS Plastic IP65 Waterproof Dustproof Electrical Junction Box Outdoor Enclosure for Electronics Black 4.5 x 3.5 x 2.1"(115 x 90 x 55 mm)(Pack of 1)
https://www.amazon.com/dp/B092HS9CMR?ref_=cm_sw_r_cp_ud_dp_7QXRPK6GWMRFWK332S6T

12v power socket

$10 ELECTOP Rectangular SAE Connector Power Socket Sidewall Port, Weatherproof SAE Quick Connector Solar Panel Flush Mount SAE Plug Adapter, 12AWG SAE Cable for Solar Generator Battery Charger (2 Pack)
https://www.amazon.com/dp/B09P4M46M5?ref_=cm_sw_r_cp_ud_dp_WVBAQNFZD803X7XZWR7W

Negative bus bar

6 Terminal Bus Bar - 150A BusBar Block with Cover, Ground Distribution, Power Distribution Terminal Block w/ 6 M4 Screws + 2 Studs, for Car Boat Marine Caravan RV (New)

https://www.amazon.com/dp/B07WV486BS?ref_=cm_sw_r_cp_ud_dp_6371WQYCT9M26KXEC293
Wire loom x2

$15 Alex Tech 25ft - 1/2" Cord Protector Wire Loom Tubing Cable Sleeve Split Sleeving for USB Audio Video Power Cord – Protect Cat from Chewing - Black
https://www.amazon.com/dp/B07FXF12HC?ref_=cm_sw_r_cp_ud_dp_C95S3XHHC5RPF1VJGDWZ


The project box is going to be installed through the bed side wall and exposed to the elements in the fender well so I made it water resistant in design.

The first cut is rough but will be

Water proof switches, plus fuses are right there easily accessible
1710977337871.jpeg

More cuts for the power plugs to run my fridge and shower unit…what? A clean man is not a mean man
48C8F87B-D963-42A1-A1B7-96B0EFC6D643.jpg

Backside of the wiring, the large project box houses the positive wiring
CD1CDF4A-105E-46CE-8D13-19847AC8209D.jpg


The small project box is the negative bus and is screwed to the large box
97015512-AFD3-4235-9904-EAF162FB828F.jpg

That way the unit can be pulled out as a whole making it easy to work on or fix if needed. You can see the main wiring looms coming out the backside
099333DB-C87A-4B14-925B-F69A40016C79.jpg

To make it pretty I added a faceplate, 1/4” black HDPE
BD17D36E-3CE1-429B-9FCA-EE824C44C161.jpg

To make the faceplate flush I routered out a recess
1710976876198.jpeg
End result
 
Last edited:

PapaDave

Local Expert Northern ID and North East WA
Member

Protector II

8,868
Coeur d'Alene, ID, USA
First Name
Dave
Last Name
Addington
Member #

10123

Ham/GMRS Callsign
KN6BKH
I decided to place my compressor, after much deliberation, on the bed side wall in front of the wheel well. I went with a QuickDraw ARB compressor mount because of its simplicity, rubber dampeners, and well it’s easy.
https://quickdrawbrand.com/product/arb-twin-compressor-bracket-universal-mount/

The space between the truck bed and fender is pretty spacious, so I decided to route my wiring, braided compressor hose, and switch box in that volume.

The first cut always cuts the deepest….

3E704F62-A0FB-4A55-9966-FCD0A71DE17B.jpg


I added Rivnuts so the mount would stand the test of time, you can see how the wiring goes through
1710977522510.jpeg

Backside showing the space available
64277B51-D59B-400C-9080-5CDD0936261B.jpg


I think the compressor/air chuck plate is a clean install! I would have centered it but you can just make out a crease to the left of it where a support rib runs up the backside of the wall. I didn’t want to compromise that rib
497BCF63-C441-47C4-A585-9761A9170B01.jpg

1710977588417.jpeg
To route the wiring and braided hose I took off the rear tire and removed the fender flare and wheel well faring. It’s all easier than it looks, just took my time removing the press fit clips.
1710977623708.jpeg

I used this bulk head fitting to pass the air hose through the bed side wall for a clean install.

Beduan 1/4" NPT Stainless Steel Female Bulkhead Coupler Thru-bulk Pipe Fitting (Full Female Thread)
https://www.amazon.com/dp/B09958F96J?ref_=cm_sw_r_cp_ud_dp_GTWFTK1Z4R4E86N5ED6X

I purchased all my air fittings, compressor, hoses, air chuck, mount plate from Desert Rat :: Off Road Truck Centers
Free shipping and no tax for me
C9F0494B-63F7-4291-8221-99142D51248E.jpg


How it looks
7F91C9F1-0D53-4701-BC2C-E8520AC20E4A.jpg


I may add a deflection plate to protect the compressor, but I will be adding a DIY full length half bed slide that will contain and control any gear on this side
AEA18A8C-E5D0-4696-9A4B-236BDAF7F610.jpg
 

Attachments

PapaDave

Local Expert Northern ID and North East WA
Member

Protector II

8,868
Coeur d'Alene, ID, USA
First Name
Dave
Last Name
Addington
Member #

10123

Ham/GMRS Callsign
KN6BKH
For wiring the dual compressor I used 8awg wire to run 2 positive lines from the battery to the compressor. Each compressor gets its own wire. I ran the negative wire to the compressor and spliced in the negative wire from my switch box as well. I also ran a shorter negative wire to the rear of the truck and grounded it to the frame. The switch box also has a positive line all the way to the battery. I used the wire loom listed previously and snaked it from the rear panel over the wheel well, down under the truck, up at the front wheel well, across the engine bay where it terminates by the battery.
8awg marine grade wire


$36 Ancor 111002 Tinned Copper Wire, 8 AWG (8mm2), Black - 25ft
https://www.amazon.com/dp/B000NV0HR2?ref_=cm_sw_r_cp_ud_dp_S0GXN33T0DDP0PB91346


I used marine circuit breakers to control the electrical connection to the rear. One is 25A for the switch box, the other is 90A for the twin compressor. Another great feature, besides protection, is that when you press the yellow button it opens a circuit and allows for safe working on your electrical connections in the rear. I mounted of them to the top of the relay fuse box in locations where the nuts underneath would not interfere with the fuses inside. There’s enough slack in the wires to fully remove the top and have access to the fuses as well.


$28 GLOSO Circuit Breaker E99 90A Breaker Standard Surface Mount 1/4" Diagonal Stud Waterproof IP67 Marine RV Truck Hi-Amp (90A)

https://www.amazon.com/dp/B089T8VXXV?ref_=cm_sw_r_cp_ud_dp_5WT55V0MVBKVMJ4C0JHW

Wire loom across the engine bay
5E51FB46-8D95-4302-BF79-19528CD9513D.jpg


Circuit breakers
B1A36066-4B2E-44AC-A0BD-E50A511975A4.jpg


I routed all of the wiring through the whole truck and drove it for a couple days before electrifying the system. If there was going to be a failure due to heat and melting I wanted it to happen before I connected it. I drove to Yosemite and back this weekend and the entire line was perfectly fine.

Yosemite is stunning!
1A68BD1A-163A-42D5-A659-F0A373739A15.jpg

1710978973824.jpeg
 

PapaDave

Local Expert Northern ID and North East WA
Member

Protector II

8,868
Coeur d'Alene, ID, USA
First Name
Dave
Last Name
Addington
Member #

10123

Ham/GMRS Callsign
KN6BKH
I used @RevereOverland 20% code and purchased Method 703 17x8.5 +35 wheels. I bought my friends tires he took off his day old Bronco Wildtrack which are Goodyear 315/70/17. He owns a tire shop and at $200 each mounted balanced and TPMS switched over I’m pretty happy. There are something like 34.2” or so. They barely rub the little mud flaps I have on still. I have a Westcott 3/1 lift coming till I figure out what I want to do for real.
EA63C4A3-6E74-47BA-83BD-9BB16BC569F1.jpg

1710979461061.jpeg
 
  • Like
Reactions: JeepingMike

PapaDave

Local Expert Northern ID and North East WA
Member

Protector II

8,868
Coeur d'Alene, ID, USA
First Name
Dave
Last Name
Addington
Member #

10123

Ham/GMRS Callsign
KN6BKH
I am wiring up my HAM radio and needed to pass the power cords through the firewall. HAMs specifically state not to power it off of the fuse block but the battery to keep down electrical noise.

On both sides of the truck under the dash are 2 large rubber grommets that have a big wire harness passing through. I poked a wire hangar through it and fished the power wires through
D2108F07-04C4-4650-99C5-F20C242E61A5.jpg

Inside the engine bay
BC08DC98-94A5-4457-92A5-F833066C8C2A.jpg


I needed to add a Ram Mount to hold my HAM head unit, and I decided off to the left was most out of the way and easy to do.

When you pull on the AC housing pull straight out and 4 clips release, then you need to rotate the housing clockwise to release the clip from the center faring over the steering wheel speedometer display.

Give it a good tug straight back at you
EC0654AD-19CD-4394-997A-41CB43054372.jpg

I found a spot with enough clearance for a washer and lock nut
44A00DDB-B675-4C63-BEA2-2AD249F205F2.jpg

I started with a small pilot hole and for plastics I like step drills as they usually leave a clean hole
37917633-766F-4D29-9CEC-18251B115D33.jpg

Washer and lock nut in
7F4693FE-ED7A-41EF-B383-AE5E3E9C3405.jpg

Looks pretty clean, and the hole isn’t the worst if I go to sell the truck someday, or I’ll leave the Ram mount as a present
5561C97A-6AB2-43F2-969E-9A5E8A297BFE.jpg

I snaked the control cable up the side, it’s easy to push between the seams
51D54E6D-DC2C-4BF0-A4F0-63AC92922CC4.jpg

Again looks clean and easily adjustable
43400406-6CE1-4391-9EFA-EDF633C266EF.jpg

Easily insight but out of the way
F76593DB-B8CF-40CF-A455-E86832CC93F2.jpg

I used a door antenna mount
EF59C381-64FD-42A9-9DA0-07F43BF50F29.jpg

1710979922149.jpeg
 

PapaDave

Local Expert Northern ID and North East WA
Member

Protector II

8,868
Coeur d'Alene, ID, USA
First Name
Dave
Last Name
Addington
Member #

10123

Ham/GMRS Callsign
KN6BKH
My HAM unit is under the front passenger seat and I wanted to add an extension for the mic so that it wasn’t stretching from under the far seat. So I routed the extension into the center console.

There’s 4 bolts that I loosened
15BDE14B-8E6B-4158-B8B5-14571E044935.jpg

I drilled a hole near the edge just big enough for the mic plug, then snaked it down and out under the seat
D629289E-28F8-4B3A-9F3C-BDF47EF5B49D.jpg

The rubber mat forces a tight fit better than I expected when I put it back in
9F25FF1C-A8C4-4321-A38C-21667D9C3DA1.jpg


Now the mic stores in the center console and can easily be used
BFC666AE-482E-4D94-A688-04C190B8649F.jpg
 

PapaDave

Local Expert Northern ID and North East WA
Member

Protector II

8,868
Coeur d'Alene, ID, USA
First Name
Dave
Last Name
Addington
Member #

10123

Ham/GMRS Callsign
KN6BKH
When I get my new KB Voodoo Pro-Max rack my plan is to install a KC HiLites rear chase bar that will have rear turn signals and amber dust lights. I needed to install 2 switches to signal the solid amber and flashing amber lights. The amber LED’s have a minimal draw so I’m switching them directly.
https://www.kchilites.com/28-multi-function-rear-facing-led-light-bar-9801.html
E070F117-0A38-4279-A32B-4B894DAFDE07.jpg


I found these switches to place in the lower left dash
https://www.aironboard.com/online/toyota-push-switch-t1b04b-rear-lights-blue.html
56DBC519-40CE-465D-92C4-69786FD655C6.jpg

1710980448487.jpeg

I was surprised to find that each plug was wired up, even if it was a blank. I hooked up a switch to where the heated steering wheel switch usually is but unfortunately it didn’t work. Thought perhaps there was a chance.
To remove a blank use a narrow screwdriver to unclip the sides
6A5C5D5F-FD88-4124-B2F4-20B07A1F9045.jpg


The AOB switch comes with a diagram to wire the switch for dash illumination and when pressed. The great news is you can use one of the unused plugs. Talk about easy. I used the bottom far right plug as you look at the panel. The positive dash light wire and negative dash light wire are the same as on the plug. I cut them and used a butt crimp to splice them into the switch harness. I combined the white and black grounds as the diagram mentions.
FFBE6736-8595-41CB-803B-33A2392C106B.jpg

I routed the amber lights power wires (green and white) with the red wire from the battery through the firewall. There’s a rubber grommet that I used a coat hangar to poke and fish it through. I loop the wires through a crook in the coat hangar and tape it off to secure the wires, at least that’s how I do it.
3AABF9A3-1A89-458A-968D-72E3182EA78A.jpg

1710980539026.jpeg

Reassemble everything in reverse order and this is how the switches came out!
EDA446CF-62AE-4AF8-8F51-6C96C39A5C91.jpg

1710980577770.jpeg

They didn’t have perfect matches for my light names but REAR LIGHTS is my solid dust light and REVERSE LIGHTS are the blinking ambers which I use less

Dash lights on
52DB3497-AFAC-4B21-A6E8-1D053FDC6D38.jpg


Switches depressed
0C1B16A2-A975-46D6-9121-7CB2E6F58B78.jpg
 

PapaDave

Local Expert Northern ID and North East WA
Member

Protector II

8,868
Coeur d'Alene, ID, USA
First Name
Dave
Last Name
Addington
Member #

10123

Ham/GMRS Callsign
KN6BKH
I need to add the 12 pin bulkhead plug that will power my rack and tent as it goes on and off my truck like a backpack for off roading and camping.

Holes always look terrible
86522F53-EE7B-46BE-A06C-D404EBCAFB98.jpg


12 pin plug that still needs the wiring to the truck, some of the wires will piggyback off the trailer plug wiring, some pins are for rack lights and tent power
https://mypartsuniverse.com/products/deutsch-dt-12-pin-flange-pigtail-kit-16awg-boat-wires-abyc-nmma-uscg-certified
E7FE5386-6934-4661-99EF-0B50B1ECA8B0.jpg


Much better
A33F71C2-0D0E-4004-960F-597C65284782.jpg


12 pin to the rack
DE22B7C9-0CE6-411F-BEDE-188F12F73A46.jpg


Also added a fire extinguisher using a QuickFist

$17 END OF ROAD 50050 3" Quick Fist Clamp for mounting tools & equipment 2-3/4" - 3-1/4" diameter, Black
https://www.amazon.com/dp/B007HOKW50?ref_=cm_sw_r_cp_ud_dp_E750JHEHY72518TMXP3Z

9D74EBA2-8BE9-4619-960F-87D83DACABF2.jpg
 

PapaDave

Local Expert Northern ID and North East WA
Member

Protector II

8,868
Coeur d'Alene, ID, USA
First Name
Dave
Last Name
Addington
Member #

10123

Ham/GMRS Callsign
KN6BKH
I finished wiring up my connections to run my chase bar, which has brake lights-turn signals- amber chase lights-and reverse lights. The chase bar is tapped into the trailer plug wiring on the backside of the bumper so I can still plug in a trailer.
6A408884-7358-4463-8327-FCEA45F9E2D6.jpg


The wiring diagram is conveniently located
A9F43E32-AC72-4F94-96C5-97D0878602FA.jpg
78E57D0F-4FC9-438F-BA22-420AD348D8AA.jpg


Splicing in using heat shrink connectors
52021365-B9F1-47F0-B415-6AE48F513E03.jpg


Again this wiring runs up to a 12 pin bulkhead connector