VRV Flyer Teardrop Intro and Build Thread

  • HTML tutorial

1Louder

Rank VI
Launch Member

Member II

4,187
AZ
First Name
Chris
Last Name
K
Member #

1437

Ham/GMRS Callsign
K1LDR
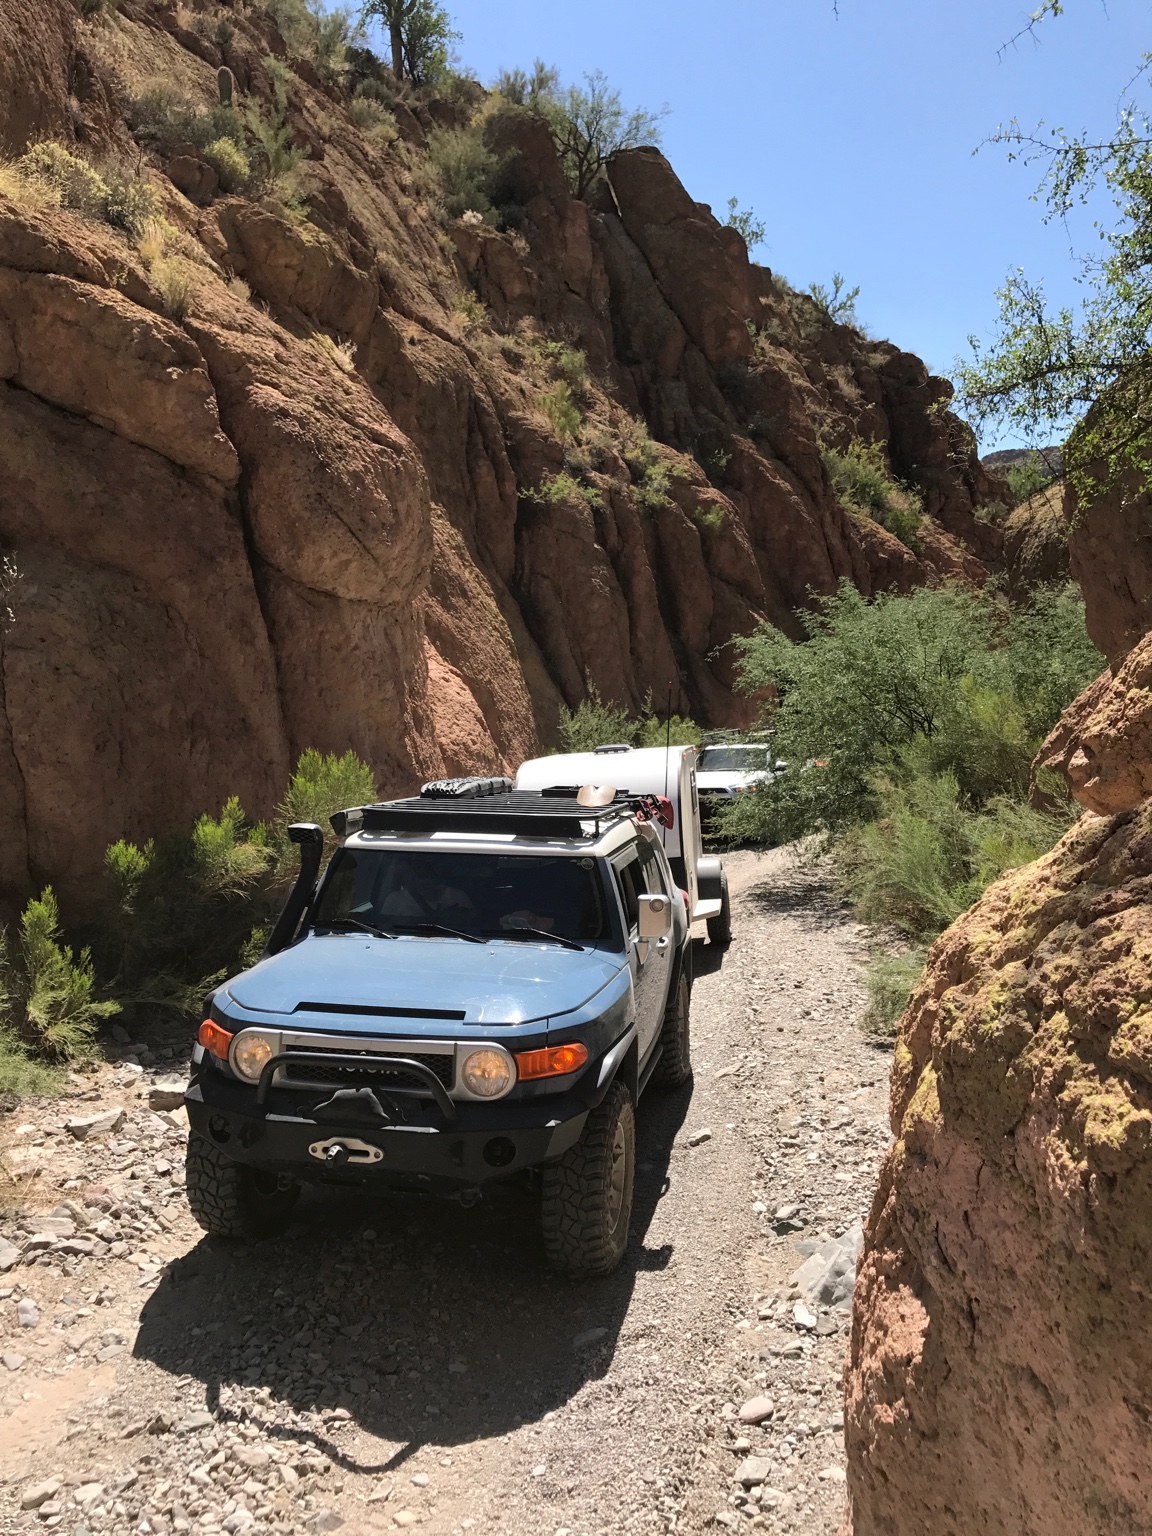
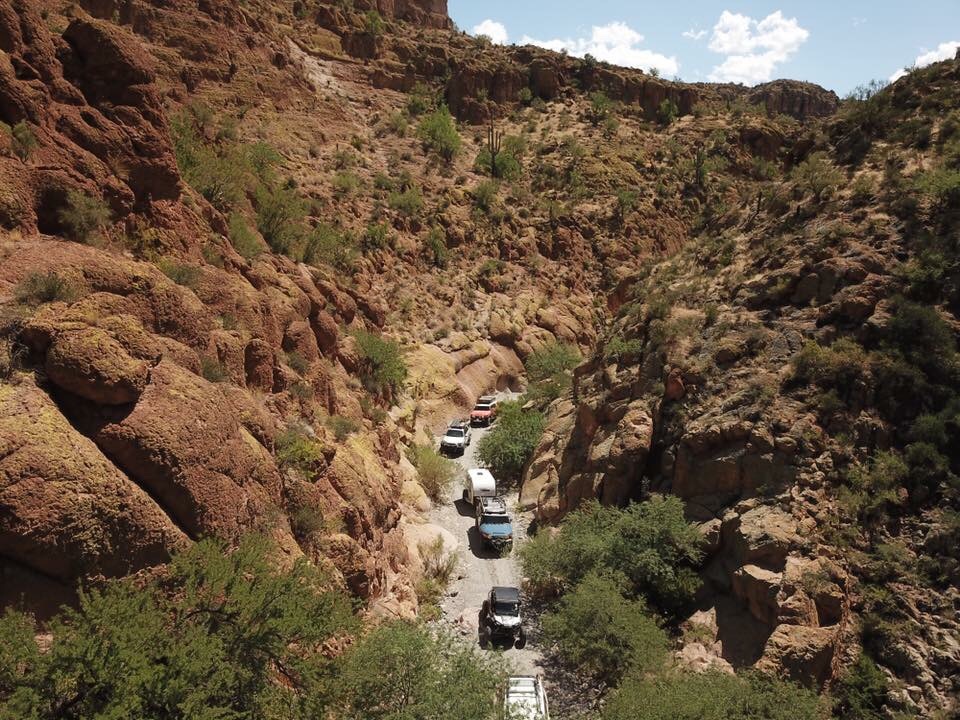
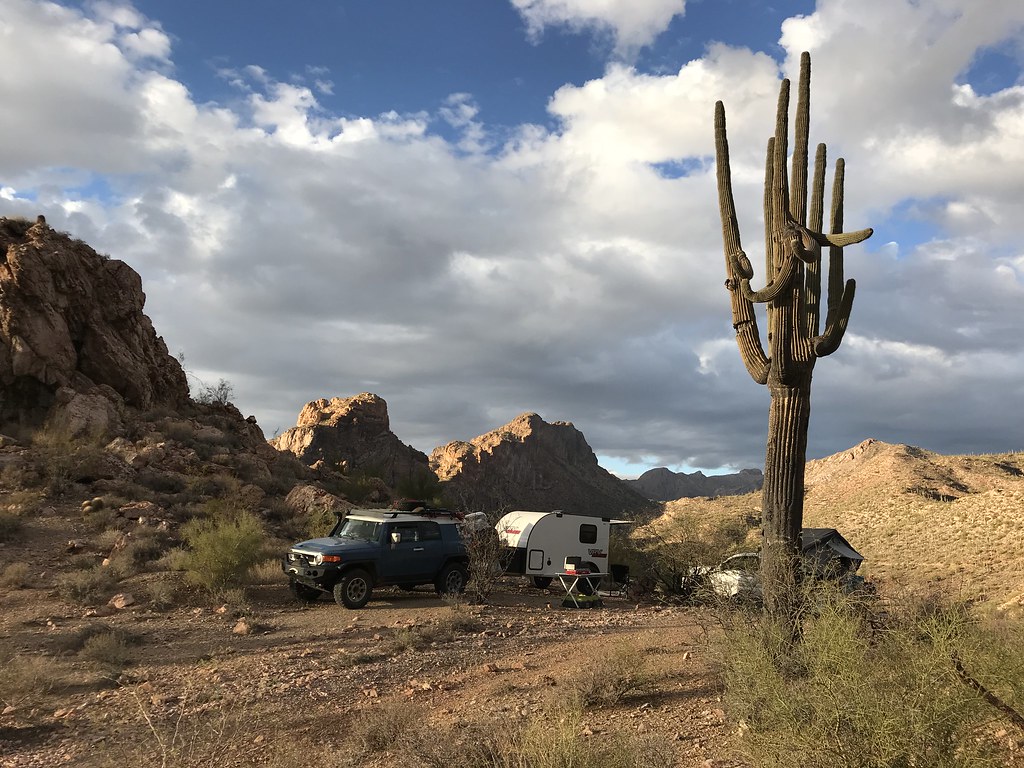
I took the plunge a little earlier than expected and we are now owners of a VRV Flyer! I met the owner in NM for delivery. The factory is in AR. My trailer was used for some photos shoots prior to delivery which was fine with me.

It's a Teardrop/Cargo hybrid. All aluminum frame, queen bed, Max air vent, torsion axle, large doors and windows. Lots of storage.

DIY opportunities abound. While vastly different than our former trailer we look forward to sleeping indoors and see how we can customize it to fit our needs.

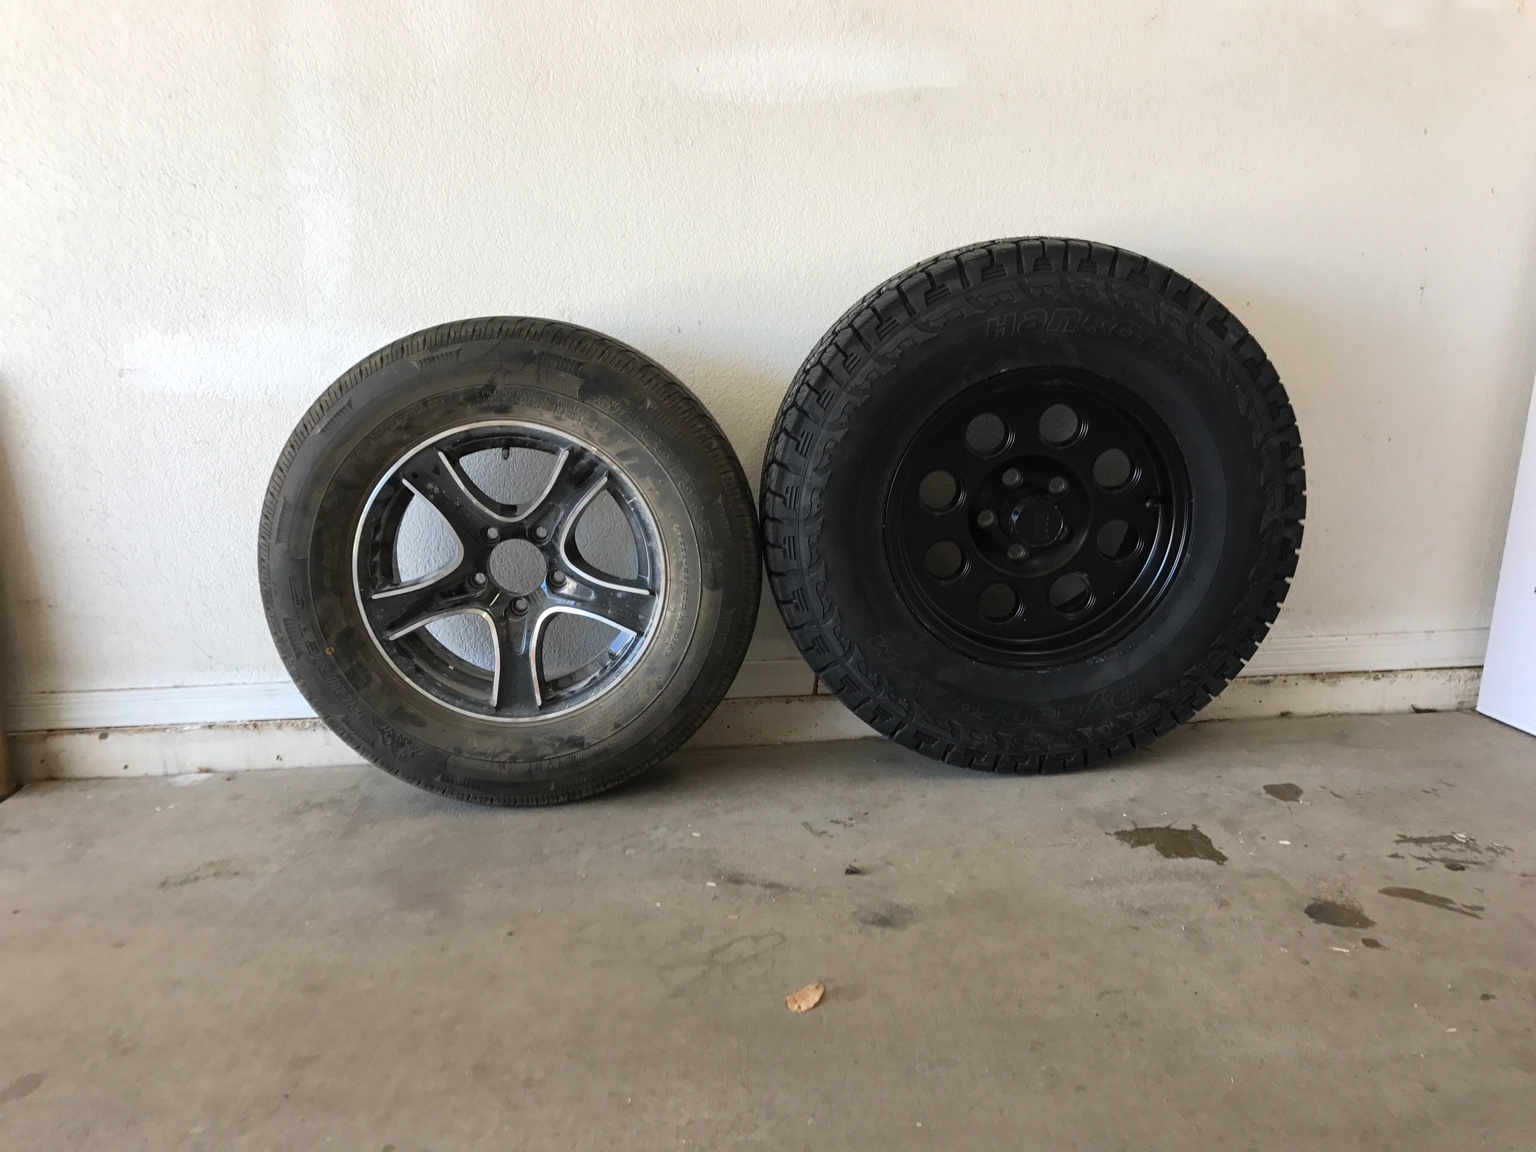
We want to add a large tongue box, lock-n-roll hitch, larger tires 29"-31" (235/75/15 fit for sure), side awning, and hopefully a slide out kitchen and water. Other possibilities a roof rack, and Propex 12v propane heater.

For more info check out: https://toyhaulersbyvrv.com/adventure-teardrops/


The obligatory gas station pic.


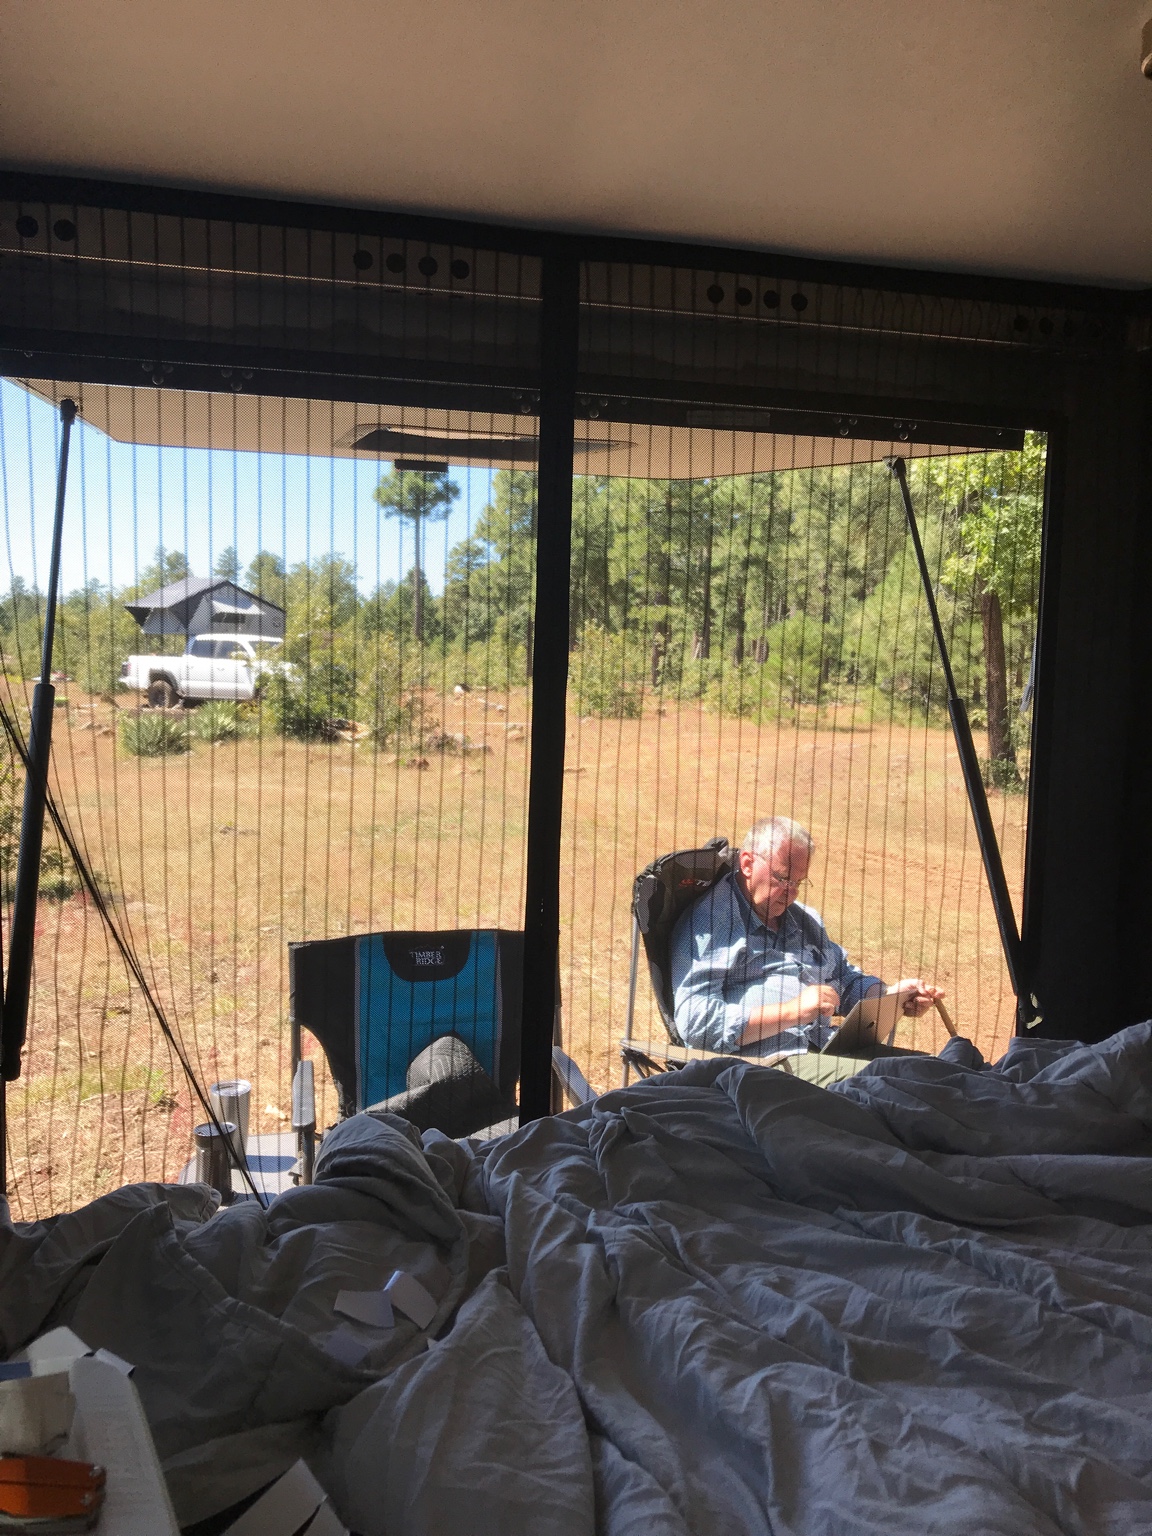
Interior view. There are 4 led lights (split 2 and 2) Backup lights serve a porch lighting and there is a porch light by the side entry. A add-on tent for the rear is available. I am going to use what I already have and modify as required. Sorry that the mattress isn't setup properly. This is a queen sized bed.


Side entry. Jeep fenders will be available soon for additional clearance. I opted for a 45 degree down torsion axle to increase ground clearance.


Flip the right side over to the left and you can setup the bed as a couch. There is a flip up table on the right. The electrical system is housed inside towards the front cabinetry underneath the bed. Trailer is solar ready with a SAE plug port. You need to have your own controller. Comes with a 75ah battery. Total interior height is 56.5". 36" from top of mattress to the ceiling. With stock tires and stock axle with roof vent only (no shore power AC unit) this should fit in standard garages. They way I am going to modify it - it won't fit. That's ok for us though because our new house has 9' doors.


Borrowed staging photo. I am research putting a slide out kitchen on the driver side. It may be stove only. Have to wait and see!


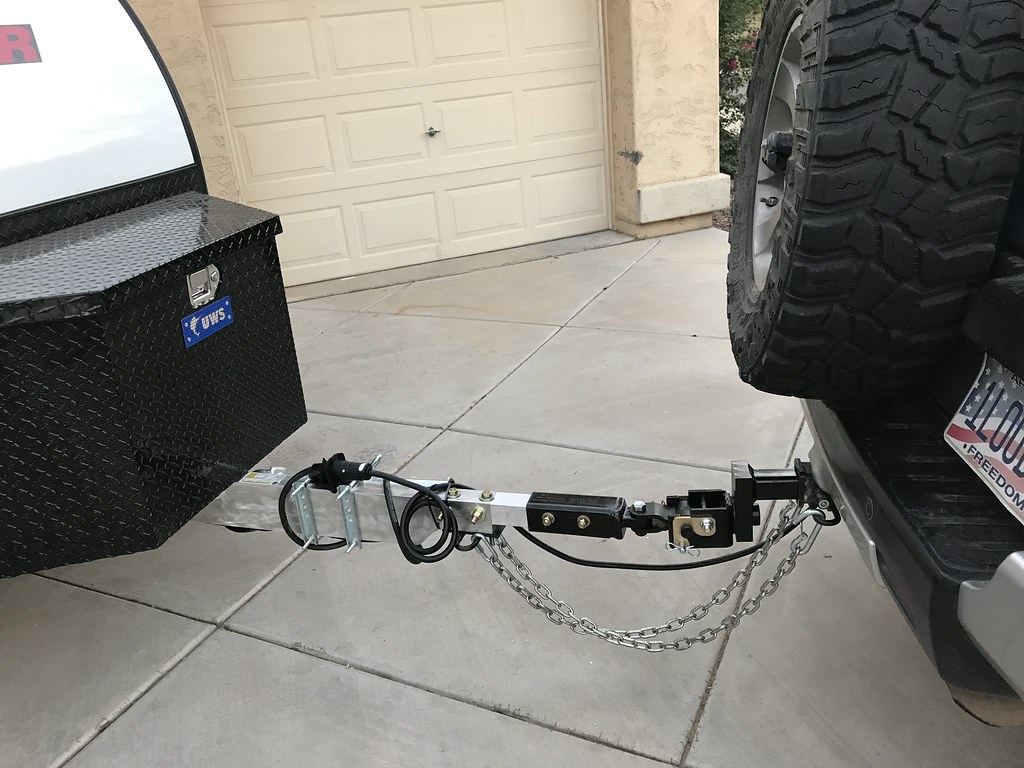
First mod - Large UWS 48" tongue box. Yet to install. I also have a lock-n-roll hitch and would like to extend the tongue length a least a foot.


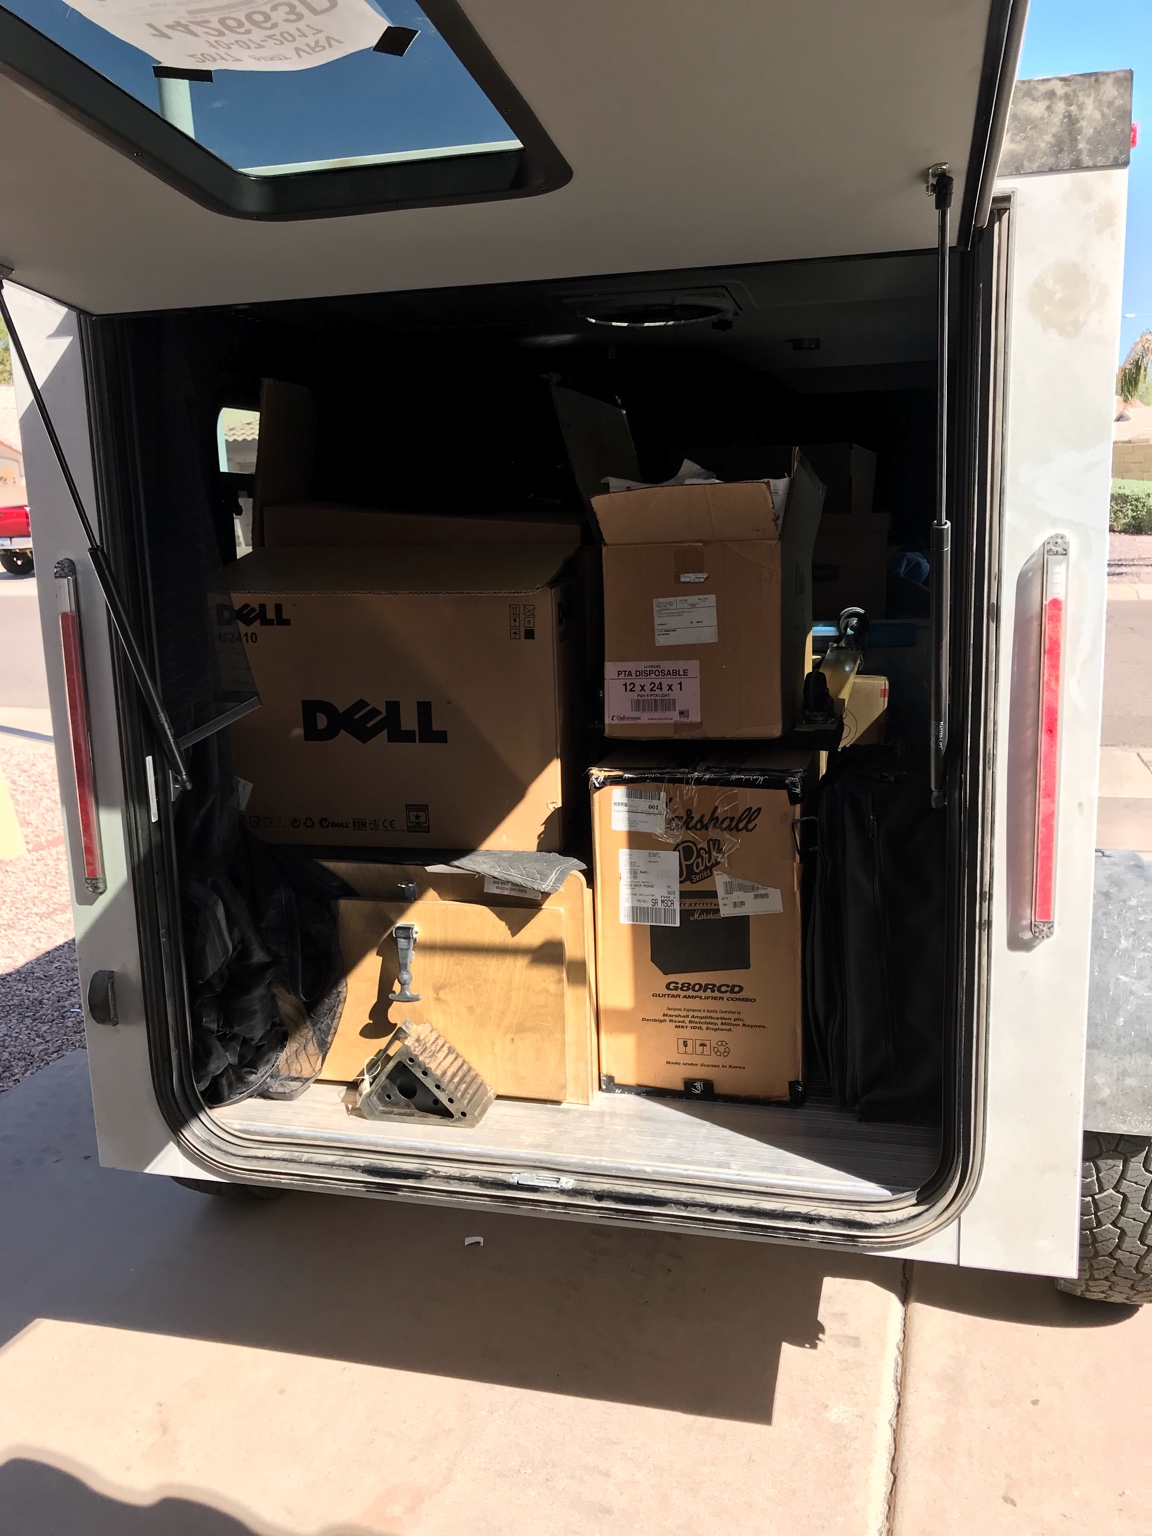
This front storage area is where I want to build a slide out table for a stove.

Better pics to come and build stories to come. First camping trip in 2 weeks.
 
Last edited:

Canoehead

Rank III
Launch Member

Off-Road Ranger I

676
Dartmouth, Nova Scotia, Canada
First Name
Duncan
Last Name
Neish
Member #

17584

Ham/GMRS Callsign
VE1NEI
I really like this trailer, very simple and flexible. Looking forward to seeing your modifications as you personalize it, and hoping to build something similar myself one day.
 

1Louder

Rank VI
Launch Member

Member II

4,187
AZ
First Name
Chris
Last Name
K
Member #

1437

Ham/GMRS Callsign
K1LDR
First modifications:

48" trailer tongue box. While this trailer has tons of storage I wanted a place for misc gear.


I'll post some better pics tomorrow.

Also swapped the rims and tires. Factory are 15x5 with 27" tires. Now I have. 15x6 rims with 30" all terrains. Much better. I am going to swap out current fenders with Jeep fenders. The fenders will also now be an option from the factory.


Before and after


Hopefully tomorrow I will get the Lock-n-roll hitch installed along with a slight tongue extension so my FJ door can clear the tongue box.

This trailer is great and I look forward to future changes to the main design for future owners. I have provided a lot of feedback and ideas to taylor some aspects of the trailers to the overland/off-road world and VRV has been very receptive.


Sent from my iPhone expect typos, grammatical errors, and any other invalid excuse.
 
  • Like
Reactions: Beee and Jimmy P

1Louder

Rank VI
Launch Member

Member II

4,187
AZ
First Name
Chris
Last Name
K
Member #

1437

Ham/GMRS Callsign
K1LDR
A busy 24 hours. My buddy came up with a good solution to extending the tongue bar so I could get better clearance with my back door and to add the Lock-N-Roll hitch. I got the parts today and we (Ed) helped put everything together. Buh Bye Ball Hitch and hello Lock-N-Roll. Only thing is I want to get the straight bar version vs drop down. The 30" tires don't sit tall enough to require anything but the straight hitch.

Next mod will likely be to add my straight awning but I really need to just go camping and stare at the trailer for a bit.


Before


After


When I get time I need to install a longer 7 pin connector. I have a temporary extension installed for now.


Hmm maybe this will be the next mod. I need to decide if I am going to do any kind of a roof rack first though.
 
  • Like
Reactions: W4P and Jimmy P

1Louder

Rank VI
Launch Member

Member II

4,187
AZ
First Name
Chris
Last Name
K
Member #

1437

Ham/GMRS Callsign
K1LDR
Took the trailer on a group run to test things out. It did quite well. Adding the larger tires and lock-n-roll hitch.

For those there are familiar we went on the Box Canyon trail near Florence, AZ. The trail is a bit rougher than the last time I took it. More exposed rocks and some deeper washouts.

Good times.

I want to add some skid plates for corner protection and maybe under the side steps.

Sadly I don't have any good shots from when a spotter was required. My friends were busy taking care of me vs taking photos.

I will be taking my first camping trip this weekend.

Next projects:
- Mount our 11lb propane tank

- Mount 2 Wavian 5 gallon water jerry cans
(These might go into the tongue box)

- Mount a straight awning. I would like this to be removable

- Design and build a rear roof rack to store spare tire and misc gear.

- Design side kitchen and build. Decide if I want to add a 16 gallon water tank, pump and plumbing


Sent from my iPhone expect typos, grammatical errors, and any other invalid excuse.


Photo by www.BournAdventure.com

In the wild

 
Last edited:

1Louder

Rank VI
Launch Member

Member II

4,187
AZ
First Name
Chris
Last Name
K
Member #

1437

Ham/GMRS Callsign
K1LDR
Today’s in camp DIY project was to add the solar controller. Easy mod and now the trailer has solar.


Sent from my iPhone expect typos, grammatical errors, and any other invalid excuse.
 

Boort

Rank V
Launch Member

Member III

2,779
Colorado
Member #

9314

@1Louder

Can you point me to more info about your solar solution? I'm thinking of adding solar to my Chalet A-frame popup and not really sure where to start.

Boort
 

1Louder

Rank VI
Launch Member

Member II

4,187
AZ
First Name
Chris
Last Name
K
Member #

1437

Ham/GMRS Callsign
K1LDR
@1Louder

Can you point me to more info about your solar solution? I'm thinking of adding solar to my Chalet A-frame popup and not really sure where to start.

Boort
Search for other threads that might have additional answers but here’s my take....

You have to decide if you want a portable or permanent solution. Since I do trips with and without my trailer I opted for portable.

In either case you need a panel(s) a solar controller and then method to connect to your battery(s). On my portable setup I use SAE plugs. This is also what was installed on the side of my VRV. In a permanent setup you would wire direct to the battery.

The pro to a portable solution is I can have my trailer in the shade and the panels out in the sun. Pros to permanent mount is no matter where you park you’ll get at least some charging.

With regards to what size in Watts it depends on the amp draw of all of your devices, how quickly you want to charge up your battery(s), and what part of the country you are in (sun conditions) 100-150 Watts is a good starting point. My 100 watt setup can keep 3 AGM Batteries happy in a matter of a couple of hours.

Hope that helps..:
 
  • Like
Reactions: Boort

1Louder

Rank VI
Launch Member

Member II

4,187
AZ
First Name
Chris
Last Name
K
Member #

1437

Ham/GMRS Callsign
K1LDR
Another day and another DIY mod.

While not required on this trip, it’s 60 degrees out, I wanted to add a screen to the back door opening.

I ordered a magnetic screen door from Amazon and installed it. While it is wider and taller than my opening it’s a good start. I plan on trimming it down and then taping the seams.

I have seen custom sized ones available for around $60. This was a $28 solution.

Anyway, happy with this setup for now. A design like this could always be used for side doors as well.


Sorry the sheets don’t match and the bed isn’t made. :)


Sent from my iPhone expect typos, grammatical errors, and any other invalid excuse.
 

Boort

Rank V
Launch Member

Member III

2,779
Colorado
Member #

9314

In either case you need a panel(s) a solar controller and then method to connect to your battery(s). On my portable setup I use SAE plugs. This is also what was installed on the side of my VRV. In a permanent setup you would wire direct to the battery.

The pro to a portable solution is I can have my trailer in the shade and the panels out in the sun. Pros to permanent mount is no matter where you park you’ll get at least some charging.

With regards to what size in Watts it depends on the amp draw of all of your devices, how quickly you want to charge up your battery(s), and what part of the country you are in (sun conditions) 100-150 Watts is a good starting point. My 100 watt setup can keep 3 AGM Batteries happy in a matter of a couple of hours.
@1Louder

Thanks for the reply. I'm mostly wanting it to keep the batts charged while in storage. I was thinking of a portable setup for the same reason, Prefer to keep the trailer cool in the shade while charging the batts. and this will let me cover the trailer at the storage lot and keep the batts charged when not in use.

As I understand your post the setup in your trailer looks something like this:

(+)---Controller-\ |OOOOOOOOOOOO|
/ \___>====SAE Plug# #SAEPlug====| 100w Panel |
(-)--/ |OOOOOOOOOOOO|


Is that correct?
Do you need any fuses in line?
Looks like your GoPower controller requires an interior mount?
What panel did you use?

Boort
 
Last edited:

1Louder

Rank VI
Launch Member

Member II

4,187
AZ
First Name
Chris
Last Name
K
Member #

1437

Ham/GMRS Callsign
K1LDR
Renogy 100 Watt Solar Suitcase. You can get that with or without a controller. They are the most budget friendly.

Not sure how to read your diagram.

Panel
Then controller
Then battery
 
  • Like
Reactions: Boort

Boort

Rank V
Launch Member

Member III

2,779
Colorado
Member #

9314

@1Louder
Renogy 100 Watt Solar Suitcase. You can get that with or without a controller. They are the most budget friendly.
Not sure how to read your diagram.
Panel
Then controller
Then battery
Thanks! I can see why you can't makes heads or tails of the diagram. The forum appears to have mangled it by removing the spaces. :(

Boort
 

1Louder

Rank VI
Launch Member

Member II

4,187
AZ
First Name
Chris
Last Name
K
Member #

1437

Ham/GMRS Callsign
K1LDR
Just a quick report of the first weekend of camping with the trailer.

It was great! While I miss the water and kitchen setup in my old Turtleback and DIY trailer it was nice to be able to sleep indoors on the windy and cold nights. EVERYTHING is a trade-off. I am having fun modifying the trailer and working with the manufacturer on new build ideas for overlanders. As with many of the RTT's the mattress is either too firm or to soft for lots of folks. For me this one is too firm. I will work on either replacing it or adding a layer on top.

Still trying to decide if I want to attempt a slide out kitchen or go with a Chuckbox from Trail Kitchens which could easily be moved from trailer to truck since I do a lot of different types of trips.

With the addition of the tongue box this trailer has a ton of storage. An OZTent RV-5 can fit inside under the bed. I removed the upper cabinet door and like have both upper spaces open.

When it cools off I take a combo pick of all the stuff that can fit.

With a little effort and spotting you can camp in a nice spot like this!


Here's a little drive by video: https://flic.kr/p/Ys6Edu
 
Last edited:

1Louder

Rank VI
Launch Member

Member II

4,187
AZ
First Name
Chris
Last Name
K
Member #

1437

Ham/GMRS Callsign
K1LDR
While I absolutely loathe moving. Especially having to do it 3 times in 3 months because our new house isn’t ready. Our VRV Flyer makes a great cargo hauler.


It will be back on the trail in 2 weekends. Yay!


Sent from my iPhone expect typos, grammatical errors, and any other invalid excuse.
 
  • Like
Reactions: T-88 and Jimmy P

1Louder

Rank VI
Launch Member

Member II

4,187
AZ
First Name
Chris
Last Name
K
Member #

1437

Ham/GMRS Callsign
K1LDR
Finally getting back to camping! Took a 2 day trip around the Gila River area. Entered from Superior via Battle Axe Rd and then down Walnut Canyon. Camped near the river and then crossed the next day. Sadly I don't have photos of the technical sections because there were only 2 of us and we needed to be focused on driving and spotting. Maybe next time. Trailer still performs great in difficult sections.

Also, VRV just released a "offroad" version of the Eco Flyer. This trailer is 11" shorter than the Flyer (What I own). It has double entry doors and front storage area for improved access, "Jeep" fenders, larger tires, and maybe a few other changes. I am including one photo of that model.

I am going to add a 16 gallon water tank and possibly a 53" ARB storage drawer to the trailer along with a few other mods. I want to make sure any changes I make do not impact the tongue weight. I also have to figure out what type of faucet/sink combo I want.

More updates hopefully soon!


New Eco Flyer
 

1Louder

Rank VI
Launch Member

Member II

4,187
AZ
First Name
Chris
Last Name
K
Member #

1437

Ham/GMRS Callsign
K1LDR
Today’s in progress modification. I am moving my straight awning from my FJ to my trailer. I have an OZ Tent RV-5 which can work well as a tent and awning for the FJ on trips I don’t take the trailer.

Anyway, I just need to get some 3M VHB tape to use in conjunction with some self tapping screws and this install will be complete.

I also have the add-a-room tent from ARB for this awning.


I’m going to have to move the awning forward for the door to work but that’s why you test stuff out!

Next project is still the onboard water system. I think I have a final draft of my design which will include an external water heater, water pump, quick connect hose/faucet for outside of the trailer and a 16 gallon water tank.
 
Last edited:

phxdsrtrat

Rank V
Launch Member

Member III

2,362
Glendale, AZ
First Name
Curtiss
Last Name
S
Member #

8501

Looking good. We're going to have to figure out a meet up since I'm in AZ too.

-Curtiss
 

1Louder

Rank VI
Launch Member

Member II

4,187
AZ
First Name
Chris
Last Name
K
Member #

1437

Ham/GMRS Callsign
K1LDR
Looking good. We're going to have to figure out a meet up since I'm in AZ too.

-Curtiss
I run a group called AZ Overlanders on Meetup.com the next gathering will probably be a show and tell parking lot event. I will post something on OB when the date gets booked.

What type of Teardrop do you have?
 

JDGreens

Rank VI
Launch Member

Member III

3,316
Englewood Co.
Member #

8112

Very nice FJ and trailer, looks like you get to us it a lot! I look forward to getting mine on the road maybe this year I'll finally get there?
 
  • Like
Reactions: 1Louder

phxdsrtrat

Rank V
Launch Member

Member III

2,362
Glendale, AZ
First Name
Curtiss
Last Name
S
Member #

8501

I run a group called AZ Overlanders on Meetup.com the next gathering will probably be a show and tell parking lot event. I will post something on OB when the date gets booked.

What type of Teardrop do you have?
It's an Oregon Trail'r Terradrop. I have, and continue to modify it but it was a great base to start from.

-Curtiss