Rebuilding my " Carry-On" TSC Trailer

  • HTML tutorial

MOAK

Rank V
Launch Member

Off-Road Ranger I

2,865
Wernersville Public Library, North Reber Street, Wernersville, PA, USA
First Name
Donald
Last Name
Diehl
Member #

0745

Ham/GMRS Callsign
WRPN 506
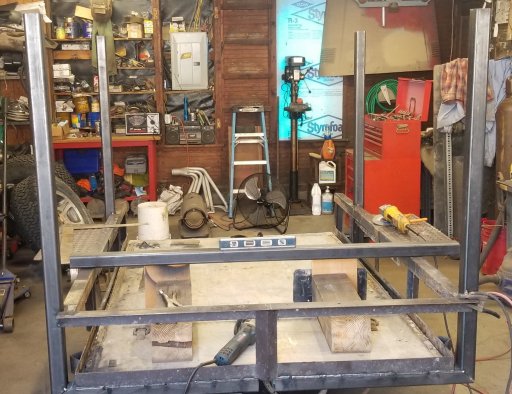
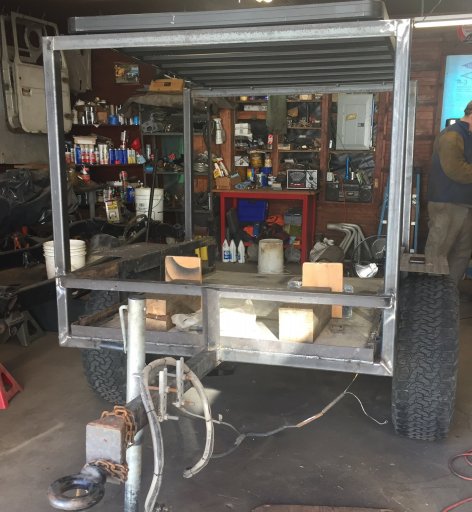
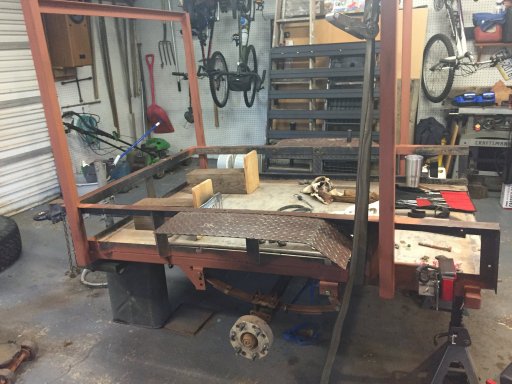
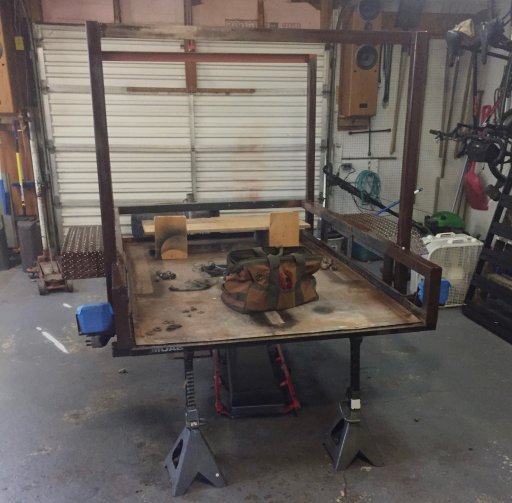
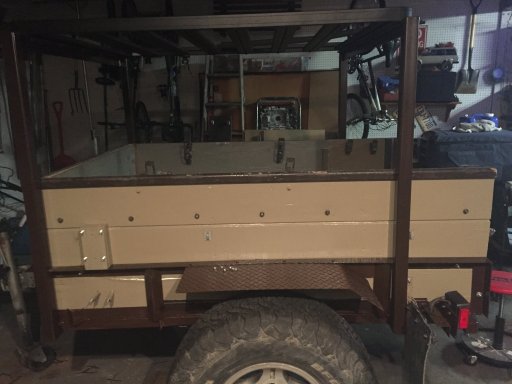
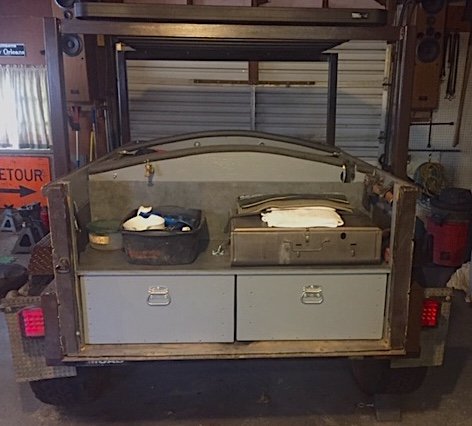
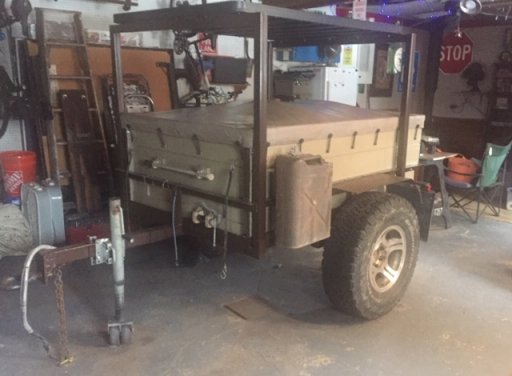
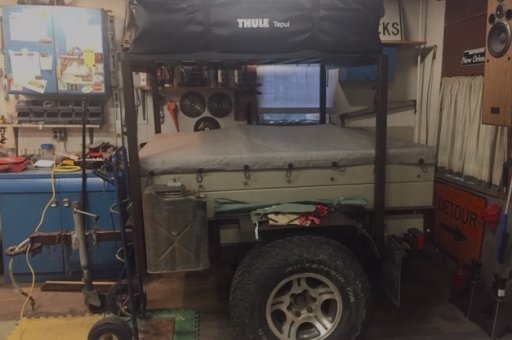
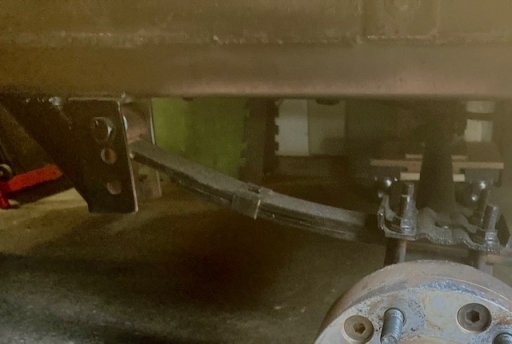
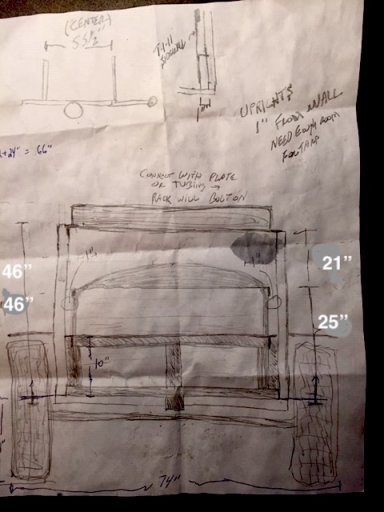
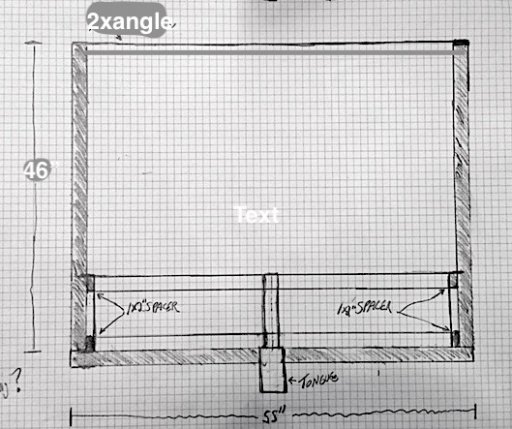
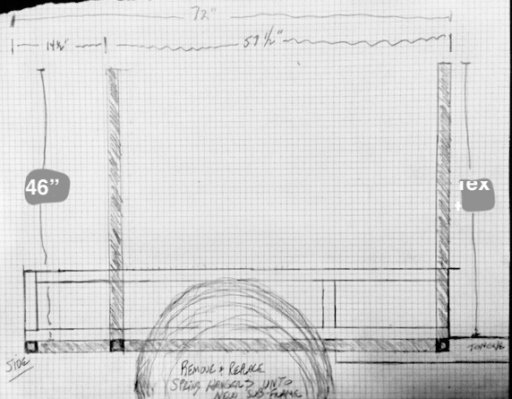
One thing for sure, our 15 year old Carry On trailer was due for a rebuild. I've always known that these trailers were designed for very light duty and I'm surprised than the frame on mine, ( puny little thin walled 2x2 angle) didn't crack or bend years ago. The axle and springs were upgraded many years ago so it's all good there. Now that we are putting an RTT atop it I knew it was time for a major rebuild. As luck would have it, a fellow in our club is a welder/fabricator. He specializes in food grade stainless, ( think micro breweries/dairy business) and did a really great job on our trailer. Once back together and on the road I won't be too concerned any longer about 100s of miles of washboard road or slow crawling technical terrain. It all began with an idea and a rough drawing
IMG_4752.jpgthen
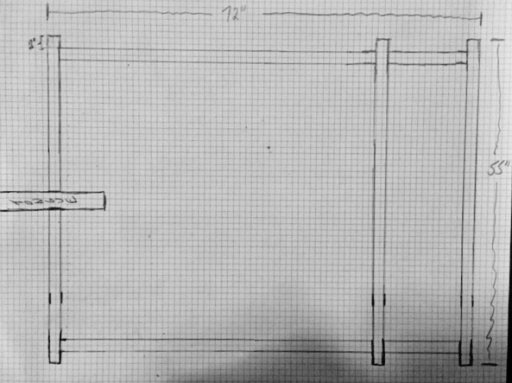
I drew some scale drawings. My buddy Brian was very appreciative of these drawings as there was no guesswork on his part.
IMG_4763.jpgIMG_4774.jpgIMG_4775.jpg
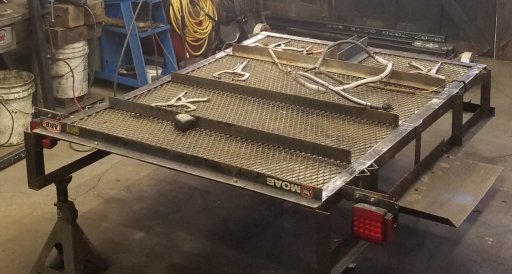
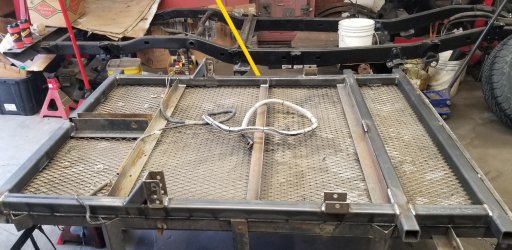
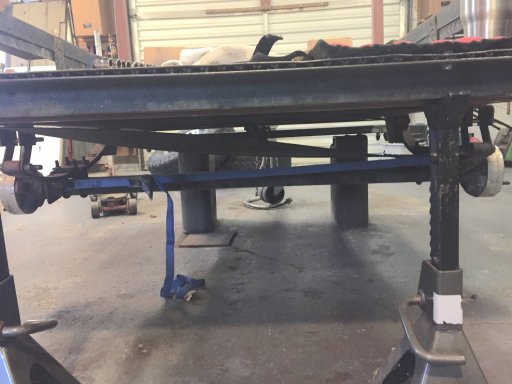
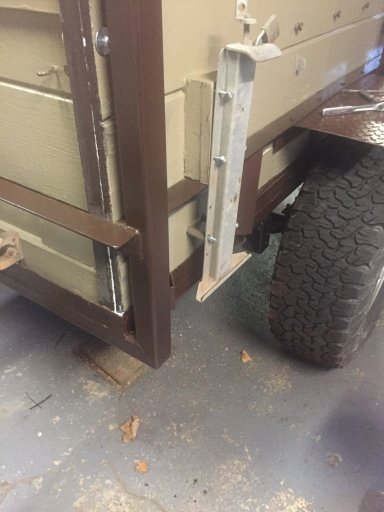
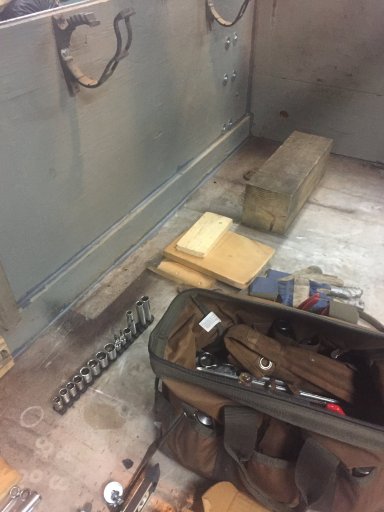
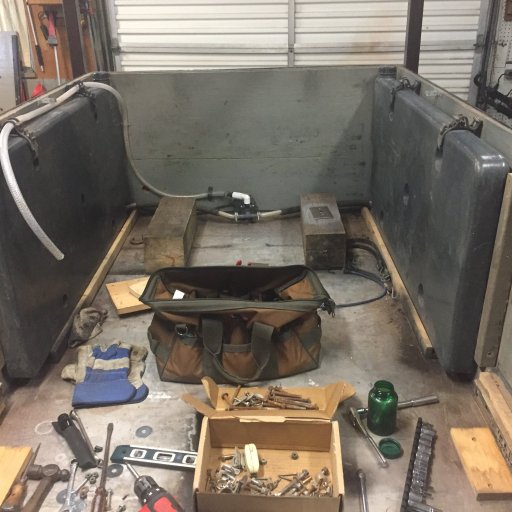
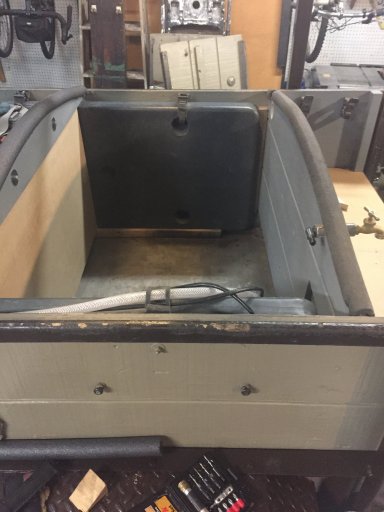
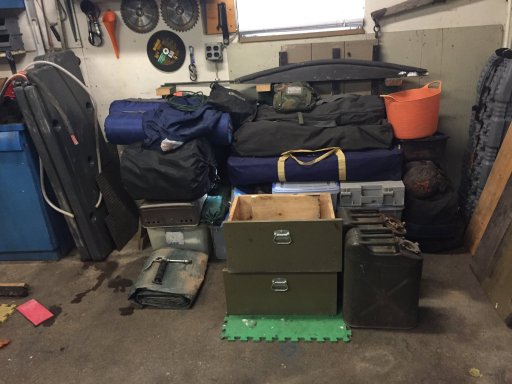
a date was set and I emptied everything out and dis-assembled everything down to the raw frame. If one looks closely the bend in the frame can be seen.
IMG_4746.jpg
IMG_4748.jpg
 
  • Like
Reactions: Downs

smritte

Rank V
Launch Member

Member III

2,827
Ontario California
First Name
Scott
Last Name
SMR
Member #

8846

Ham/GMRS Callsign
KO6BI
If your going to add in shocks, early king pin lowered VW. I have a set of Monroe gas shocks on both of mine. Eye's on both ends and the length is good.
 
  • Like
Reactions: MOAK

MOAK

Rank V
Launch Member

Off-Road Ranger I

2,865
Wernersville Public Library, North Reber Street, Wernersville, PA, USA
First Name
Donald
Last Name
Diehl
Member #

0745

Ham/GMRS Callsign
WRPN 506
If your going to add in shocks, early king pin lowered VW. I have a set of Monroe gas shocks on both of mine. Eye's on both ends and the length is good.
Shocks may be later, we’ll see after this next trip in April.. I remember running a pair of Monroe airshocks on my lowered VW bug a long time ago. So I was leaning toward old VW shocks. This trailer never bounced around much, as the tires at 20lbs became the shocks. but with the tent up top and the added 250lbs in tent, rack, and new framing, shocks may be in order.
 

smritte

Rank V
Launch Member

Member III

2,827
Ontario California
First Name
Scott
Last Name
SMR
Member #

8846

Ham/GMRS Callsign
KO6BI
I did some comparisons with and without on my M-100. You really saw the difference over 25 mph on dirt roads. On one of my trips, I somehow lost a shock bolt. The guy behind me said the passenger side of the trailer was bouncing and the driver side wasn't. We were crossing a dry lake at about 40 mph. In the dirt I normally run about 10-15 psi on my trailer tires just to give my fridge that extra bit of cush.
I figured if your building the frame, now is the time to add in shock tabs.
 
  • Like
Reactions: MOAK

MOAK

Rank V
Launch Member

Off-Road Ranger I

2,865
Wernersville Public Library, North Reber Street, Wernersville, PA, USA
First Name
Donald
Last Name
Diehl
Member #

0745

Ham/GMRS Callsign
WRPN 506
The first thing Brian did was remove the axle, springs and bolt on tongue. Then flip the trailer over and level it up. The spring hangers removed, cuts were made, and the fun begins with the addition of the new sub-frame, and replacing the hangers.
IMG_4815.jpgIMG_4832.jpg
once it was flipped back over 45 cuts were made and the uprights fitted and welded into place along with the 2x angle. Five holes in each end were drilled to bolt the rack onto the trailer. We bolted up and checked the tongue for level, then welded the tongue in place. We got the spring and axles bolted up well enough for me to get it home.
IMG_4856.jpgIMG_4860.jpg
 
  • Like
Reactions: Downs

MOAK

Rank V
Launch Member

Off-Road Ranger I

2,865
Wernersville Public Library, North Reber Street, Wernersville, PA, USA
First Name
Donald
Last Name
Diehl
Member #

0745

Ham/GMRS Callsign
WRPN 506
Sorry if I missed it, but what wall thickness did you use for the uprights supporting the rack?
.1875 (7 gauge) was used everywhere. We considered thinner wall for about 30 seconds. I must get back to this build, been really busy..
 
Last edited:

MOAK

Rank V
Launch Member

Off-Road Ranger I

2,865
Wernersville Public Library, North Reber Street, Wernersville, PA, USA
First Name
Donald
Last Name
Diehl
Member #

0745

Ham/GMRS Callsign
WRPN 506
Four bolts on each side hold the trailer box walls onto the frame of the trailer. The walls are so snug in the corners that the gentle persuasion of a good leather hammer beats them into place before bolting everything up. I use clear caulking at all the exterior corners and dark grey caulking on the interior. The box panels are marine grade T-1-11 and have been doing a great job for 11 years. Not one bit of rot. So, I repainted them to match the body color of our Landcruiser before putting it all back together. The pair of 6x6 blocks are lag bolted to the frame rails. They provide a deck for our day and back packs to ride on, and beneath that deck is the water pump and related plumbing. The water tanks are fastened to the sides with fistgrips and they sit in a rubber cushioned wooden rail that is bolted to the floor. IMG_4882.jpgIMG_4886.jpgIMG_4885.jpgIMG_4894.jpg
 

MOAK

Rank V
Launch Member

Off-Road Ranger I

2,865
Wernersville Public Library, North Reber Street, Wernersville, PA, USA
First Name
Donald
Last Name
Diehl
Member #

0745

Ham/GMRS Callsign
WRPN 506
Finishing up the interior. Install flooring above the water pump, add dividers, install our kitchen and drawers. It all went back together surprisingly easy. Once the interior was finished I installed the rack. I like using the rack for two reasons, it matches the rack on our Landcruiser, so its high on the cool factor, but more importantly it enables me to finely tune my tongue weight. Moving the tent just a couple of inches fore or aft can make a big difference. I did take the time to refinish our kitchen with new tile countertop and back splash. The tailgate slides up and out and used as a side board A big supermagnet holds it in place stop the flat fender and an adjustable leg is affixed to the outboard end. I think we are now good to go for another 10 years before another rebuild. IMG_4903.jpgIMG_4907.jpgIMG_4919.JPGIMG_4923.jpgIMG_4941.JPG
 
Last edited:

MOAK

Rank V
Launch Member

Off-Road Ranger I

2,865
Wernersville Public Library, North Reber Street, Wernersville, PA, USA
First Name
Donald
Last Name
Diehl
Member #

0745

Ham/GMRS Callsign
WRPN 506
I’m not sure what you’re asking, the rack is 62” x 46” , centered upon uprights that are 57” apart, front to rear. 57” accommodates the slotted rack, centered upon them. The tent is 48”x56” the one inch overhand allows for the annex to be fitted.
 

Gr8 Hortoni

Rank II

Enthusiast III

473
Whitehall, Michigan, USA
First Name
Michael
Last Name
Horton
You answered it all. Lol. I was looking at the spread forum front to back, distance between the mounting bars. I’m planning on building one similar and wasn’t sure if being spread out that far still worked for mounting the tent. Thank you!
 

MOAK

Rank V
Launch Member

Off-Road Ranger I

2,865
Wernersville Public Library, North Reber Street, Wernersville, PA, USA
First Name
Donald
Last Name
Diehl
Member #

0745

Ham/GMRS Callsign
WRPN 506
Yes, if you’re not using a rack, 57” is way too long to fit a 3 man tent. My son in law did his trailer in much the same way, except, no rack. His uprights are just in front of and just behind his fenders. We wanted easy access to the stowage areas and the ability to dial in our tongue weight. Have fun building yours.
 

Purpony

Rank I
Member

Member I

233
CT
First Name
Marc
Last Name
C
Member #

27180

cool build. Im working on one of these trailers right now. About to put a custom width 3500 lb axle under it and a set of 32" tires.

What where your running for springs and tire size on your original setup? Did you run lift blocks? I flipped my original axle for a spring under just for mockup and with the 32" tires they sit right at the top rail. Ive been trying to figure out how im going to buld the fenders. I see your fenders attached to the top rail with what looks like plenty of clearance, why i ask if you where running lift blocks?

Your new setup looks much more rugged now!!!!!!!!!!
 

MOAK

Rank V
Launch Member

Off-Road Ranger I

2,865
Wernersville Public Library, North Reber Street, Wernersville, PA, USA
First Name
Donald
Last Name
Diehl
Member #

0745

Ham/GMRS Callsign
WRPN 506
I was using the same size tires on the original build. (285/75/16) I may go to a larger diameter tire in the future, (255/85/16) but thats all the larger I'll ever go. I've never cared for the idea of lift blocks, they are just one more thing taking any build away from the KISS methodology. The springs are 2 leaf double eye, 25.25" long x 1.75" wide with a 1250 lb rating with the stock length shackles that come with the springs. I haven't scaled it out yet, but I've done my math. The original build weighed 1,000 lbs, fully loaded with all the gear, gasoline and water. This new build has added roughly 375 lbs. However, we no longer pack in all the old tent accessories, cots, etc, reducing the cartage weight by about 50 lbs. We also aren't loading a 65 lb tent upon the roof rack of our Landcruiser. Nonetheless this improvement has added only about 300 lbs of weight so the combined spring rating of 2500 lbs will be well within their tolerance. Here is a photo of how we lifted the suspension. ( spring over combined with the tall hangers in the front ) Currently we are using the top hole, so there is plenty of room for those 255s if I ever decide to go back to skinny tires. IMG_0010.jpg