

DISCLAIMER: I originally posted this on TacomaWorld.com. Due to OB's 20 image limit on a post, I've had to link some of the build pictures to that post as I feel that the remission of these pictures takes away from the clarity of the build process.
So after riding in my buddies '16 DCSB OR with the Technology Package, I became a little jealous of some of the bells and whistles that are not on my '15 DCSB OR Base. In particular was the Qi Charger. So, I decided to make my own and I was encouraged to share it with you guys.
DISCLAIMER - This is for a 2015 Manual Transmission. I can not vouch that this will work for Auto Transmissions because I haven't examined the dash in those.
What you will need:
1 - CHOETECH Three Coil USB Micro Qi Charger
1 - 12VDC to 5VDC Regulator
3" - Heat Shrink Tubing (0.63" ID Before, 0.16" ID After)
Assorted smaller ID heat shrink for the wires
Soldering Iron
Solder
Sand Paper or Acetone
Dremel or exacto knife
VHB. I used 3M 4929. It's 25 MILs thick and it's made for automotive applications. I highly recommend using this because its thin and strong.
Obligatory Finished Product Pic first:
https://www.tacomaworld.com/attachments/20170521_185904-jpg.1532650/
This is a picture that I actually took to show off my button routing/addition that I did. However, you can see the little cubbie hole below the buttons. This is where I set my phone now and it automatically charges. (I couldn't take a picture of my phone charging, because I use my phone to take pictures.)
What to start with:
https://www.tacomaworld.com/attachments/20170501_064008-jpg.1532657/
I bought both of these off Amazon. Each are about $20.
The Qi charger is a simple CHOETECH Three Coil USB Micro Qi Charger.
https://www.amazon.com/Choetech-T51...ords=CHOETECH+Three+Coil+USB+Micro+Qi+Charger
The little PCB is a 12VDC to 5VDC Regulator.
(OB doesn't seem to like this link but HERE is where it's supposed to go)
The Build:
First, you need to take apart the Qi Charger.

You can see the three coils here. The reason that I chose this particular Qi charger was because if it sits in the center of the cubbie, one of the three coils will charge my phone no matter where my phone is placed.
If you flip the Qi PCB over, you will notice two conveniently placed through-holes for the DC Voltage In.

Here I just soldered on two strands of 18 AWG stranded. 18 AWG is a bit much, but it fit in the holes nicely and its what I had laying around.

Here's a shot from the Flip side.

Next, I had to do some enclosure modifications.
First I had to route out some of the enclosure so that my new wires could get out.

Next, I had to remove the matte finish off of the top side of the enclosure. I found out, through trial and error, that the VHB that I wanted to use didn't adhere to that stuff. I didn't want to sand it at first, so I tried to remove it with acetone. This works, but it's a PITA. In hind site, I should have just carefully sanded it off.

Now, put the Qi Charger back together.


Now the Regulator.
Here is the Wiring Diagram that I pulled from Murata's site:
https://www.tacomaworld.com/attachments/20170501_064508-jpg.1532696/
Easy enough with a little solder:

It's hard to see here, but there are actually two BLACK wires soldered to the middle pin. These are my Ground from the Qi Charger, and my Ground that will attach to the truck.
NOTE: Be sure to add shrink tubing to the wires before soldering them onto the PCB.
Assembled (note the presence of the matte finish in this picture. Like I said, trial and error)
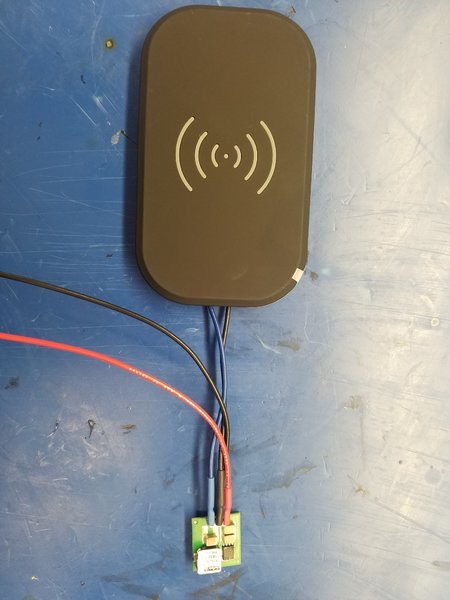
Next I enclosed the entire PCB in heat shrink and adhered it to the back of the Qi case. Again, be sure to sand off the matte finish for the VHB to adhere properly.

A quick check on the power supply to verify functionality and current draw:

Here is, approximately, the max distance that the Qi will reach and still charge. Definitely , more than enough.

NOTE - I completely forgot to document two steps. First, the grey rubber double WiFi looking symbol will either need to be trimmed flush with the top cover or removed completely. Second, the entire top surface will need to be covered with the VHB. (Which you can kinda see in the picture above)
The Install:
Now I'm not going to go through the minutia of disassembling the center console. This is because, at least in the 2015's, it's a PITA! To get to the bottom row of buttons on the center console (where the 12V cigarette lighter/chargers are) is like the center doll of a Russian Nesting Doll. I had to take the entire Dash apart and remove the center console armrest/storage box.
Anywho, I removed the shifting nob and pulled that whole piece out.
https://www.tacomaworld.com/attachments/20170521_140035-jpg.1532720/
It's hard to see in this picture (sorry) but the white insulated area in the very back is where the Qi will need to mount.

Here is the underside view.

Carefully peel back the insulation. I didn't want to damage mine because I wanted to place it back over the charger when I was done.

Next, peel off the VHB backing and place in the center of the cubbie wall. Be sure that the charger gets placed relatively level to the bottom of the inside of the cubbie, as this is where the phone will be nominally sitting.
Ensure that the VHB has a solid bond by pressing firmly from both sides, then place the insulation back over the Qi Charger.

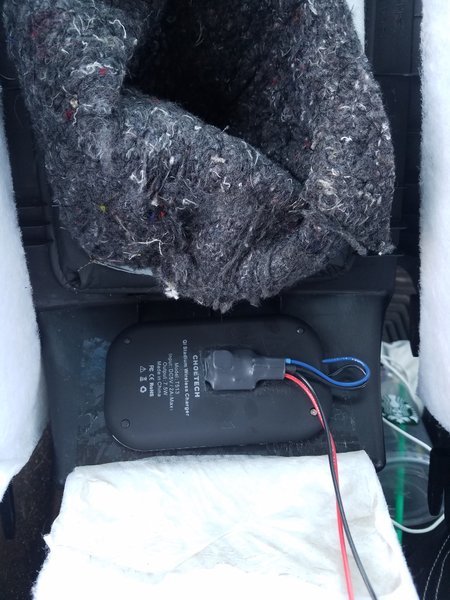
I pulled the +12V (Blue wire in the Picture. This should have been the RED wire from the Qi Charger, but I got a little excited/tired and cut the RED wire too short, so I had to put in a jumper) from the 12v cigarette lighter adapter. It's the Green/White wire on the back.

I then attached a 3 AMP fuse to the BLACK wire of the Qi Charger and mounted the fuse below the cup holders for easy access if the Fuse pops.

And that's it. I put everything back and I now have an in-dash Qi charger in my 2015.
So after riding in my buddies '16 DCSB OR with the Technology Package, I became a little jealous of some of the bells and whistles that are not on my '15 DCSB OR Base. In particular was the Qi Charger. So, I decided to make my own and I was encouraged to share it with you guys.
DISCLAIMER - This is for a 2015 Manual Transmission. I can not vouch that this will work for Auto Transmissions because I haven't examined the dash in those.
What you will need:
1 - CHOETECH Three Coil USB Micro Qi Charger
1 - 12VDC to 5VDC Regulator
3" - Heat Shrink Tubing (0.63" ID Before, 0.16" ID After)
Assorted smaller ID heat shrink for the wires
Soldering Iron
Solder
Sand Paper or Acetone
Dremel or exacto knife
VHB. I used 3M 4929. It's 25 MILs thick and it's made for automotive applications. I highly recommend using this because its thin and strong.
Obligatory Finished Product Pic first:
https://www.tacomaworld.com/attachments/20170521_185904-jpg.1532650/
This is a picture that I actually took to show off my button routing/addition that I did. However, you can see the little cubbie hole below the buttons. This is where I set my phone now and it automatically charges. (I couldn't take a picture of my phone charging, because I use my phone to take pictures.)
What to start with:
https://www.tacomaworld.com/attachments/20170501_064008-jpg.1532657/
I bought both of these off Amazon. Each are about $20.
The Qi charger is a simple CHOETECH Three Coil USB Micro Qi Charger.
https://www.amazon.com/Choetech-T51...ords=CHOETECH+Three+Coil+USB+Micro+Qi+Charger
The little PCB is a 12VDC to 5VDC Regulator.
(OB doesn't seem to like this link but HERE is where it's supposed to go)
The Build:
First, you need to take apart the Qi Charger.
You can see the three coils here. The reason that I chose this particular Qi charger was because if it sits in the center of the cubbie, one of the three coils will charge my phone no matter where my phone is placed.
If you flip the Qi PCB over, you will notice two conveniently placed through-holes for the DC Voltage In.
Here I just soldered on two strands of 18 AWG stranded. 18 AWG is a bit much, but it fit in the holes nicely and its what I had laying around.
Here's a shot from the Flip side.
Next, I had to do some enclosure modifications.
First I had to route out some of the enclosure so that my new wires could get out.
Next, I had to remove the matte finish off of the top side of the enclosure. I found out, through trial and error, that the VHB that I wanted to use didn't adhere to that stuff. I didn't want to sand it at first, so I tried to remove it with acetone. This works, but it's a PITA. In hind site, I should have just carefully sanded it off.
Now, put the Qi Charger back together.
Now the Regulator.
Here is the Wiring Diagram that I pulled from Murata's site:
https://www.tacomaworld.com/attachments/20170501_064508-jpg.1532696/
Easy enough with a little solder:
It's hard to see here, but there are actually two BLACK wires soldered to the middle pin. These are my Ground from the Qi Charger, and my Ground that will attach to the truck.
NOTE: Be sure to add shrink tubing to the wires before soldering them onto the PCB.
Assembled (note the presence of the matte finish in this picture. Like I said, trial and error)
Next I enclosed the entire PCB in heat shrink and adhered it to the back of the Qi case. Again, be sure to sand off the matte finish for the VHB to adhere properly.
A quick check on the power supply to verify functionality and current draw:
Here is, approximately, the max distance that the Qi will reach and still charge. Definitely , more than enough.
NOTE - I completely forgot to document two steps. First, the grey rubber double WiFi looking symbol will either need to be trimmed flush with the top cover or removed completely. Second, the entire top surface will need to be covered with the VHB. (Which you can kinda see in the picture above)
The Install:
Now I'm not going to go through the minutia of disassembling the center console. This is because, at least in the 2015's, it's a PITA! To get to the bottom row of buttons on the center console (where the 12V cigarette lighter/chargers are) is like the center doll of a Russian Nesting Doll. I had to take the entire Dash apart and remove the center console armrest/storage box.
Anywho, I removed the shifting nob and pulled that whole piece out.
https://www.tacomaworld.com/attachments/20170521_140035-jpg.1532720/
It's hard to see in this picture (sorry) but the white insulated area in the very back is where the Qi will need to mount.
Here is the underside view.
Carefully peel back the insulation. I didn't want to damage mine because I wanted to place it back over the charger when I was done.
Next, peel off the VHB backing and place in the center of the cubbie wall. Be sure that the charger gets placed relatively level to the bottom of the inside of the cubbie, as this is where the phone will be nominally sitting.
Ensure that the VHB has a solid bond by pressing firmly from both sides, then place the insulation back over the Qi Charger.
I pulled the +12V (Blue wire in the Picture. This should have been the RED wire from the Qi Charger, but I got a little excited/tired and cut the RED wire too short, so I had to put in a jumper) from the 12v cigarette lighter adapter. It's the Green/White wire on the back.
I then attached a 3 AMP fuse to the BLACK wire of the Qi Charger and mounted the fuse below the cup holders for easy access if the Fuse pops.
And that's it. I put everything back and I now have an in-dash Qi charger in my 2015.
Last edited:


