"Nanuuq" my Land Rover Discovery 2 diesel swap, ...forever a project!

  • HTML tutorial

TheBigPurpleOne

Rank II
Launch Member

Enthusiast I

My original plan way back was to just toss the grubby 4BT in & mate it to my automatic... but when I decided to go whole hog on the build is when I started to track costs. I originally planned for $5,000 to just get the dirty stock 4BT in there, so after some number crunching I updated the budget plan for $10,000 to refresh the engine, add a manual trans, upgrade turbo, re-do all electrics, & upgrade every supporting system that made sense with the upgrades. So far I've found I was pretty close in my estimates, because I made a few deals here 'n there, but also made a few costly mistakes/had unforeseen issues, so a lot of the budgeting balanced out in the end. I have a few more relatively inexpensive mods to add, head studs + injectors, but for the most part everything is bought & paid for at this point aside from maybe a bit more on the consumables side of things. As of typing this I'll be within a few hundred of my budget estimate if I buy anymore "hard parts". Also I don't know if it's sensible or not to include the money recouped from selling no-longer-needed Rover parts, but I have a fair bit of parting out to do now & I'm confident it's worth well north of $1,000 once I put the time into splitting everything apart.

TL;DR = My budget is $10,000 for the whole powertrain & full chassis rewire builds. All in parts + materials + consumables, since all labor was myself & friend's. All parts are purchased, & I've now nearly reached my budget cap. I have $1,000+ in unneeded Rover parts to sell though.
Man budgeting normally involves selling everything that isnt nailed down to make the project work, so i think youre doing well!!
 

Tinker

Rank V
Launch Member

Off-Road Ranger I

2,357
West Michigan
First Name
Mike
Last Name
Klemish
Member #

5606

Still alive!


Took a break offline during all this recent forced spare time. Figured if that is outside of my control, then at least I do have control with what I do with it, so I put my "nose to the grindstone" & went after a bunch of vehicle projects + personal health/hobby goals.

By some luck, for the first time in my life I managed to get EVERY vehicle project running and (mostly) driving! Highly unlikely this ever happens again, so better get some photos:


One of the more daunting tasks was thoroughly emptying out the whole shop to rebuild / reorganize / reclean everything.... now you can hardly tell it's the same place! (floor cleaned, leaks plugged, better lighting, updated wiring, air plumbed, insulation repaired, bunch of pallet racking, fabricated new weld table + welder carts + layout table + tool carts + hydraulic press etc)


Been driving the Rover around a couple times a week to expose any issues that couldn't be found while sitting static in the shop. I stopped in at a truck stop while I was out recently to roll it up on a scale... honestly quite a bit less weight than I expected! Of course there are a few hundred pounds more to come on board (hood, rear bumper, sliders, winch, bigger axles, etc) but I have a couple big weight cut ideas too.


As far as issues discovered: 1) The power steering return banjo fitting is STILL leaking... ARGH! I tried another fitting, several types of sealing washers, about to JBweld the freaking thing :expressionless: 2) The pulley I modified wore its bore out on the OE Rover alternator, so I had some help from a talented machinist friend & his ever helpful coworkers to make a pulley v2.0 with a keyway + bushing, so far so good. 3) It was driving down the road super sketchy at first, but turned out I just forgot to adjust the panhard bar for the new mount & had a tire with only 10lbs of air. Only 10 minutes later & back to smooth driving down the road! It is honestly surprising how smooth it cruises at 60mph, even with these beat up lift coil-springs that are rated completely wrong now for this weight distribution with the new powertrain + camper. I should go back and get the front/back axle weights so I can get proper coil springs on the way.


Tinker

Rank V
Launch Member

Off-Road Ranger I

2,357
West Michigan
First Name
Mike
Last Name
Klemish
Member #

5606

Finally the dashboard makes a reappearance! But the new NV4500 shifter was always an interference issue (seen in middle, stub touching the lower dash), although I didn't guess it would be so close to clearing.


Didn't need to clearance much really, and a simple bit of bent plate did the trick for the reach. Plenty solid and puts the shifter in the most ergonomic position I could manage, but it may evolve as I get more miles behind hte wheel.


Here's my plan for adding some of the new gauges, not seen here & to be mounted elsewhere: Boost, Voltage for both batteries, Charge controller etc


Finally a new video after nearly 6 months! Ran out fuel, alternator pulley jumped ship, and getting the project weighed in:

Next on to the gauges, the lights, the hvac, the electrics, and a hood! (or whatever ends up left of it)
 

Ob1

Rank VI
Launch Member

Influencer I

3,057
Palo Alto, CA, USA
First Name
Ofer
Last Name
Bruhis
Member #

17919

Ham/GMRS Callsign
KD6UKE
Finally the dashboard makes a reappearance! But the new NV4500 shifter was always an interference issue (seen in middle, stub touching the lower dash), although I didn't guess it would be so close to clearing.


Didn't need to clearance much really, and a simple bit of bent plate did the trick for the reach. Plenty solid and puts the shifter in the most ergonomic position I could manage, but it may evolve as I get more miles behind hte wheel.


Here's my plan for adding some of the new gauges, not seen here & to be mounted elsewhere: Boost, Voltage for both batteries, Charge controller etc


Finally a new video after nearly 6 months! Ran out fuel, alternator pulley jumped ship, and getting the project weighed in:

Next on to the gauges, the lights, the hvac, the electrics, and a hood! (or whatever ends up left of it)
I just love that sound. No radio is needed.
 
  • Like
Reactions: k9sar and Tinker

Tinker

Rank V
Launch Member

Off-Road Ranger I

2,357
West Michigan
First Name
Mike
Last Name
Klemish
Member #

5606

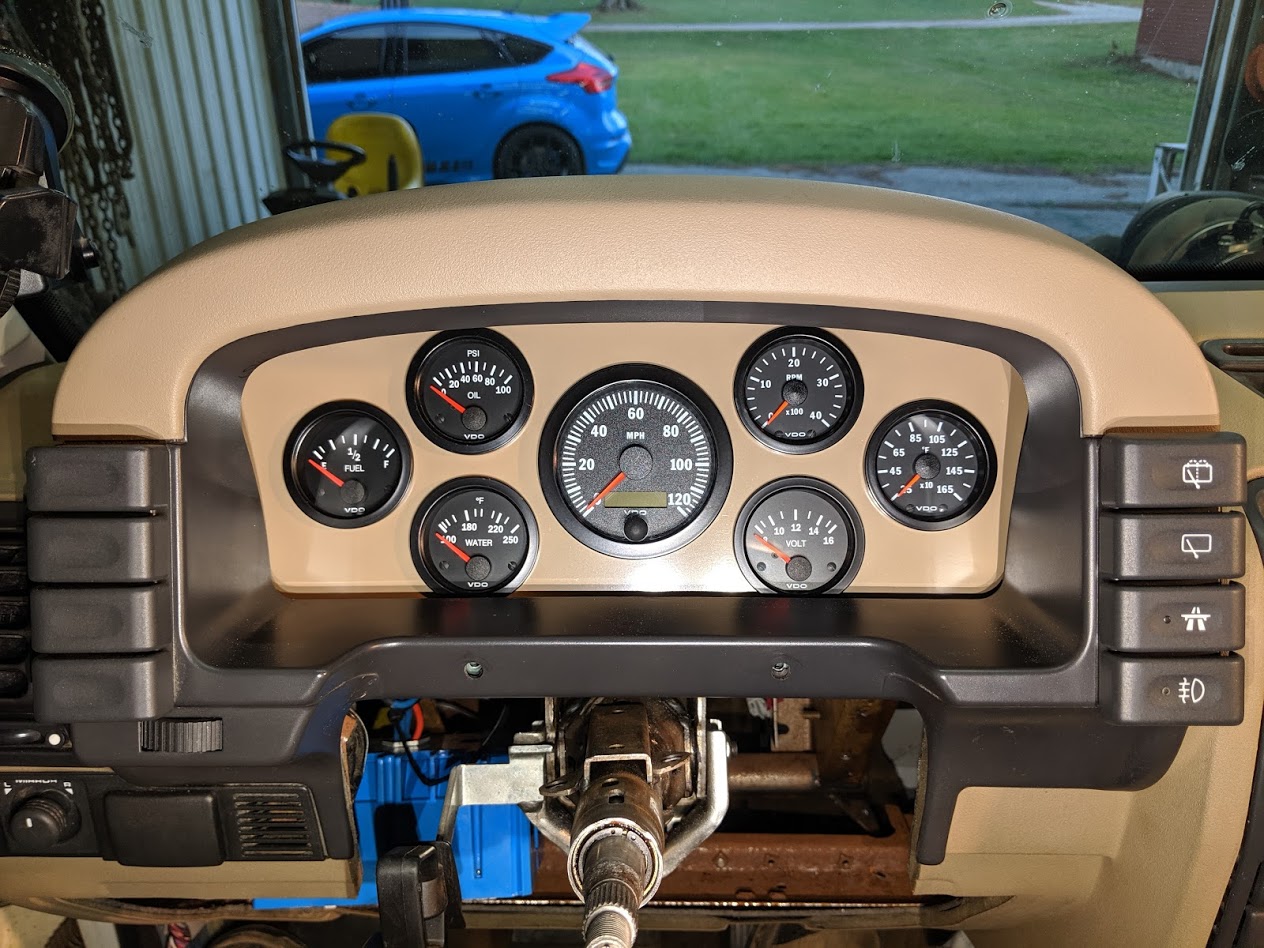
My new custom gauge cluster is starting to take shape!


I'm using a 1/8" (aka 3mm) aluminum sheet that's a leftover of a milling machine's control cabinet that was being scrapped:


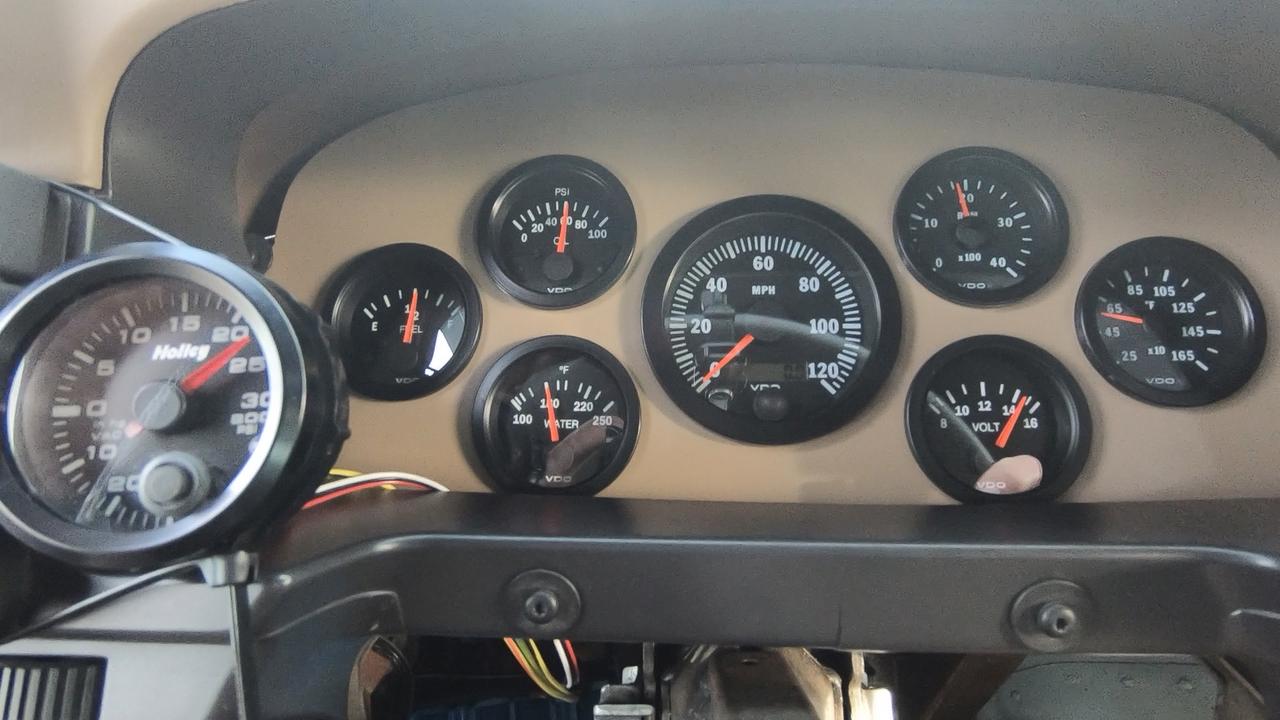
Gauges: Fuel level, engine oil pressure, engine coolant temperature, speed + odometer, engine rpm, alternator voltage, and exhaust gas temperature. (not pictured, to be placed elsewhere: boost pressure, dual battery voltages, engine oil temp, trans oil temp, transfer case oil temp, etc)


Fits nicely in the originals place, and with all the important data I could ever want, right up front:
 

PDB

Rank IV
Member

Enthusiast III

1,003
Wales, UK
First Name
PD
Last Name
B
Member #

27464

Nice to see a 5 door original impreza in your line up. Mine had an air intake bonnet scoop. I had a 1995 Prodrive version, green with gold wheels. Lots of mods. Let it go after it turned 196,000 miles. Spent a lot of time in that car flat out and full of gear. Very reliable and quick. Love to hear a scooby go by.

Disco gauge cluster looks fantastic.
 
  • Like
Reactions: Tinker

Tinker

Rank V
Launch Member

Off-Road Ranger I

2,357
West Michigan
First Name
Mike
Last Name
Klemish
Member #

5606

Nice to see a 5 door original impreza in your line up. Mine had an air intake bonnet scoop. I had a 1995 Prodrive version, green with gold wheels. Lots of mods. Let it go after it turned 196,000 miles. Spent a lot of time in that car flat out and full of gear. Very reliable and quick. Love to hear a scooby go by.

Disco gauge cluster looks fantastic.
That thing's been a blast, but desperately needs rust repair in the rear strut towers. Bet that was fun ride! And oh yeah that Subaru sound is a unique one for sure.
 

PDB

Rank IV
Member

Enthusiast III

1,003
Wales, UK
First Name
PD
Last Name
B
Member #

27464

That thing's been a blast, but desperately needs rust repair in the rear strut towers. Bet that was fun ride! And oh yeah that Subaru sound is a unique one for sure.
That car released my inner hooligan alright. I think it was 2 years before anyone overtook me on a B road. :grimacing:

The diff needed work and I'd used up most of the points on my licence, so I let her go. Taught me a lot. The number plate was D3 EBT. I'm sensible Sam now. :neutral:

Must check out your scooby thread. Those disco gauges are perfect. Is the one on the right exhaust gas temp?
 
  • Like
Reactions: Tinker

Tinker

Rank V
Launch Member

Off-Road Ranger I

2,357
West Michigan
First Name
Mike
Last Name
Klemish
Member #

5606

That car released my inner hooligan alright. I think it was 2 years before anyone overtook me on a B road. :grimacing:

The diff needed work and I'd used up most of the points on my licence, so I let her go. Taught me a lot. The number plate was D3 EBT. I'm sensible Sam now. :neutral:

Must check out your scooby thread. Those disco gauges are perfect. Is the one on the right exhaust gas temp?
My first car I hooned around was a Scirocco, good fun for such low power!

There's a lot of corrosion & ratrod style work in that thread, not for the faint of heart haha!

Yep! That's one of the gauges that's mandatory before I start turning the boost up & tuning the fueling.
 
  • Like
Reactions: PDB

Tinker

Rank V
Launch Member

Off-Road Ranger I

2,357
West Michigan
First Name
Mike
Last Name
Klemish
Member #

5606

Here's the process of modifying the new manual transmission shifter and the original dashboard, so they play nice together... plus a bunch of test rips rowing thru the gears to get a feel for the new shifter movement:

 
  • Like
Reactions: k9sar

Ob1

Rank VI
Launch Member

Influencer I

3,057
Palo Alto, CA, USA
First Name
Ofer
Last Name
Bruhis
Member #

17919

Ham/GMRS Callsign
KD6UKE
Yep! That's one of the gauges that's mandatory before I start turning the boost up & tuning the fueling.
Nicely done mate.

Is this a pre or post turbo gage? And where would you consider the ‘red range’ on the 4B?
 
  • Like
Reactions: Tinker

Tinker

Rank V
Launch Member

Off-Road Ranger I

2,357
West Michigan
First Name
Mike
Last Name
Klemish
Member #

5606

Nicely done mate.

Is this a pre or post turbo gage? And where would you consider the ‘red range’ on the 4B?
Pre-turbo right in the exhaust manifold at the output flange. From what I've read Cummins states 1200deg sustained is maximum and from diesel racers that anything +1500 for more than a few moments is almost guaranteed damage.
 
  • Like
Reactions: Ob1

Tinker

Rank V
Launch Member

Off-Road Ranger I

2,357
West Michigan
First Name
Mike
Last Name
Klemish
Member #

5606

Exhaust gas temp sensor installed, but had to drill out my previous tapped hole that was a size too small (eighth vs quarter inch npt) and of course it went a little crooked... probably should've taken the manifold off too. Oh well, hopefully the off-kilter sensor will distract from my TERRIBLE paint job on the engine block that didn't hold up due to the winter cold a few seasons back :( (very much looking forward to a redo on that next summer when I do the frame rails too)


While I was at it I chucked in the boost gauge's pressure sensor right into the turbocharger's outlet elbow (putting the gauge reference as near to the turbo as I could)


Lots of wiring, but a good test run before the thousand+ feet of motorsports grade Raychem "spec55" wire I ordered gets here for the full rewire job:


Did a quick test fire to check the status of all the new readouts and aside from dialing in the NV4500's VSS to match GPS readings it looks like all I have to work on is the tachometer signal that I'm trying to steal from the old Rover alternator... but I kind of expected that to take a little fiddling around to get right (plus I have a laser RPM reader to verify the gauge reading when it's working properly)
 
Last edited:

Tinker

Rank V
Launch Member

Off-Road Ranger I

2,357
West Michigan
First Name
Mike
Last Name
Klemish
Member #

5606

Upgraded the shop! Scored a pre-war era vertical milling machine, and locally made to boot (Jackson Machine & Tool No.2). Couldn't have done it without the help of a couple friends with the skill & muscle to tear it down & rebuild it again 30 miles away. It's in surprisingly good shape for being near 100 years old & thankfully came with a bunch of old tools, so I don't have to feel bad about breaking them as I learn.


I'm excited to see what I can do with a level up like this, even though I have very little knowledge in that department, but thankfully I have smart friends! Can't help but think that a lathe & TIG welder are in my future as well now... Don't have what I need? Now I can make it! :grinning:
 

Tinker

Rank V
Launch Member

Off-Road Ranger I

2,357
West Michigan
First Name
Mike
Last Name
Klemish
Member #

5606

I thought for sure that these Rover alternators had a "W" wire you could tap into for an RPM pulse signal, but after cracking it open it would appear I was wrong on that one...


So I had to get creative and drill & tap a tiny hole into one of the stator field windings for my new "W" wire to drive my tachometer gauge:


Took it for a drive & thought I had all the gauges working... although sadly after a bunch of testing it seems the "vehicle speed sensor" in the transmission is dead, but at least the rest of the cluster is alive 'n kicking:


Also had the final bits of my wiring arrive for the Rover's full rewire project... well over a thousand feet in this tote, going to be a big job! Big stuff is all marine-grade tin coated & silicone wrapped, while all the smaller is Raychem Spec55 motorsports grade wire, & the wrappings all aerospace kit. Here's hoping all the work I've been doing on the temporary/test wiring pays off so I don't let the smoke out of this good stuff:
 

Tinker

Rank V
Launch Member

Off-Road Ranger I

2,357
West Michigan
First Name
Mike
Last Name
Klemish
Member #

5606

Almost forgot to share the video of the all the detail work on that custom gauge cluster I've built (much more than just these images here)

 
  • Like
Reactions: El-Dracho