"Nanuuq" my Land Rover Discovery 2 diesel swap, ...forever a project!

  • HTML tutorial

Tinker

Rank V
Launch Member

Off-Road Ranger I

2,357
West Michigan
First Name
Mike
Last Name
Klemish
Member #

5606

Probably the best feeling on a swap project is running with good oil pressure! Congrats.
That's no kidding & thanks!

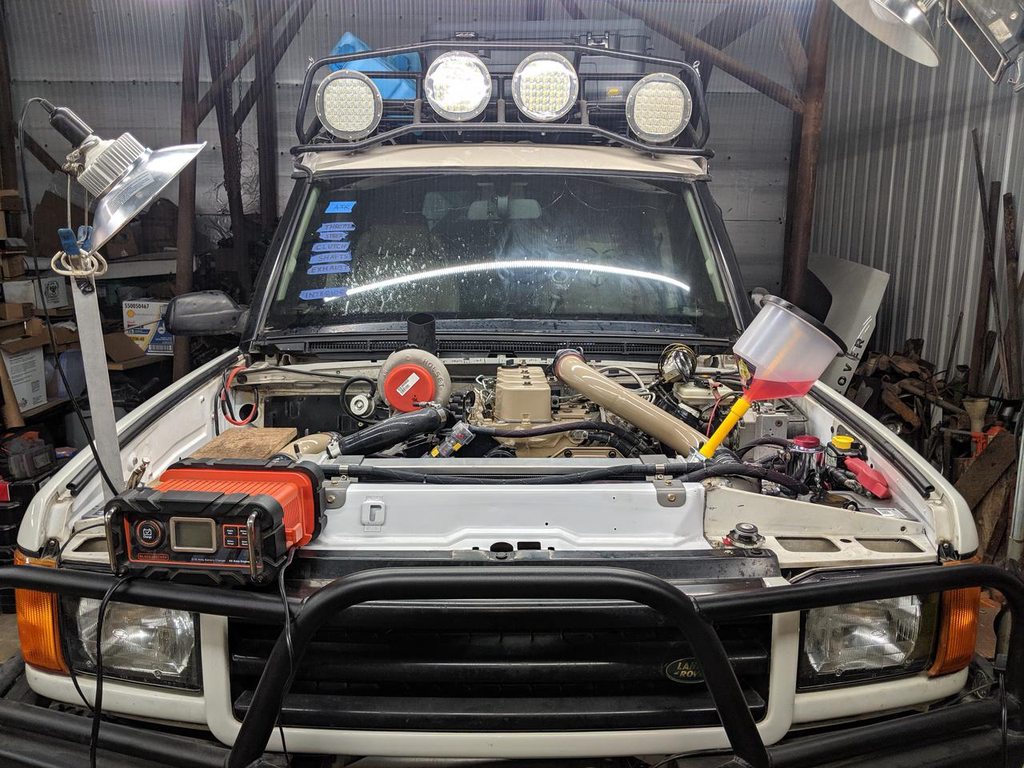
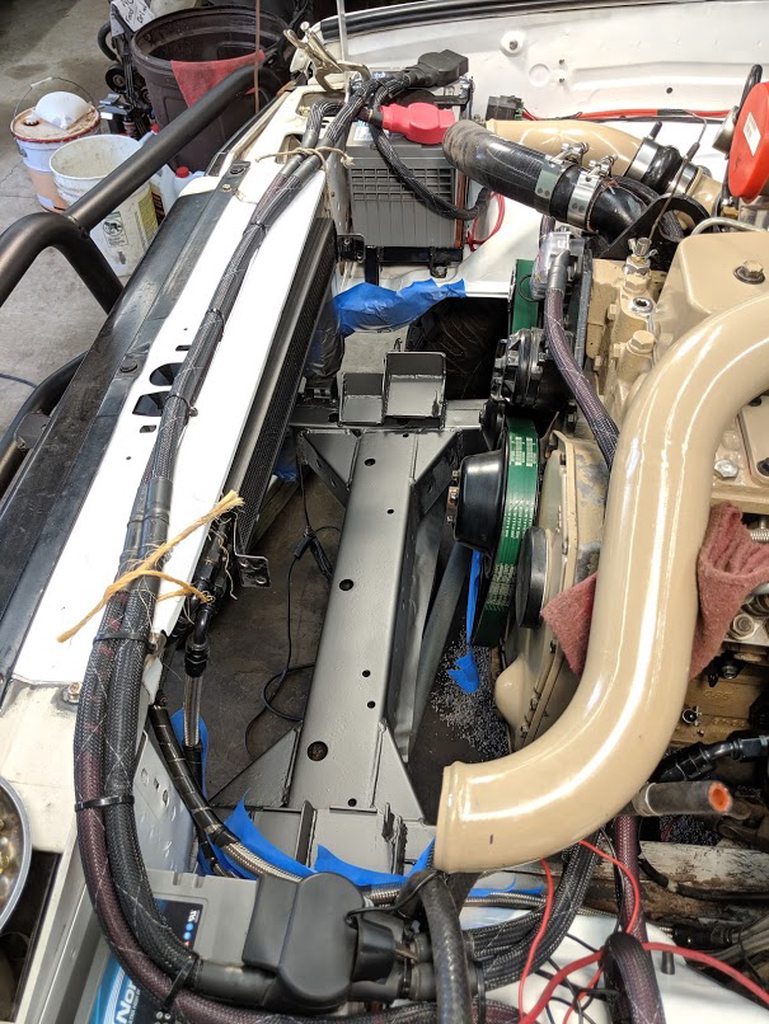
I was getting all sorts of sketched out when I first turned it over & it wasn't budging the needle on the electronic oil pressure gauge, so I plumbed in a spare mechanical gauge I had to go alongside it, just to verify. Then we realized the batteries haven't been on any kind of charger since I bought them a while back & were not ready to turn over that much compression. Oops. Even after a top up on the angry pixies the thing still didn't want to cough up any smoke! We thought maybe we weren't getting enough air out of the injection lines, or maybe the oil priming process with the drill-pump somehow didn't get enough thru the engine to prime the oil pump's rotors.

But it was none of the above & ended up being me just chasing my tail & overthinking things. Looking back at it, the thing I missed was stupid simple. The lever I pulled out of the leftover parts box (that was from the original mud-pump this engine was in) and installed temporarily for the start-up was letting the throttle shaft on the injection-pump spring back from the idle range into full shutdown... didn't even realize until I reached down & gave it a wiggle while the starter was cranking & BOOM it started running!

It was running a little rough at first, although not for long after I bled off the trapped air in those new fuel lines by cracking the nuts on the injectors. Runs great & doesn't shake anywhere near what I was expecting or had seen in other 4BT videos! It's not straight-6 smooth with a glass of water on top without a ripple, more of a T-rex stomping around kind of water in that glass. Even so I'm genuinely surprised how stable it is, & the shutdown shake isn't bad at all either.

The thing starts so fast! I swear the crankshaft can barely get half a rotation before it's started. And here I was thinking I may have been excessively rough on the starter during all that cranking & hurt it. Now to get rocking on all the connections it needs (driveshaft mods, clutch pedal, throttle cable, steering gear mods, etc) to get on the road & out of the shop!

The windshield was splattered in even more diesel than I was after that night:
 

Tinker

Rank V
Launch Member

Off-Road Ranger I

2,357
West Michigan
First Name
Mike
Last Name
Klemish
Member #

5606

Seeing and hearing the sheer joy you felt, damn near had me in tears
I was getting legit freaked out by the lack of gauge movement in oil pressure (caused by the low cranking rpm from near dead batteries) so when that first puff of smoke came out.... 2 years of anticipation finally paid off! :openmouth:
 

Tinker

Rank V
Launch Member

Off-Road Ranger I

2,357
West Michigan
First Name
Mike
Last Name
Klemish
Member #

5606

So, onto the list of things to get it road worthy!

First order of business is the steering pump that sprung a leak on me right before the start up. I'd attempted modifying an original & beat up pump can (aka the reservoir that's integral to the pump, wrapping around it) and honestly I'm not all that surprised it was wet around the seal since we had to weld along a fair bit of rust that was right over the area the seal's meant to meet the can. So I bit the bullet and started preparing earlier than expected for a hydroboost + assist ram setup. A new can with a -10AN supply fitting will replace the leaky fill-neck style can, and a remote reservoir with built-in filter (and extra port for hydroboost) will supply the fluid that's gathered as it returns from the cooler.


Next is the driveshafts, which are fairly easy to get ready. I've just been waiting until the engine was running and could be mostly sure nothing would change before sending them out for modifications. The 2 shafts used to be quite different as you can see here, but now by some random luck they'll need to be the very same length (29.5" flange to flange). I'm also having the local driveline shop change out 1 of the flanges (marked with x's) so that it'll match the other 3 flanges, which will make having spares easier than I could've ever hoped for.


Also I'm finding myself in dire need of space on the driver's side of the engine bay. For all the new electrics, as well as the new steering reservoir. There is plenty of space to be gained... if I get the ABS pump and lines out of the way. Been putting it off for a while since I wasn't able to get any decisive answers on the size and type of fittings used. So I dug around the local salvage yards and found a Disco (not exactly a rare sight due to the engine issues) that was relatively untouched. I tore out all the ABS lines + fittings to bring home and measure for ordering the parts I need to replace it all with simple -3AN hose. It'll free up nearly a square foot of space!


While I'm waiting for the driveshaft mods I can start on the transfer case brake that I'm custom making to replace the old giant drum brake. I measured just about every rotor I could on me and my friends vehicles. And I found a surprisingly close match to the ideal size range in my CRX rally car's front brakes. The 2 hole patterns won't interfere with one another, the hat depth clears the transfer case output housing, and the hub bore in the rotor fits perfect to the centering ring on the driveshaft flange! I made up some drawings for drilling the flange's bolt pattern into the rotor, and started sketching up ideas for a bracket to hold the caliper I'm linking to the original cable.
 
  • Like
Reactions: Joso1122

Tinker

Rank V
Launch Member

Off-Road Ranger I

2,357
West Michigan
First Name
Mike
Last Name
Klemish
Member #

5606

I was about to build a hare-brained "turntable" setup thing on the drill press to bore out the new driveshaft flange bolt pattern... but thankfully I asked a friend who's skilled with machining first, because he drilled the 6 new holes stupid fast! That & 10X more accurate than anything I would've done. I really need to stop talking about a mill & get one already.


It fits! Although it's a pretty tight area to tip in there, & the old studs could maybe do with cutting down a little so I don't keep scuffing up my divorced transfer case subframe. Now that it's in there I can get the driveshafts in & start fabricating a brake caliper bracket for my new e-brake setup.


Today's victim was the ABS system... good riddance! Never really used it, partly due to being a common failure point on these trucks, & partly because it was linked to the terrible traction-control system that Rover engineers thought could replace a diff locker. (Spoiler: It didn't even come near to replacing a locker & now I have a real transfer case locker) Having that garbage out of there affords me so much extra space on the driver's side of the engine bay.


Changing to AN fittings & stainless/teflon hose was the plan eventually anyway. It's so easy to work on, maintain, & modify. And this takes care of a step towards a future plan to custom mount a set of salvaged Range Rover brakes. A full set off a supercharged Range Rover sport is cheap & they'll have plenty of power to stop this build with 6-piston fronts + 4-piston rears.


Also on a side note I drained out the Valvoline SynPower from the NV4500 (turns out the trans builder had incorrect information on their site) & replaced it with the correct Redline MT-85 oil that meets the original specs. Don't want to risk the synchro's on a brand new transmission.
 

Tinker

Rank V
Launch Member

Off-Road Ranger I

2,357
West Michigan
First Name
Mike
Last Name
Klemish
Member #

5606

Wow, you've got it together. I'm jealous of every disco I see. Especially yours.
Thanks, it's been a fun project that I'm learning/trying out a lot of things on.

Finished making my new -3AN (aka 3/16" JIC) teflon-lined stainless brake lines from Eaton "Aeroquip" parts. I must be getting used to the stuff because not a single finger was poked or drop of blood spilled while putting them together:


Several feet less in length & a ton of space cleared up now with this setup running straight out of the master. I'll save adding in an adjustable proportioning valve until the giant 6-pot & 4-pot brakes go in, but there's plenty of room to do so when it's time:


I ran all these new lines right to the support brackets where the (already stainless) brake caliper hoses run down to each front wheel, & also to the junction where the long hardlines (will get upgraded with the big brakes) run down the frame to the rear brakes:
 

Tinker

Rank V
Launch Member

Off-Road Ranger I

2,357
West Michigan
First Name
Mike
Last Name
Klemish
Member #

5606

Mother of all build threads here. I just spent 4 hours reading all 19 pages. One of the best build threads I've ever seen. Awesome disco 2.
I'd print it out into a coffee table book... but I don't see this project ending anytime soon, & would just ruin it with greasy hands looking for info on things I couldn't remember. But thanks! Trying to lay this thing out like what I was hoping to find back when I was hunting for a Disco of my own.
 

Tinker

Rank V
Launch Member

Off-Road Ranger I

2,357
West Michigan
First Name
Mike
Last Name
Klemish
Member #

5606

I got a bit nervous about a stain on the radiator the other day... couldn't be sure if it randomly sprung a leak (boxed in with sharpie) or I completely spaced out spilling some coolant on it. But I figured it was worth taking it back to the radiator shop to double check & I needed to clean up the frame under the coolers anyway. It also highlighted that my radiator drain is crap, which I'm replacing with a 90-degree petcock that has a barb for putting a hose on next time. I'm not a fan of the traditional "spray down everything in a 3 foot radius" method of draining coolant on most vehicles.


I intend to do a bunch of work restoring the frame & coating all the areas of it that I've modified. One of the areas that I can't just cover or tape off in the future is this forward frame area, which makes it worthwhile to pull the coolers out now & get the area protected properly. Thankfully I have most of the moisture issues in the shop sorted out, so the exposed metal bits have very little if any rust to clean up.


Wire brushes, scotch brite, coarse sandpaper, brake clean, degreaser, more brake clean, acetone, blow dry, THEN paint. I'm usually terrible about all the prep work involved with painting & body work... definitely not my strong suit. But these frame rails need to outlast all the mud, sand, & heavy road-salt winters it'll go thru when I get back to driving it near every day again.


I picked up the radiator this afternoon & received the good news that there was no leak & I'm a dumb. Also, speaking of good news: I test fit the vacuum/steering pump combo with the new PSC "external style" power steering pump can that has the AN fitting (to replace the modified fill-neck can) and it clears the pump! It'll easily fit the -10AN feed from the new PSC reservoir that I need to find a home for yet. I'm waiting to final mount the pump combo until I get more ideally sized bolts to replace the pump's studs, just so that I can get the pump out of that tight area in the future without removing the entire assembly every time.
 

Joso1122

Rank II
Launch Member

Contributor III

327
New Mexico, USA
First Name
Josiah
Last Name
Solberg
Member #

19096

I got a bit nervous about a stain on the radiator the other day... couldn't be sure if it randomly sprung a leak (boxed in with sharpie) or I completely spaced out spilling some coolant on it. But I figured it was worth taking it back to the radiator shop to double check & I needed to clean up the frame under the coolers anyway. It also highlighted that my radiator drain is crap, which I'm replacing with a 90-degree petcock that has a barb for putting a hose on next time. I'm not a fan of the traditional "spray down everything in a 3 foot radius" method of draining coolant on most vehicles.


I intend to do a bunch of work restoring the frame & coating all the areas of it that I've modified. One of the areas that I can't just cover or tape off in the future is this forward frame area, which makes it worthwhile to pull the coolers out now & get the area protected properly. Thankfully I have most of the moisture issues in the shop sorted out, so the exposed metal bits have very little if any rust to clean up.


Wire brushes, scotch brite, coarse sandpaper, brake clean, degreaser, more brake clean, acetone, blow dry, THEN paint. I'm usually terrible about all the prep work involved with painting & body work... definitely not my strong suit. But these frame rails need to outlast all the mud, sand, & heavy road-salt winters it'll go thru when I get back to driving it near every day again.


I picked up the radiator this afternoon & received the good news that there was no leak & I'm a dumb. Also, speaking of good news: I test fit the vacuum/steering pump combo with the new PSC "external style" power steering pump can that has the AN fitting (to replace the modified fill-neck can) and it clears the pump! It'll easily fit the -10AN feed from the new PSC reservoir that I need to find a home for yet. I'm waiting to final mount the pump combo until I get more ideally sized bolts to replace the pump's studs, just so that I can get the pump out of that tight area in the future without removing the entire assembly every time.
Yup, i knew it. My fill neck is the wide-body style...definitely not gonna fit. I'll need the 10AN can as well.
 

Tinker

Rank V
Launch Member

Off-Road Ranger I

2,357
West Michigan
First Name
Mike
Last Name
Klemish
Member #

5606

Yup, i knew it. My fill neck is the wide-body style...definitely not gonna fit. I'll need the 10AN can as well.
It's well made & usually only runs ~$40, also there's a -12 version if you want to step up from 5/8" to 3/4" pipe. Here are some links:
>>> (PSC Motorsports) Remote Fill P Pump Reservoir Can # 10 JIC Feed O-ring Side-SR2545 : Reservoirs and Coolers, Reservoir Cans | PSC Motorsports - performance steering components, power steering
>>> (Summit Racing) PSC Power Steering Reservoirs SR2545-10K
 
  • Like
Reactions: Joso1122