Basic Dual Battery Install in a '99 Land Cruiser

  • HTML tutorial

KonzaLander

Rank VI
Member

Traveler II

3,402
Junction City, Kansas, USA
Member #

15814

Ham/GMRS Callsign
KE0EBF
With the addition of a fridge to my Land Cruiser, I really wanted to isolate the power used by accessories when parked to a dedicated house battery. There are many possible routes to achieve a functional dual battery setup; this is how I did it.

Objective:
Install a simple and cost effective dual battery system

Goals:
System should operate automatically, manually or be switched off
Ability to self jump start
Keep it safe

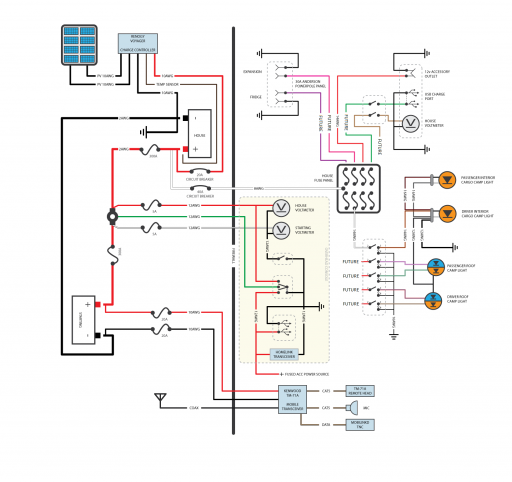
I like to draw diagrams when doing electrical work, for home or vehicle. This helps keep me organized and greatly reduces the chance of me wiring in a short circuit or having and un-fused power source. Below is a basic diagram for this dual battery system.
Dual Bat Wire.png

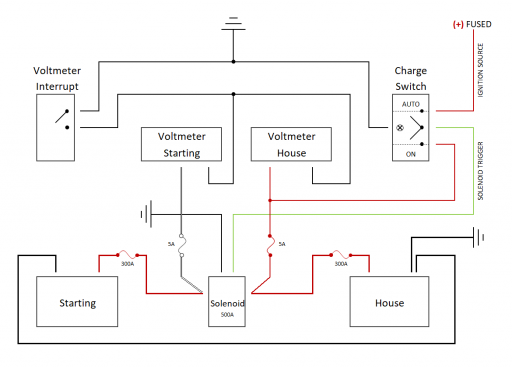
This works as follows:

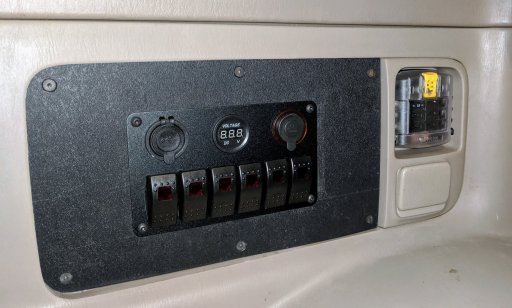
Voltmeters - I can view the battery voltage anytime. With the solenoid deactivated the voltmeters will show the resting voltage of each battery. With the solenoid active the voltmeters will display the voltage of the batteries combined.

Charge/Solenoid control
- AUTO, the solenoid is activated when it receives power from an ignition power source. This setting automatically ties the batteries together when the vehicle is running and isolates them when it is off.
- ON, the solenoid is activated when it receives power from the house battery. This allows a self jump start incase the starting battery has died.
- OFF, the solenoid will not activate

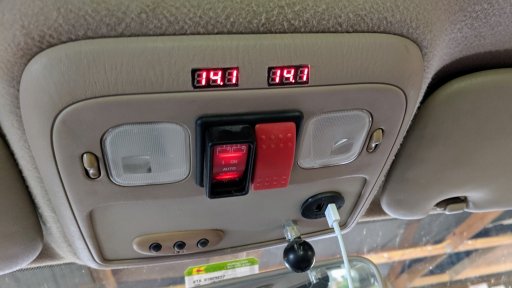
The control center for the batteries is fitted to my overhead console. The primary switches replaced the useless sunroof controls in my Cruiser since the sunroof hasn't operated in years. The small digital voltmeters were cut into the console.
IMG_20190623_132519.jpg

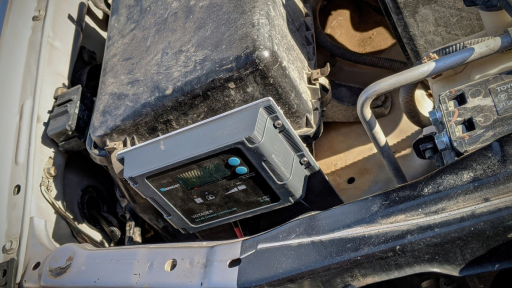
The 2nd battery tray I am using is an old style Slee Offroad tray, which is designed for an Optima battery. Since I was trying to keep costs down, I found an H5 (Group47) AGM battery that fit the tray. As a bonus the terminals are recessed into the battery case.
IMG_20190420_162455.jpg

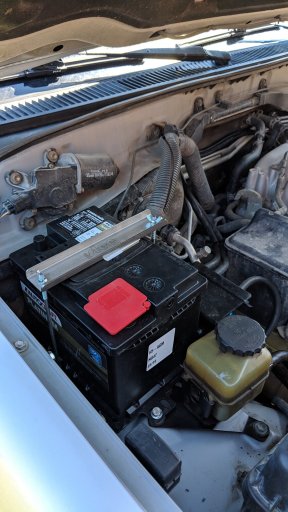
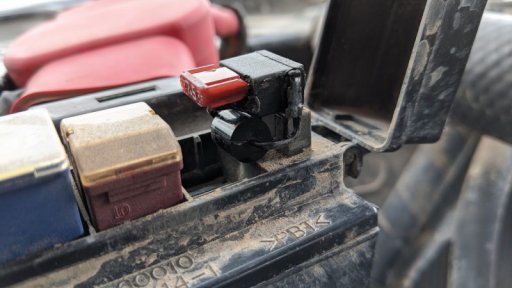
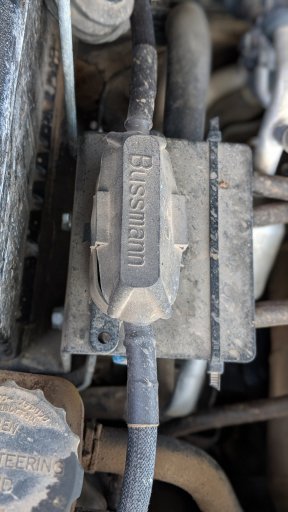
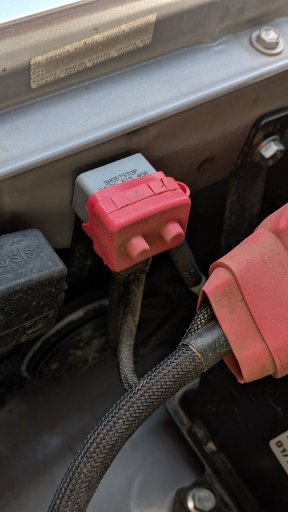
At both the starting battery and house battery I installed Bussman fuse holders and 300A MEGA/AMG fuses to protect the vehicle and batteries from a massive short circuit in the event a cable breaks. I used 2AWG welding wire, tinned copper lugs, braided loom and adhesive backed heat shrink to build the battery cables.
00100dPORTRAIT_00100_BURST20190804124905909_COVER.jpg

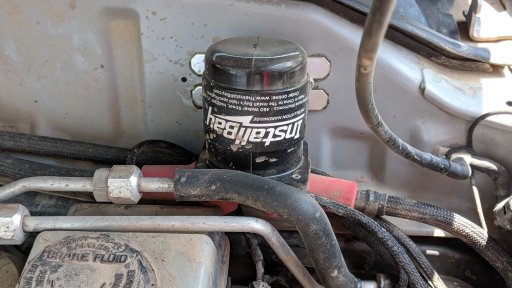
I tucked the solenoid against the firewall directly in front of the driver's seat. The solenoid engages with a solid audible 'click'. I made sure to cover all positive terminals in the whole system.
00100dPORTRAIT_00100_BURST20190804124844090_COVER.jpg

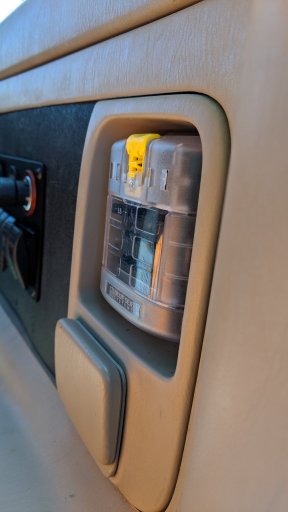
With the batteries charging, the solenoid functioning and having been lucky at preventing any wrench to ground arcs, I installed a small circuit breaker off the house battery. This little breaker supplies power to the rear of the vehicle, where all of the house accessories will be powered from.
00100dPORTRAIT_00100_BURST20190804124927565_COVER.jpg

I utilized the factory subwoofer space to make a house accessory switch panel and power distribution system.
IMG_20190627_215357.jpg

The Blue Seas fuse block is recessed into an old cupholder in the back of the Cruiser.
IMG_20190723_134520.jpg
 
Last edited:

oldmopars

Rank V
Launch Member

Member III

2,865
Selah Wa
First Name
Scott
Last Name
Solomon
Member #

20486

Very nice system. I love the use of the fuse panel and the switch panel. The system you are using is much better than the battery isolator that a lot of people use.
Having the house battery isolated and then being able to use it to self jump is a great idea. A little peace of mind.
 
  • Like
Reactions: KonzaLander

smritte

Rank V
Launch Member

Member III

2,827
Ontario California
First Name
Scott
Last Name
SMR
Member #

8846

Ham/GMRS Callsign
KO6BI
Nice install. I wish I had a cupholer in the back of mine to do that. I had to repurpose the ashtray hole to mount my accessory port and Anderson plug. My relay/fuse panel is behind a side compartment door.
 
  • Like
Reactions: KonzaLander

KonzaLander

Rank VI
Member

Traveler II

3,402
Junction City, Kansas, USA
Member #

15814

Ham/GMRS Callsign
KE0EBF
While my H5 AGM House Battery has done a good job maintaining a charge with the fridge running, I though it would be a good idea to help supplement the battery when the Cruiser is not being driven.

Objective:
Help maintain a charge on the House battery while the Cruiser is sitting still

Goal:
Add a Solar Panel that still allows me to install a RTT
Works with the current dual battery system outlined above
Have the ability to work without relying on other installed systems (redundancy)
Be cost effective

The first challenge was determining where to mount a panel on the Cruiser. After studying the approach others took on their SUV's, I narrowed it down to three usable options:
1. Hood. Install a flexible panel to the hood.
2. Mount a rigid panel directly to a roof rack or on slide out mechanisms.
3. Install a flexible panel on the roof like RV'ers do.

Since I do not have a full rack on my Cruiser and only mount a soft sided RTT on the aftermarket crossbars, I could not install a rigid panel without some serious expense. The sunroof on this Cruiser has been inoperable since I purchased it so I really wanted to try and utilize the space above it. I ultimately decided to find the biggest flexible panel I could that would fit over the existing sunroof opening and fit between the stock roof rack side rails and between the slope of the roof tot he windshield and where my RTT mounts. The flexible 100W Rich Solar panel fit perfect. In following what several RV enthusiasts have done, I secured the panel with 3M's VHB (Very High Bond) foam tape to the roof.

100W Rich Solar panel adhered to the roof with 3M VHB double stick tape over the sealed up sunroof. You can also see some of the Eternabond RV Roof Tape I used to seal up the sunroof. I used a 20A PV cable fuse and ran 10AWG PV cable down the windshield trim to the engine bay and routed the wires through the inner fender to the charge controller under the hood.
1591732403719.png

It is generally said that a charge controller under the hood will have a short lifespan due to heat. I looked at placing a charge controller in the cabin, but decided against it since the battery was under the hood and the 4 big cables that I would need to run through the firewall.

I installed a waterproof 20A Renogy Voyager solar charge controller on an aluminum mount I bent up directly behind the headlight. My hope is that air coming in around the headlight will help keep the controller cool. 10AWG cables connect the solar charge controller to the H5 AGM House battery with a 20A circuit breaker installed at the battery on the positive side. I also opted to install the option battery temperature sensor on the battery positive side for the solar charge controller.
1591732458318.png

This setup works great! The solar charge controller is generally maintaining the house battery. If the house and starting battery are tied together without the alternator running, the solar charge controller charges both house and starting AGM batteries. My biggest fear was burning up the solar charge controller or over charging the house battery by charging the house battery with the alternator. This is not a problem since the solar charge controller senses the increased voltage as a "full battery" and quits supplying power the the battery.

I have sketched out the current accessory wiring configuration on my Land Cruiser. This includes ham radio, dual battery, solar, rear accessory fuse panel and future projects.
1591731544993.png
 
Last edited:

smritte

Rank V
Launch Member

Member III

2,827
Ontario California
First Name
Scott
Last Name
SMR
Member #

8846

Ham/GMRS Callsign
KO6BI
Nicely done.
What software did you use to draw the schematic?
Don't worry about over charging. The Cruisers alternator voltage is designed for lead acid. A bit lower than you need for the agm. The solar will top it off nicely while you sit. I have a similar set up with a 50 watt panel. My agm's are kept happy when it's parked.
Your 100 watt should keep up with the fridge and topping off the batteries. I have a 120 with my trailer and its a bit overkill.
I was going to run a 100 watt on mine but I would have had to cover the sunroof. Mine still works even though I don't use it. Looking back I should have just put the 100 watt on.
 
  • Like
Reactions: KonzaLander

KonzaLander

Rank VI
Member

Traveler II

3,402
Junction City, Kansas, USA
Member #

15814

Ham/GMRS Callsign
KE0EBF
@smritte I used Adobe Illustrator to draw the newest schematic. It was a project I tackled when I couldn't travel a couple of months ago.

My AGMs are pretty happy being charged by the alternator. I performed the ALT-S (alternator sensing) mod and am charging at about 0.5v over factory. If charging directly from the alternator, both batteries are receiving between 13.9v and 14.7v.

You essentially install a diode inline of the ALT-S line which tricks the alternator into delivering an extra 0.5v.
IMG_20200609_190234.jpg
 
Last edited:

smritte

Rank V
Launch Member

Member III

2,827
Ontario California
First Name
Scott
Last Name
SMR
Member #

8846

Ham/GMRS Callsign
KO6BI
You essentially install a diode inline of the ALT-S line which tricks the alternator into delivering an extra 0.5v.
Nice
very few people know that trick. I've dropped a 2 ohm resistor inline in the past and got about the same. I haven't done it to this vehicle yet. I keep forgetting.
 
  • Like
Reactions: KonzaLander

KonzaLander

Rank VI
Member

Traveler II

3,402
Junction City, Kansas, USA
Member #

15814

Ham/GMRS Callsign
KE0EBF
February 2023 Update

This system has continued to work beautifully. I would not change any part of the fundamental design after living with it for a few years.

I did have issues with the Rich Solar panel.

The coating on the panel started to delaminate after only 4 months of use. I figured since Rich Solar provides a 1 year warranty I would be able to either get advice on how to stop the delamination or get a replacement panel... Boy was I wrong. I sent my first support message to Rich Solar in July 2020 and continued to message them monthly until my "warranty" period expired in February of 2021. I also called their support line four times and sent a message via Facebook. My inquiry was never responded to or acknowledged in any fashion :worried: Despite the failing coating, the panel was still producing all the power I needed.

On a windy trip to the high Rockies in March 2022, the 3M VHB tape holding the panel do the top of the cruiser let go on I70. At 75mph. With a 35mph head wind. It was a spectacular failure. The Rich Solar panel was destroyed so I replaced it with a 100W rigid Renogy panel. My RTT had been permanently relocated to a trailer.

1675808697663.png
 
  • Haha
Reactions: mmbirtcher

smritte

Rank V
Launch Member

Member III

2,827
Ontario California
First Name
Scott
Last Name
SMR
Member #

8846

Ham/GMRS Callsign
KO6BI
Sucks about that panel. I know everyone does it but, I've never been a fan of taping things down. When I installed my panel on my trailer, I used construction adhesive under the leading edge and installed six screws. Every now and then I read about someone's panel coming off after about three years. makes me wonder if the VHT tape slowly breaks down over time.