What do you do with your 1993 Toyota FZJ80 Land Cruiser once the kids have left the house? You turn it into a “home” and explore as much as possible.
Overland Bound Member Ofer Bruhis takes us through every decision made converting his Land Cruiser 80 Series into a (very) tiny home. Read on for all the details!
Words and Photos by Ofer Bruhis
My Land Cruiser 80 Series
About 25 years ago we bought a family car. A 1993 Toyota FZJ80 Land Cruiser. It served us for 20 years for family camping, and car pooling around town. Now that the 4 kids have left the house, we have no use for it.
Looking at the low resale value, we decided instead to invest and convert it into a house/camper having all the options of being on/off the road and being independent of lodging and food.
The first issue was to create a reliable overland Land Cruiser vehicle, with a robust drive train, a fuel efficient engine and one that could travel over any terrain.
This meant we would have to replace the 10 MPG 1FZ-FE gas engine/auto transmission with a 1HDFT (which is a Toyota 24-valve turbo diesel engine mated with an H151 5-speed transmission). This 24 MPG upgrade would allow us a 700-mile range per tank of gas.
Transforming the Land Cruiser – Exterior
Searching for the right engine for the Land Cruiser 80 Series was a long process -we’re talking 2 years. After exhausting eBay and Craigslist, in December 2017 the engine was finally found through the North America Land Cruiser Community (through Facebook).
The engine/drivetrain came out of a European HDJ81 Land Cruiser and was sent to Valley Hybrids, a shop in Stockton, California that specializes in diesel engine conversion for Land Cruisers.
They replaced most of the external parts, rebuilt the injector pump and injectors, and did all the checks to verify that the engine was in excellent running condition. They also rebuilt the 5-speed transmission.
The transfer case was converted to part time 2WD/4WD from all time 4WD in order to get even better milage on the highway. They have done an amazing job. We could have not chosen a better shop.
Meanwhile, “back at the ranch”, the Land Cruiser was undergoing more changes. The bumpers were upgraded with more rugged units that can accept a winch and a spare tire in the back. (Bumpers by 4x4Labs.)
The front seats were refinished with new leather and seat warmers. The two rows of rear seats were removed to allow space for a kitchen and bed. The electrical and fuel systems had to be converted to the diesel engine and the transmission hump had to allow for the new manual shifters.
The Land Cruiser was then painted with a ‘sand’ color.Once the engine was completed at Valley Hybrids, we borrowed a truck and brought it from Stockton to San Jose, CA.
On a hot sunny day in July the engine was finally put into the vehicle. Since this engine was designed for this Land Cruiser model in other countries, little metal work modification was required.
The finished job on the drivetrain required testing before the work on the “tiny house” began. The car was driven for 1000 miles. It also required a trip to the CA DMV to change the title of the vehicle from gas to diesel.
At this point we added a second battery to support the ‘home’ part of the Land Cruiser. It is charged by the alternator when the engine is running and disconnects when the voltage drops below 12.5 VDC when the engine is not running.
It connects to a solar panel when the car is parked for extended period of times while using the fridge.
Transforming the Land Cruiser – Interior
Tali Hardonag Architects then began the interior design of the vehicle in order to convert it into a “tiny home”. After a long search, a marine grade fridge/freezer was selected to accommodate the limited space — Webasto BI-41 dual.
The advantage of this model is that it has a detached compressor that can be placed up to 6 feet away from the fridge.
The lid for the fridge gave us a bit of a problem. For a $1000 fridge, the quality of the lid is not great. It just sits on the top of the fridge and is made of molded plastic with a sheet of Formaica on top.
We figured that securing is a must, so we used removable hinges on the back, and rubber latches in the front. All this had to be integrated into the lid and Corian on top of it all. It was a time consuming task.
Our search for a sink and faucet zeroed in on a Kohler K-3349–1-NA. We liked it because it’s a sturdy 18 gallon model, small and deep. The faucet will fold in to the well.
The sink was mounted on the frame. It required to be ‘sunk’ in about an inch, so the faucet folds flush with the counter top cover. The drain for the sink was hooked up. The last section is silicon hose and it exits behind the right rear wheel.
An extension can be attached if we want the water to flow away from the vehicle. Otherwise we can just use a small bucket. We had issues with space for the stove. We ended up building a stove from two camping stoves and some machined brass pipe parts.
The connection was used from a torch welder and it hooks to a standard Coleman propane tank. The stove was assembled and tested. It requires a wind shield and is designed to fit in a drawer under the fridge when not used.
We can pull it back to cook by the tail gate, or remove it completely and place it on the counter top for cooking in wet or cold weather. We used an old Corian slab to build the countertop.
It took a long time to get everything accurate, but once assembled it looked great. The material was easy to work with and the glue lines are almost invisible.The SkyCart aluminum drawers (6061-T6 0.1″ thick) were powder coated with Navy Gray (Cardinal GR-01) by Moises Finishing in San Jose.
We installed the drawers with soft close glides. The bottom drawer is a bit lower to allow taller pots to fit in. The finished panels for the drawers were installed using 100% silicone to glue them. We hope it will hold.
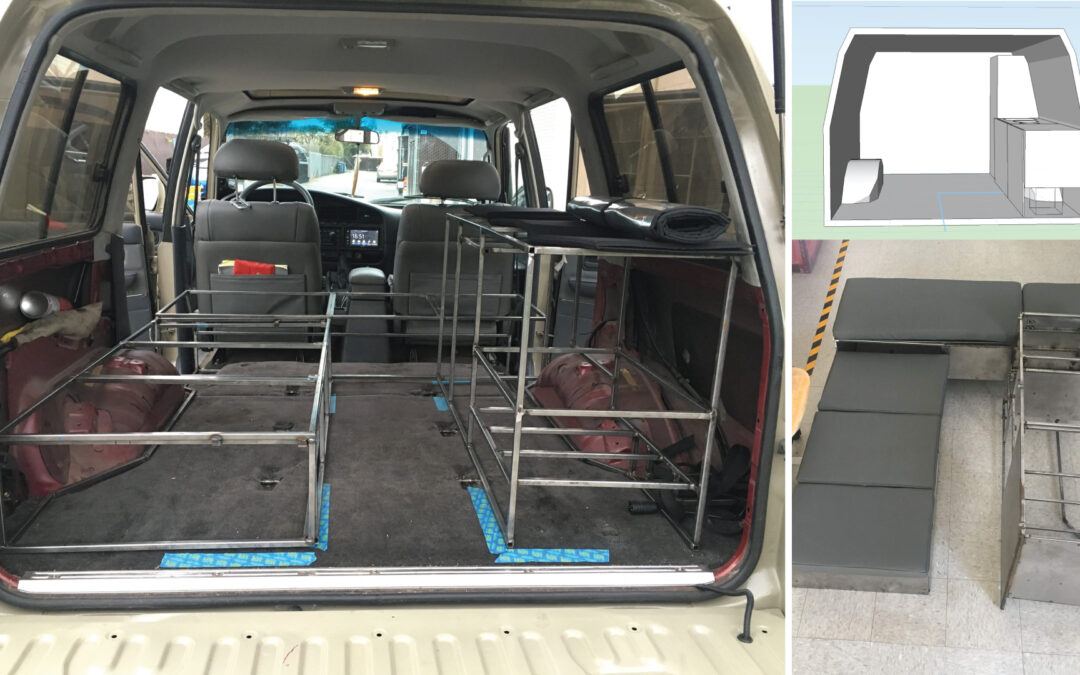
Also, all the sheet metal inside was covered with noise dampening sticky material. The lower side of the bed is a bench that has a slider part that opens to a twin bed.
The bench will have 3 cushions so that passengers will be able to sit on a bench seat in the back. They will have leather on top to match the front seats. The bench also has a storage area underneath. We used latches to lock it in place.
We also installed a back cushion for the bench, that is removable and used as the part of the mattress that covers the slider part of the bed.
These 3 frames attach to each other and to the vehicle itself with screws. They are not permanent, and can always be removed. The storage compartment is behind the front seats with 3 aluminum lids that hinge.
The two hatches on the driver side and center have 2″ cushions and also serve as the upper part of the bed. The rear tail gate has food grade stainless steel plates with latches so that we can store all the recovery gear. It is a bit heavy, so when opening it, care must be taken.
Water tanks are 8″ PVC schedule 40 with caps. Each tank provides 30 liters of water. One of the tanks holds hot water. (It heats 9 gallons to 150F in 18 minutes when the engine is running and warm.).
A circulating pump with a thermostat runs the water through a heat exchange unit with the radiator coolant. The compressor will pressurize the tank so that water ‘climbs’ to the faucet and shower. Ha, yes, the shower…
The exterior shower unit is a Bullfinch shower head. The unit is well made, and very compact. The shower head plugs in and has the handle integrated into it.
We used 3/8″ copper pipe for the water system. Most used compression fitting, except in a few places that used a silicon hose with clamp to relieve the stress of the vibrations.
The original pump that we chose was not self priming, so we chose a different pump. We used an old Prius battery to run the pump. (Yes. A Prius battery in a Land Cruiser 80 Series.)
Also, the electrical panel (has a) solar panel controller, 110 VAC Converter panel, main switch panel, thermostat controller, 110V plug and fuse box. A main disconnect was added as well. The 110VAC 1KW converter was mounted inside the wheel well to save space.
We added rock sliders and new Old Man Emu suspension from Cruiser Outfitters. for the Land Cruiser 80 Series. The suspension is a bit stiffer because of all the expected load we are planning to add to the car.
The roof rack is made by Prinsu Design in Idaho. It easily mounts on the vehicle and spreads the weight. Very well designed! The ARB awning was installed with custom made brackets.
The air system was installed with an ARB compressor and a 1 Gallon air tank. A pressure reducer was required for the air system that pushes the water up out of the tanks to the faucet and shower head. We are fighting gravity all our lives.
The heat exchange was mounted above the transfer case. There was just enough space for it. Silicon hoses to the radiator water. Rigid copper for the drinking/shower water.
So the setup for the three modes of the car — drive, cook, sleep are below:
And at this point the vehicle was ready for the first test. An 8000 mile trip to Alaska!
You can check out the entire photo album here!
Whether you’re building out a Land Cruiser 80 Series, a brand new Gladiator or Subaru, head over to the Overland Bound Forums and start researching for the adventures YOU want to take. Creating a forum account is free. Check it out!
I wish I knew who these owners of this tiny house FJ-80 are, because I would like to convert my FJ-80 to Diesel and also sell them my Solar roof rack, which will immensely benefit their setup for overlanding.
THIS. WOW. Fantastic design and great article. I can’t say enough about how much I admire this build. I wonder what the wife and I will build for our inevitable retiree adventure fever?…because this was inspiring.
For a brief moment on our last western tour we thought we may want to upgrade to a self contained 4×4 camper of some sort. Until we camped in the San Rafeal Swell. The campsite was spectacular and the touring we did could never be done in a full size 4×4 camper, ( think Sprinter or E350 van ) Our minds were made up. We will be dumping substantial dollars and time into our 80. Thanks for this write up. A beautiful job that inspires us to continue with our 80 and sooner than later convert to diesel.
I know what I’m building next for the 4Runner!!!
What an awesome build! You could really live in there no doubt.
nice but I think dirtsunrise nailed it as they ahve been living out of thier 80 for a couple years now and no problems as of yet,
My thought early on in this article was “low resale value of an 80?” Then I see how much money was spent on this build. Relative to that my first house had a low resale value! Wow. This article maybe needs to go right next to the overlanding doesn’t have to be expensive article that came out awhile ago.
Yes, it doesn’t have to be expensive, but it can also be whatever you want it to be based on your budget and your personal preferences.
Fantastic Setup!! I’ll be looking over this and reading over this many times! Such great ideas!! Congratulations on such an awesome rig!
Ofer, well done! There are some very unique and clever solutions to typical problems encountered when doing this kind of a build. I like the framework and the metalwork in the storage and drawers, the sink solution, countertop material… everything! This is well thought out and adapted to the specific journeys and use you will use it for and I’m so impressed by your step-by-step development with the end goal in mind. I hope our paths cross one day and I can take a look at this truck in great detail. Happy trails! Dan.
fantastic quality build.
Full and updated build blog is on:
https://www.overlandbound.com/forums/threads/building-a-home-in-a-80-series-landcruiser.27601/