Last November, 2013 I took a solo trip up to Strawberry Lake, East of Fresno. Life got busy and I am just now getting around to writing this article! This has to be one of my favorite trips. The trail was just long enough, some great crawling, lakes, solitude, epic scenery. I started early in the morning, wanting to be on the road before the sun came up. Before I get too far into it, let me tell you how to get there. You need these directions, because Google Maps will not get you there!
Go to Fresno, CA, then follow directions to get to Shaver Lake. Take highway 168 North from Shaver Lake. After approximately 10 miles, you’ll cross the crest of Tamarack Ridge. Continue another 2.5 miles and turn right after the Tamarack Creek Bridge. After you turn, you’ll see a cluster of signs listing all the lakes with an indication of whether or not they are open.
Reset your odometer as you turn off Highway 168. Turn right after 1.9 miles, following sign to Red Mountain Trailhead. At 3.2 miles, turn left at an intersection by a corral. Continue straight as the road gets rougher at 4.7 miles then bear right at 4.8. The road climbs uphill and soon enters an area called sand flats before reaching a cluster of signs at 6.6 miles (01). All Red Mountain trails start here.
These directions are from the book, “Guide to Northern, CA Backroads and 4-Wheel Drive Trails” by Charles A. Wells. I highly recommend it if you are in the area. Here is a link to the book on Amazon:
Backroads Book
The one thing to note about the Red Mountain trails is that they are not rated easy. Even the “Easiest” is not for a stock, unmodified rig. These trails are rated “Difficult”. According to Charles A. Wells:
Some trails suitable for more aggressive stock vehicles but most trails require vehicle modification. Lifts, differential lockers, aggressive articulation, and/or Winches recommended in many cases. Skip plates and tow hooks required. Body damage possible. Grades can be steep with severe ground undulation. Sideways tilt can be extreme. Sand hills very steep with soft downslopes. Deep water crossings possible. Shelf roads extremely narrow; use caution in full-sized vehicles. Passing may be difficult with back required for long distances. Brush may scratch sides of vehicle.
Day 1
If you decide to follow me on this route, be prepared for awesome, but more importantly, be prepared! After loading the vehicle and heading out – I crossed the San Mateo Bridge to get over to the east bay and head toward Fresno, I hit my goal, and was in the truck and on the road just as the sun came up. I was full of glee, knowing I had a full day of adventure in front of me!
I usually leave the final “cold goods” shopping until I am actually on the road. It has become a tradition. This time, after getting a fare amount of road behind me, I hit the Von’s on the other side of Fresno to get meat and beer (OK, a few other odds and ends too).
Hitting the trail and getting higher and higher, I started getting more excited as I saw the “signs” of high country and more rugged going.
Shaver Lake was low at that time of year, but the beauty did not disappoint. I pulled over for a snack break, took some pics and stretched my legs before heading for the traihead.
Now if you are able to follow directions, and you’ve made it this far, you’ll come to the turnoff described above and see some signs looking like this to show the way. You know you are going in the right direction. As I followed the dirt road toward the trailhead. I started to pass a few patches of snow. Guess I didn’t need to pack up the ice!
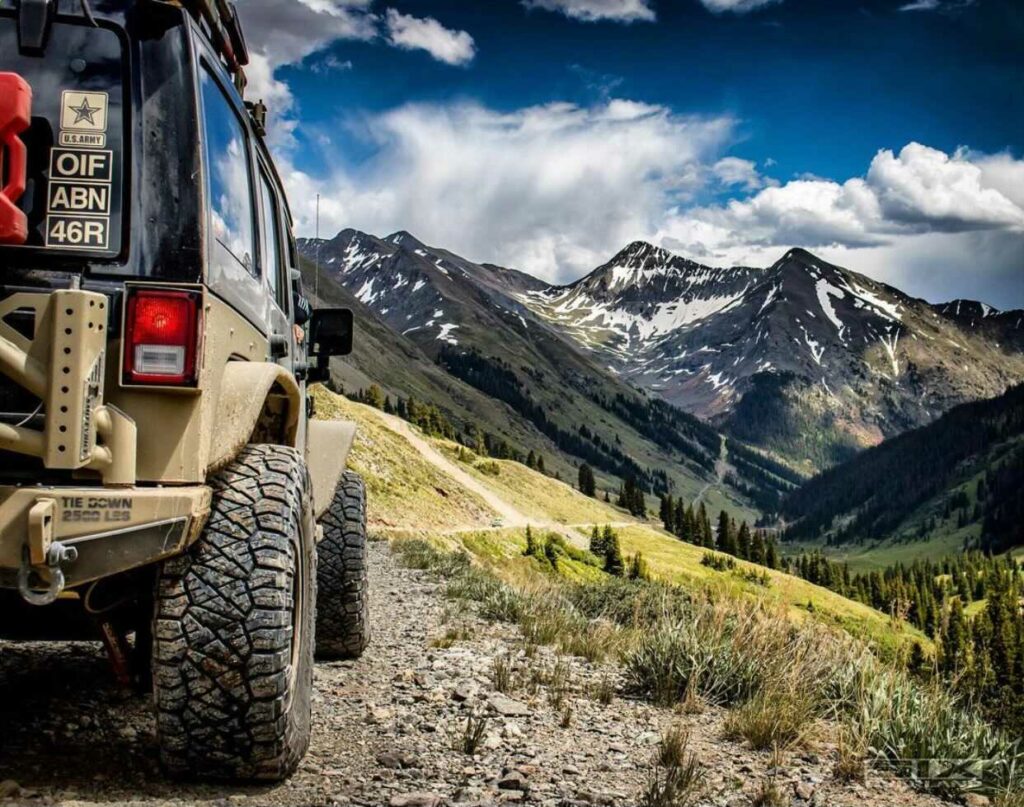
I finally made it to the trailhead. From this point, all trails to various lakes are accessible and its a matter of picking your favorite destination. I head heard of the very hard climb to Mirror Lake, and since I was alone, decided to head to Strawberry Lake where the going was a little bit easier. The trail was still plenty of fun, and quite challenging in a few areas!
I have included the high resolution images of the “Easy” and “Difficult” trail ratings in this area, and what that means. Keep this in mind before you head up!
After reviewing the signs and picking my destination, I headed out! It was a great trail, and I didn’t need my winch once! Here is a little footage of the trail as I traveled the route for the first time!
Once I arrived, I was struck by its pure beauty. The Trail is maintained by a local club, and they do a fantastic job – you are out in the middle of know where, but you have a very nice pit toilet and campfire rings. Its an amazing camp site, right next to the lake!
Here are some images of the campsite. You can see the lake just past the camp kitchen!
I unpacked the rig and settled in for the night. I like to get to camp early so I can relax for a while and enjoy the site. The weather was turning cold. I could feel it. I picked a meal and a drink that would keep me bundled up on the inside 🙂
That was the end of Day 1. A perfect day. I settled in for the night, in my tent, and called it a quits.
Day 2
I should have known of course. All that ice and snow meant something! I FROZE MY ASS OFF! I only have a 30 degree sleeping bag, and that tent is pretty thin. It dropped down pretty low and I tossed and turned all night because of the cold. Just enough to keep me restless, but not enough to get me to move to the truck. I vowed that I would change the sleeping setup and sleep in the truck for the remainder of the trip!
After a fire and some breakfast, I decided to head back down the trail to have lunch at Mirror Lake. I had passed it by and wanted to check it out.
Mirror Lake was as picturesque as Strawberry lake, and it was great to get to know more of the trail, and to get to know the trail even better. It all added up to be another great day!
I didn’t take the tent down but I put my pad and sleeping bag in the truck, and that night, I slept like a baby. Warm and toasty in the Overland Bound Rig!
Day 3
The next day I decided to say goodbye to Strawberry lake, and head up higher above Huntington Lake. I referred to the guidebook and headed up the road. I traveled high, to about 11,000 feet and could tell it was going to be even colder. I traveled on a trail that became way too difficult. I would have been measuring yards per hour instead of miles, and decided to go back down a ways to a nice spot I found with a killer view. Later, I found out what kind of rig could make the journey…read on!
I set up a simple camp, table and a chair, and began to prep a meal. On the last night I kept it simple, and spent most of the evening with my feet kicked up, taking in the view. This location is also in the California Offroad book.
Once again I slept cozy, wrapped up snug as a bug in the truck. The truck really does provide excellent insulation in cold weather!
Day 4
The next morning I had a simple breakfast – always cinnamon rolls on the last day, and packed the rig for the journey home.
After rolling down the hill a ways, I came across a fellow trail runner. Remember I said that trail was too rough for the Overland Bound Rig? Well, I found out why. This is the rig the trail was made for. Just when you think you are tough guy on the trail someone really puts you in your place. 🙂
Somewhere in Central California, headed back to my home, I took a time capsule snap shot so I can laugh at myself 30 years from now! Until next time, Outfit and Explore!
-Michael
Mike
great writeup as always
that trail looked to tight for a big rig like mine
best regards,
mike aka ExpeditionNorth
Thanks a Mike!
It might be – pretty short wheel base required.
Mike thank you for the photo journal. I found the “Guide to California Backroads and 4 wheel-drive Trails” by Charles A Wells and Matt Peterson to be especially helpful. thank you for the recommendation.
Mike
Great Mike, glad to hear it!